How to paste 1 photo onto another. How to insert a picture into a picture in different ways? Features of overlaying photos on photos online
Photoshop: how to superimpose one image onto another? Photoshop is a program with a large set of tools for working with graphics. Today we'll look at how to cut out an image and overlay it onto another.
One of the advantages of Photoshop is that each new element with which we work is reflected in a separate layer and work on it does not affect the previous layer (images).
In order to cut out a picture in Photoshop, you need to do the following, select the layer we need and use one of the selection tools.
Having marked the area we need, we select the “Edit” item from the “Menu” in which we select the “Copy” operation (for copying) and the “Cut” operation (to cut out the part of the image that was marked from the picture).


Due to the fact that these images are presented as separate layers, we can overlay them on each other, make them transparent, make gradients and carry out many other operations, apply filters.
Open the file
We launch our favorite program, and then use the File-Open command (File-Open, if you are using the English version) to create a clean file. Pay attention to the extensions you will work with: it is better to leave in the types only the one that belongs to the file you are looking for. So, the desired image has opened.
Tasks:
There are two images available. We are not happy with the background in the picture with the running horse, so we will make it appear against the backdrop of a seascape. For this:
1. Create a new file for the future image;
2. Place the horse and sea species separately on different layers;
3. After selecting, cut out the animal from the original photo;
4. Give the new photo maximum naturalness.
Now let’s go through the points in detail.
New file
The dimensions of the new file will be set to 500 X 375, the same as the photo with the sea. Then you need to create two layers in it: “horse” and “sea”, and the “sea” layer should be located under the “horse layer”. Names are assigned by right-clicking. In the drop-down context menu in Layer Properties, give the layers clear names.
The program now has three windows with files: the original ones with the horse and the sea, as well as a new one. The active window will be the last one.
We place the sea on the layer of the same name by moving this window to the active state - click on it, it becomes the last one. Next: select the entire image (after all, we need the entire landscape) via Select -> All (Select -> All) or Ctrl + A. A signal that the window is highlighted will be the appearance of a frame of “running ants”.
Then we copy (Ctrl+C) and transfer it by clicking to the work area, where the horse will already be against the backdrop of the sea. Now on the layer of the same name we can observe the landscape.
We perform the same operations with the Horse layer, and after that the two initial pictures can be closed: this way they will not interfere with further actions.
Selecting the horse
Since the horse is a figure with complex lines, you can use these methods to highlight it. You can use quick selection, which is called by clicking the left mouse button. After opening the tool selection window, you should select the magic wand: it will select all adjacent areas of the zone you click on. The reason is that the wand recognizes the colors of the pixel and its neighbors, which become active. We will need the following values for the magic wand parameter.
Tolerance can be given a value from 0 to 255. At 0, the wand recognizes only one shade, at 32 – in a range of 32 shades, etc. We need to set the value to 100.
Then you should check the Anti-aliased checkbox so that the borders of the fragment are smooth. Be sure to select Contigous Pixels so that the magic wand captures pixels in areas adjacent to the selected area. We need to deselect the Sample All Layers, otherwise the effect will spread to everything, and we only need to work with the horse layer.
After selecting the horse itself, you will see that the selection is not entirely perfect, but for now it is important for us to get the contours of the animal’s figure. Click Ctrl+Z or the tool until you are happy with the selection.
To remove unnecessary surroundings, select Select-Inverse. Then we press Del, and we have only the cut out horse to work with, but against the backdrop of sea waves. We remove the selection (Select – Remove Selection), and then try to remove the grass that was captured along with the horse.
Let's use the Magnifier tool (shown with a plus sign) by clicking on the panel. Zooming in on the part where the grass remains, left-click on the Lasso. In the panel of this tool, select the magnetic lasso: it will select areas along with dragging the cursor. The border of the area will be snapped to the closest shade of color corresponding to the borders of our horse.
By clicking, you can create an intermediate point, and then move the mouse along the boundaries of the horse’s limbs. The intermediate points will disappear as the contour closes - only the selected area will remain. Press Del, click on the magnifying glass with a minus sign, and reduce the image to working sizes.
To create a natural environment for the limbs, create a new layer where we will place the sand image. We take the Pipette and use it to select the color of sand we need. Next, select in the Brush parameters the one that will resemble sand in texture.
The tools in Adobe Photoshop are quite wide, so you have several ways to select an object in a picture, each of which is suitable for its own case. We will not consider all of them, but only the main ones.
1. Selection with the Magic Wand Tool
The Magic Wand is one of the easiest selection tools to use. Perfect if you have a simple object to highlight or, conversely, a simple background, as in our case.
To select an object using the magic wand, right-click on the Quick Selection tool and select the magic wand from the additional menu that appears.
The essence of the magic wand is that it allows you to select objects in the image that are as close as possible in color. For example, our picture has a white background, so it will be convenient for us to highlight it using a magic wand, and then invert the image so that the flower is selected.
To do this, simply click on the white background, after which the magic wand carefully selects it. All we have to do is invert the selection, so press the key combination Ctrl+Shift+I, after which the selection is transferred to the flower.
For more complex objects, you can adjust the tolerance level - an indicator that allows you to include colors that are similar in shade. The higher this indicator, the correspondingly more shades of the selected color will be included in the selection.
In order to make several clicks of the magic wand on the image and not lose the selection, do not forget to set the “Add to selected area” mode, which is located in the upper left corner of the window, or simply hold down the Ctrl key.
2. Select with the Magnetic Lasso Tool
Another useful smart selection tool that is a favorite of many Photoshop users. Its effect is truly magical: you select this tool, begin to try to carefully trace along the contour, but even if you make mistakes, the selection will lie perfectly evenly on the contour of the object, as if being magnetized.
To select the magnetic lasso, right-click on the Lasso tool and select the tool we need from the menu that appears.
The settings of the selected tool will be displayed in the upper area of the window. In the “Width” field the number of pixels is set, i.e. the gap through which the lasso will place a point. The smaller the number of pixels, the more accurate the result can be achieved, but more effort will have to be made.
To start making selections using the magnetic lasso, simply hold down the left mouse button and begin to carefully trace the image. As soon as you release the mouse button, the selection will be applied.
If during the tracing process the magnetic lasso makes a mistake, simply press the Del key, which will delete the last added point. Press this key as many times as necessary until the desired number of points is removed.
3. Using the Color Range feature
A method that is already applicable to complex objects, but located in approximately the same color range. For example, this function is ideal for highlighting splashes of water.
To use this feature, click on the “Selection” tab and open the “Color Range” section.
A window will appear on the screen, and the cursor will turn into the Eyedropper tool. Move the window to the side so that the image is visible, and then click on the object you want to select.
For example, in our example the flower has purple petals. If you click on the lightest area with the eyedropper, the color range will most likely include the white background, so in our case we need to click on the most saturated area.
Using the Scatter slider, move it to such a position that the selected area is as light as possible, and what should not be included in the selection remains black.
Apply your changes and a selection will appear on your image.
4. Using the Quick Selection Tool and the Thin Edge Function
As the name “Quick Selection” suggests, this tool is aimed at selecting simple objects. But due to the fact that we use the “Thinner Edge” function to slightly adjust the edges of the selected object, this method can be used to select quite complex objects.
Use the Quick Selection tool, which is located in the same place as the magic wand.
To select with this tool, simply start clicking on the areas that need to be captured. To make the tool capture an additional area, hold down the Shift key or set the “Add to selected area” option. To remove excess selection that the tool has captured, hold down the Alt key and click on the excess selection.
Having finished selecting the object, we move on to thinning the edge. To do this, click on the “Selection” tab and go to the “Thinner Edge” section.
A window will appear on the screen, and only the selected object will remain on your image to make it easier for you to evaluate the result. Using the sliders, achieve the most natural selection result, you can focus on the settings, as in the screenshot below.
To apply the settings, click the “OK” button, after which the window will be closed.
How to move a selected object to another image?
1. Add a second image in Photoshop into which the selected object will be inserted.
2. Go back to the first image and press Ctrl+C to copy the object.
3. Go to the second image and paste an object into it using the Ctrl+V combination.
4. Apply the “Move” tool and position the object in the area of the picture you need.
5. Press Ctrl+T to resize the object in the image if necessary. To maintain the object's proportions, don't forget to hold down the Ctrl key when resizing.
Photoshop has a lot of different capabilities that can be implemented using different tools. And, if designers and photographers skillfully use all the functions of Photoshop, then ordinary users have yet to get acquainted with them. For example, many people are interested in the question: how to cut out an image and put one on top of another in photoshop? This is absolutely not difficult, especially since in our article we will clearly show how to do it.
How to cut out an image in Photoshop
So, let's launch Photoshop. To get started, we need to create several tabs in the program that will contain:
- A picture from which we will cut a specific image
- Blank canvas
- The background on which we want to place the cut-out image
Tabs are made by dragging files to the tab bar, which is located horizontally under the options. As a reminder, images should not be placed as layers.
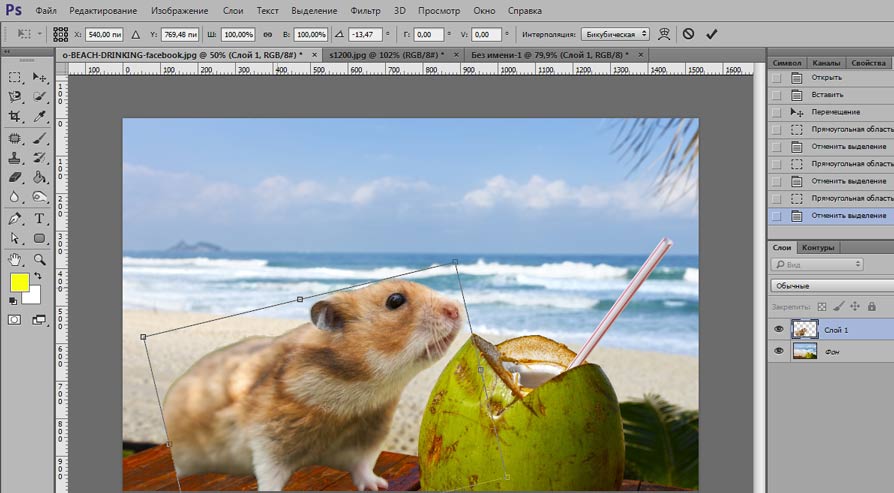
In order to cut an image in Photoshop and paste it onto another background, we first need to select it. An example is a hamster on a green background. The contours of a hamster can be distinguished in two ways:
- Using a tool "Quick Selection"
- Using a tool "Magnetic lasso"
Both of these tools are in the panel on the right. To call them, right-click on the corresponding shortcut.
Let's start with the Magnetic Lasso. When you select a tool, a magnet will appear in the picture. Draw it as accurately as possible along the contour of the figure, placing dots without moving away from the edges. If the mouse is moved and the line does not go where it should, then press “Backspace” (or Ctrl+Alt+Z) until the point reaches the place where the correct selection was interrupted.
By the way, if you find it difficult to work with Magnetic Lasso, you can do without it. Then use only “Quick Selection” or “Magic Wand”.
When your object is completely highlighted with dots, double-click with the mouse and a dotted selection of the object will appear.
Sometimes in Photoshop it is difficult to select an image with precision, especially if it has discontinuous edges (fingers, ears, some other details). To finish edges and hard-to-reach areas, use "quick release". Then enlarge the image by simultaneously pressing the Alt key and the mouse wheel. You can then reduce it using the same method.

For convenience, we adjust the size of our highlighter. With this tool you can either add some parts to the contour that were not captured, or remove them if they got there by accident.

After the final result of the selection, we copy (Ctrl+C) the object and paste it into an empty canvas by pressing Ctrl+V. You can smooth out the outline using the eraser, setting the minimum hardness, and make the erasing dispersed so that the boundaries of the figure are created as naturally as possible.

How to superimpose one image onto another in Photoshop
To superimpose one image onto another in Photoshop, we copy (Ctrl+C) our pre-selected object cropped from another background (what we actually did above in the article) and paste it onto the background we need, which has been waiting for a long time in the third tab.
So, we have a background and a layer with an object (with a hamster). We work with the layer where the figure is. If desired, it can be edited to match this background. To do this, in the tab "Editing» click "Transformation", and then experiment. Change the scale, rotate (while holding Shift to maintain proportions), work with color, etc. If you don’t like it, return to the previous state by clicking Ctrl+Alt+Z.
That's all! Now you know how to cut out an image in Photoshop and overlay one on top of the other. The first time, of course, something may seem difficult. Don't be afraid to click on some tools and work with them, there is always the option to return the original version.
Study and you will definitely succeed!

Did you read to the very end?
Was this article helpful?
Not really
What exactly did you not like? Was the article incomplete or false?
Write in comments and we promise to improve!
When working with Photoshop, most often you will have to work with existing images. Either you will need to fix something in them, or you will want to take a part from the image to use in another image, or who knows what else.
Opening an image
First you need to open the image itself in Phoroshop. To do this, select the menu command File -> Open. In the window that opens, select the required image.
Please note that in the File type section there is a huge list of supported files. If you select a specific file type (for example, gif), then only files with that extension will be displayed in the selection window. Therefore, if you know for sure that a given file is in a given folder, but you don’t see it in the image selection window, then you have selected the wrong file type.
Formulation of the problem
As always, let's look at an example. Suppose we have two photographs like this:
And we want the horse to gallop along the seashore. What we need to do:
- Create a new file for a new image (horse on the seashore).
- Place images of the horse and the sea on different layers of the new file.
- Cut out the horse. To do this, you must first select it.
- Add naturalness to a new image.
Let's look at all the points step by step. You can pick your own photos or download these here.
Creating a new file
So, let's create a new file, size 500 X 375 (these are the dimensions of the photograph with the sea, although we could make a smaller image).
Let's create two new layers: one we'll call "horse", the other - "sea", and the -Sea- layer should be under the -Horse- layer. To give a name to a layer, right-click on the layer and select Layer Properties from the context menu that opens. A settings window will open where you need to set a name:

Now we have three files open in the program, that is, three windows with different files (with the sea, with the horse, and the newly created one, which we will call the working window). Moreover, the active window (with which we are working) is the latter.
In it, on the “Sea” layer, we will place our sea. For this:
- Let's make the window with the sea active (just click on it).
- Let's select the entire image; to do this, select the command Select -> All from the menu or press the key combination Ctrl + A. A selection frame in the form of running ants will appear around the image.
- Let's copy this image (Ctrl+C). Now let's make our working window active (click on it), make sure that the -Sea- layer is active (if not, click on it) and paste the image (Ctrl+V). The sea layer now shows the sea.
Do the same thing to place the image of a horse on the -Horse layer. Thus, we have both necessary components for the future image. Therefore, files with photographs of the sea and horse can be closed.
Selecting a knight
Photoshop provides several image selection tools; we looked at one of them (rectangular selection) in the first lesson. But it won’t work here, since our horse has a complex shape.
To select it, we will use two tools on the toolbar:

Left-click on the -quick selection- tool, the tool selection window will open:
Select the -magic wand- tool. If you click on any pixel of the layer with this tool, adjacent pixels of the same shade will be selected. In the options bar for this tool, select the following options:
In the Tolerance field, you can enter values from 0 to 255. If you set the value to 0, then only one shade will be selected; if you set it to 32, the tool will select pixels in the range from a color 16 units darker to a color 16 units darker. units lighter than the one you clicked. In our case, we set the value to 100.
We will also check the Anti-aliased checkbox to make the borders of the selected area smoother.
The -Adjacent pixels- (Contiguous) checkbox selects only those pixels that are located in areas adjacent to the selected area.
Uncheck the -Sample All Layers- checkbox, because... it extends its effect to all layers, and we work only with the -horse- layer.
Now click the tool on the image of the horse, it will be highlighted.

The selection itself will not be perfect (we will refine it later), at this stage the main thing is to highlight the contours of the horse. If you don't like the way it's highlighted, click again with the tool and the selection will disappear (or Ctrl+Z) and try again.
Now that our knight is selected, we need to remove all unnecessary things. To do this, select the command Select -> Inverse from the menu. Now the entire area around the horse will be selected. Press Del on the keyboard and get our cut-out horse against the background of the sea:

Remove the selection (in the menu, select the command Selection -> Remove Selection). Agree, it’s not bad at all, but the grass needs to be removed. To do this, first zoom in on the bottom part of the image (where the grass is). To do this, select the Loupe tool from the toolbar. ![]()
In the options bar for this tool, click on the magnifying glass with a plus sign.
Now click on the part of the layer where the grass is. This part of the image will enlarge; if you click again, it will enlarge it even more. If you click on the magnifying glass with a minus sign, and then on the image, it will be reduced in size. This way you can enlarge and reduce images to make it easier to work with.
So you've enlarged the part where the grass is. Left-click on the Lasso tool and the tool selection window will open:

Select the -magnetic lasso- tool. This tool automatically creates a selection as you move or drag your cursor. The area boundary "sticks" to the nearest distinctive shade of color or shadow that defines the shape's boundary.
Click on the image to create your first waypoint. Move the cursor along the border of the shape you want to select (in our case, the horse's limb). As you move the cursor, the selection line will "stick" to the border of the shape. The temporary points that appear as you move the cursor will disappear as soon as you close the path.

Again Del on the keyboard, remove the selection, reduce the size to normal (on the toolbar, take the Loupe tool - in the options bar, click on the magnifying glass with a minus).

To make it even more convincing, let’s add sand to the horse’s hooves. To do this, create a new layer and make it the top one. Now grab the eyedropper tool from the toolbar
This tool selects a color from the active image or any other area of the screen and assigns it as the foreground or background. We need the color of the sand, so we click on the sand image. Look, the main color has changed.
Now grab the brush tool from the toolbar

In the options bar for this tool, select a brush that resembles sand (i.e. with jagged edges).

Make one click on each hoof. It will look something like this:

That's it, our image is ready and the lesson is over. In the next lesson we will look at other selection tools, and also learn how to resize images and their parts.
And so, open the pictures in FS:
File - Open
In the Layers window, remove the locks.

Cut out the object using Pen tool(see lesson No. 13), for convenience, enlarge the picture with the Magnifier tool or Ctrl ++, Ctrl - reduce

Having finished tracing:

Feather for small objects 1px. , larger - 2px.

The object is highlighted with a dotted line. Next, press Ctrl+C - this will copy the object to the clipboard, click on the background and press Ctrl+V - paste object and use the Move tool to position the object as you need. Using Free Transform Ctrl+T, give the object the desired size

All that remains is to adjust Brightness/Contrast, Color, etc. so that the object fits into the background.
To do this we go: Image - Correction

Now save: File - Save for Web in JPEG format

This is what happened

Part II
Adding people from other photos
A situation often arises when, while taking a photo in a friendly company, someone is not included in the frame (for example, the person taking the photo). Well, either someone went to the toilet at that moment, or is already sleeping on the floor, but he is in some other photographs and we would like to add him to the general photograph. In short, from several such photographs:


Get this one:

To do this, open all these pictures in Photoshop, cut out the person we need on each one and transfer it to the general picture (as this is done discussed in the previous part).
Since the sizes of people in different photographs will almost certainly vary (unless all this was taken from one point), you will need to adjust the sizes.
For this we will use Free transformation Ctrl+T and adjust the dimensions on each layer

Don't forget to maintain proportions. To do this, the percentage ratios in width and height must be equal: Hold down the Shift key, pull the corner diagonally, first release the mouse, then the Shift key.

Now, to make it more believable, all that remains is to adjust the color and brightness of individual people. This is done in the Image menu - Correction-Brightness/Contrast and Color Balance
Part III
Here I will give an example of how to cut out more complex objects
For example: hair, trees, feathers, etc.

As you can see in this picture, it will be difficult to cut out the hair. When using the eraser or lasso tools, the cut hair turns out unnatural, but there is a very fast and effective way!
Like most selection tools, the best results will be if you have dark hair on a light background. Well, let's study.

Don't forget to remove the lock in the Layers window.
Select a selection tool: Brush - size 1500 pixels (you can take a much smaller number), soft with blurred edges

Next we go Filter-Extract
A window will open, and the selection tool should already be clicked (or you can select it yourself, the very first one in the panel on the left). We begin to select the area where the hair needs to be cut. The smaller the brush size, the better quality you will get. Your selection should ultimately be closed.
After you have finished highlighting the contour and areas with problem hair, take FILL tool and fill it in. 
As you can see, every hair is trimmed carefully!

Next, using the Move tool, drag the image onto the Background, and use Free Transform Ctrl+T to give it the desired size.
Don't forget to adjust color, brightness, etc. This is done in the menu Image-Correction-Brightness/Contrast and Color Balance
Save: File-Save for Web in JPEG format.

Related posts:
 Bootable Windows USB flash drive: Rufus and ISO image How to make a bootable Windows 8 flash drive
 Cleaning computer mice
 Hot keys on the keyboard - assignment of various combinations Key combination for switching between windows
 Vertex Impress Open - Technical Specifications
 Wings of autumn from Irina Zaitseva, or how to cheer yourself up “Never set limits for yourself, think, dream, and more boldly”


