Charge your phone battery directly to frog. Frog for charging batteries of mobile devices. Instructions for using the charger
The widespread universal charger "Frog" is designed to charge lithium batteries used in cell phones and other small-sized equipment. This device cannot be used with other types of batteries, only with lithium... Also, this device is used to "swing" completely discharged batteries.
Depending on the modification, the device can be powered in the following ways:
1.from a household network, 220v,
2. from the car network, 12 v,
3. from USB computer, 5 V.
The most common and practical device is the "Frog" powered by the network.
There are two sliding whiskers on the body of the device, which are used to connect to the battery contact pads. A battery can have from 2 to 4 contact pads, we will return to batteries with a large number of pads later. The mustache of the device is pushed apart to the required size and connected to the positive and negative areas of the battery.
To which mustache to connect plus or minus does not matter. The correctness of the connection is selected with the buttons.
And if the device is automatic, then the polarity will be determined automatically. If the frog has buttons on the body, then after connecting the battery, you should make sure that the polarity is correct. To do this, press the left button (1), the diode under the inscription "CON" and "FUL" will light up. This means the battery is connected correctly. If the diodes do not light up, the battery is not connected to the terminals correctly, and this may also indicate a complete discharge of the battery. We can either turn the battery over physically, or press the right button, reversing the polarity. If, after pressing the button, changing the polarity, and then checking for correct connection, there are no results, then the battery is discharged or the mustache does not touch the battery pads. After connecting the device to the network with the battery installed, the charge indicator, the diode under the “CH” inscription should start blinking. When the battery is fully charged, the diode under the inscription "FUL" will light up. If after connecting to the network, the charge indicator "CH" does not start blinking, then you should check the connection of the mustache to the contact pads of the battery and the polarity of the connection. The polarity reversal button (2) can be pressed while the device is connected to the mains.
A failed battery may be indicated by the following:
If the device does not start charging,
- if after connection the diode under the inscription "FUL" immediately lights up,
- if the battery charges very quickly for 5-10 minutes,
Batteries with a large number of contact pads can be charged with a frog, but for this you have to disassemble the battery and connect directly to the "bank", bypassing the battery controller. This is the case if the battery controller does not allow charging through the contact pads.
Now a little about the buildup of discharged batteries.
If your phone has been lying down for a very long time and has not been used, then its battery can be drained. And an attempt to charge the battery using a complete charger is doomed to failure. In this case, the "Frog" will help. Connect the discharged battery to the Frog for five minutes. This will be enough for it to be further charged in the phone.
The charging time depends on the capacity of the battery:
500 ma / h - 2 hours 30 minutes
800 ma / h - 4 hours.
1000 ma / h - 5 hours
The frog charger is a fairly popular modern device. Many do not know how to use this device, despite its so high popularity.
As a rule, the frog is used to recharge a variety of devices, so it can cope with the role of a spare charger at home, as well as help out on trips.
It should be noted that the indicators of the functionality of this device depend largely not only on the manufacturers, quality initial data, but also on the ownership of the basics of using the device.
It often happens that in the absence of basic knowledge, even the simplest manipulations of recharging portable devices cannot be successfully performed.
Before proceeding with the study of the features of the correct use of the device, you should understand the purpose for which it is intended. So, with the help of a frog, you can recharge:

- a variety of batteries for cell phones;
- lithium batteries, which are equipped with modern cameras;
- accumulators for PDA;
- the same batteries from similar small-sized devices.
Outwardly, the frog is a fairly simple device and it is represented by a box, one part of which is equipped with a plug for connecting to sockets, and the other with a clamp designed to ensure contact. The device is quite simple, and its use involves only carrying out some simple manipulations.
- versatility;
- ease of use;
- unique design features that allow this recharge to be used with almost all batteries.
The charger is powered both from home networks in 220V, and from networks in cars, as well as through USB ports available in computers.
Device functionality
On the market of modern technologies, you can find a lot of different devices for recharging that belong to the universal category. Their distinctive features are manufacturers, components and price indicator.

Universal kits consist of:
- an adapter designed for connecting the device;
- directly frogs;
- a power supply unit (network type) with a built-in USB output;
- adapter for mobile phones;
- wires for connecting the frog to the USB port.
All frogs are designed to perform specific functions, the main of which is to recharge batteries and accumulators. So, the functionality of standard type frogs is presented:
- recharging Li-Ion batteries;
- recharging batteries going to telephones, which can be supplied with electricity by means of personal computers equipped with 5V converters;
- the possibility of individual recharging, which can also be done with a special adapter.
An interesting fact is that you can choose several methods at the same time to recharge. For example, filling an external battery with energy can occur while recharging the internal one. An important advantage of the devices is the size of the charger.
Any manipulation with a frog involves the sequential execution of certain actions. So, in order to recharge the device, you need to be guided by the following instructions:
- The first step is to remove the charger from the device, which must be turned off before these steps.
- Determination of the terminals on the battery, which must be clamped using the corresponding antennae located on the frog.
- The third step is to test the indicator. So, in conditions of correct connection of the frog, the appearance of a green light should be observed.
- Connecting the device to an outlet, after which the charging process will begin directly.

After completing all the above steps, it is highly recommended to pay attention to the indicators, one of which should be emitting green light, and the other one should be blinking red. This is a confirmation of the correct execution of all manipulations.
As a rule, it takes 2 to 3 hours to get a full charge, and readiness can be judged based on the change in the shades of the indicators. Red light should not be present at all, and green should appear in its place. Thus, both LEDs will light green.
After that, the device is ready for use for its intended purpose!
Modern technology is striking and impressive in its variety. So, for example, there are many types of devices for charging various devices. In our article we will talk about such chargers, which are colloquially called "frogs". The frog is very simple and easy to use. It plugs into a regular outlet at 220 volts.
Frog is a universal charger that fits all batteries of any mobile phone. The frog is also good for other lithium batteries, for example, from cameras, PDAs and other small-sized equipment.
The charger is a small box that looks like a frog with a plug for an outlet. From the body there are two antennae - for connection and for charging.
There is nothing difficult about how to charge the battery with a frog. To recharge your phone using this device, you need to follow a few simple steps.
How to charge a frog: instructions
- If you have studied this device, read the accompanying instructions on how to charge your phone with a frog, then you probably know that first you need to remove the battery from the phone, but before that you must turn it off.
- Next, click on the clothespin on the frog. This is necessary in order for the device to open.
- Now try inserting the battery into the device so that the two terminals match. If your charger has four terminals, then you need to use the two that are located on the side.
- Then click on the TE button (usually on the left). If the CON LED lights up green, this indicates that you have succeeded in connecting everything correctly. If it does not light up, then try to reconnect the terminals.
- Now, if you have already checked the correctness of the connection, and the CON LED did not light up, it may well be that the battery was completely discharged, which is called "to zero". In this case, your charger with a battery should be plugged into the network for about five minutes. After that, check if the CON indicator that we need now lights up. On fire, it means everything is in order. If nothing happens again, check if there is voltage in the network, as well as the health of the battery itself.
- Now plug in. Is the CH indicator on or flashing? If so, everything is fine.
- The battery is charged when the left FUL indicator on the charger comes on.
As you can see, there is nothing particularly complicated in this matter. Now you know how to charge through the frog.
The recently appeared charger, popularly called the "frog", thanks to the versatility, has become very popular. It can charge the batteries of almost all mobile devices: phones, tablets, PDAs, cameras, camcorders. The main condition is that the batteries must be lithium, others will be disabled.
In contact with
Classmates
Advantages of charging a frog
These include:

Kinds
 Standard models are for connection to household outlets with a voltage of 220 V. For use in cars, 12-volt varieties are available. For the operation of a charger equipped with a cable with a USB connector for connecting to a PC, 5 V is enough. In addition, they are divided into automatic, independently setting the correct polarity of the connection, and semi-automatic, on which this is done manually with the TE button.
The charging process is monitored using indicators located on the case:
- FULL lights up when the battery is fully charged;
- CHARGE signals that the process has started and is running normally;
- POWER indicates a connection to a power source;
- CON with green light indicates the correct battery connection, with red it is necessary to change the polarity with the TE button.
Rules for working with charging
Using the frog to charge the batteries is simple. To do this, you need to perform the following sequence of actions:

If CON does not light up when the battery is connected, it is likely that the battery is discharged to its limit and needs to be pushed. To do this, plug the device into an outlet and wait a few minutes. With correct polarity CHARGE will light up, if not, then you should change the poles and start charging. It happens that when connected to an outlet, POWER and FULL light up simultaneously. This is due to poor contact between the terminals of the device and the battery. You just need to reinstall the battery. If the FULL indicator immediately lights up when connected to an outlet, then the battery has worked as it should. Have to buy a replacement. Fast charging (5-10 minutes) means your phone's battery won't last long.
Self-made charging frog
Make a full-fledged universal frog charger from scratch with your own hands layman will find it difficult... If you can't buy, then many will be able to remake an old mobile phone charger into a frog. For work, a piece of sheet plastic, a spring from a clothespin, 2 paper clips, and a wire are enough.
The work is done in a certain order:

The DIY device is ready to charge the batteries of any brands of phones. But if there is a need to charge more powerful mobile devices, you should buy a factory model. They are inexpensive, for example, the price of a Chinese-made frog does not exceed 200 rubles.
If you lose a native charger from a mobile phone or smartphone, inexpensive universal chargers for 3.7 volt lithium batteries come to the rescue, the so-called frogs (or toads). They have adjustable contacts, to which the battery previously removed from the phone is directly connected. Of course, this creates some inconvenience (you need to constantly remove the cover, the time gets lost), but sometimes this is the only way out when the charging from a rare Chinese phone is lost.
Instructions for using the charger
The frog charger is designed to charge Li-Ion batteries used in cell phones, GPS receivers and cameras. It works from a network of 110-220 V. Output voltage is 4.2 volts, current is 200 mA. The charge occurs automatically and is controlled by the microcircuit, and it automatically turns off when the required level is reached. Standard charging time is 1.5 hours.It is necessary to clamp the battery into the frog so that the charger contacts are on the + and - terminals of the battery. If the battery has 3 or 4 contacts - usually you need to use the 2 outer ones. If the polarity of the connection is correct, then pressing the button TE (left) the first green LED lights up CON... If not lit - press the right button CO (polarity reversal) and press the first button again. On some frogs CON can light up when connected without pressing the button - also correct polarity. Also, there are already models that will automatically determine the polarity. Accordingly, there is no right polarity reversal button.
If everything is fine - CON lights up green, plug into a 220V outlet. Lights up PW and starts to light up or blink CH (charge - charge). At the end of the charge, the right LED lights up FUL (full - full). If a CON does not light up at all, the battery may have sat down to zero. Then connect arbitrarily in any polarity and plug it into the network for 5 minutes (not for long - it's not scary). If a CH will blink, then the charge is on and everything is correct, otherwise change the polarity with the right button and see how it will behave then CH... If it immediately burns PW and FUL then most likely the battery in the frog will not contact (so the LED lights up without a battery at all) - move it to the contacts.
Repair manual for the "frog" charger
As for a completely inoperative charger, just look for a burnt-out part. But sometimes you come across low-quality chargers when, when connected to the "frog" of the battery, the charge current is less than the specified one. Not 200 ± 50 mA, but several times less. Thus, the battery is simply undercharged. With a decrease in the charging current at the output, the final voltage on the "fully charged" battery also decreases. Hence the low battery life when installed in the phone. When the charger light indicated the end of the charge, the battery voltage was only 3.9V. Why is this happening? Most likely the matter is in the range of parameters. A small deviation in the resistor values \u200b\u200bleads to a change in the overall characteristics of the device.Schematic diagram of the frog memory
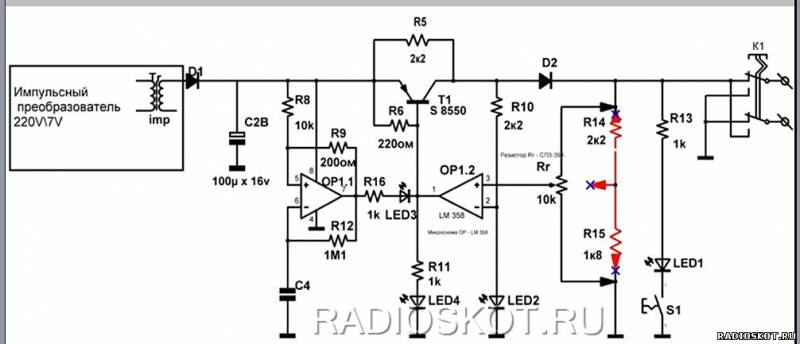
Replacing the fixed resistors R14 and R15 (the numbering of the parts in the diagram corresponds to the numbering of the parts on the printed circuit board) with a multi-turn trimming resistor of the SP3-39A brand with a nominal value of 10 Kom, it becomes possible to accurately set the output current. After replacement, I set the current at 250 mA, which roughly corresponds to the specified parameter on the charger case. You can, of course, set the charging current with a trimmer at will and another. When the light signaling of the device turns on, notifying of the end of the charge, the charging current is reduced to 70 mA, and the voltage on the battery is set within 4.15V. The full charging process lasts about two hours, that is, as when charging in the device with a native charger. Download the full version of the instructions on the forum.

Homemade toad
After analyzing several schemes of the memory device Frog, settled on one of them. I decided to make it as a prefix for NOKIA charging (I think many have them, and I have a few of them lying around) to charge the Li-ion battery 18650
... In the charger from NOKIA, the output from the transformer is almost 7V, which should be enough for the set-top box.

The battery itself will need a battery compartment to attach it to the side of the case. On the cover there is an output of four LEDs and a micro toggle switch. In the meantime, a seal has been developed for the circuit on CMD and simple radioelements, with installation on top of the board. Download it.

The seal that is attached is already mirrored, immediately send it to print. The photo shows just the arrangement of the elements, as it should be.

Then I soldered a separate memory card, tested it - it works great! With the specified parts at the output of the charger 4.2V. Put the used battery on charge - the charge rises. The LM358 microcircuit was supplied with a soldered one, removed from somewhere. PSU used with an output of 6V 0.45A.
I drew a schematic diagram and checked - Igoran.
Discuss the article Frog CHARGER