What the sudo su command does. Everything you need to understand sudo vs su on Ubuntu Linux. Obtaining superuser rights to execute multiple commands
Which is the right way to use su or sudo?
For a long time, many have been confused by the variety of security options when performing operations with maximum privileges. For example, the official Ubuntu documentation recommends using something likesudo nano , and in numerous amateur manuals (in the style of "5 command line tricks that will surprise your grandmother") to get root "new shell it is suggested to writesudo su - ... I'll try to explain why this state of affairs seems to me to be wrong.
AND historically, the only universal way to execute a command as another user on Unix was su. Launched without parameters, it asked for the superuser password and, if successful, simply changed the current username to root, leaving almost all environment variables from the old user (except for PATH, USER and a couple more, see.man su from your distribution). It was more correct to run it assu - - in this case, the shell also received the correct environment. With parameter-c you could run the command:su -c "vim / etc / fstab".
In this case, trusted users had to remember the root password "and all users listed in the" wheel "group (that is, in a group whose members could execute the su command and become a superuser) had the same unrestricted access to the entire system, which was a serious security issue.
Then the sudo command came along and it was a breakthrough. Now the administrator could specify the list of allowed commands for each user (or user group), files available for editing, special environment variables and much more (all this splendor is controlled from/ etc / sudoers, see man sudoers from your distribution). When you run sudo, it asks the user for his own password, not the root password. A complete shell can be obtained using "sudo -i "
Special mention should be made of the dedicated teamsudoedit that safely launches the editor specified in the environment variable$ EDITOR ... In a more traditional scheme, file editing was done something like this:
sudo vi / etc / fstab
Vi launched this way inherits a shell with unrestricted rights and via:! the user could run any command (unless, of course, the admin had taken care of this in advance) and open any file.
sudoedit checks whether this user can modify the given file, then copies the specified file to a temporary directory, opens it in the editor (which inherits user rights, not root "a), and after editing, if the file has been changed, copy it back with special precautions ...
On Debian-based distributions, the root user does not have a password, instead, all administrative actions must be done viasudo or its graphic counterpartgksudo ... Complete replacementsu, sudo should be the only command for switching between users, however, as was said at the beginning, at the moment this is not so and for some reason everyone is inventing wild sequences of sudo, su, vi and dashes.
Therefore, I invite everyone to remember once and for all:
After first publication of this post I was asked several questions. From the answers it turned out to make a mini-FAQ.
Q: how to use sudo to dosu -c "echo 1\u003e / etc / privileged_file"? sudo echo 1 / etc / privileged_file swears at "permission denied"
A: This is because only the echo command is executed with elevated privileges, and the result is redirected to a file with normal user privileges. To add anything to privileged_file, you need to run the following command:
$ echo 1 | sudo tee -a privileged_file\u003e / dev / null
Or temporarily become a root:
$ sudo -i
# echo 1\u003e privileged_file
# exit
Q: sudo -i is longer than su -, and there seems to be no difference between them, why print more?
A: sudo has several advantages that you should bother typing in a few extra characters:
- by default sudo writes all user activity to the authpriv syslog channel (as a rule, the result is put in the /var/log/auth.log file), and a similar feature must be included in su by setting a special parameter in the settings file that differs from distribution to distribution (SULOG_FILE in /etc/login.defs on Ubuntu Linux, /etc/login.conf and /etc/pam.d/su on FreeBSD, etc.)
- in the case of su, the system administrator cannot restrict the commands executed by users, and in sudo, he can
- if a user should be deprived of administrative rights, in the case of su, after removing him from the wheel group, he must forget the root password; if sudo is used, it is enough to remove him from the corresponding group (for example, wheel or admin) and / or the sudoers file, if it has been further customized.
Q: I'm the only user on my system and I'm used to su, why do I need sudo?
A: I'll answer the question with a question: if there is a valid sudo, why use the deprecated su?
Sudo Is a program for Unix-like operating systems, which allows users to run programs with the security privileges of another user, by default the superuser.
Unlike the linked command su, users must provide their password for authentication. After authentication, if the configuration file that is usually found in / etc / sudoers, allows you to grant the user access, the system executes the required command. The configuration file gives permission to access, including allowing to execute commands called from the terminal; allows you to request password for each user or group; allows you to require you to re-enter your password every time, or never require you to enter a password at all. It can also be configured to allow the passing of arguments or multiple commands.
In simple terms, in order to perform certain actions in Linux, we will need to either enter a password or log in as the superuser (su).
Let's look at a simple example, in order to be able to delete \\ copy \\ replace system files in Ubuntu, you need to open the file manager Nautilus on behalf of the superuser.
To do this, enter in the terminal ( ctrl + alt + T). Be careful, the terminal is case sensitive.
Then the following text appears:
password for user: / here enter your password, please note that no characters will be displayed /Thus, you have opened the file manager Nautilus on behalf of the superuser and now you can safely (or not so much) go picking system files ^^
Next example. For example, you need to dig into the contents of the system file using a text editor, but you cannot make changes in it. Open a terminal and enter:
sudo geditThus, you have opened a text editor with superuser rights.
Another example is if, for example, you will execute a large number of commands and each time you enter a password, you simply do not like it. You can open a superuser session in the terminal which will save you from this inconvenience.
Enter in the terminal:
Then we enter our password, the superuser session is open. Thank you for attention
The sudo command is very important for managing permissions in the Linux operating system. Thanks to this small command, you can give authority to perform certain actions on behalf of the administrator to other users, while not giving them the superuser password itself. Also, you do not need to always sit under the superuser account to sometimes perform administrative actions.
It would seem that such a small team, with a minimum of opportunities and the most simple use, but in fact it can do much more. In this article, we will look at how to configure sudo in linux to control access to system functions and user capabilities.
How does sudo work?
Before moving on to configuring access to the sudo utility, let's take a look at how it works. On Linux, there are two ways to get administrator rights. You can switch to the root user using the su command, or you can pass the desired command in the parameter to the sudo utility, which will execute it as an administrator. Moreover, the second method is preferable, because you will not forget that you are using root rights and will not do anything unnecessary.The command name means substitute user do or super user do. The utility allows you to run programs as another user, but most often as the root user. The utility was developed back in 1980 by Bob Cogshel and Cliff Spencer. During this time, many developers have changed and many features have been added.
Sudo works thanks to the SUID access flag. If this flag is set for a program, then it is executed not on behalf of the user who launched it, but on behalf of the owner, given that the sudo file belongs, then the utility is executed as root. Then she reads her settings, asks for the user's password and decides whether he can be allowed to execute commands as an administrator. If yes, then the command passed in the parameter is executed.
Now that you know the theory, let's take a look at how to set up sudo on Linux.
Linux sudo setup
All sudo settings are located in / etc / sudores. Here you can configure a lot of parameters, ranging from who will be allowed to execute commands on behalf of the superuser and ending with limiting the set of available commands.To open a file for editing, type the following command as the superuser:
You can also specify the text editor where you want to edit the configuration file:
# EDITOR \u003d nano visudo
Next, we will look at the most interesting settings that you can set in this file. But first, let's go over the basic syntax of the file. It consists of two types of strings, these are aliases that allow you to create lists of users and flags, as well as the rules themselves that determine how the sudo command will behave. The alias syntax looks like this:
type alias_name \u003d item1, item2, item3
The type indicates what type to create the alice, the name is the name that will be used, and the list of elements is the elements that will be implied when referring to this name.
The description of user permissions has a slightly different syntax:
user host \u003d (other_user: group)commands
User indicates the user or group for which we are creating the rule, the host is the computer for which this rule will apply. Another user - under the guise of which user the first one can execute commands, and the last one - the allowed commands. An alias can be used instead of any of the parameters. Now, setting up sudo on Debian and other distributions.
Main settings
Alias \u200b\u200bDefaults allows you to set standard parameters for the utility, which we will consider in this section. This alias begins with the word Defaults, followed by the name of the flag. If there is a symbol in front of the name, it means that the flag must be turned on, otherwise turn off:Disable introduction on first use:
Defaults! Lecture
The superuser cannot execute sudo:
Defaults! Root_sudo

Now if you try to execute sudo sudo nothing works:

Change the home directory for the target user, by default, the current user's folder remains as the home directory:
Defaults set_home

Save the list of groups of the current user:
Defaults! Preserve_groups

Prompt for superuser password instead of user password:


Next, let's look at variables that can be set to values \u200b\u200bto set the desired settings:
Set the number of password attempts to try before sudo exits, default is 3:
Defaults passwd_tries \u003d 5


The number of minutes that will elapse before sudo asks for the password again, by default 5. If set to 0, the password will always be asked, no matter how long ago you used the utility:
Defaults timestamp_timeout \u003d 10

The next parameter sets the number of minutes that sudo will wait to re-enter the password if you enter it incorrectly:
Defaults passwd_timeout \u003d 10
You can change the message that will be displayed when prompted for a password:
Defaults passprompt \u003d "Your password:"

You can specify another user, not root, from which all commands will be executed, for this use:
Defaults runas_default \u003d "user"
You can log all attempts to connect to sudo:
Defaults logfile \u003d / var / log / sudo

Then we try to check the operation of the log:
$ sudo cat / var / log / sudo

These were all the most interesting sudo configuration options you might need, next we'll look at how to set sudo permissions for users.
Setting up sudo users
We have already examined the syntax for setting up actions for users above, here everything is more complicated than with aliases, but you can figure it out. For example, let's allow any user to use sudo, from any host, and execute any commands:ALL ALL \u003d (ALL) ALL

Such a command is very insecure, it permits everyone and everything. The first is ALL - to allow all users, the second is ALL - for all hosts, the third is ALL - to allow any user to log in, and the fourth is to allow any command to be executed. But a different construction is used much more often:
% wheel ALL \u003d (ALL) ALL

Means the same as the previous one, only here we do not allow all users to use sudo, but only those who are in the wheel group.
% wheel ALL \u003d (root) ALL
Here we have already limited the possible choice of users to only the root user. You can also specify a user group on behalf of which he can execute commands:
% wheel ALL \u003d (root: admins) ALL

This means that you can run the command as root or another user from the admins group. We can also specify the commands that the user can execute. For instance:
User_Alias \u200b\u200bUsers \u003d user1, user2, user3
Runas_Alias \u200b\u200bAdmins \u003d root, admin
Host_Alias \u200b\u200bHosts \u003d host1, host2
Cmd_Alias \u200b\u200bCmds \u003d / bin / mount, / bin / umount
Users Hosts \u003d (Admins) Cmds
This means that users in the Users list will be able to execute Cmds commands as Amdins users on Hosts hosts.
There are still a few words left to say about flags. The NOPASSWD flag tells you not to ask for a password when executing this rule. For example, to allow all users to run the mount command with sudo without a password:
ALL ALL \u003d (root) NOPASSWD: / bin / mount
You can also prohibit the execution of this particular command in general using the NOEXEC flag:
ALL ALL \u003d (root) NOEXEC / bin / mount
You can check if the / etc / sudores file was configured correctly and see all created rules using the command: 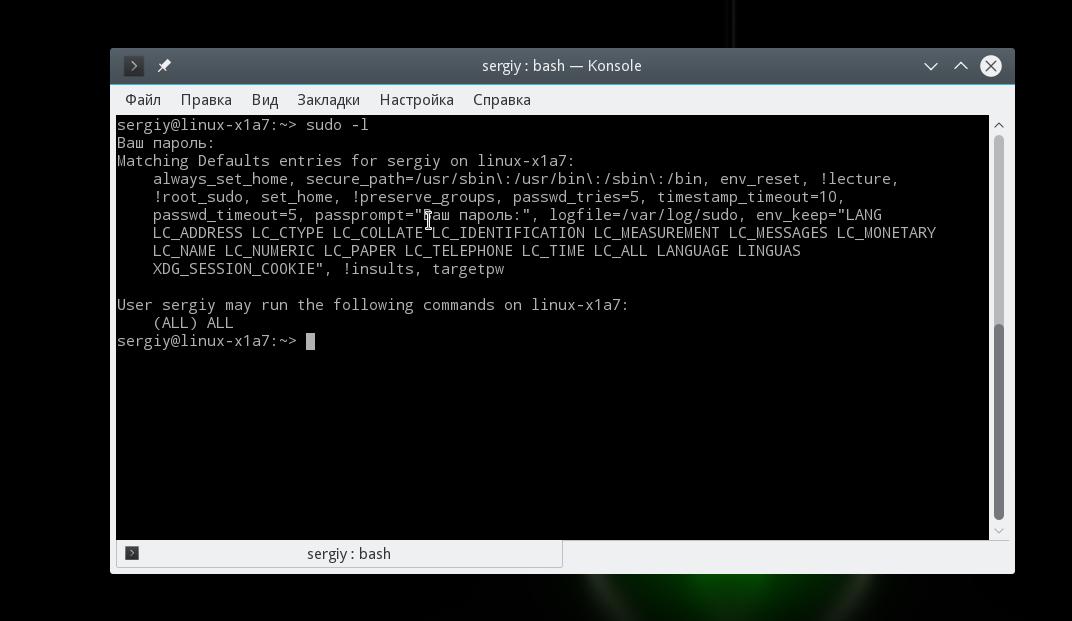
All flags and settings are displayed here, as well as the permissions of this user.
conclusions
In this article, we looked at how sudo configuration is done on linux. As you can see, despite the fact that this is a very simple utility, it hides a lot of useful settings that you can use on your system. If you have any questions, ask in the comments!Sometimes, to solve a task, you need to open a terminal and execute commands from the superuser (sudo or su), also called ROOT. Although some of them can be done using a graphical interface.
For what Root is needed and used in Unix systems, you can learn from, and we will further discuss how sudo or su is used in Linux systems.
Suppose we need to perform a non-standard task, where charting tools will not help us. In addition, the command line is a very flexible tool, here you can see the output of commands and understand what is going wrong. Most importantly, the commands in the terminal are standard for all Linux distributions.
So, there are two main ways to get root privileges - sudo or su
The sudo command is used on Debian-like systems or the more popular Ubuntu, while "su" is used on almost all other Linux distributions.
Entering sudo in the Ubuntu operating system requires entering the Root password and then, after a successful entry, gives superuser rights for the duration of only one command. All subsequent commands that require Root privileges on Debian-like systems will need to retype "sudo". And in other Linux distributions where the "su" command is used, it provides full Root access, after entering the password, until you enter "logout" or close the terminal.
Debian-like (Ubuntu) systems have one trick that can give you full Root access until you close the terminal. This is necessary if you will be executing many commands as Root, and you do not have to enter “sudo” before each command. To do this, use the command:
For example, we need to find all existing users in the system, see their directories and assign the rights of the required directory of one user to another. To do this, if I were using Ubuntu, the command in the terminal would be as follows:
Sudo du -sch / home / *
After that, the password from Root would follow:
16K / home / lost + found 27G / home / pavel 34G / home / pavelubuntu 50G / home / pavelzen 110G total
I know that I am a user of the / home / pavelzen directory, but I also need to become the owner of the / home / pavelubuntu directory. To do this, I again need to enter "sudo" before the command.
And for other systems: first I would command
password and then
Du -sch / home / *
Chown -R pavelzen: / home / pavelubuntu
This is how terminals and superusers appear on Linux systems.
Every owner of a server machine knows that you shouldn't trust full access (root) to everyone.
We know the consequences of some of these moments. And, to simplify life, in Unix kernel implemented command sudo.
A tool that allows users to execute commands with superuser privileges. For example, it allows junior administrators to use certain commands to perform tasks within the competence.
Superuser root - Administrator account in Unix (as well as Unix-like OC) with identifier 0, which is allowed to execute all commands without exception.
It is installed from the repositories using the package manager: apt-get install sudo or yum install sudo.
Sudo config permits to specify user, user group, hosts and prompt or not prompt for a password at runtime.
For example, executing a command as another user.
Run Midnight Commander as superuser
Open in a text editor nano file nginx.config from user Anton.
Sudo -u anton nano /etc/nginx/nginx.config
configuration file sudoers located in the directory / etc /.
To edit the configuration file use the command visudo.
You should not modify the / etc / sudoers file with a text editor, because when saving, the syntax is not checked, as is the case with visudo.
User rights template in the configuration file / etc / sudoers
User /% group ALL / host_name / + machine_group \u003d ALL / enumeration_command_separated_commas (additional parameters):
Allows the anton user to execute all commands on all hosts (with a password prompt)
Anton ALL \u003d (ALL) ALL
Allows the admins group to execute all commands on the Alpha machine (without entering a password)
% admins Alpha \u003d ALL NOPASSWD: ALL
By default, when executing commands via sudo, you need to log in with a password. You can disable authorization using the parameter NOPASSWD)
Provided in sudo and by grouping command groups into aliases.
Combining commands for working with the network into one entity NETWORKING
Cmnd_Alias \u200b\u200bNETWORKING \u003d / sbin / route, / sbin / ifconfig, / bin / ping, / sbin / dhclient, / usr / bin / net, / sbin / iptables, / usr / bin / rfcomm, / usr / bin / wvdial, / sbin / iwconfig, / sbin / mii-tool
You can use them for example for limitation of rights user or group to execute commands affecting the service.
Allow all commands to be used by Egor and the devops group, except for those in the NETWORKING group
Egor ALL \u003d ALL,! NETWORKING% devops ALL \u003d ALL,! NETWORKING
We've covered some of the sudo functionality for a detailed look, use man pages from your distribution kit.
Related entries:
 How to set up my tele2 unlimited
 The computer does not see the USB flash drive - the reasons and solutions to the problem
 How to connect the Internet for a day from Tele2?
 What to do if the computer does not see the USB flash drive in Windows
 The computer does not see the USB flash drive, what to do


