What does apply update from external storage mean. Android Step by Step: ClockWork MOD Recovery - What is it and why is it? Updating with ADB Sideload
As you know, the Android operating system provides the user with enormous functionality, using which he can realize the full potential of his smartphone: from advanced settings using the engineering menu and ending with a complete factory reset using a special mode - Android System Recovery 3e. What to do in this menu with a smartphone, you will learn from this article.
This setting mode was provided for working with system files and system parameters. With it, you can activate or block almost all functions of your Android device. Here you can carry out such complex manipulations as a complete cleaning or system restore in just a couple of clicks. Due to the fact that this menu plays an important role, it is not so easy to get into it, but more on that below. In order not to harm your device, you need to know the points of the mode, their meaning in Android System Recovery 3e and what to do to carry out certain actions.
Launch Android System Recovery 3e
As mentioned above, launching this menu is not easy. To get here:
- Turn off the gadget;
- Simultaneously hold down the volume rocker, the Home button and the power key.
After a few seconds, the Android logo will appear on the screen, and then the Android System Recovery 3e menu will launch. What to do in it and what menu items mean - we'll talk about this further.
Assigning items in the mode
The very first and most important point is Reboot. It allows the user to restart the device.
To use the device's memory stick as an external storage connected via USB, select Toggle USB strage.
There is also work with the CWM package. It is used to install native Recovery on the device.
Choosing "Instal from sdcard" (installing CWM from a memory card), you will find yourself in a subsection with the items:
- Installing CWM Recovery, which is preloaded on the memory card - Choose zip from sdcard;
- Check md5sum amount - Check md5sum a file;
- Find out the signature of the CWM package - Toggle Signature Verification;
- Check CWM for compatibility with the device - this can be done by clicking on Toggle Sclipt Assert.
How to use Android System Recovery 3e mode for flashing, what to do on Lenovo or other gadgets? Use only proven features that you know about!
- Reset all smartphone data - Wipe data / factory reset;
- Wipe Cache allows you to completely clear the cache;
- Wipe dalvik cache is used to clear Dalvik-Cache;
- Use Wipe battery stat to clear battery usage history;
- Format System completely removes all system files;
- Format Date formats the data section;
- Format cache deletes cache data, but the files themselves remain in it;
- Cache kernel data clearing - Format boot;
- To completely format your device, use Wipe all partitions.

All the values \u200b\u200bof the menu items that we are talking about are completely identical for all gadgets running Android.
Backup / Restore is one of the most important sections that is responsible for backing up and restoring data. It contains points:
- Backup - creates a backup copy of data;
- Restore - serves to restore the factory firmware;
- Advance Restore - used to restore individual data partitions;
- Advanced Backup - can be used to copy partitions.
The next item is responsible for converting formats to Android System Recovery 3e. What to do in this menu? Here you can choose different types of conversions to EXT4 and EXT3. Here's what this section allows you to do:
- Convert / change a backup converts the device system;
- Use Convert Data to convert data;
- Change one of you backup is used to translate backup sections;
- Convert Cache converts cache;
- Wipe data / factory reset is used to convert all partitions;
- System formatting - format system, data - format data, cache - format cache.
Extra menu

In the Advanced section, you can perform such actions using the following commands:
- File System Check checks the validation of system files;
- Print Partition Info displays log information on the display;
- Copy recovery.log to sdcard is used to save copies of the recovery log;
- Opening ext and ext2 formats on an SD memory card - Partition SD Card;
- No - save my fat32 partition! terminates partitions;
- Use Fix Permission to fix permissions in / data / data.
And finally, the last item is Power Menu. It is used for power management:
- Reboot Recovery reboots;
- In Bootloader mode, use Reboot into Bootloader;
- A simple reboot is done using Reboot;
- Power Off - normal shutdown.
Thus, using this menu, you can implement a huge number of functions that are not available in the visual settings. If you have any questions, you can always ask them in the comments!
To enter recovery mode, follow these steps:
1. When turning on STB, press and hold the button RESET on the back of the device.
2. Wait for the Recovery menu to appear.
Reset to factory settings
Attention! All user data will be deleted!
1. Select Wipe data / factory reset.
2. Confirm the factory reset. Please select "Yes - delete all user data"... Wait until the factory reset is complete.
3. Reboot the system. Please select reboot system now.
Installing Updates from a USB Drive
1. Download the update file (archive) to a USB stick.
2. Connect the USB storage device to the set-top box.
Apply update from EXT(external storage).
4. Select Update from udisk.
5.
Installing updates from SD card
1. Download the update file (archive) to the SD card.
2. Connect the SD card to the set-top box (insert the card into the corresponding slot on the back of the device).
3. From the Recovery menu, select Apply update from EXT(external storage).
4. Select Update from sdcard.
5.Select the file to update. Then the update will take place automatically.
Installing updates from the cache
1. Download the update file to your device.
2. From the Recovery menu, select Apply update from cache(internal storage).
3. Select the update file. Then the update will take place automatically.
Note: updates can also be installed using ADB.
What to do if your Android smartphone suddenly starts to freeze and behave as if you wanted to live your life? How to reflash Android? This question is asked by many users of modern gadgets of various brands - from top-end Samsung and Sony to the now gaining popularity of Chinese Xiaomi (more often in colloquial speech - Xiaomi) and Meizu.
Possible solutions to problems


CWM 5.5.0.4
Installation of .zip archives occurs through the "Install ZIP" item. The file is whether it be custom or deoxidators, crackers or decorators, kernels or modems. I would like to remind you that before any manipulation, do not be lazy to make a BACKUP! You will need it, and I guarantee it. You can find out more about backup at the end of this topic. So, you downloaded, for example, custom firmware CyanogenMod 11, and do not know how to install it. I will help you, follow the steps described below:
- First, we need to have, in fact, CWM Recovery itself and a backup made, in case of an unfortunate case
- Before starting the installation, I would recommend that you have a battery charge of at least 50%! Because when the battery is 20% or less, it may fail! Better to insure yourself!
- If your smartphone is connected to a computer or a charger, it is better to disconnect it from there
- In my case, we install the custom firmware CyanogenMod 11, first we need to download it and copy it to the root of the memory card without unzipping him!
- That's it, we downloaded the necessary files and copied them to the desired address, now we need to go to CWM
- After that, select the item "Install ZIP from Sdcard", and after that "choose ZIP from Sdcard"
- A kind of file manager will open in front of us, in it we need to select the downloaded archive
- After selecting the archive, you need to confirm your choice by clicking "YES"
- After successful installation, you need to restart our smartphone
- Everything went well, the instruction is complete!

Backup copy system:
- Launching CWM
- After that, select the next sub-item "Backup" and select "Yes"
- We reboot the device "Reboot System Now"
Recovery backup:
- Launching CWM
- Select the item "Backup and Restore" (creating a backup and restoring from a backup)
- After that, select the next sub-item "Restore"
- Select the previously saved backup copy, it is located at / clockworkmod / backup and click "Yes".
- We reboot the device "Reboot System Now".
Hello gentlemen. Most people do not know their new devices well, they ask “How to get ROOT?”, “How to change OS” and so on. And so that there are no such frequent questions, I will tell you about different secrets about this popular mobile operating system - Android.
This time we will start with the most important thing - ClockWork MOD Recovery. Why is he, and what is he hiding? We will learn about this further ...
In general, CWM is a kind of BIOS (more understandable for PC users) that helps us fine-tune an Android device. Thanks to him, we can install different patches, firmware and mods. The CWM itself is located in the system memory of the smartphone, but first it must be installed. You can find details about installation for your device on this website, or download Rom Manager from Google Play (Requires Root) Basically, each device has a native Recovery. They are of different types - 1e, 2e, 3e. These native Recovery are limited in many more functions than CWM.
Now let's move on to the CWM itself. It comes in different versions for each device. For example, I now have version 6 of CWM. For some, the menus may differ, but in general the same.
In the photo, we see several points:
- Reboot system now - Immediate system reboot
- Install zip from sdcard - Install .zip from sd card
- Install zip from sideload - Install .zip with ADB
- Wipe data / Factory reset - Wipe data / factory reset
- Wipe cache partilion - Clears the cache partition
- Backup and restore - Backups and restores
- Mounts and storage - Mounts and Storage
- Advanced - Advanced settings
1. Reboot system now - just reboots the device
2. Install zip from sdcard has several sub-items:

- Choose zip from sdcard - choose zip from sd card
- Apply /sdcard/update.zip - apply automatically /sdcard/update.zip
- Toggle signature verification - Toggle signature verification

Apply /sdcard/update.zip - installs a special update from the root of the memory card only if it has the name update.zip
Toggle signature verification - enables / disables verification of signatures in .zip in order to install only factory .zip
3. Install zip from sideload is a special function that installs .zip from computer via USB cable. To do this, you need ADB drivers and a special program that manages all this. The program has detailed help on what and how to do.
4. Wipe data / Factory reset - allows us to return the device to its original state and deletes all data on the phone, but the memory card will not be touched
5. Wipe cache partilion - clears application caches. Needs only when flashing or when the device often "freezes"
6. Backup and restore - the savior of your Android device. This section helps to make backup copies of the software, and restore software from the "backup" if it is "okayed / gone into the bootlap". Let's take a closer look at this section:

Backup- makes a backup copy of the software to save applications, application data and all the firmware itself. You just need to click on the section and the "backup" will be created (The speed of creation depends on the class and cache of the memory card)
Restore - restores software thanks to "backup". When we click on the section, we will see a folder with certain numbers. This is the year.month.day.the time for creating a "backup". Select the desired folder and the software will be restored.
Delete- deletes the backup copy if it is no longer needed. He chooses what he needs and the "backup" will be scrapped.
Advanced restore - restores from the backup only what is needed from the firmware. For example, user data or the system.
Free unused backup data - freeing memory in "backup"
Choose deafult backup format - choice of backup format .tar or .dub
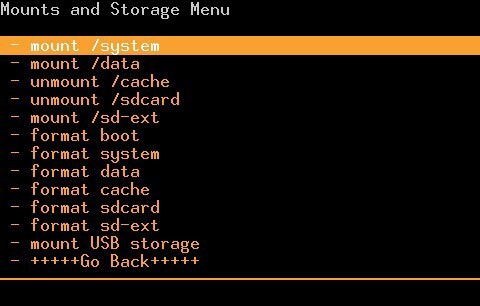
7. Mounts and Storage -mounting and storage. I see no reason to describe.

- Unmount / cache - unmounting the cache directory
- Mount / data - mount the data directory
- Mount / system - mount the system directory
- Unmount sdcard - unmount an external sd card
- Mount / sd-ext - mount the sd-ext directory
- Format / cache - formatting the cache directory
- Format / data - formatting the data directory
- Format / system - formatting the system directory
- Format / sdcard - formatting an external sd card
- Foamat / sd-ext - formatting the sd-ext directory
- Mount USB Storage - mount an external USB

Clearing dalwick cache. Needed when the device freezes or when installing a mod.
Report error - saves all errors in a special file error.log
Key test - hard keys test. When you press a key, its code is displayed on the screen
Show log - saves all your actions in a special file recovery.log
Fix permission - fixes all permissions in rw-r-r in / system directory
Partition sdcard - mounts partitions such as ext3, ext4 and creates a swap file
How to get into Recovery? Each model has different methods, but I will tell you one universal one. When you turn on the device and see the manufacturer's logo - quickly press the "Volume -"
Be careful when playing with CWM, and make backups in every possible way. Good luck with your adventures!
In this article I will tell you what CWM and how to flash a phone through it. The possibilities of CWM, installation examples, rules for flashing some phone models will be considered. This method is the most popular and very convenient, since almost all custom firmwares work through it. Professionals will not find anything new in this material, but for beginners it will be very useful.
So let's start in order. CWM is an abbreviation for ClockWorkMod, in other words, a modified unofficial recovery. It has much more features than native recovery. Depending on the model, the device can be installed both separately and work in parallel. It can be used to install unofficial firmware, install add-ons and fixes, connect to a PC in different modes (including ADB), create backups (full or partial) and many other useful things.
How to install CWM recovery? First you need to download the file you need, this is a zip archive. We throw it on the phone's flash drive. Sometimes it is better to rename the archive to update.zip, because in older versions the standard recowery manager cannot install anything other than archives with that name.
We enter recovery.
Turn off your phone. Press simultaneously 2 keys, power and center button. You should have something similar to what is on the screen.

Choose "apply update from sdcard" , and choose our archiver "update.zip" , then we overload, and load exactly the same keys as above.

As a rule, the following CWM control scheme is used on most devices:
- volume up button - up,
- volume down button - down,
- on / off button - select an item.
On some devices, navigation can be done using other keys.
If all the steps are done correctly, you should have something like the following image.
Everyone who takes the first steps in studying the procedure for flashing Android devices initially pays attention to the most common way to carry out the process - firmware through recovery. Android Recovery is a recovery environment that practically all users of Android devices have access to, regardless of the type and model of the latter. Therefore, the firmware method through recovery can be considered as the easiest way to update, change, restore or completely replace the device software.
Almost every device running the Android OS is equipped with a special recovery environment by the manufacturer, which provides to some extent, including ordinary users, the ability to manipulate the internal memory of the device, or rather, its partitions.
It should be noted that the list of operations that are available through the "native" recovery installed in devices by the manufacturer is very limited. As for the firmware, only official firmware and / or their updates can be installed.

In some cases, through the factory recovery, you can install a modified recovery environment (custom recovery), which in turn will expand the ability to work with firmware.
At the same time, it is quite possible to perform the basic actions for restoring operability and updating the software through the factory recovery. To install official firmware or updates distributed in the format * .zip, we perform the following steps.


How to flash a device through a modified recovery
Modified (custom) recovery environments have a much wider range of options for working with Android devices. One of the first to appear, and today is a very common solution, is the recovery from the ClockworkMod team -.
Installing CWM Recovery
Since CWM recovery is an unofficial solution, you will need to install a custom recovery environment into the device before using it.


- For Samsung devices, in most cases, an application is used.
- For devices built on the MTK hardware platform, an application is used.
- The most versatile method, but at the same time the most dangerous and difficult, is to flash the recovery through. In detail, the steps taken to install the recovery in this way are described at the link:
Firmware via CWM
With the help of a modified recovery environment, you can flash not only official updates, but also custom firmwares, as well as various system components represented by localization languages, additions, improvements, kernels, radio, etc.
It is worth noting the presence of a large number of versions of CWM Recovery, so after logging in, you can see a slightly different interface on various devices - background, design, touch control, etc. In addition, some menu items may or may not be present.

The examples below use the most standard version of the modified CWM recovery.
At the same time, in other modifications of the environment, the firmware selects items that have the same names as in the instructions below, i.e. slightly different design should not cause concern for the user.
In addition to the design, the management of CWM actions in various devices is different. Most devices use the following scheme:

- Hardware key "Volume +" - moving one point up;
- Hardware key "Volume-" - move one point down;
- Hardware key "Nutrition" and / or "Home"- confirmation of the choice.
So, the firmware.


Firmware via TWRP Recovery
Besides the solution from the ClockworkMod developers, there are other modified recovery environments. One of the most functional solutions of this kind is. How to flash devices using TWRP is described in the article:
Thus, the firmware of Android devices is carried out through the recovery environment. It is necessary to take a balanced approach to the choice of recovery and the method of their installation, as well as to flash into the device only the corresponding packages received from reliable sources. In this case, the process proceeds very quickly and does not cause any problems later.
| Articles |
Hello, tell me how to use Android System Recovery 3e, there is such a huge menu that half of the items are not clear.
Answers (2)
- be sure to charge the battery by 80-90%;
- turn off the device;
- simultaneously hold down the "on / off" buttons, "louder" volume control, sometimes the "home" button (depending on the model);
- wait until the manufacturer's icon appears;
- release, the recovery menu will appear.
- "Reboot system now" - reboot, through it you can exit android system recovery, depending on the device, the menu may contain this item in the "power menu" section;
- "Wipe data / factory reset" - reset to factory settings, delete all information from the device, after which the smartphone will be like after purchase;
- "Wipe cache partition" - this item is responsible for deleting the system cache and applications, that is, cleaning unnecessary files;
- "Install from sdcard" - installation of zipped files from a USB flash drive.
- "Backup" - a backup copy of the operating system is created and stored on a USB flash drive;
- "Restore" - installation of a backup, by opening the item, a list of firmwares will appear;
- "Advanced restore" - restoring a part of the operating system, the command works with the same partitions as the next function.
- "Mount / system" - system;
- "Unmount / data" - for storing user information;
- "Mount / sd-ext" - mounting part of the operating system on a USB flash drive to expand its capabilities;
- "Unmount / cache" - cache, temporary files;
"Mount / sdcard" - sd card. - "Wipe dalvik cache" - cleaning unnecessary files of the dalvik machine, which runs programs on the phone;
- "Wipe battery stat" - clears information about battery usage;
- "Restart adb" - loading into adb mode, which is needed to control the device via the command line from a PC;
- "Fix permissions" - the command returns the file permissions to their original state.
- not unlocked bootloader;
- experiments on installing custom recovery, as a result of which the native one is out of order;
- breakdown of volume or power buttons.
- download the zip archive;
- open it, find the ADB.exe file;
- in the menu that appears after clicking on it with the right mouse button, select the item "run as administrator";
- then a blue window will appear;
- write "y" and press "inter" repeat this 3 times, thus we agree to install the program and drivers;
- go to the ADB folder, it should be at the root of the C drive;
- copy the downloaded recovery here and rename it to recovery.img;
- press "shift" and the right mouse button;
- select "open command line";
- enter "fastboot flash recovery recovery.img" this is the command that will install the downloaded recovery;
- by pressing "inter" we start it;
- we write "reboot".
This comment is edited.
Recovery (also known as the recovery menu) is a separate small operating system that has a minimum of functions and works independently of the main one. There are stock and custom recovery. The first is "native", the second is modified and improved, it must be installed independently.
The most common custom ones are CWM and TWRP, they are supported by most devices.
To enter the recovery on android you need:
To move around it, a volume control carriage is used - "louder" up, "quieter" down. To enter the sub-item, you must press the "on / off" or "home" button.
Returning to the previous menu is carried out with the “go back” item. After selecting any command, a list with sub-items "no" and one "yes" appears, which must be pressed to start. 
The number of items depends on the android system recovery. The instructions for use are as follows:

Some items have additional sub-items, so I'll tell you about each of them. Section "backup and restore":

You need to be very careful with the item "mounts and storage", as it can damage the device. It is used for formatting - permanently deleting all information and mounting, that is, connecting to the system. This item works with the following sections:
The "format" command works with the same sections, but only clears all the content. Applying this item to "system" or "data" will kill the smartphone.
In the recovery there is a submenu "advanced", which includes additional features. Here is a list of them:

This comment is edited.
Rarely, but a situation arises when android system recovery 3e does not respond. What to do with this problem and the ways to solve it depend on the reasons:
The most common reason android system recovery 3e may not respond is a locked bootloader. It is unlocked in different ways and depends on the specific device model.
An unsuccessfully delivered recovery must be "rolled back" to the native one. First you need to find stock recovery for the model you need - it is best to search on our and American forums.
The recovery is stitched through the ADB program, which is installed on the computer as follows:
After that, you can go to the updated recovery.
If the buttons fail, connect the device to the computer, as described above, enter "reboot recovery" and press "enter".
Translated into Russian, apply update from adb means “apply update from adb”, that is, by selecting this command, you update the Android OS. As you know, they are installed through the phone or through the special one corresponding to each manufacturer. At the same time, few people know about installing packages using ADB. Why you need this, you will learn from this article.
What does apply update from adb mean
In "recovery" mode on a smartphone or tablet, several commands are available to apply system updates. If you have a firmware update file, then based on the location of the package, the following command is used:
- apply update from adb cache (the file is taken from the cache)
- apply update from adb external storage (file is taken from external storage)
- apply update from adb (update from computer)
In the standard "recovery" mode, you are prompted to select a file from the cache if the update is downloaded by the system. You can also choose on an external drive, or install the update via ADB, if the package is on your computer.
Updates are usually installed through a program built into the system. The user checks for the package on the manufacturer's server and downloads it if necessary. The further installation process takes place automatically, without the participation of the owner. However, sometimes this method does not work.
Companies issue updates “in batches” in certain markets to reduce server load. Sometimes the update is revoked, less often the firmware will refuse to accept the update. More often than not, manual installation is used by impatient owners who want to be the first to test a new "package" of updates.
Instructions for installing updates via ADB
Important! The minimum battery charge for installing small packages is 50%. For major upgrades, it is recommended to charge the battery between 75-100%.
- Download the update archive in ZIP format. Rename the package to "ota" or "update".
- In the phone settings, open the section for developers, where activate "".
- Connect the device to the computer where ADB is configured. Data cable required.
- In the context menu, taking into account the held down Shift button, call the command window.
- Put the phone into recovery mode with the command adb reboot recovery.
- Confirm the action if the mobile device prompts you to use USB debugging.
- In the recovery menu, select the "apply update from adb" item to apply the update via ADB. The volume buttons are used to navigate, the power key is to confirm the action.
- Next, on your computer, enter adb sideload (path to the archive on your PC) ota.zip.
- After the installation is complete, reboot your smartphone from recovery - reboot system now. Or by the adb reboot command on a PC.

Output
The apply update from adb command is used to install a system update. This method is useful when other methods are not suitable at the moment. For example, there is no way to put the archive on the phone. It is also worth noting the ease of installation of the package. If you find it difficult to use ADB, then use ADB Run, where commands are included in the program, which simplifies interaction.
Found a mistake or inaccuracy? Write about it in the comments, and also add a fix.
Was this article helpful?
Rate it - support the project!


