We add images to the WEB-page, as well as video and audio! Illustrated tutorial on Web-graphics For placing graphic images on web pages
Definition 1
A web page is a text file created in HTML and hosted on the World Wide Web (WWW). In addition to text, a Web page may contain hypertext links that can be used to navigate to and view other Web pages, as well as inserts in the form of graphics, animation, video clips, and music.
With HTML you can:
- Create and edit Web pages.
- Edit HTML documents from the Internet taking into account the functioning of all objects embedded in the document (pictures, animations, etc.).
- Using hypertext links and the ability to embed pictures, diagrams, animation, video clips, music and speech, text special effects into an HTML-format document, create multimedia presentations, slideshows, and demo projects.
Remark 1
Graphics are usually stored in separate files. The HTML language has special tags that are used to write links in the codes of Web pages that represent the actual addresses of these files on the Internet. When encountering such tags, the Web browser makes a request to the Web server for the corresponding file with an image, audio, or video and displays it on the Web page at the location of this tag. Any data (images, audio and video clips, etc.) that are stored in files separate from the Web page are called embedded elements of Web pages. Let's take a closer look at the process of adding an image to a Web page.
Adding Images to a Web Page
The appeal of Web pages lies precisely in the graphics used on them and other various objects. Adding an image to a page is not difficult. And adding graphics that can make the appearance of a Web page more presentable and professional is much more difficult and requires special knowledge.
You can add an image to the page using the image source tag, which looks like:
where is the tag itself, and scr is its attribute. Since the scr attribute is required, we can say that this entire record is one common tag. The image source tag does not use the corresponding end tag because the source tag is self-contained and therefore requires a closing slash at the end when using it.
Adding Alternative Labels
On the Internet, you can often find various labels that are displayed when you hover the mouse pointer over a graphic object of a Web page. These labels usually contain additional information about the image itself or about the area of \u200b\u200bthe page on which it is located.
Below is the HTML code with the alt attribute added inside the tag. This attribute, similar to the src attribute, tells the browser some additional information about the image, and it can also always be used in conjunction with the tag.
alt \u003d "(! LANG: This is a picture!" />!}
The function of the alt attribute is to define alternative text for a graphic element added to a Web page. It is called alternative because it is displayed on the screen as an alternative to the image itself. The alt attribute serves another important function. It allows the web designer to be sure that if the visitor of the page does not see the image on his screen, he at least can at least see the text information added to this image.
When using the alt attribute for each tag, it is important to be careful not to assign inappropriate text messages to graphic elements. For example, there is no point in adding alternative text labels to the page's appearance. To avoid such errors, you can set the alt attribute of these elements to an empty value (alt \u003d ""). If you do not specify values \u200b\u200bfor other attributes, the browser renders the image at its original size, while aligning the top edge of the image with the top edge of the adjacent text line. However, you can change both of these parameters using style sheet tags.
Image Attributes
The tag contains attributes that allow you to resize images. Here are some of them:
- height - it is used to determine the height of the image in pixels or percent;
- width - it defines the width of the image in pixels or percent.
Adjusting the height and width of the image
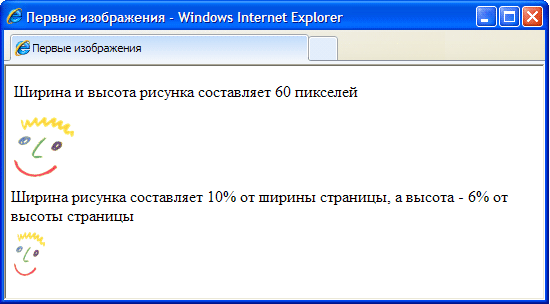
The sizes of images placed on Web pages can be set using the above attributes. Moreover, their values \u200b\u200bare set either as a fixed number of pixels or as a percentage relative to the page size. In the HTML code below, the first tag contains the dimensions of the original image in pixels (60 pixels vertically and 60 pixels horizontally), the second tag sets the width of the same image to 6% of the page width, and the height to 10% of the page height.
alt \u003d "This is a picture!" hеight \u003d "60" width \u003d "60" /\u003e
alt \u003d "This is a picture!" height \u003d "10%" width \u003d "6%" /\u003e
Remark 2
When displaying images in its window, the browser does an equally good job of handling both kinds of values. Keep in mind, however, that visitors to your Web pages may have a different screen resolution than yours. Therefore, when resizing an image, be sure to set both image values \u200b\u200b(height and width). If you change only one of these values, the screen may appear stretched vertically or horizontally.
You can use to create the illusion of faster loading images. To do this, you must always specify the values \u200b\u200bof the height and width attributes, regardless of whether the image is resized or not. Because they tell the browser important information about the amount of space required to fit the image on the page. In response, the browser designates the space needed for the image and continues to build other page elements without stopping the image itself from loading. This makes the page seem to load faster because its visitors do not have to wait until the image is fully loaded to see other information on the page.
In order for an image on any screen, regardless of its resolution, to occupy a precisely defined space across the width of the page, percentage values \u200b\u200bmust be used. If you want the resolution of the image itself to be constant (its size in pixels), you must use the values \u200b\u200bin pixels.
Align text and graphics
To align the image to the right or left edge of the text line, use the align attribute of the tag. For instance:
alt \u003d "This is a picture!" hеight \u003d "60" width \u003d "60" align \u003d "right" /\u003e
To align the image vertically with respect to the text line, you can also use this attribute, which can be top, bottom, and center. The top value indicates that the top of the image is aligned with the top of the surrounding text. The bottom value indicates that the bottom of the image is aligned with the bottom of the surrounding text. Center indicates the alignment of the center of the image to the center of the text line.
Using images as links
Images are also used to create hyperlinks to other documents. In HTML, the image turns into a hyperlink in the same way as the caption. For this, a tag is used, which contains a page element (in our case, an image), which should become a link. The link will be followed by clicking on this image.
Image thumbnails
In addition to the above method in which an image acts as a hyperlink, it can also be used as a hyperlink to navigate from one image to another. This is necessary in cases where the size of the image that you want to publish on the Web page is large enough and will take a very long time to load, which is unacceptable for many visitors. Therefore, create a reduced copy of this image (thumbnail) and represent it as a hyperlink. If a visitor to the page is interested in this image, he can click on the thumbnail to view the full image. Here's a sample code:
alt \u003d "Click to see normal image."
hеight \u003d "60" width \u003d "60" /\u003e
Secrets of Using Images Successfully
Images provide a wealth of visual information for visitors, and this makes them attractive, and besides, they are quite simple to add to a Web page, but they must adhere to certain rules for creating a site if we want it to become popular on the web.
When creating pages, you should try to place small images on them, since large images will take a long time to load, and some users still use low-bandwidth communication channels to access the network, and therefore the sizes of the downloaded files have for them fundamental importance.
Remark 3
The total file size of the entire HTML document is also important, which, in turn, will depend not only on the size of the images contained in it, but also on their number. Care must be taken when using the alt attribute so that the content of the text message always matches the image itself. And in the opposite case: it is necessary to ensure that the image corresponds to the textual information presented on the page.
When using images borrowed from the Internet on the page you create, you should check if these images are protected by copyright.
HTML images are added to web pages using a tag ... The use of graphics makes web pages more visually appealing. Images help to better convey the essence and content of a web document.
Using HTML tags
Inserting images into an HTML document
1. Tag ![]()
Element represents an image and its fallback content, which is added using the alt attribute. Since the element
is inline, then it is recommended to place it inside a block element, for example,
Or
Tag has the required src attribute, the value of which is the absolute or relative path to the image:

For tag the following attributes are available:
| Attribute | Description, accepted value |
|---|---|
| alt | The alt attribute adds alternative text for the image. It is displayed at the place where the image appears before it is loaded or when the graphics are disabled, and is also displayed as a tooltip when you hover the mouse cursor over the image. Syntax: alt \u003d "(! LANG: image description" . !} |
| crossorigin | The crossorigin attribute allows you to load images from resources on a different domain using CORS requests. Images uploaded to the canvas using CORS requests can be reused. Allowed values: anonymous - The cross-origin request is made using an HTTP header and no credentials are passed. If the server does not provide credentials to the server from which the content is requested, the image will be corrupted and its use will be restricted. use-credentials - Cross-origin request is made with credentials passed. Syntax: crossorigin \u003d "anonymous". |
| height | The height attribute sets the height of the image in px. Syntax: height \u003d "300". |
| ismap | The ismap attribute indicates that the picture is part of a server-hosted map-image (map-image is an image with clickable areas). When you click on the map image, the coordinates are sent to the server as a URL query string. The ismap attribute is only allowed if the element Syntax: ismap. |
| longdesc | An extended image description URL, in addition to the alt attribute. Syntax: longdesc \u003d "http://www.example.com/description.txt". |
| src | The src attribute specifies the path to the image. Syntax: src \u003d "flower.jpg". |
| sizes | Sets the size of the image depending on the display parameters. Works only when the srcset attribute is specified. The attribute value is one or more strings separated by commas. |
| srcset | Creates a list of image sources to be selected based on screen resolution. Can be used in conjunction with or instead of the src attribute. The attribute value is one or more strings, separated by commas. 
|
| usemap | The usemap attribute specifies the image as an image map. The value must start with a # character. The value is associated with the value of the name or id attribute of the tag |
| width | The width attribute sets the width of the image in px. Syntax: width \u003d "500". |
1.1. Image address
The image address can be specified in full (absolute URL), for example:
url (http://anysite.ru/images/anyphoto.png)
Or via a relative path from document or root directory site:
url (../ images / anyphoto.png) - relative path from the document,
url (/images/anyphoto.png) is the relative path from the root directory.
This is interpreted as follows:
../ - means to go up one level, to the root directory,
images / - go to the folder with images,
anyphoto.png - Points to an image file.
1.2. Image dimensions
Without setting the image dimensions, the drawing is displayed on the page in real size. You can edit the dimensions of the image using the width and height attributes. If only one of the attributes is set, the second will be calculated automatically to maintain the proportions of the picture.
1.3. Graphics file formats
JPEG format (Joint Photographic Experts Group)... JPEG images are ideal for photographs, they can contain millions of different colors. Compresses images better than GIFs, but text and large areas of solid color can be smudged.
GIF format (Graphics Interchange Format)... Ideal for compressing images with solid color areas, such as logos. GIFs let you set one of the colors to be transparent so that the background of a web page can appear through part of the image. GIFs can also include simple animations. GIFs contain only 256 shades, which makes the images appear blotchy and unrealistic like posters.
PNG format (Portable Network Graphics)... Includes the best features of GIF and JPEG formats. Contains 256 colors and allows you to make one of the colors transparent, while compressing images to a smaller size than a GIF file.
APNG format (Animated Portable Network Graphics)... Image format based on PNG format. Allows animation to be stored and also supports transparency.
SVG format (Scalable Vector Graphics)... An SVG drawing consists of a set of geometric shapes described in XML format: line, ellipse, polygon, etc. Both static and animated graphics are supported. The set of functions includes various transformations, alpha masks, filter effects, the ability to use templates. SVG images can be resized without loss of quality.
BMP format (Bitmap Picture)... It is an uncompressed (original) bitmap template that is a rectangular grid of pixels. A bitmap file consists of a header, palette, and graphic data. The header contains information about the graphic image and the file (pixel depth, height, width and number of colors). The palette is specified only in those Bitmap files that contain palette images (8 or less bits) and consist of no more than 256 elements. The graphical data represents the picture itself. The color depth in this format can be 1, 2, 4, 8, 16, 24, 32, 48 bits per pixel.
ICO format (Windows icon)... The storage format for file icons in Microsoft Windows. Also, Windows icon is used as an icon on sites on the Internet. It is a picture of this format that is displayed next to the site address or bookmark in the browser. One ICO file contains one or several icons, the size and color of each of which is set separately. The icon size can be any size, but the most commonly used square icons with sides of 16, 32 and 48 pixels.
2. Tag
Tag
The name attribute is available for the tag, which specifies the name of the map. The value of the name attribute for the tag

Element
3. Tag
Tag describes only one hotspot within the client-side image map. The element does not have an end tag. If one hotspot overlaps another, then the first link from the list of scopes will be implemented.
| Attribute | Short description |
|---|---|
| alt | Specifies alternative text for the active area of \u200b\u200bthe map. |
| coords | Determines the position of the area on the screen. Coordinates are specified in length units and separated by commas: for circle - coordinates of the center and radius of the circle; for rectangle - coordinates of the upper left and right lower corners; for polygon - coordinates of the vertices of the polygon in the desired order, it is also recommended to indicate the last coordinates, equal to the first, for the logical completion of the figure. |
| download | Complements the href attribute and tells the browser that the resource should be loaded the moment the user clicks on the link, instead of, for example, pre-opening it (like a PDF file). By giving a name to the attribute, we are thus giving a name to the loaded object. It is allowed to use the attribute without specifying its value. |
| href | Specifies the URL for the link. An absolute or relative link can be specified. |
| hreflang | Specifies the language of the linked web document. Used only in conjunction with the href attribute. Accepted values \u200b\u200bare an abbreviation consisting of a pair of letters representing the language code. |
| media | Determines what types of devices the file will be optimized for. The value can be any media query. |
| rel | Supplements the href attribute with information about the relationship between the current document and the linked document. Accepted values: alternate - a link to an alternative version of the document (for example, a printable page, translation, or mirror). author - link to the author of the document. bookmark is the permanent URL used for bookmarks. help - link to help. license - a link to the copyright information for this web document. next / prev - indicates the relationship between individual URLs. With this markup, Google can determine that the content of these pages is linked in a logical sequence. nofollow - prohibits the search engine from following links on this page or a specific link. noreferrer - indicates that following the link, the browser should not send the HTTP request header (Referrer), which records information about which page the site visitor came from. prefetch - indicates that the target document should be cached, i.e. the browser in the background loads the content of the page to its cache. search - Indicates that the target document contains a search tool. tag - indicates the keyword for the current document. |
| shape | Sets the shape of the hotspot on the map and its coordinates. It can take the following values: rect - active area of \u200b\u200brectangular shape; circle - active area in the form of a circle; poly - active area in the form of a polygon; default - the active area occupies the entire image area. |
| target | Indicates where the document will be loaded when following the link. It takes the following values: _self - the page is loaded into the current window; _blank - the page opens in a new browser window; _parent - the page is loaded into the parent frame; _top - the page is loaded into the full browser window. |
| type | Specifies the MIME type of the referenced files, i.e. file extension. |
4. An example of creating an image map
1) We mark the original image on the active areas of the desired shape. The coordinates of the areas can be calculated using a photo processing program, for example, Adobe Photoshop or Paint.
 Figure: 1. An example of image markup for creating a map
 2) Set the name of the map by adding it to the tag
Jpg "alt \u003d" (! LANG: flowers_foto" width="680" height="383" usemap="#flowers">
!}
 Figure: 2. An example of creating a map-image, when you press the mouse cursor on a flower, you go to a page with a description
This tutorial shows you how to decorate a web page by adding graphics to it. We will get acquainted with the most common image formats, find out what tag is used to add pictures to the page, deal with alternative captions and alignment of text and graphics. We will also get acquainted with the main attributes of images and learn how to adjust the width and height of the image. Next, a few words about using images as links and what image thumbnails are. Finally, there are some general tips for using graphics on a web page.
Adding images to a web page
If the web page contains nothing but textual information, it may seem interesting to someone, thanks to the information presented on it, but it is unlikely that anyone would be tempted to call it attractive. It is very easy to add images to a web page. Adding graphics that can give a page a professional look requires some knowledge. What, in fact, is today's lesson devoted to.
The two most commonly used graphic formats on the Internet are GIF and JPEG. The format developed by and named by the Joint Photographic Experts Group (JPEG) is typically used to store images with smooth color transitions, such as photographs.
Almost all other graphic elements are saved in GIF (Graphics Interchange Format), a format for exchanging graphic data. Currently, there is another new graphics format that is gaining popularity: PNG (Portable Network Graphics). It is expected to eventually replace the GIF format. However, do not rush to re-save all your graphic files in this format, while it is still not supported by all browsers.
All images are added to the web page using the same tag called the image source tag  ... Probably now you yourself can determine that this entry consists of the tag itself
 , its attribute (scr), and the value of this attribute (location). However, since the scr attribute is required, it is more convenient to think of this entry as a single common tag. You've also probably noticed that the image source tag does not have a corresponding end tag. This is a separate, self-contained tag, so remember to add a closing slash at the end of it:
.
# 1058; D XHTML 1.0 Transitional // EN "" http://www.w3.org/TR/xhtml1/DТD/xhtml1/transitional.dtd "\u003e First images f\u003e This image was added to my first web page. \u003e 

Adding Alternative Labels
When surfing the Internet, you have probably noticed various inscriptions displayed when you hover the mouse pointer over some graphic element of a web page. These labels usually provide some additional information about the image itself or about the area of \u200b\u200bthe page that it occupies.

The HTML code below shows how the alt attribute is added inside the tag. ... Similar to the src attribute, the alt attribute tells the web browser some additional information about the image, and it can also always be used in conjunction with the tag
.
The alt attribute specifies alternative text for the graphic element added to the web page. This text is called alternative because it can be displayed on the screen as an alternative to the image itself. The alt attribute has another very important purpose. Many Internet visitors using low data rate channels may instruct their browsers not to download or display graphical information. This allows them to speed up the loading of web pages on their computers.
Also, remember that not all browsers are capable of displaying graphics in their windows. For example, the Lynx browser does not support this feature at all. Thus, the alt attribute allows the web designer to be sure that if a visitor to his web page does not see an image on his screen, he can at least see the text information added to that image.
Although the alt attribute can be defined for each tag , be careful not to assign inappropriate text messages to some graphic elements. For example, it doesn't make sense to add alternative text labels to various elements of the external design of a web page. To avoid such errors, you can set the alt attribute of such elements to an empty value (alt \u003d ""). If you do not set any other attributes, the browser renders the image at its original size, aligning the top edge of the image with the top edge of the adjacent text line. You can change both of these parameters using the style sheet tags.
Image Attributes
For tag attributes are provided to resize the image. Some of these attributes are listed below.
height - Specified in pixels or percent - Specifies the height of the image
width - Specified in pixels or percent - Specifies the width of the image.
Adjusting the height and width of the image
The dimensions of the image placed on the web page can be specified using the height and width attributes. The values \u200b\u200bof these attributes are specified either as fixed pixel counts or as a percentage relative to the page size. Take a look at the HTML code below. The first tag sets the dimensions of the original image, which you saw in the previous images of this tutorial, to 60 pixels vertically and 60 pixels horizontally. The second tag sets the width of the same image to 6% of the page width and the height to 10% of the page height. The figure shows how both of these images appear in a browser window.
By displaying the image in its window, the browser does an equally good job of handling the values \u200b\u200bset in both pixels and percentages.Be aware, however, that the computers of your web page visitors may be set to a different screen resolution than installed for your monitor. What follows from this? For example, the monitor has a resolution of 800x600. In the previous example, the image added to the web page was set to a width of 6% of the page width, which would be 48 pixels at this resolution. If you view the same image on a monitor with a resolution of 1024x800, the specified 6% of the page width will correspond to a width equal to 61 pixels.
When resizing the image, do not forget to set both values \u200b\u200bcorresponding to its height and width. If you change only one of these values, the image itself will be stretched vertically or horizontally on the screen. An alternative option is to adjust the size of the image using a graphical editor.
You can create the illusion of faster image loading. Regardless of whether the image is resized or not, always include values \u200b\u200bfor the height and width attributes, as these will tell the browser important information about how much space needs to be allocated on the page to accommodate the image. In this case, the browser will be able to designate the space required for the image and continue building other page elements without stopping the download of the image itself. This gives the impression that the page is loading faster because its visitors do not have to wait until the image is fully loaded to finally see the other information presented on the page.
If you really want the image to fit exactly the right amount of space across the width of the page, use percentages. In this case, on the screen of any monitor, the image will occupy the same part of the page as on your screen. If you want the image's resolution (pixel size) to remain constant, use the pixel values.
Align text and graphics
Tag align attribute Allows you to align the image to the right (right value) or left (left value) edge of the text line. Examples of using this attribute are shown in the figure.
The same attribute can be used to align the image vertically (again, relative to the text string). It can take three other values \u200b\u200btop, bottom and center. If the align attribute is set to top, the top of the image is aligned with the top of any surrounding text. If the align attribute is set to bottom, the bottom of the image is aligned with the bottom of the surrounding text. If the align attribute is set to center, the center of the image is aligned to the center of the text line.
Using images as links
Images are not only good for web page design. They can be successfully used as hyperlinks to other documents. In HTML, this is easy because images turn into hyperlinks in exactly the same way as text boxes. To do this, you must also apply a tag, enclosing a web page element that should become a link to another document. Thus, if the transition to a hyperlink should be carried out after clicking on some image, it is necessary to enclose the tag of this image in the tag.
In this case, after a web page visitor hovers over the image, the text message “This is my self-portrait!” Will be displayed next to the cursor. After clicking on the image, the DOC2.htm document will be opened, which is indicated by the hyperlink.
Image thumbnails
Another common use of HTML's hyperlinking capability is to use some images to navigate to others. What is it for? The fact is that quite often the size of the images you want to publish on a web page is too large, and there is no certainty that visitors will have the patience to wait until they finish loading. In such cases, a small copy of the original image is created, called a thumbnail, which the browser will handle much faster. If a visitor is interested in the image and wants to download a full copy of it, he will only need to click on this thumbnail. This is what the corresponding HTML codes look like.
As you can see, clicking on the thumbnail.jpg image opens another image file (image.jpg). A text string, specified as the value of the alt attribute, tells the visitor how to open the main image.
Secrets of Using Images Successfully
Images are interesting and attractive, carry a lot of visual information and are very easy to add to web pages, but you should still follow some of the following rules if you really want to create a site that will become popular with Internet users.
The larger the image file size, the longer it will take to download it to the user's computer. Since most Internet users still use low bandwidth links to access the Internet, download sizes are still critical to them. Be sure to keep this in mind and try to keep images as small as possible on your web pages.
It is not only the file size of the individual image that matters, but also the total file size of the entire HTML document. The more images are added to the web page, even if they are small, the larger the file size of the final document will be. Preview your page in different browsers and estimate how long it takes each browser to load.
Because the alt attribute is so important (it is recommended that you define it for each tag , be careful when using it. Make sure that the content of the text message always matches the image itself, otherwise visitors to your page may be misled. The same note applies in the opposite direction: make sure the images match the textual information provided on the web page. A photograph of an airplane would be appropriate on an air travel site, and completely redundant on a wildlife site.
You can find many interesting images on the Internet and easily save them on your computer. However, many of these images are copyrighted. If you find an image you like on a commercial site, see if there are any copyright messages there and if this image is available for free use.
If the image on the web page is not copyrighted, you can copy it to your computer. To do this, simply right-click on this image and select the Save Image As command from the menu that opens. After saving the image on your computer, you can use it further like any other drawing.
There are hundreds of image formats, but only a few are supported by web browsers. In this article, we will describe the various graphic file formats that are available to web designers and when they should be used.
Graphic file formats that are supported by most popular web browsers are: Graphic Interchange Format (GIF), Joint Photographic Experts Group (JPEG), Portable Network Graphics (PNG), and vector graphics. Some properties of graphic files:
- Transparency - this property allows an image to be in varying degrees of transparency from solid to fully transparent.
- Compression - This property allows an image to be saved in a much smaller file, using mathematical algorithms to treat a group of pixels as a single element.
- Weaving - allows the image to be loaded first on odd lines and then on even lines. This allows the visitor to see the image more quickly.
- Animation - creates the appearance of movement by taking a series of sequential shots. Animated GIF does not require a browser plugin and can work on almost all devices.
- Progressive Loading - Similar to weaving in that it only downloads part of the image initially, but not on an interleaved basis.
GIF was founded in 1980 and adopted by web designers in the early 1990s as the primary graphics format for web pages. GIF files use a compression algorithm that makes the file size small for fast loading. GIF is limited to 256 colors (8 bit), transparency and interlaced graphics support. It is also possible to create animated graphics using this format. All browsers can display GIF files without any problem.
GIF benefits:
- Most widely supported graphics format
- Diagrams look better in this format
- Transparency support
The files are compressed, but support “true colors” (24-bit) and are the preferred format for photographs where quality is an issue. JPEG supports progressive format, which allows you to see the image almost instantly, which will improve in quality when the download is finished.
Unlike GIF files, web designers can manipulate compressed JPEG files, allowing for different levels of image quality and file sizes.
JPEG advantages:
- Bigger compression means faster download speeds.
- Produces excellent quality for photographs and complex drawings.
- 24-bit color support.
PNG is a relatively recent format that was introduced as an alternative to GIF files. PNG supports up to 24-bit color, transparency, interlacing, and can contain a short textual description of the image that is used by search engines.
Benefits of PNG:
- Overcomes 8-bit color restrictions in GIF
- Allows textual description of images for search engines
- Supports transparency
- Schemes look better than JPEG
Vector graphics
Most web graphics are a bitmap or graphic that is made up of a grid of colored pixels. Illustrations should be created in vector graphics, which consists of a mathematical description of each element that makes up the line shapes and colors of the image. Vector graphics are created using programs such as Adobe Illustrator or CorelDRAW. Vector graphics must be converted to any GIF, JPEG or PNG format for use on web pages.
What format should you use?
A web designer can choose either GIF or JPEG format for most applications. But since GIF files tend to be small compared to the JPEG file size, most web designers will use GIF for backgrounds, boxes, frames, and any other graphics that look great with 8-bit color.
Most designers will choose the JPEG format for photographs and illustrations, where compression does not compromise the visual quality of the image.


