Where to remove startup programs. How to disable startup programs. CCleaner: easily and quickly remove programs from startup
There are several ways, and each has its own merits and demerits, so let's start exploring. The easiest way is to find the Startup folder in the Start menu. All shortcuts found here will be loaded with Windows. Depending on the language of the operating system, this folder may be called "Startup" or "Startup" ..
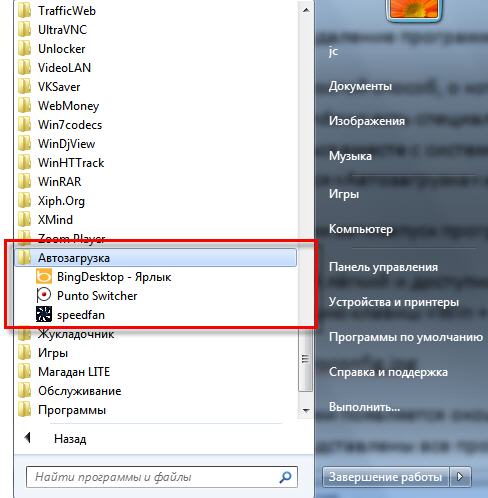
As you can see, I have BingDesktop, Punto Switcher and SpeedFan loading. To exclude a program from the Startup folder, you just need to right-click and delete the shortcut. But when Windows boots, many more processes and programs are launched than are represented in this folder.
Built-in utility to manage startup
This is the easiest and most affordable way for Windows 7. To run the "msconfig" utility, press the "Win + R" key combination and enter the word "msconfig" in the window that appears

A window appears in front of us, in which you need to go to the "Startup" tab. Here are all the programs of the autorun section registered in the Windows 7 registry.

What we see here:
- The startup item is the name of the program
- Manufacturer - software developer
- Command - path to the program with startup keys
- Location - the registry key or folder where this command is located
- Disconnection date - accordingly, the date when this item was disabled by you
Now we find the application in the list, uncheck it and click "OK". Msconfig will prompt us to reboot, but you don't have to.

Controlling startup in Windows 8/10
The beauty of this program is that it finds all possible places from where anything can be downloaded at all and allows you to disable hidden programs with a single click! And it's all completely free! Installation is not required, but during the first launch you will need to confirm the license agreement by clicking the "Agree" button.

You need to run the file "autoruns.exe" or "autoruns64.exe" for 64-bit Windows. The second file "autorunsc.exe" is designed to run in the command line mode. The Autoruns window looks like this:

The upper part contains tabs, each of which indicates the location of the startup objects. These are not only programs, but also libraries (dlls), toolbars, widgets, drivers, services and much more. The first tab “Everything” presents everything in order. On the "Logon" tab, you will find those programs that we could have disabled in previous ways.
In the middle, there is actually a list of programs. To disable the program from autorun, just uncheck it. If the checkbox to the left of the entry is unchecked, then it is already disabled. Lines are marked in yellow that are listed in startup, but their files have been deleted, i.e. they won't load anyway. Programs without a description ("Description" column) or without a manufacturer ("Publisher" column) are marked in pink, which, as it were, hints at a viral origin, but not necessarily that it is a virus.
By clicking on any line with the right button and selecting "Search Online ..." a search bar with the name of the executable file will open in the browser, so that you can analyze how safe the object under investigation is. More detailed information is displayed at the bottom of the window. I told how to determine the level of trust of applications.
Using the "Save" button on the toolbar, you can save the current state of startup, and then compare after a while, in order to find out what has been added. By the way, it's also a very useful tool. I noticed that Autoruns for some reason does not check the launch parameters "userinit.exe" and "explorer.exe", so it is better to check these keys manually, more on that later.
Editing autorun in the registry
Now we are smoothly moving on to manual editing of the registry. Press "Win + R" and enter "regedit" in the line. The registry editor will open in front of you, in which you need to go to the startup section.

There are two of them:
- global for the entire system, from which programs are launched under any user: "Computer \\ HKEY_LOCAL_MACHINE \\ Software \\ Microsoft \\ Windows \\ CurrentVersion \\ Run"
- environment of the current user: "Computer \\ HKEY_CURRENT_USER \\ Software \\ Microsoft \\ Windows \\ CurrentVersion \\ Run"
We go into both registry keys in turn and find in the list on the right the application that needs to be excluded from autorun, and delete the entry using the right mouse button. Below there is one more section called "RunOnce". These sections can contain commands for one-time execution, for example, to complete the installation of a software package. You can search there too, but most likely it will be empty.
Unlike the "msconfig" utility, in the registry editor, we can look at more loopholes from where something can start. I'll show you the two most vulnerable spots, both of which are along the way: "Computer \\ HKEY_LOCAL_MACHINE \\ Software \\ Microsoft \\ Windows NT \\ CurrentVersion \\ Winlogon"
Pay attention to these two parameters:
There should be exactly what you see in the picture (paths may differ). If something else is written after "userinit.exe," or after "explorer.exe", then it will also automatically start with Windows. In 99% of cases, it is a virus! Simple editing of these entries is unlikely to help. After all, if the virus is in memory, it will quickly overwrite the record again. Therefore, you will need a complete one.
What else can you do?
If you tried all these methods, but failed to find and disable the program, then look also at the services and the task scheduler. It is possible that the program is launched from there. Autoruns has corresponding "Services" tabs for services and "Sheduled Tasks" for scheduled tasks.
Without Autoruns, you can easily view services if you press "Win + R" and enter "services.msc" in the window. The "Services" window will open in front of you, in which you need to look for the name of the program you are looking for.

How to start the task scheduler and search for scheduled tasks there.
Also note:
- most startup objects do not start in Windows Safe Mode
- if the program that set itself to autoload is launched again, and it considers that it still needs to be in autoload, then it will be registered there again! Therefore, you need to look in its settings where you can disable autorun.
If you are using any other interesting method, then please tell us about it in the comments.
One of the reasons for the slow operation of the OS is the programs that are present in the autorun. As a rule, not all of them are needed for Windows to work correctly, so some can be removed, which will increase the performance of the computer, it will start up faster and respond to your commands.
You will learn how to turn off the startup of Windows 7 programs below. At the same time, remember that there are service applications, the deactivation of which can lead to malfunctions of the operating system. After clearing the list of automatically included programs, you will notice that it will take much less time to boot the OS.
Why from autorun?
Many applications located in the "Autostart" affect the speed of loading the operating system. You have probably noticed that a computer that was purchased relatively recently starts to boot up less quickly after a few months, and during operation it also “slows down”.

After installing various applications, they are automatically added to "Autostart" without your permission. That is why it is necessary to disable the startup of programs in Windows 7, which you rarely use, or you do not need at all. In the course of their work, all these applications use computer resources, for example, RAM, which affects its performance.
Of course, not all programs in "Autostart" need to be removed, since some of them are really needed, but there are those that must be loaded with the OS. Therefore, before clearing the Startup list, make sure that you do not disable anything important.
Why are apps added to Startup?
As mentioned above, many programs are added to "Autostart" on their own. For example, you download an application, and you are offered another one in the load, which is placed in the "Autostart" without your permission. It's one thing when it's really a necessary program, for example, to control a video adapter. But if you do not need the application, then you need to know how to disable startup programs in Windows 7.
Often, users add programs that they most often need to Autostart. For example, if you constantly need to be on Skype, you can include it in the startup list. But there are also required applications like antivirus or firewall (firewall).
If you are not satisfied with the startup speed of regular "brakes", and you cannot find where to disable the startup of programs in Windows 7, then read about it below.
How programs
So, you decided to get rid of some applications in "Autostart", but do not know how to do it. In fact, everything is very simple. To see what programs you have there, go to the "Start" menu, open "All Programs" and find the appropriate section, which is called "Startup". By clicking on it, you will open a list of all applications in the "Autostart".
If you want to remove the program from "Startup", you can do this using the command line. Call it by pressing the "WIN + R" buttons, and then enter the "msconfig" command there. Click "Enter", the "System Configuration" will open, where you need to go to the "Startup" section.

Now you can turn off the startup of Windows 7 programs yourself. Uncheck the boxes next to those applications that you do not use. By the way, if you do not need them, then remove them through "Programs and Features".
How to disable startup programs in Windows 7 using Autoruns and CCleaner
You cannot remember which keys you need to press to call Or, perhaps, you want to open the list of Autostart programs with just a few clicks. Then you can install one of the free applications on your computer that allows you to do this.

The first program is called Autoruns. It is recommended to download it from the official website. At the moment there is only an English version, but you should not be intimidated, because the interface is designed in such a way that even a novice user can figure it out.

Another popular app is CCleaner. You can also download it from the official website. In order to disable the startup of programs in Windows 7, you need to launch CCleaner and go to the "Service" section. Now select "Startup" and click once on the application that you want to remove from "Startup". There are corresponding buttons on the right.
Before deleting something or, conversely, adding it to Startup, you need to read a few tips from experienced users:
- It is not recommended to remove the anti-virus program from "Autostart", because after loading the OS, you may forget to turn it on, which means that there will be a threat of a virus penetration.
- If you do not know if it is possible to disable a certain program, then look for information about it on the Internet, and then make a decision, because some applications are service applications.
- In addition to cleaning "Startup" from unnecessary programs, it is recommended to enable some services that can be found on the tab of the same name in the "System Configuration" window.
- When you know how to disable the startup of Windows 7 programs, do this operation with all unnecessary applications to ensure the minimum load on the system during startup.
Conclusion
As you can see, it's not difficult to open Startup and remove all the "garbage" from there. You just need to remember one thing and the command "msconfig". After completing these steps, you will notice that the next time your computer boots up much faster, especially if there were a lot of applications in the "Autostart".

Often users, having downloaded a movie from a torrent, forget to close the client itself and remain on the distribution. As a result, web pages open much slower. However, if you remove this application from "Autoplay", then the problem will be solved. That is, when you need to download something, you manually launch the client and close it the same way.
So, now you know how to disable startup programs in Windows 7. It is recommended that you regularly check what you have there. By the way, some applications themselves ask whether to add them to the "Startup" or not.
As you install new programs, your computer may slow down. One of the reasons is the large number of autorun utilities in the list, which take up device resources. Today we will consider what autoloading is, as well as how to optimize it so that resources are not wasted.
Startup: what is this option and how is it useful
The autostart option for programs means opening utilities for further work in them immediately after turning on the computer, in particular, Windows. There is a list of startup programs. The user has the right to edit it himself: add and remove unnecessary utilities. The automatic mode of enabling applications will save you from searching for shortcuts on the "Desktop" in order to launch programs: you have turned on your computer device and you can immediately work in the desired utility.
In the "Startup" tab, you can edit the list with programs that should open when Windows starts
It is important to know that a considerable number of startup utilities negatively affect the performance of the operating system: the utilities included in the list continue to function in the background after autostart and load the central processor. As a result, the device runs slowly, especially if it has poor specifications.
Thus, it is not recommended to include many utilities in the list: no more than 7. Only antivirus will be a mandatory item. All other programs you choose yourself. For example, if you constantly work on the Internet, put your favorite browser in startup.
How to disable autorun utilities in Windows 10 or remove unnecessary software from there
Autoload is a useful option, but sometimes, as we noted above, users are faced with its disadvantages. In this case, problems may appear through no fault of a person: often during installation, utilities are automatically included in the autorun list without the user's knowledge, even if there is no need for it. As a result, even a new computer starts to freeze.
How to be in such a situation? You cannot turn off autoload completely. In this case, only unnecessary programs are removed in any of the following ways, so that the list becomes much smaller.
Through the "Task Manager"
In the "Task Manager" you can not only end program processes, but also customize your autorun list. What exactly do you need to do in this window?
- In Windows 10, the "Task Manager" can be quickly launched through the "Taskbar" (the lower bar on the computer screen, which contains icons of open programs and the "Start" button). Click on the field free of icons on the "Taskbar" with the right mouse button and in the context menu, make a choice in favor of the "Task Manager".
 Select the "Task Manager" item in the context menu of the "Task Pane"
 - You can also open this window in the classic way: hold down the key combination Ctrl + Shift + Delete and select "Task Manager" in the new screen.
- The manager window will have several tabs. As you may have guessed, we need the "Startup" section.
 In the "Task Manager" switch to the "Startup" tab
 - Click on the column above "Status" to sort the list with utilities - it will be convenient to work with it.
 Click on the "Status" parameter to arrange the list
 - Take a look at the apps that are included in startup. Find the ones you don't need. Select them one by one with the left mouse button, and then click on the "Disable" button located at the bottom of the window. If you want to deactivate all applications in this list, repeat the procedure for all items, except for the antivirus, as it should start working immediately after Windows starts.
 Select the program in the list with the left mouse button and click on the "Disable" button
 - Close Task Manager and restart your device.
Video: how to remove programs from the autostart list using the "Task Manager"
Using the "Registry Editor"
You can set up a list with utilities for autorun not only through the usual "Task Manager", but also through a window called "Registry Editor". Even beginners who previously did not know about the existence of this important built-in service can handle this procedure. Let's consider everything step by step.
- To make the "Registry Editor" window appear on the screen of your device, hold down two keys simultaneously: Win (the button with the Windows icon) and R.
- A small "Run" window will open. It will have one line "Open". Enter the regedit command here. Now click on OK or press Enter on the keyboard.
 Enter the command regedit in the "Open" field
 - Click on the left button "Yes" to allow the "Registry Editor" to make changes on this computer.
 Click on "Yes" to allow the "Registry Editor" to make changes on your device
 - The editor window is divided into two parts. We will look for the file folder we need in the left area, where the tree structure is located.
 The "Registry Editor" window is divided into two parts: sections and a list of files with folders
 - First, open the following sections one by one: HKEY_CURRENT_USER - Software - Microsoft - Windows - CurrentVersion - Run.
- As a result, you will see a list of files that are responsible for the autorun of individual applications on the device. As a rule, the name of these files contains the name of the utility, so here it will be easy to determine which items need to be removed.
 Find in the list of registry entries in the Run folder the names of unnecessary programs that should not run with Windows
 - To remove an application from the list, for example, ViStart or CCleaner, right-click on it to bring up a small menu with options. In it, we already select "Delete".
 Click on "Delete" to remove the registry entry
 - Click on "Yes" to confirm the removal of the file from the registry. Don't worry: it won't crash your system. You just disable the launch of the utility.
 Confirm the deletion of the registry entry by clicking on "Yes"
Using the "Startup" folder on the system drive
The folder containing the list of startup programs is located on the system drive. In order not to search for it in Windows Explorer for a long time, we suggest using a quick method that will help you immediately display the desired section on the screen. So what needs to be done:
- On your keyboard, hold and hold for a couple of seconds two keys: Win and R. The already familiar "Run" window will open, with which we launched the "Registry Editor".
- In the "Open" field, write the following: shell: startup. In order not to make a mistake in the command, it is better to copy it and then paste it into the line using the context menu, which is invoked by the right mouse button.
 Enter the shell: startup command in the "Open" field to launch the "Startup" folder
 - This will launch Windows Explorer, in particular the Startup folder.
 In the "Startup" folder there will be a list of programs that start working together with the start of Windows
 - To remove an unwanted application from the list, right-click on it to display a list of options. In it, we already click on the "Delete" item, which is near the end.
 Select "Delete" in the context menu that appears to remove the program shortcut from the "Startup" folder
This method has a big drawback: not all applications that are in the "Autostart" mode are displayed in this folder. Thus, you will not be able to fully edit the list of utilities.
Uninstalling with Task Scheduler
To optimize the list of utilities for autorun along with Windows loading, you can use one more built-in service of the operating system: "Task Scheduler". How to open it and what should be done in its window?
- Open the "Search" section of the "Taskbar". It will be with a magnifying glass icon to the right of the Start button.
 Click on the magnifying glass icon to open Windows Search
 - If there is no such icon, enable it: right-click on the "Taskbar" and select "Search" in the context menu, and then the value "Show search icon".
 Select Show Search Icon
 - Enter the query "Task Scheduler" in the line. It will immediately appear in the results. Open it with the left mouse button.
 Enter the search query "Task Scheduler" in the line
 - In the service window, open the "Task Scheduler Library".
- There will be a list in the middle of the window. Find an unnecessary program in it. Left-click on it to highlight it, and then click on "Delete" or "Disable" on the right third side of the screen. Be careful as you can disable important processes from starting here.
 In the list of programs for scheduled launch along with Windows, disable unnecessary items
Install special programs
You can clean the startup list not only using the built-in Windows tools, but also using special software. Today we will consider two simple and effective utilities as an example: CCleaner and Autorun Organizer.
CCleaner: easily and quickly remove programs from startup
The CCleaner utility is a universal assistant for Windows optimization from the developer Piriform. Its main function is to clear hard drives from "junk" files that accumulate over time and begin to slow down the operation of the device. With this tool, you can easily and easily edit the list with auto-run programs. Use the following instruction to remove unnecessary utilities from the list:
- Download the utility from the official site. Install the program following the simple instructions of the installation wizard.
 Click on the Download Free Version button to download the CCleaner installer
 - Launch the application using the shortcut on the "Desktop".
- Go to the "Service" section and then to the "Startup" tab. A list with programs that open when the device starts up appears in the Windows block.
 In the "Startup" tab there is a list of programs that start together with Windows
 - Select the unnecessary utility in the list with the left mouse button. Then click on the blue "Turn off" or "Delete" button. Repeat this step for each application you want to remove.
 Click on the unnecessary program with the left button and select "Disable" or "Remove" on the right side of the screen
Video: how to disable startup programs using CCleaner
Autorun Organizer: an easy-to-use startup manager
Unlike CCleaner, this tool, developed by ChemTable Software, is only for managing the startup list. This is its main function: it does not clean disks. Nevertheless, the utility copes with its tasks efficiently: even if the program itself is re-included in the autorun list, Autorun will immediately disable it.
The disadvantage of the utility is that during the installation it is proposed to install additional software: Yandex Browser and other related products from this company. However, you can refuse to install these programs by simply unchecking the boxes.
Now we will consider where you can download this startup manager, as well as how to work in its window.

In the program itself
Often the utilities themselves include themselves again in the autostart list some time after you have removed them using any of the above methods (with the exception of Autorun Organizer, since the program strictly monitors this). To exclude them from being added to the list again, turn off the autoload option in the utility itself along with the OS. Usually, each program has an item "Start automatically with Windows".
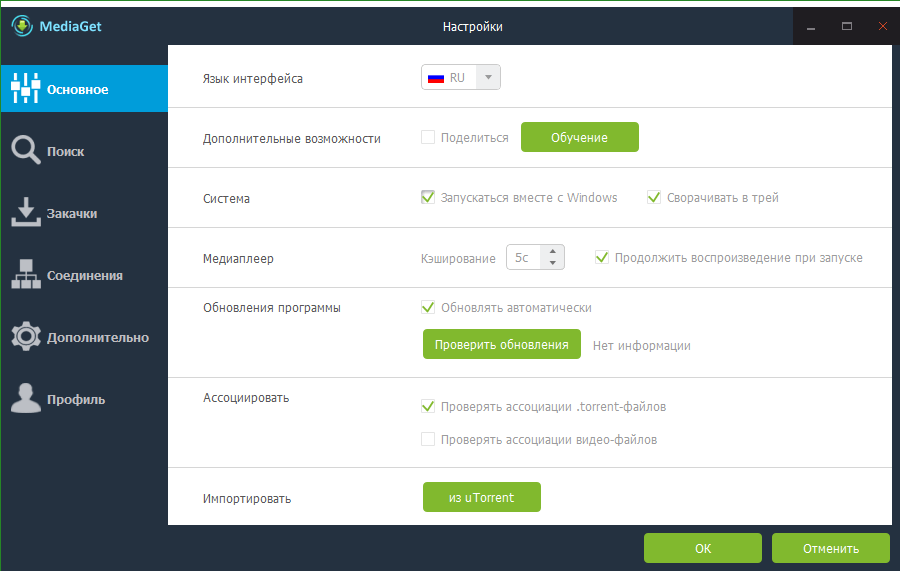
Let's look at the procedure using the example of one of the popular download managers and media player in one tool called MediaGet.
- Open MediaGet from a shortcut on your desktop or in the start menu.
- In the upper right corner, find a small gear-shaped icon.
 Find the gear-shaped icon in the upper right corner
 - Click on it to open the menu. Now click on "Settings" to open the section with options.
 Left-click on the "Settings" item
 - You will immediately be taken to the "General" tab.
- In this tab, in the "System" block, find the item "Start with Windows".
 Find the item "Start with Windows"
 - Uncheck it so that in the future the program does not run in the background immediately after Windows starts.
 Uncheck "Run with Windows"
 - Left-click on the green OK button for the changes to take effect.
You can go into the settings of each program separately and turn off the launch option with Windows to remove them from the list permanently.
If at startup along with Windows there are many utilities you do not need, you need to clean up the list: remove all programs that you do not use, as they take up precious system resources of the computer. This can be done both using standard Windows tools and using special utilities, for example, CCleaner and Autorun Organizer. If you notice that the program is re-added to the list, disable the "Run with Windows" option already directly in its settings.
Many owners of computer equipment have repeatedly wondered why it loaded quickly enough when purchased, and after a short period of time Windows loading became longer. Experienced PC owners know that by installing new software products, which are in urgent need, the execution files are simultaneously included in the startup registry. As a result, these applications start to automatically start in the background along with Windows. Of course, due to this, the additional one increases, in connection with this, its loading time also increases.
Considering that most often the user does not need all these installed applications every day, a completely reasonable question arises of how to remove the program from startup.
A large list of startup programs can affect the performance of the operating system.
Before starting to study the information on how to disable the startup of Windows programs, it is important to understand why this is all done.
Why remove programs from startup
If only a small part of the installed applications start at the same time with the operating system, this is unlikely to irritate the owner of the PC, in some cases, their startup will remain completely invisible to him.
If the number of such programs increases, then the Windows startup time will increase proportionally. And this already causes negative feedback from the PC owner. Unfortunately, many developers of a software product, even without urgent need, include an autoload function in it. As a result, after installation, it starts to start together with the OS.

Now it is quite simple to navigate how to disable startup programs. The green check mark is removed in front of unnecessary applications. Upon completion of all actions, the system will offer to reboot. It is best to do this immediately, then the result of all actions will be immediately apparent. But you can opt out of the immediate reboot, then the changes will take effect after the scheduled system reboot.
Removing with programs
It is also useful to know an alternative way to remove the program from startup. It is carried out thanks to special software products that can be downloaded from various resources, installed and immediately started to implement the plan.
One such software product that makes it easy to disable everything unnecessary from automatic loading is CCleaner. It is good because it is compact, easy to use and highly efficient.

After launching CCleaner, the user should go to the "Startup" tab, where a complete list of software products loaded with the operating system will also be presented.
A user, wanting to delete a particular application, must click on it, the line will turn blue. Now it remains to sequentially press two buttons: "Turn off" and "Ok". Having done such simple manipulations, the user will undoubtedly be able to disable unnecessary applications.
There is another successful Autoruns program that acts as an effective helper if you need to remove something from an automatic download. Despite the fact that Autoruns is not Russified, the interface is quite understandable, so it does not raise questions even for beginners. To remove a software product from automatic loading, you just need to uncheck the box next to it.
Qualified specialists, as well as those who have sufficient practical skills, prevent the installation of programs with an activated automatic start function, turning it off either at the installation stage or immediately after installation by going into the settings of the installed software application.
Removing unnecessary applications from automatic loading is a necessary measure, since with a significant number of them, it is impossible to talk about the successful operation of the operating system.
Over time, after installing Windows, you have many programs installed, some of which are launched along with the operating system. Now, I can even predict why you got to this blog - your computer starts to slow down when you turn it on, and extra programs start along with the system (Viber, uTorrent, Daemon Tools, etc.). Right?
Disable programs from startup Windows 7
This can be done literally in 1001 ways, but as usual, I will write 1 the fastest and easiest way, where you will cope with your task in 1 minute.
To disable unnecessary programs, use the following instruction, which I mentioned earlier:
Open the Start menu and in the search write "msconfig" without quotes (you can copy and paste). Then press "Enter" and go to the "Startup" tab.
You have opened a list of programs that run along with the OS. Carefullylook at those programs that do not affect the operation of the OS (torrent, media, agent @ mail.ru, Viber, Skype, etc.) and disable them.
Click ok and restart your computer.
If this method does not suit you, go to the alternative method (see below).
Remove programs from startup Windows 10
In the top ten, disabling startup is even easier thanks to the built-in editor in the task manager.
- To open the task manager, press 3 keys simultaneously « Ctrl "+"Shift "+"Esc ".
- In the top menu, go to the startup tab and right-click to disable unnecessary programs.

- Restart your computer.
This is a really very simple way, if something is not clear to you, I recorded this video for you:
An alternative method of disabling software autorun
This method is suitable for all OS (Win. XP, 7, 8, 10, Linux, etc.). We will clean the startup using the third-party and familiar program "CCleaner". First you need to download it from the official site (always download the software from the office. Sites).
Choose the free version, which is sufficient and download it.
After installing the program, most likely, for convenience, you will have to change the English language to Russian. To do this, open "Options", then "Setting" and at the top of the drop-down list "Language" you must select Russian.

Then everything is very simple, open the "Service" in the left menu, an additional menu will appear in front of you, where you need to select "Startup". Here is a list of programs that start with the system, click on the extra one that needs to be disabled and in the right menu click "disable". If something is not clear, see the screen below or welcome in the comment.

That's all. As you can see, you don't need to be a “programmer” to cope with such a task. If you still have any questions, or you are just bored, write in the comments)).


