Where is the bcd file located in windows. BCD Boot File from Scratch with Bcdedit
Working on a computer today is undoubtedly an important part of a modern person's life, which opens up unlimited possibilities for him. Nevertheless, this peculiar barrel of honey also has its own spoon of honey in the form of various faults and problems with the operating system and the constituent elements of the PC. In particular, for Windows OS users, a rather common problem is an error with code 0xc000000f in the boot \\ bcd. It arises for various reasons, thereby determining the difference in approaches and methods of its solution.

Causes of the error on the computer
Analyzing the factors that contribute to the occurrence of error 0xc000000f during the next startup or initial installation of Windows, we can come to the conclusion that the reasons for such a problem may be:
- problems with controller drivers;
- automatic reset of system boot settings in BIOS;
- errors in the system disk;
- damage or deletion of the \\ Boot \\ BCD file;
- broken installation disk with Windows image.
In general, knowing what caused the problem, it is quite easy to fix it. At the same time, it should be admitted that not everyone and not always succeed in determining the cause of the error with code 0xc000000f the first time. In this case, the only thing that remains is to test each of the possible ways to solve the problem in action. One will definitely work!
Method # 1: Debug BIOS Settings
So, if after checking the hard drive it turned out that it is in perfect order, the cause of the error 0xc000000f with \\ Boot \\ BCD in Windows XP, 7 and 8 should be looked for in the BIOS. To do this, we restart the computer and by pressing the F1, F2 or Del keys, enter the BIOS. After that, look for the Boot section in the upper BIOS panel and enter it. Next, in the menu that appears, find and open the Hard Disk Drivers item:

As a result, a list of drivers should be displayed as 1st Drive and 2nd Drive. Appeared? Excellent! Then select the 1st line and press Enter. After that, in the window that appears, we find SATA: 4S-WDC WD20EARX-00PASB0 and by pressing the arrow ñ on the keyboard we raise it to the first place in the list. Now press Enter, and then F10 for the changes to the settings to take effect. It remains only to exit the BIOS and restart the computer.
Note that if the reason for the error 0xc000000f in \\ Boot \\ BCD was caused by incorrect system boot settings in the BIOS, as a result of the steps taken, the problems with starting Windows 7, 8 or XP will be eliminated.
Method number 2: Recovering using an installation disc (flash drive)
On computers with Windows 7/8 / XP, you can get rid of the problem with the boot \\ bcd file (error 0xc000000f) using an installation disk or a bootable USB flash drive with an operating system image. In this case, the step-by-step instructions will look like this:
Step # 1: BIOS setup
In the manner described in method number 2, enter the BIOS, open the Boot section and select the Boot (First) Device Priority item in it. After that, using the ñ button, set the CD-ROM parameter (if you intend to use the installation disk) or USB-HDD (if you will use a bootable USB flash drive for recovery). We save the settings, insert the disk / flash drive with the Windows image and restart the computer.
Step # 2: Restart startup
If the BIOS settings were made correctly, when the system restarts, a window will appear prompting you to boot your computer with Windows. We press any key, and then select the item "System Restore" in the installation wizard:

After that, in automatic mode, the system will analyze the problems in the operation of the operating systems installed on the computer and offer to fix them:

If the proposal to correct the error does not appear, manually select the operating system in the list, click "Next" and select the "Startup restore" item in the new window:

Step # 3: Analyze your hard drive
If the startup repair tool did not work, go back to the system restore options and select the "Command Prompt" item from the menu. Next, in the command line that opens, we drive in the chkdsk C: / f task and press Enter:

After completing the task, close the command line and restart Windows. If the error 0xc000000f does not disappear after that, proceed with the configuration further.
Step # 4: Entering the Bootrec.exe command
Repeating the steps indicated in step number 2, enter the command line, drive in the Bootrec.exe task and press Enter:

As you can see from the information provided on the command line, there are four commands to restore the disk structure. It is quite easy to send them for execution. To do this, we drive each of the tasks into the command line one by one, confirming their input by pressing Enter:
- Bootrec.exe / FixMbr;
- Bootrec.exe / Fixboot;
- Bootrec / ScanOs;
- Bootrec.exe / RebuildBcd:

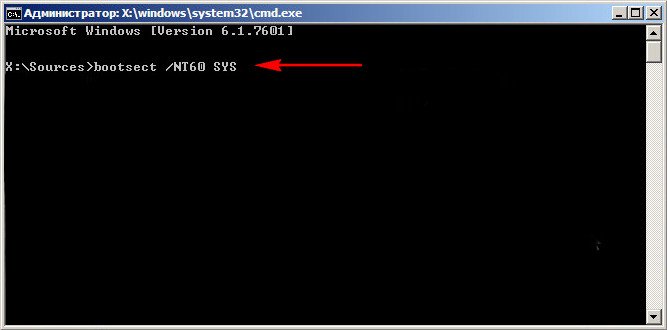
Alternatively, you can use the bootsect / NT60 SYS alternative command to restore boot \\ bcd:

In any case, after executing such a command and exiting the command line, the system will offer to start the operating system in automatic mode. The result is quite predictable - the error in boot \\ bcd will disappear.
Method # 3: Troubleshoot with Easy Recovery Essentials
The Easy Recovery program will help you effectively deal with the error code 0xc000000f in the boot \\ bcd file. You can download it absolutely free straight from the official website. Did you handle it? Then we write the program to a disk (flash drive), insert it into the drive and set the launch parameters in BIOS (see step # 1 of method # 3).
After Windows restarts, Easy Recovery should start automatically. All we need to do is select Automated Repair in the window that opens, click Continue, mark the C drive and click Automated Repair again:

As a result, Easy Recovery will fix the problem with the boot \\ bcd file, which in turn will get rid of the error 0xc000000f:

Note that this program is equally effective for all versions of Windows, including the Vista operating system. However, in addition to Easy Recovery Essentials, you can fix error 0xc000000f with programs such as Paragon Hard Disk Manager; MBRFix; Error Fix 5.3.
How to fix error 0xc000000f on Windows 7, Windows 8, Windows 8.1, Windows 10? It's pretty simple. Read the article and repeat these steps on your computer.
What messages does it give
In English:Recovery
Your PC needs to be repaired
The Boot Configuration Data for our PC is missing or contains errors.
File: Boot / BCD
Error code: 0xc000000f
In Russian:
Recovery
Your computer needs to be restored
File: Boot / BCD
Error code: 0xc000000f

Or
Windows failed to start.
Status: 0xc000000f
Details: The boot menu failed because the required device is not available.

Error 0xc000000f - what's wrong with the computer
Causes
- System boot settings have been auto-reset in BIOS.
- The controller drivers have flown.
- The system disk is damaged.
- System files are corrupted.
- The \\ Boot \\ BCD or winload exe file is deleted or damaged.
How to fix error 0xc000000f
Method # 1. Checking the connection of cables to the hard drive
If you climbed into the system unit or just moved it before the error appeared, the hard drive connection cable may have come off. Open the system unit and check the cable connections to the hard drive.Method # 2. Restoring disk boot settings in BIOS
If you have multiple hard drives, their boot priority in BIOS may have changed. Go to BIOS.To enter, use one of these keys (the keys may vary depending on the developer): Del, F1, F2, Esc, combination Ctrl + Alt + Del, combination Ctrl + Alt + Ins, F10, combination Ctrl + Alt + Esc.
In the BIOS Advanced Setup or Boot section (depending on the developer), we find the Hard Disk Drive Priorities item. We look at which disk is in the boot priority. There should be the one on which Windows is installed. If you don't know what it is called, swap them.

If the error persists, return everything as it was and go to method # 3.
Attention!
Methods 3 and 4 will require a bootable disk or a USB flash drive, if there are none and cannot be done, then go straight to method # 3.Method number 3. Recovery
Find a bootable Windows disk or create a bootable USB flash drive. To create the latter, we use a special utility for creating a bootable USB flash drive.For Windows 8, Windows 8.1 and Windows 10


In the opened black command line window, write chkdsk c: / f / r
We press Enter.

A disk check will run, which will find any errors and fix them.

For Windows 7


On Windows 7, a disk check will run, which will find all errors and fix them.
The error with code 0xc000000f should be gone. If not, try another method.
Method number 4. Using the built-in Bootrec utility
This method also requires a bootable DVD / USB device connected to the computer. The main goal here is to restore Boot Configuration Data (BCD), the file that controls Windows startup.We repeat all the actions described above, but enter in the command line:
bootrec.exe
As you can see, there are 4 options that we all use in the following sequence:
Bootrec.exe / FixMbr
Bootrec.exe / Fixboot
Bootrec / ScanOs
Bootrec.exe / RebuildBcd


Method number 5. Windows boot recovery using third-party software
You can use third-party programs for recovery. Among the most efficient and easy to use, we will name: Acronis True Image, EasyRecovery or Paragon HARD DISK Manager.| Download Acronis True Image (via direct link) | Download EasyRecovery (via direct link) | Download Paragon HARD DISK Manager (via direct link) |
We download any of these programs. We write it to a disk or USB flash drive (which one has). We insert the DVD into the drive, the USB flash drive into the USB port. Reboot your computer. We enter the BIOS, change the startup parameter to DVD or USB, respectively. Save changes and reload. The program should start automatically. Then follow the recommendations of the Recovery Wizard.
We hope that all of the above helped you fix error 0xc000000f on Windows 7, Windows 8, Windows 8.1 and 10.
12/05/2011 Mark Minasi
Running Bootmgr requires operating instructions from a binary file called a Boot Configuration Data (BCD) file. Typically this file is located in the \\ boot folder of the active partition. The Bcdedit command is used to customize the BCD file. Let's see how to build a bootable BCD file from scratch using it.
In the article "Recovering a System Using Bootsect" published in the previous issue, it was about how to recover a Windows 7 / R2 system that has stopped loading. In particular, clarifications were provided regarding the Windows 7 / R2 boot record and the Bootmgr application. ...
A working BCD file usually contains at least two objects. First, it is a boot manager containing all boot information, in particular an indication of which item in the operating system boot list should be used by default, and the timeout for user selection if there are several items in the operating system boot list. Secondly, the file contains at least one operating system boot element. The procedure for creating these objects is described below.
Let's start by deleting all existing BCD files and creating a new empty file. According to the strange property of Bcdedit, you first have to create a new BCD file in some place, and then "import" it, that is, copy all its contents into the "official" BCD file in the \\ boot folder of the active volume. This can be done using two commands entered in an elevated command prompt window:
Bcdedit / createstore bcd bcdedit / import bcd
These commands work regardless of whether the \\ boot \\ bcd folder exists in the correct location, or there are no BCD files on the boot volume. After completing the steps above, the newly created BCD file is no longer needed and can be deleted.
Now let's create a boot manager for the BCD file using the following command:
Bcdedit / create (bootmgr)
Note the / create option in this version of the command instead of the previously used / create store. This option allows you to create different kinds of BCD objects. Using this parameter in combination with the identifier (bootmgr) creates a boot manager. I am omitting the description of using the command with the / d option, which is contained in any example I can find on the Internet. This information is not needed when creating a download manager.
The download manager does not require complex configuration. You just need to specify the boot volume and the waiting time for the user to select an item in the operating system boot list:
Bcdedit / set (bootmgr) device boot bcdedit / timeout 30
Let's move on to creating an operating system boot list item that will instruct the boot manager to boot Windows from files in the \\ Windows folder of one of the system volumes. Typically this volume is drive C, but if booting from Windows Preinstallation Environment (WinPE), you need to check which drive the \\ Windows folder is on, as WinPE may call it D or E.
Let's create an element of the operating system boot list:
Bcdedit / create / d "Windows 7" / application osloader
The / create (no identifier) \u200b\u200band / application osloader options specify that the operating system boot list entry is created for Vista and later Windows. The / d parameter contains a label that the boot manager specifies when offering options for items in the operating system boot list. After executing the command, the system returns a new globally unique identifier (GUID) that needs to be inserted into the following command:
Bcdedit / default ()
At this point, we have a bare object that needs to be set to some values \u200b\u200busing the Bcdedit / set command discussed in previous Bcdedit releases. What values \u200b\u200bshould be set? The answer is simple. We take the output of Bcdedit from a healthy copy of Windows and use it as a model. In my case, the \\ Windows folder is on drive D, so I enter the following:
Bcdedit / set (default) device partition \u003d d: bcdedit / set (default) path \\ windows \\ system32 \\ boot \\ winload.exe bcdedit / set (default) osdevice partition \u003d d: bcdedit / set (default) systemroot \\ Windows bcdedit / set (default) detecthal yes
Finally, we enter the following command so that Windows can "see" the item in the boot list as expected:
Bcdedit / displayorder (default) / addlast
Try this on a test system and you should be able to fix boot issues very quickly.
Mark Minasi (www.minasi.com/gethelp) - Senior Editor for Windows IT Pro Magazine, Microsoft Certified Systems Engineer
Need good advice on how to make repair Windows 7 bootloaderif restoring the startup using the installation disk of the seven did not help. I will briefly explain what the matter is: first Windows 7 was installed on the computer, then the second system needed Windows XP, after installation it naturally started alone, to boot two operating systems I used the EasyBCD program. In the future, XP was no longer needed and I formatted the partition on which it was located from Windows 7. Now, when booting, there is nothing but a black screen. What can be done in this case? More details if possible. Sergei.
Repairing the Windows 7 bootloader
Hello friends! Most importantly, do not worry, your problem is simple and, in principle, a simple tool "Restoring Windows 7 Startup" described in our article should help, but! If this article does not help you, then two others should help:
these articles describe a few more good ways to restore the boot of your operating system, besides them there is another one, so try it and don't just give up.
Let me remind you that you cannot install an older operating system after a younger one, Windows 7 in no case will boot after installing Windows XP on a computer, since the latter overwrites the Master Boot Record (MBR) upon installation. Therefore, you have installed an additional boot manager, which is used to configure the boot of several operating systems and has its own bootloader.
- I also want to say that file system errors are often to blame for the unsuccessful boot of Windows 7, you can fix them even if the operating system does not boot, all the details are in our other article " "
- Friends, in this article we will work with the Windows 7 recovery environment, or rather, with the recovery environment command line. I will give you the necessary commands, but if it is difficult for you to remember them, you can. This will greatly facilitate your work.
- The Master Boot Record (MBR) is the first sector on the hard disk, which contains the partition table and a small loader program that reads in this table the data from which partition of the hard disk to boot the OS, then the information is transferred to the partition with the installed operating system, to download it. If the master boot record contains incorrect information about the location of the system, then we will receive different errors during boot, here is one of them "BOOTMGR is missing press CTR-Alt-Del for restart" or we will observe a black screen. The problem is fixed repairing the Windows 7 bootloader.
When you removed old XP along with EasyBCD, you left your computer to fend for itself with an incomprehensible boot record and it gives you a black screen as a token of gratitude. To rectify the situation, we will conduct load recoverywindows 7, that is, we will overwrite the master boot record using the Bootrec.exe utility located on the recovery disk or on the Windows 7 installation disk (friends, if you have a netbook and want to use the recovery environment on the flash drive, read the comments first). Also, with this utility, we will write a new boot sector, understandable by Windows 7.
Repair Windows 7 bootloader automatically
We boot from the recovery disk or installation disk with Windows 7, in the initial phase of booting the computer, when prompted to boot from the disk "Press any key to boot from CD ...", press any key on the keyboard for 5 seconds, otherwise you will not boot from the disk

There is a short search for installed Windows systems and analysis of problems that prevent them from loading

Problems are usually found quickly and the recovery environment prompts you to fix them automatically. Click on the "Repair and restart" button, after that the computer will restart and Windows 7 will be restored.
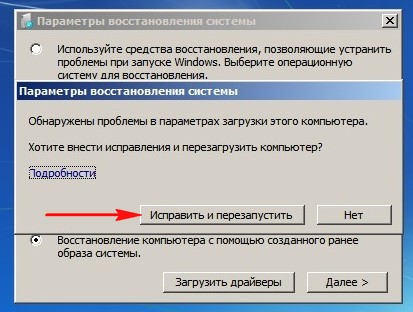
If the problems with booting the system continue or you will not be prompted to fix the problems automatically, then in this window you need to select the operating system that you want to restore, you most likely have one and Next.

First, choose a toolLaunch recovery, it can also solve problems with booting Windows 7

Repairing the Windows 7 bootloader manually
If this remedy does not help, choose a remedy Command line

We enter the commands:
diskpart
lis vol (we display a list of hard disk partitions and see that “Volume 1” is a hidden System Reserved partition, the volume is 100 MB, the Windows 7 boot files must be located on it and it must be made active). We also see a partition with installed Windows 7, it has the letter D :, the volume is 60 GB.
sel vol 1 (choose Volume 1)
activ (make it active)
exit (exit diskpart)
bcdboot D: \\ Windows (where D: is the partition where Windows 7 is installed), this command restores the Windows 7 boot files (bootmgr file and Boot Store Configuration (BCD) files)!
"Download files created successfully"

Restoring the Windows 7 bootloader manually (method number 2)
In the command prompt window, enter the Bootrec command and Enter
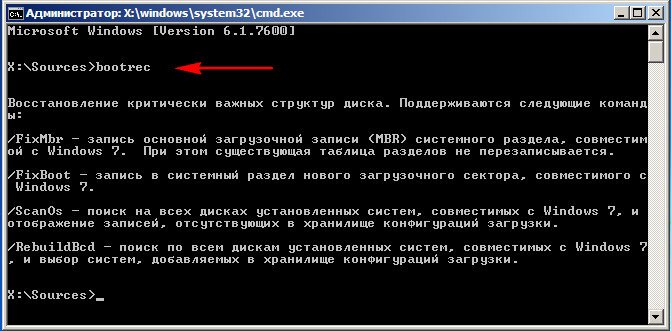
full information about the utility's capabilities comes out. Select the master boot record Bootrec.exe / FixMbr.
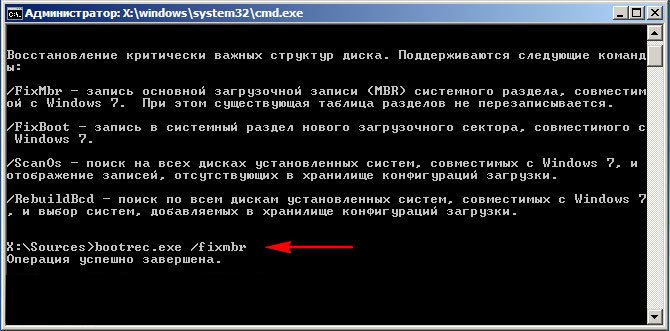
The operation completed successfully. A new boot record has been written to the first sector of the boot partition.
The second command Bootrec.exe / FixBoot writes a new boot sector.

The operation completed successfully. Exit. Next, we try to load our Windows 7.

Friends, if the commands Bootrec.exe / FixMbr and Bootrec.exe / Fixboot do not help you, do not despair, there is one more tool.
Method number 3
Enter the command Bootrec / ScanOs, it will scan all your hard drives and partitions for operating systems, and if any are found, a corresponding warning will be issued. Then you need to enter the command Bootrec.exe / RebuildBcd, this utility will prompt you to add the found Windows to the boot menu, agree and enter Y and press Enter, all found Windows are added to the boot menu.
In my case, two operating systems were found. Everything can be seen on the screenshot.

In addition to the above method, there is one more, enter bootsect / NT60 SYS on the command line, the main boot code will also be updated.
Exit
So, the error is that the first hidden System Reserved partitions should be marked with a red flag on both hard drives. On Windows 7 the volume of such a partition is 100 MB, and on Windows 8 350 MB, these are the partitions that carry the attributes: System. Active and it is on these partitions that the boot store configuration (BCD) files and the system boot manager file (bootmgr file) reside. And we get these attributes are other sections. Because of this, Windows 7 and Windows 8 won't boot.

Select the first hard Disk 1, click on the first System Reserved partition with the right mouse and select "Mark as active"

The System Reserved volume will be marked as active. Click OK.

We do the same with Disk 2. The Acronis Disk Director program works in a pending operation mode, so that the changes take effect, press the "Apply pending operations" button

Proceed.

As you can see, after our changes, those sections that are needed became active.

Exit the program and reboot. The result of the work is positive - both operating systems are loaded one by one.
Related entries:
 How to set up my tele2 unlimited
 The computer does not see the USB flash drive - the reasons and solutions to the problem
 How to connect the Internet for a day from Tele2?
 What to do if the computer does not see the USB flash drive in Windows
 The computer does not see the USB flash drive, what to do


