How to rename a profile name in windows 10. Rename the user's directory on the home version of the top ten
The need to change your username can arise for various reasons. Most often this has to be done due to programs that save their information to the user's folder and are sensitive to the presence of Russian letters in the account. But there are times when people just don't like the name of the account. Be that as it may, there is a way to change the name of the user folder and the entire profile. Today we will tell you exactly how to do this on Windows 10.
Please note that all the actions that will be described below are performed on the system disk. Therefore, we strongly recommend creating a restore point as a safety net. In case of any error, you can always return the system to its original state.
First, we'll look at the correct procedure for renaming a user's folder, and then we'll show you how to avoid the negative consequences that can be caused by changing the account name.
How to change the account name
All described actions must be performed in combination, otherwise in the future there may be problems with the operation of some applications and the OS as a whole.
- First, right-click on "Start" in the lower left corner of the screen. Then, from the context menu, select the line that is marked in the image below.
- A command line will open, in which you must enter the following value:
net user Administrator / active: yes
If you are using the English version of Windows 10, then the command will look slightly different:
net user Administrator / active: yes
After entering, press on the keyboard "Enter".
- These steps will enable the built-in administrator profile. It is present by default on all Windows 10 systems. Now you need to switch to an activated account. To do this, you need to change the user in any way convenient for you. Alternatively, press the keys together Alt + F4 and in the drop-down menu select the item "Change user"... You can learn about other methods from a separate article.
- In the start window, click on the new profile "Administrator" and press the button "To come in" in the center of the screen.
- If you logged in with the specified account for the first time, you will need to wait a while until Windows completes the initial settings. This usually takes only a few minutes. After the OS boots, you need to click on the button again "Start" RMB and choose "Control Panel".

In some editions of Windows 10, this line may not be present, so you can use any other similar method to open the "Panel".
- For convenience, switch the shortcut display to "Small icons"... This can be done in the drop-down menu in the upper right area of \u200b\u200bthe window. Then go to the section "User accounts".
- In the next window, click on the line "Manage another account".
- Next, you need to select the profile for which the name will be changed. Click on the corresponding area with LMB.
- As a result, a window for managing the selected profile will appear. At the top you will see the line "Change account name"... Click on it.
- In the field that will be located in the center of the next window, enter a new name. Then press the button "Rename".
- Now go to disk "C" and open the directory in its root "Users" or "Users".
- On the directory that corresponds to the username, press RMB. Then select the line from the menu that appears "Rename".
- Please note that sometimes you may get a similar error.

This means that some processes in the background are still using files from the user's folder on another account. In such situations, you just need to restart your computer / laptop in any way and repeat the previous point.
- After folder on disk "FROM" will be renamed, you need to open the registry. To do this, simultaneously press the keys "Win" and "R"and then enter the regedit parameter in the field of the window that opens. Then press "OK" in the same window either "Enter" on keyboard.
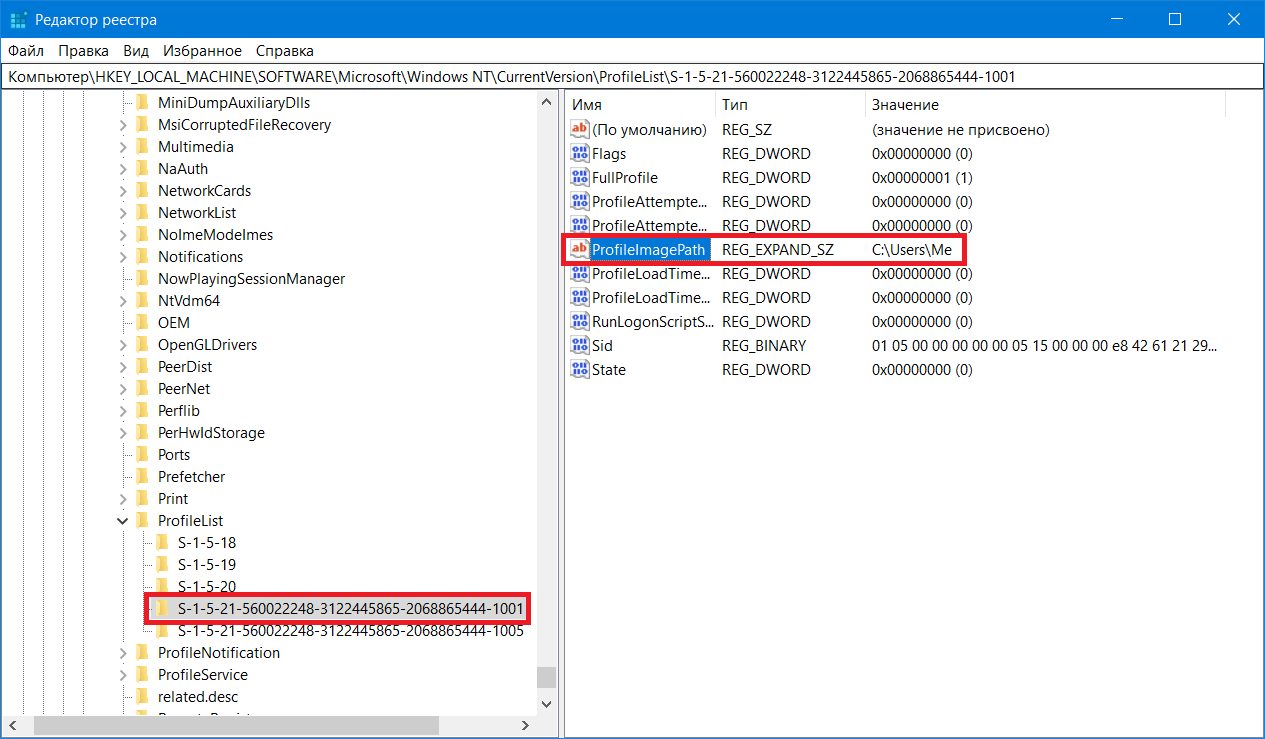
- The Registry Editor window will appear on the screen. On the left you will see a folder tree. You need to use it to open the following directory:
HKEY_LOCAL_MACHINE \\ SOFTWARE \\ Microsoft \\ Windows NT \\ CurrentVersion \\ ProfileList
- In the folder "ProfileList" there will be multiple directories. You need to look at each of them. The folder to look for is the one that contains the old username in one of the parameters. It looks roughly like the screenshot below.
- After you have found such a folder, open the file in it "ProfileImagePath" double clicking LMB. In it, you need to replace the old account name with the new one. Then press "OK" in the same window.
- Now you can close all previously opened windows.


This completes the renaming process. You can now log out of your account "Administrator" and log in under your new name. If in the future you do not need an activated profile, then open a command line and enter the following parameter:
net user Administrator / active: no
Preventing possible mistakes after name change
After you log in with a new name, you need to make sure that there are no errors in the further operation of the system. They can be associated with the fact that many programs save part of their files to the user's folder. Then they periodically refer to her. Since the folder has a different name, this software may malfunction. To fix the situation, you need to do the following:

Having done such manipulations, you will specify the folders and system functions the path to the new user folder. As a result, all applications and the OS itself will continue to work without errors and failures.
This concludes our article. We hope you followed all the instructions carefully and the result was positive.
When setting up Windows for the first time, the user always needs to create a profile in the operating system. A separate profile is created for each individual user, the files of which are stored on the system partition C: \\ Users. Sometimes it happens that a user has to change the name of an already created folder for a number of specific reasons. Most often, this need arises at a time when the system or application is not working properly. Very often the reason for such anomalies is the fact that the user's folder is named using Cyrillic characters. For example, "Taras", not "Taras". Another, more commonplace reason may be the usual desire to use a new name.
There are a few things to keep in mind here:
- If you create a profile using a Microsoft account, Windows 10 will most likely create a folder that will be abbreviated from your email address. It is because of this that many users wish to rename their profile folder. The inconvenient name is especially annoying when the user has to deal with the command line and usernames.
- The name of the account itself can be changed at any time, but renaming does not change the name of the profile folder. That is why the problems associated with Cyrillic characters in the name of the profile folder cannot be solved by simply renaming the account.
- Renaming a linked folder may cause some applications or services to stop working. Therefore, the best solution would be to create a new local profile and then connect your Microsoft account to it.
Easiest way to rename user folder in Windows 10
This method can be called the simplest with reservations. For some, on the contrary, it will seem too complicated due to the need to transfer data and reinstall applications. But we can say for sure that this method will the safest and a win-win. You definitely won't run into problems or problems caused by account renaming. For those who do not have too much information and reinstalling programs will not be difficult, it is best to use this method. It is also recommended after a clean install if you misnamed a user and want to rename his profile folder. In short, the essence of this whole undertaking is to simply create a new user and delete the old one.
How to change user folder name in Windows 10 Pro
When it becomes necessary to rename the user's folder, but creating a new one is not an option, the first thing the user comes up with is the idea to simply rename the folder by analogy with any other file or directory. The trouble is, this method doesn't work with the profile folder. Windows simply won't let you do this.
Note: This method is not valid for Windows 10 Home. Use the method outlined below instead.
First you need to create a new Computer Administrator account. You should have two profiles: the one that needs to be renamed and another profile with Administrator rights.
If you do not want to create a new account, you can activate the hidden Administrator profile, which is installed by default with the operating system. To do this, do the following:

Now you need to log in to the newly created local account with Administrator rights or to the profile activated through the command line. Keep in mind what you need exactly log off from the system, and not just change the user, so save all files and close all applications so as not to lose important information.

This does not end there. The user folder is a very important section of the operating system structure, so its name must be changed not only in the explorer itself, but also in the system registry.
Log in to your previous profile and check if the name has changed. If yes, then temporary profiles can be removed or disabled.
- If you created a new local account, click Win + I and go to section Accounts - Family and Other People.
- Click on the profile in the section Other people and select Delete.
- Confirm the deletion of the account.
- To disable the standard Administrator account, open a command prompt as Administrator (Start - command “CMD” - right-click - run as administrator) and enter the following command: net user Administrator / active: no.
How to change user folder in Windows 10 Home
The first method won't work on Windows 10 Home, so you'll need to use a different method. Please note that in the first case, no unpleasant consequences from renaming the user's folder were found. In the case of Windows 10 Home, programs may crash. For example, the program can inform you about errors in addresses and links. This method too should work on Windows 10 Professional, but we do not recommend using it, since this edition of Windows 10 has its own instructions that do not lead to crashes or problems in applications. Remember, for Windows 10 Home, the best way to rename your profile folder is to create a new one. If something goes wrong and the applications stop working after the rename, you still have to create a new user.
As in the previous case, start by creating a new local account with Administrator rights:
- Click on Win + I and open Accounts - Family and other people - Add a user for this computer.
- Click on I do not have this person's login details.

- Click Add user without account Microsoft... Any name will do, and you don't have to set a password at all.

- In chapter Other people click on new profile and select Change account type.

- From the dropdown list select Administrator... Click OK.

- Alternatively, you can simply activate the standard, but hidden and by default deactivated Administrator account. run Command Prompt as Administrator and then enter the following command: net user administrator / active: yes.
- Now go to the created account and open the Registry Editor. To do this, click Win + R and enter regedit.
- Go to: Computer\\HKEY_LOCAL_MACHINE\\ SOFTWARE\\ Microsoft\\ Windows NT\\ CurrentVersion\\ ProfileList.
- Select your account section from the list and change the setting ProfileImagePath... Enter the name you want to install.

- Now on the left side of the registry editor at the very top, click on Computerand then press Ctrl + F... Enter in search C: \\ Users\\ Old user folder name... Press Enter and change the folder name in every found parameter. This process can be quite lengthy, so please be patient. After each rename press F3 to go to the next parameter.
When you're done, log out of your account and go back to the one you renamed. Check if the profile name changed successfully.
Wondering how to rename a user folder in Windows 10? This refers to the directory located in C: \\ Users, which is named the same as the account from which the user logs into Windows 10. This article will help with this.
Below are three methods to change the name of the directory where the current user's settings are stored to the required one.
Instead of introducing
What is it for? Some applications do not always get access to the stored settings and other files located in the user's directory if the path to it contains Cyrillic characters. In order to force such a program to function normally, you have to change the path to its settings by replacing the name of the user's folder with one that does not contain Cyrillic characters.
The second reason may be a simple reluctance to continue working with such an account name or an error when entering its name.
A third factor in replacing the directory name might be using a Microsoft account. In this case, long names are truncated, and not always successfully.
Never use another account with administrator privileges and programs like Unlocker to rename the user directory. This will lead to the inability to log into the account, the path to the settings of which was changed in this way.
Create a new account with the required name
If the account has been used recently and its deletion is not critical for the user, you can create a new account with the required name and corresponding privileges. After authorization under a new name, the old account can be deleted.
Remember that this will delete all settings and files stored in user subdirectories.
Open the control panel applet called "User Accounts". Follow the link "Manage another account".

Click on the item - Add a new user in the "Computer settings" window responsible for creating a new profile.

We get into the computer settings, where on the "Family and other users" tab, click on "Add a user for this computer".

In the next window, set the name and password of the new user and click "OK".

Then we return to "Computer settings", go to the "Accounts" category, then to the "Family and other users" category, where we press "Change account type" and set administrator privileges to the newly created user.

We log out of the system, log into the Windows 10 environment under the new account and delete the old one, all through the same "Accounts ..." applet.
The proposed method for achieving goals is the simplest, but its use is permissible in rare cases.
We rename the user's directory on the version of the home "top ten"
The option proposed below is only suitable for the Home edition of the "dozen", but its use sometimes leads to the fact that some programs will have to be configured again, since they will not be able to detect the previously created configuration files.
We activate the integrated account or log into the system from an account with administrator privileges. Through the command line, classic explorer, file manager (Total Commander), rename the directory of the required user (renamed to "site"). We call the utility registry editor by executing the command "regedit" in the search bar or in the command interpreter window (Win + R).

Go to the HKEY_LOCAL_MACHINE \\ SOFTWARE \\ Microsoft \\ Windows NT \\ CurrentVersion section. In the subsection "ProfileList" we find the directory that bears the name of your user. Often, subsections here are called free names, where dashes and numbers are used. We check each of them until we see the name of the required account. Double-click on the "ProfileImagePath" parameter, in the window that opens, enter a new path to the user's directory.

Click "OK".
We log out of the system and log into our account, the path to the folder with the settings of which was changed. In order to turn off the account with administrator rights used to log in, enter a command of the form: "net user Administrator / active: no" into the command line, press "Enter".

Renaming directories in Pro and Enterprise editions
As before, create a new profile with system administrator privileges through the "Accounts ..." applet or activate a disabled account.
To activate an unused Administrator account, run the command line on his behalf (via the Win + X menu).

We enter and execute the command: "net user Administrator / active: yes".

We end the current session, or as it is also called, we exit the system using the shutdown button in the Start menu. On the lock screen, click on the "Administrator" inscription to enter the Windows 10 environment with elevated privileges.
Is the Administrator profile not listed? We restart the computer. We go to the Administrator account. We call the Start context menu and select "Computer Management".

Expand "Local Users" → "Users".

Using the context menu of the username whose directory you want to rename, we call the "Rename" command.

Enter a new name and click on the free area.
Using Explorer, rename the user directory located in "C: \\ Users".

We call the registry editor, as in the variant with the home version. We follow the path HKEY_LOCAL_MACHINE \\ SOFTWARE \\ Microsoft \\ Windows NT \\ CurrentVersion. In the subsection "ProfileList" we find the directory corresponding to your account.
There will be several folders with incomprehensible names. We find the right one empirically. This can be understood by looking at the "ProfileImagePath" value.
After double-clicking on the above key, set a new path for the location of the user's directory. We close the registry editor window and log out of the Administrator account through the Shutdown item located in Start. We go into your account, if everything was done correctly, Windows 10 should boot without failures and errors.
Deactivate the account used to change the path to the user's directory by executing the command "net user Administrator / active: no".
On this topic, how to rename a user folder in Windows 10 can be considered closed and exhausted.
More and more people using personal computers are anxious to learn how to change a username in Windows 10, since many of the default logins given by the system do not meet the requirements for work. This operation simplifies the use of the system, allows you to more conveniently and accurately define work groups and devices. There are various ways to change the name in the latest version of Microsoft Windows.
How to change login on Windows 10
The easiest way to change a username in Windows 10 is to change the system account settings. Access to this function is carried out through the "Start" menu, where you need to click on the icon with the avatar and username. You can also go to the system control panel and select "User Accounts".
In the window that opens, you can rename the profile of both your own and other users (if you are logged in as an administrator).
Enter the desired name and confirm by pressing Enter. You will now be able to observe it in the Start menu, on the boot screen, and elsewhere. Computer owners who are interested in how to change the username on Windows 10 should take into account that it is better to indicate any system name in Latin letters. The use of the Cyrillic alphabet is allowed, however, this may cause conflicts with some programs that do not support the Russian language, where the name in this font will be displayed incorrectly. Think about it if you want to get a thorough understanding of how to change your username on Windows 10.
Change computer name and workgroup
To change the name of a computer and a workgroup in Windows, the same sequence of actions is used. Enter the "Start" menu and click on the name of the item "PC Settings". Go to the "System" tab, where you will see the current name of the computer and workgroup. Click "Change settings" to make changes and in the window that opens, rename your computer and, if desired, the account, confirming the action by clicking OK.
Please note that the change made will become active only after restarting the computer.
You can perform this operation immediately by clicking on the button that appears, or later, having previously completed the active applications. If your computer is connected to other devices in the house over a network, you must also remember to rename the network connection (for example, by restarting the router) so that it appears in the network groups accordingly.
Create a new user and delete accounts
If you are interested in how to change the Windows 10 username, be sure to keep in mind that some applications start to work incorrectly after the standard username or workgroup name change. In addition, some of the system folders can no longer be renamed or moved to other directories. If a similar phenomenon is observed on your computer, the best solution would be to create a new account and make it the main one by default (transfer administrator rights). To get started, use the standard capabilities of the system by going to the "Start" menu, clicking on the avatar and selecting "Change account name".
In the window that appears, select the function for changing the parameters. Go to the "Family and other users" tab and then select the option to add a new profile for the current computer. Many people ask questions about how to rename Windows 10 users or create new ones without an online link.

The fact is that by default, when creating a new profile, a computer running Windows 10 automatically binds it to the Microsoft server, connecting to the website of the system manufacturer. This is not convenient for all users, since to access various data, you will need a constantly active Internet connection, so the corresponding option can be disabled.
To avoid syncing with Microsoft servers, create a new profile without specifying an existing email address, and also check the Add without Microsoft account option.
Now you can specify the desired name and, if necessary, set a password, supplementing it with a hint for recovery in case of loss. Give the created profile administrator rights by selecting the "Change account type" option and choosing "Administrator" here. Restart your computer to log on with the new settings.
After creating a new profile, you will most likely no longer need the old one, so you can delete an unused account in Windows 10. Use the account settings window you already know from the Start menu or Control Panel. Here you can go to the options of any profile that is not a computer administrator and select the "Delete" item.
Do not forget to pre-save in a separate folder or removable media all unnecessary profile data from the Users directory on your hard disk, since they will be deleted from the default folder immediately after the current user record is destroyed.


