How to create an FTP connection to quickly exchange files between Android and PC. Which Asus router is suitable for creating a file FTP server
If you often transfer files from your Android smartphone or tablet to your computer, and vice versa, then you do it most likely via a USB cable. Today I will talk about the way you can transfer files (photo, video, music) to the phone from a computer (and vice versa) via a Wi-Fi network, via a router.
We will get full access to files on a smartphone or tablet and will be able to copy, delete, create new files, as if connected to a computer via a cable. Only in our case, we will connect by air, without wires. And the connection will be configured via FTP.
All you need is an Android mobile device, a computer or laptop, and a router. The computer and phone must be connected to the same router. Android is connected via a Wi-Fi network, this is understandable, and a computer can be connected both via cable (LAN) and via Wi-Fi.
On the phone or tablet, we will launch the FTP server using the "ES Explorer" program (this is done in a few clicks), and on the computer we will connect to the FTP server, which we will launch on Android. And that's all, you can transfer files. Please note that you will not have access to files that are on your computer. And there will be access only to files on a mobile device, as to a drive. If you want to access files on your computer, you need to set up a local network. There is some information in the article.
Setting up FTP connection between Android device and Windows
Before proceeding with the setup, you need to decide whether you only want to establish such a connection sometimes, and after each disconnection and connection of the smartphone to the router, enter a new address on the computer, or you will often use an FTP connection and want to create a connection to your devices on the computer. That would then simply run the server on a mobile device, and immediately watch the files on the computer.
If you want to create an FTP connection to your Android device on your computer, and do not enter the address every time, then you definitely need to reserve a static IP address for your phone (tablet) in the settings of your router. So that the router always gives out the same IP for your device.
This is done differently on different routers. Later, I will definitely prepare a separate manual for different routers. Here's an example:
Then we launch "ES Explorer". Open the menu (swipe from left to right), and select "Remote Access". Under the "Status" label there should be the name of your Wi-Fi network. Click on the button "Enable".
The address will appear, which we will now enter on the computer.

This completes the FTP setup on Android. If you click on the button in the form of a "gear" then the settings will open. There are not many of them, but they are useful. For example, you can prohibit shutting down the server, after closing the program, you can configure the port, set the root folder, change the encoding. See more information on the settings under the spoiler.
There is an account setting. By default, an unprotected FTP server is created with anonymous access. Optionally, you can set a username and password, which will then need to be specified when connecting on a computer. But this is optional. And yet, there is a "Create shortcut" item. After clicking on it, a shortcut will appear on the desktop, with which you can start the FTP server with one click.

Let's go to the settings on the computer.
We connect from a computer to a phone or tablet via Wi-Fi
I tested the connection from a laptop on Windows 7 and Windows 10. If you have Windows 8, it will still work. The laptop easily opened the FTP server that was running on the smartphone, and I got full access to the files and could manage them.
Everything is simple here. We open the explorer on the computer, or go to "My computer", "This computer" (in Windows 10), and in the address bar we enter the address that appeared in the "ES Explorer" program on the mobile device. I have this "ftp://192.168.1.221:3721/". You will most likely have a different address.
Look carefully, enter without mistakes. As will enter, press Enter... You will take away all the files of your mobile device. It's the same in Windows 10.

Now you can manage files: copy them from phone to computer, and vice versa. Delete, move, create folders, etc.
But, if you close the explorer window, you will need to enter the address again, which is not very convenient. Therefore, you can create a connection to an FTP server in Windows. After that, the folder of your device will appear, opening which, you will immediately get access to the files. Provided that the server on the phone is turned on.
You can establish an FTP connection using a standard Windows tool. If for some reason the standard tool does not suit you, then you can use third-party programs, such as the "FileZilla" client.
Create a permanent folder with FTP connection to your smartphone
Note! This method will only work if you have reserved a static IP address for your mobile device in the router settings.
Go to Explorer ("My Computer"), and click on "Map network drive".

On Windows 10, this step looks a little different:


Another window will open in which we press "Next". In the next window, double-click on the item "Select a different network location."

An account setup window will appear. If you did not specify the username and password in the "ES Explorer" program, then leave a check mark next to "Anonymous login" and click "Next". And if you specified the data for connection, then specify them.

In the next window, you need to specify a name for the network connection. I wrote something like "My Lenovo". You can enter any name and click "Next". In the last window, click on the "Finish" button.

A folder with files located on your Android device will open immediately. The shortcut to this folder will always be in the explorer. And the files in this folder will always be available when the FTP server is enabled on the mobile device (remote access).

When you want to upload a song to your phone, or see a photo, you just need to enable "Remote Access" on your mobile device and go to the folder we created.
Is it possible to connect a laptop to a phone via Wi-Fi, but without a router?
Yes, you can. If you don't have a router, and you want to transfer files between your Android mobile device and your laptop wirelessly, then everything can be configured a little differently. Rather, the settings will be exactly the same, just the connection needs to be organized differently.
If it is not possible to connect through a router, then you need to organize a direct connection between the laptop and the mobile device. To do this, just start the distribution of the Wi-Fi network on the phone. It seems to me that every smartphone can do this. This function is called differently. Something like "Access Point".
We launch the access point on the smartphone (you don't even need to turn on the mobile Internet so that the laptop does not gobble up all the traffic), and connect our laptop to this access point. Further according to the standard scheme, which I described above. Everything works, I checked it.
Afterword
If you don't often connect to your mobile device to share files, then you can of course use a USB cable. But, if you often need to copy something, then the method described above definitely deserves attention. We click on the icon on the mobile device, and on the computer we immediately get access to the files. Conveniently.
How do you use such a connection? What are the pros and cons? Share your experience in the comments, and of course ask questions.
An FTP server through an Asus router in the AiDisk application is the most optimal way to configure the distribution of files over a local network. In order to enter such a server, you must use the IP address 192.168.0.100 or 192.168.1.100 depending on the model. It should be emphasized here that it is not used to enter the router, but to connect to a file drive. It will not work to enter the settings of the router using it.
Which Asus router is suitable for creating an FTP file server?
The line of Asus routers is very large, you can find a model for every taste and wallet. And about a third of them have a USB port. And this means that having such a router, it is possible to run an FTP server on it to exchange documents between computers.
It is easy to distinguish such models by the letter "U" at the end of the names Asus. It just means that this router has a USB port.
Setting up an FTP server on an Asus router via AiDisk in the old version of the admin panel
Since Asus devices are distinguished by quite good reliability, today you can find quite working models of the release of five or ten years ago. Therefore, in this article, I will show you how to run an FTP server on an Asus router in both old and new software versions.
Login to 192.168.0.100 through AiDisk in the old version of the admin panel
So, in business we have our good old router RT-N10U. All firmwares of this company of the same generation have a similar interface, so the manual will be useful for owners of any models. Those that have a USB connector have the AiDisk utility preinstalled, so it will be easy for you to navigate.
So, we connect the drive - it can be either a simple flash drive, or a full-fledged external hard drive with autonomous power supply from the mains, which is preferable.
We go to the control panel of the router at the address "http://192.168.1.1" and select "AiDisk" from the menu. If the page below does not appear, then you need to wait and restart the setup wizard until the router recognizes the drive.

We press the only available button and select the access mode for the future FTP server.
I prefer the third option, and later it will be possible to set a separate password for those who just want to use the file storage.

Of course, the login and password will need to be changed to your own.
Accessing the Asus FTP server from the Internet
I have already explained that it allows you to replace your white dynamic external IP address with a domain name if you have a white external IP address (read more about DDNS service). If you have a router from another manufacturer, for example Zyxel, then it will most likely support well-known DDNS services, for example no-ip.com, which I have already talked about on this blog.
The Asus router does not support them in the standard firmware, since this manufacturer has its own service. And to support third-party DDNS, you need to install non-original firmware. Therefore, we will register a new account in the asuscomm.com service here. If you do not want the ftp server to work on the Internet, but only around the apartment, then select the option "Skip ASUS DDNS settings". Later, in another section - WAN\u003e “DDNS” tab - you can configure this function separately.

- at the external address http://yourname.asuscomm.com
- or ftp://192.168.1.1 for internal network users, which can be simply entered into a browser.
On some models of Asus routers, for the ftp server to work, you must also set a specific port - by default it is "2121", that is, the final address for internal use in the local network looks like "http://192.168.1.1:2121". In some other models, the IP of the server may differ, for example, the type "192.168.0.100:2121" is also widely used.
We open this page, enter the specified username and password and get into the storage:

Now you can also go to the "USB Applications" section and see the users who are allowed to access files and a list of all documents on the USB flash drive, which is now a full-fledged ftp file server with wifi access.

Also, having selected a specific user, you can set access rights for him to each separate folder. To do this, check the appropriate boxes next to these folders:
- R / W - write and read
- W - write only
- R - read only
- No - no access
Error when it does not go to the address 192.168.l.l00 or 192.168.0.l00
What should I do if I can't log into the Asus ftp server? I will not write about common mistakes in work or incorrect settings.
I noticed that very often people just incorrectly type the ip address of the file storage. For example, instead of the number "1" they write the letter "L", which is very similar in spelling. Like 192.168.L.L00 or 192.168.0.L00. Don't do that. There are only numbers in the address!
Video on creating an FTP server through an Asus router
Today we will focus on a seemingly very commonplace topic, namely the local network.
The local network, LAN (slang. lokalka; English Local Area Network (LAN) is a computer network covering a relatively small area or group of buildings (home, office, firm, institute).
Ask: "What is the connection between LAN and smartphones?" Everything is very simple. When I bought my first Android smartphone (HTC Wildfire), I was very interested in how this “smart guy” is able to closely “communicate” with computers without a sync cable, using only a Wi-Fi module.
After examining it up and down, I noticed that the firmware is not suitable for a networked environment. DLNA appeared only in later versions of Android.
Digital Living Network Alliance is a standard that allows compatible devices to transmit and receive various media content (images, music, video) over a home network, as well as display it in real time.
But I wanted to transfer not only music, but also documents and other files. And many thanks to the third-party developers who came up with a cool Android program that helped me turn what I wanted into reality, “This program combines a file manager with its own archiver, multimedia support and more and more. But its trick is different. With the help of "ES-Explorer" it is very easy and convenient to exchange files over the network and with cloud services (Google Drive, Sky Drive, Drop Box, etc.).
So, we need a computer (OS - Windows, Linux, possibly OS X), a smartphone (Android OS) and a shared Wi-Fi point (router).
Download the application “from Google Play (it's free) and install it on your smartphone.

At the top you see three tabs. By default, there are four of them, but I removed one (FTP), since I do not use this protocol. Let's talk about the LAN and Network tabs. Let's start with LAN.
When you click on the bookmark, we see the following picture:

Here I have added the computers that I use. To do this, you need to click on the second button on the right (with a plus sign), and then a window will appear in which you will be offered to create a server or scan the network environment. I would like to note right away that the scanning process can be lengthy and not always effective. So we select the "Server" item.


Here you are asked to specify the domain name (if you have a DNS server), the server IP address (for example 192.168.0.100), username and password (if your computer requires it), check the "Anonymous" checkbox (about it a bit later) and, in fact, enter the name of the connection (the name that you will display on your smartphone; it can be hit by anyone, for example, “Home computer”).
If you check the "Anonymous" box, it looks like this:

You just need to enter the IP address of the computer and the name of the connection, which is enough to exchange documents between the smartphone and PC. Now you need to share folders or drives on your computer.

Smartphone and PC must be on the same Wi-Fi network
Now we take a smartphone and go to our computer, select a folder or file, hold down the icon.


Now select the action (for example, copy or cut) and go to the PDA tab.

We select the folder where you want to insert the file - and voila, it's on your phone.
The same can be done with cloud servers. Select the “Network” tab.

We add the server in the same way as we added the computer, only here you have to enter the credentials of your account in the cloud service.


After adding cloud servers, you can do the same file sharing steps as with a PC. You can also exchange directly between the cloud and your PC using your smartphone (without downloading information to it).
If you, unlike me, use an FTP server somewhere, then you should know that adding and configuring is the same. The only thing is to check the correctness of the port, username and password (if required). It is much more interesting to get through a browser to a smartphone using FTP. To do this, go to the "ES-Explorer" settings.


We select the settings for remote access (Root rights are not needed).

And we set everything up: select a port (you can use any, but let it stand as it is) and the root folder (the folder into which the first entry will be made). Next, we set up accounts (this is if you want to restrict access to your smartphone), then we set up the encoding (if the browser shows hieroglyphs), and a quick start of the FTP server (creates a shortcut on the smartphone's desktop). To get to a smartphone from a computer, you need to type ftp://192.168.0.102:3721 in your browser (just write down the IP address of your phone, it is indicated in the “Remote access” item).
P.S. And advice to students. If you have a Wi-Fi network deployed at your university, buy yourself a Wi-Fi adapter. This will greatly simplify the task of copying information.
If you find an error, please select a piece of text and press Ctrl + Enter.
Smartphones play an important role in the modern world. In addition to the fact that these devices allow communication at a distance and exchange instant messages, smart phones also perform a number of other functions. First, a smartphone significantly expands the communication capabilities of the device, allowing you to communicate in instant messengers and make video calls. And secondly, the smartphone provides its owner with wide multimedia capabilities, which include: playing music, video recordings, launching video games, using the device as a GPS navigator and much more.
In addition, the phone itself is capable of capturing high quality video and taking high resolution photos. In other words, there is a need.
Synchronization methods
Due to the large amount of data, the file exchange process can be quite lengthy. Even a USB cable cannot fully provide fast data exchange, not to mention the inconvenience of using this method. Regular connection and disconnection of the cable can lead to accelerated wear of the device connector.
Other data transfer methods, such as bluetooth, are not fast enough, which can cause synchronization to take several hours.
The fastest and most convenient way to transfer data can be considered. Unfortunately, stock Android tools do not provide for data exchange between a mobile device and a computer.
To establish synchronization, the user will have to install third-party software, an FTP server or a file manager. One of the most convenient applications is ES Explorer... This program provides several ways to connect a smartphone to a computer at once, via FTP protocol and directly to shared files on the local network. For both the first and the second method, you need a Wi-Fi router.
To connect to a home LAN network, certain computer settings are required.
First, you should call the control panel and go to the network management section, after which, change additional parameters.
In the window that appears, you must select " current profile"And enable network access at all points, then select" All networks"And at the very bottom put a tick on the item" Disable general …».

Now, you need to select any folder on the local disk of the computer, right-click on it and go to the tab “ Access».

Next, you need to click on the " General access»And in the window that appears, specify the users who have access to the selected directory. To have access to a network folder on a mobile device, as a user, you should select “ All", And also, specify the rights to read and write.

In the shared directory, you can copy or move any files that will now be available for download from your smartphone.
To access the network directories, in ES Explorer, you do not need to configure anything, just enter the application, swipe right to expand the toolbar and go to the section " Net».

In this section, you should select the subsection " LAN”, And start scanning the available directories.


The names of the computers connected to the home network will appear in the window, by clicking on one of them, you can see the same shared folder.
The shared catalog can be used both for downloading files from it, and for downloading materials from the smartphone itself. Unlike other methods of data transfer, using a LAN connection, you can move dozens of directories with files and subfolders inside at once.
To make sure of the connection speed, you can put video files in a shared folder, and then open them on your smartphone. The data transfer speed is so high that the files will not open as streaming video, but as a full-fledged video file that can be “scrolled” to the middle or end of the timeline.
In ES Explorer, you can configure access to a full-fledged FTP server, moreover, if you wish, you can make an FTP server from the smartphone itself.
In fact, this method is suitable for those who, for some reason, could not access shared folders on the local network. To start the FTP server, you need to go to the same section " Net", But this time select the subsection" Remote access».

A new window displays the status of the available network and the key " Enable". After switching on, the screen displays the address where you can access the device files.


It is interesting that in the settings, you can select the root directory, so it can be either the phone's memory or microSD.
You can use both a browser and a computer explorer to access the catalogs of your smartphone. Although the explorer is much more convenient, you can use it to drag and drop any files from other sections.
As in the case of LAN, this method allows you to move files both from computer to smartphone and vice versa.
For quick access to the smartphone memory, you can go to the section " This computer"And using the right mouse button add a new element, indicating in the field" the address", The same ftp address from the smartphone screen. Thus, after starting the FTP server on the phone, a person can access it as easily as a local disk.
There are many other tools for transferring data, take at least the file manager for Android total comander or cloud services, but unlike other applications, ES Explorer does not need to install additional modules, and it does not require tedious registrations to work.
How to transfer files between Android devices over Wi-Fi? If both Android devices are connected to the same Wi-Fi network, transferring files between them is a breeze. For the intended scenario to work, both devices (or at least one) must have ES Explorer installed.
The sequence of actions is as follows:
1. Connect to the same Wi-Fi network.
2. On the device from which you want to copy the files, launch ES Explorer and go to the section Net, Remote access.
3. Press the button Enable... You will receive parameters for accessing the FTP server that will run on this device, for example ftp://192.168.0.101:3721.
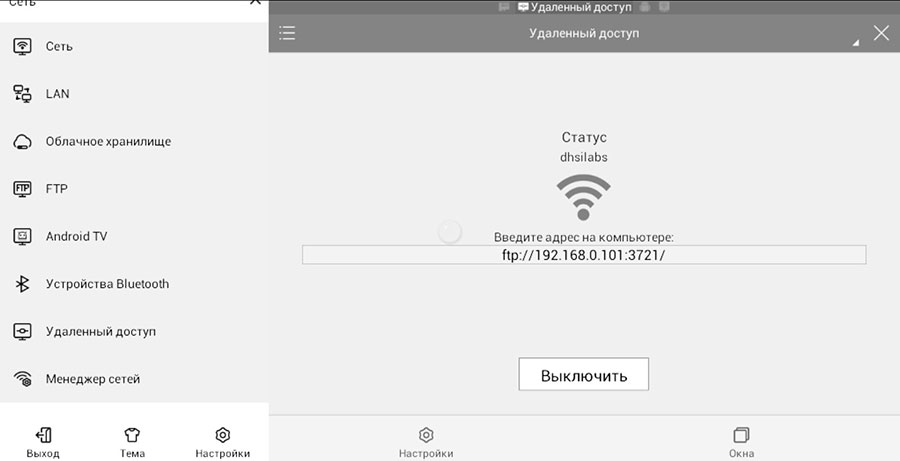
FTP server started
4. On the second device, start any FTP client and connect to the first device using the received parameters.

Protocol selection
5. If ES Explorer is installed on the second device, go to the section Net, FTP and press the button Create a... Select ftp protocol. Enter the access parameters obtained earlier and be sure to turn on the switch Anonymous.

Connection parameters

Added FTP server
6. The added FTP will appear in the list, select it. You will see a list of files on the first device.


