The css width and height parameters for sizing the html elements of the page. Things to Remember
Description
Sets the width of block or replaceable elements (for example, the tag ). Width does not include the thickness of the borders around the element, padding, and margins.
Browsers work differently with width, the display result depends on the used ... Table 1 shows possible options and the resulting width.
| Internet Explorer | Opera 10+, Firefox, Chrome, Safari | Opera 9 | |
|---|---|---|---|
| Not specified (compatibility mode) | If the content exceeds the specified width, then the block resizes to fit the content. Otherwise, the block width is equal to the width value. | In all cases, the browser follows the CSS specification. Namely, the block width is obtained by adding the width, padding, margin, and border values. The content of the block, if it does not fit into the specified dimensions, is displayed over the block. |
The width is equal to the value of width. |
| Transitional HTML |
|||
| Strict HTML |
The width is formed by adding the values \u200b\u200bof width, padding, margin and border. The content of the block, if it does not fit into the specified dimensions, is displayed on top. |
The width is equal to the value of width plus padding, margin, and border. The content of the block, if it does not fit into the specified dimensions, is displayed on top. |
|
| HTML 5 |
|||
| XHTML |
Syntax
width: value | interest | auto | inherit
The values
Any units of length accepted in CSS are accepted as values \u200b\u200b- for example, pixels (px), inches (in), points (pt), etc. When using percentage notation, the width of the element is calculated depending on the width of the parent element. If the parent is not explicitly specified, then the browser window is used as its parent.
Auto Sets the width based on the type and content of the element. inherit Inherits the value from the parent.
HTML5 CSS2.1 IE Cr Op Sa Fx
Lorem ipsum dolor sit amet, consectetuer adipiscing elit, seddiem nonummy nibh euismod tincidunt ut lacreet dolore magna aliguam erat volutpat.
The result of this example, as displayed in the Safari browser, is shown in Fig. 1.
Figure: 1. Block width
Object Model
document.getElementById ("elementID") .style.width
Browsers
Internet Explorer 6 incorrectly defines width as min-width. In quirk mode, Internet Explorer up to and including version 8.0 incorrectly calculates the width of an element without adding padding, margin, and border values \u200b\u200bto it.
Internet Explorer 7.0 or later does not support the inherit value.
Description
Sets the height of block or replaceable elements (for example, the tag ). Height does not include the thickness of the borders around the element, padding and margins.
If the content of the block exceeds the specified height, then the element's height will remain unchanged and the content will be displayed on top of it. This feature can cause the content of elements to overlap when the elements in the HTML code are sequential. To prevent this from happening, add overflow: auto to the element's style.
Syntax
height: value | interest | auto | inherit
The values
Any length units accepted in CSS are accepted as values \u200b\u200b- for example, pixels (px), inches (in), points (pt), etc. When using percentage notation, the height of an element is calculated depending on the height of the parent element. If the parent is not explicitly specified, then the browser window is used as its parent. auto sets the height based on the content of the element
HTML5 CSS2.1 IE Cr Op Sa Fx
The result of this example is shown in Fig. 1.
Figure: 1. Applying the height property
Object Model
document.getElementById ("elementID") .style.height
Browsers
Internet Explorer 6 does not correctly define height as min-height.
In quirk mode, Internet Explorer up to and including 8.0 incorrectly calculates element height without adding padding, margin, and border values \u200b\u200bto it.
Internet Explorer 7.0 or later does not support the inherit value.
This lengthy tutorial article will focus on important topics, the task of which is to organize the methods of working with block elements, explain to the reader what changing the model for calculating the width and height of elements is used for, how to manage overflow of block elements, and how to work with minimal and maximum element sizes.
While exploring the CSS box model, we figured out that the width and height properties set the width and height of the inner area of \u200b\u200ban element ( content area), which can contain text, images and other elements.
In the CSS box model, there is a difference between the width and height values \u200b\u200byou set for an element and the amount of space the browser reserves for displaying it. The total width and height of elements is the area of \u200b\u200bthe browser window, which consists of the width and height of padding, borders, and custom values \u200b\u200bspecified for them.
The total element width is calculated using the formula:
div (width: 150px; / * set the width of the element * / height: 150px; / * set the height of the element * / padding: 10px; / * set padding of the element * / border: 5px; / * set the borders of the element * / }In our case, this saves the situation, and we do not have to perform any calculations, and in the future we are afraid of any changes that may be required for our elements. Let's leave these unnecessary calculations on the browser side and look at the result of our example:
For a final understanding of this model for calculating the width and height of elements, we will consolidate the knowledge gained with the following example:
The value of the content-box property is the default and calculates the total width and height of the element according to the classic scheme. For example, width:
150px (custom width) + 10px (left inner padding) + 10 pixels (padding right) + 10 pixels (left border) + 10 pixels (right border) \u003d 190 pixels.
For the second element, to which we applied a property with a border-box value, the custom width and height of the element already includes the element's content, border, and padding. In most cases, using a property with a border-box value is preferable on pages, as it makes the final dimensions of the element obvious and avoids some of the unexpected situations discussed above.
The result of our example:
Overflow control of block elements
In the process of layout, you will encounter situations when the content of an element will be displayed outside the borders of the element. By default, the browser renders such content (element overflow is displayed), which in some cases leads to visual errors. The overflow CSS property is responsible for this browser behavior. Let's consider its possible values:
Let's take a look at the following example:
overflow: visible
overflow: hidden
Eat some more of these soft French rolls and have some tea.overflow: scroll
Eat some more of these soft French rolls and have some tea.overflow: auto
Eat some more of these soft French rolls and have some tea.AT this example we placed four blocks of fixed width and height, for which different values \u200b\u200bof the CSS overflow property are specified:
- First block (visible value) - content is outside the bounds of the element (default).
- Second block (hidden value) - The content that overflows the element is clipped.
- Third block (scroll value) - The overflow is trimmed, but the scrollbar is added.
- Fourth block (auto value) - as with the scroll value, only the scrollbar will be added automatically if a block overflows along a specific axis ( x - horizontal, or y - vertical), rather than permanently displayed on the page.
The result of our example.
Hi, dear reader.
This is the eleventh lesson learning CSS... In this tutorial, we will look at just two simple but important properties. These properties are responsible for the height and width of the block.
Before you start this lesson, complete the previous lessons:
Theory and practice
In the last lesson, we looked at what the box model is, padding and padding. In this we will consider only two properties: the height and width of the block. Height in CSS is set by the property height , and the width by the property width ... Let's take a look at the code with a real example (let's take an example from the last lesson):
| 1 2 3 4 5 6 7 8 9 10 11 12 13 14 15 16 17 18 19 20 21 22 23 | <html\u003e <head\u003e <title\u003ehome</ title\u003e <meta http-equiv \u003d "Content-Type" content \u003d "text / html; charset \u003d utf-8"\u003e <link rel \u003d "stylesheet" type \u003d "text / css" href \u003d "style.css"\u003e </ head\u003e <body\u003e <div id \u003d "content"\u003e <div class \u003d "firstPar"\u003e <p\u003eAliquam malesuada tellus justo, eget lacinia nunc rutrum a. Phasellus dictum tempor eleifend. Nunc ut magna non purus fermentum egestas ac eu nulla.</ p\u003e <p\u003eFusce est tellus, mattis quis nisl et, egestas posuere libero. Donec scelerisque tellus porttitor massa dictum pulvinar.</ p\u003e </ div\u003e <div class \u003d "secondPar"\u003e <p\u003eCras</ p\u003e <ul\u003e <li\u003eamet condimentum</ li\u003e <li\u003ealiquam volutpat</ li\u003e <li\u003eelementum interdum</ li\u003e </ ul\u003e </ div\u003e </ div\u003e </ body\u003e </ html\u003e |
And in CSS for each block
Let's see how it looks in the browser:

As you can see, we have set a specific height and width. If we set the height less than the text fits, then the text would go outside the block. Experiment with height and width. At first it will be difficult to determine the required size in pixels by eye, but over time you will get used to it.
This is a small and simple tutorial. Try resizing the block yourself and see what happens. Practice is the most quick way learn anything!
Hello dear readers! Today we will look at how to size the block elements of a web page with using css properties and configure the display of content if it does not fit in the element.
width and height - width and height of elements in css
Using the style attributes width and height, you can set the width and height of block elements, respectively:
width: auto |<ширина>| inherit
height: auto |<ширина>| inherit
Any units of measurement available in css can be used as values \u200b\u200b- for example, pixels (px), inches (in), points (pt), etc.
p (width: 200px; height: 150px)
In addition to absolute units, you can specify the relative value of the size of elements in percent. In this case, the width and height of the element will depend on the width and height of the parent element. If the parent is not explicitly specified, then the dimensions will depend on the browser window.
div (width: 40%;)
Auto gives control over the size of the element to the web browser and is the default. In this case, the size of the element will be such that all of its contents will fit in it.
Let's look at some examples.
Welcome to our car website. Here you will find many interesting and useful articles about cars, about their technical characteristics and features.
Result:
In this example, we've created a div and nested paragraph p with text inside it. For the div, we strictly set the dimensions to 300 by 300 pixels. The p element has both width and height values \u200b\u200bof auto, so as you can see in the screenshot, its width is set to the width of the parent element, and its height is set to fit all the text in the paragraph.
Now let's change css settings for paragraph p and set fixed dimensions:
Layer2 (
background: #eee;
width: 250px;
}
Result:

As you can see, the paragraph width has become narrower and equal to 250 pixels, and its height has increased so that the text will fit, since the height parameter remains equal to auto.
Now let's set the height and width of the paragraph as a percentage:
Layer2 (
background: #eee;
width: 50%;
height: 50%;
}
Result:

As you can see in the picture, the width of the p element is now half the width of the div. And the height has increased to equal 75 percent of the div's height.
When specifying the width and height of any elements in relative units, you may need to specify the minimum and maximum possible sizes. After all, for example, when the browser window is resized, the element size may decrease and increase to such a size that the readability of the site becomes very low.
You can determine the minimum width and height using the min-width and min-heigh attributes:
min-width:<ширина>
min-height:<высота>
Similar style attributes max-width and max-height allow you to set maximum sizes:
max-width:<ширина>
max-height:<высота>
It is clear that when setting the maximum and minimum values heights and widths, the dimensions of the element cannot be greater than the maximum and less than the minimum values.
It is worth clarifying that the task height and width parameters only make sense for block tags, since these parameters are not processed by the browser for inline elements.
It can happen that when you set rigid parameters for the height and width of an element, the content it contains may not fit into the limited area.
For example, let's reduce the size of paragraph p from the above examples to 100 pixels:
Layer2 (
background: #eee;
width: 100px;
height: 100px;
}
Result:

As you can see, the text has gone beyond the boundaries of the paragraph and it doesn't look very nice. To avoid such situations, there is a css rule - overflow.
Overflow option to hide (hidden, visible) or scroll (scroll, auto) content
Content overflow can occur when both the width and height of an element are constrained. Consider two paragraphs:
First paragraph text
Second paragraph text
Result:
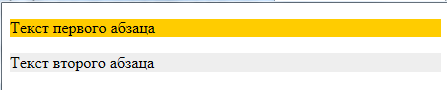
Since neither width nor height is specified for paragraphs, the browser calculates them on its own based on its own understanding of the value of auto. As a result, the paragraphs took up all the available space in width and in height in accordance with the content they contained.
Now let's limit the width of the first paragraph:
First paragraph text
Second paragraph text
Result:

As expected, the width of the paragraph has decreased, and the height has been adjusted to accommodate all the text.
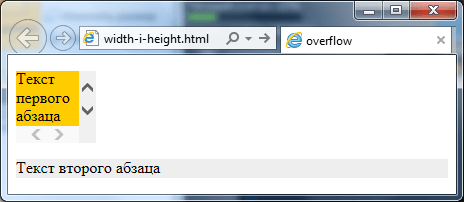
Well, now let's limit the height of the first paragraph:
First paragraph text
Second paragraph text

As a result, it turned out that the text does not fit into such a limited paragraph, and therefore it ran into the area of \u200b\u200bthe lower neighbor. Accordingly, it is practically impossible to read the text in either the first or the second paragraphs. It is to control the behavior of content in such situations that there is overflow rule:
overflow: visible | hidden | scroll | auto | inherit
By default, overflow is visible, which tells the browser to display content that does not fit in the container. The result can be seen in the example above.
The rule hides everything that does not fit in the container:

The scroll value will display scrollbars vertically and horizontally on the element, even if the entire content fits:
First paragraph text
Second paragraph text
The most popular and logical solution, if you need to make scrollbars for a container, is auto... In this case, the browser itself will determine when and along which axes the scrollbars should be displayed:
First paragraph text
Second paragraph text
Result:

You can also use the overflow-x and overflow-y style attributes to customize scrollbars, which allow you to customize the display of scrolling along individual axes. Thus, it is responsible for horizontal axisand for vertical axis.
Therefore, if, for example, you need horizontal scrolling never to appear in a paragraph, and vertical scrolling to appear only when necessary, then just write the following css rule:
p (overflow-x: hidden; overflow-y: auto;)
And the task will be solved.
That's all. Until next time. Do not forget to subscribe to blog updates and I will be grateful if you use the buttons of social networks.


