Step-by-step installation of Wordpress on Denver. Installing WordPress on Denwer. Installing WordPress on hosting: step by step instructions
Today I provide a detailed guide to installing wordpress in Denver. In previous articles we talked about (denver) and.
If you missed these lessons or do not know what this is about, I advise you to read these lessons.
In order to install wordpress on denver, you first need to download the engine itself. You can download it from the official website ru.wordpress.orgwhere you will find the most recent version.
After you have downloaded the engine, you need to unpack it into a folder on the local server (the folder in which your site will be located).
If you have not created it yet, then go to the directory C: \\ hosting (here I installed Denver) next "home" > "Localhost" > "Www" > and here we create any folder for the site.
I have it let it be called "My-site.ru" so the path to install WordPress will be like this:
| C: \\ hosting \\ home \\ localhost \\ www \\ my- site. ru |
C: \\ hosting \\ home \\ localhost \\ www \\ my-site.ru
Extract all files from the wordpress zip archive to this folder, this is how it will look

Now you need to create a database, since the wordpress engine uses it for its work. I described how to do this in the previous article "Configuring phpmyadmin and MySQL database".

In the address bar of the browser, enter the address of the folder into which we unpacked wordpress (the folder with our blog)
http: //localhost/my-site.ru/
And a message appears in front of us that the settings file has not been installed wp-config.php.
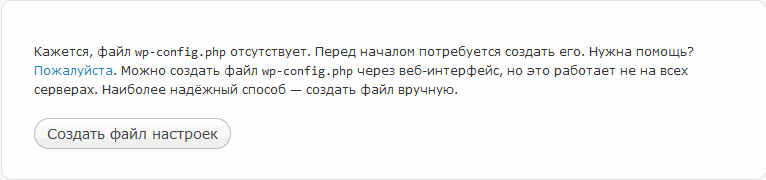
Now I will show two ways to configure this file in order to connect the database to the wordpress blog. The first will be done using a browser. And in the second method we will create and edit the wp-config.php file ourselves
1. Connecting the database to the wordpress blog
After that, as we, referring to the folder with our blog, at
| http: // localhost / my- site. ru / |
http: //localhost/my-site.ru/
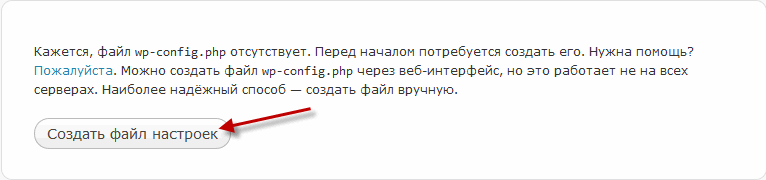
in the message that appears, click.
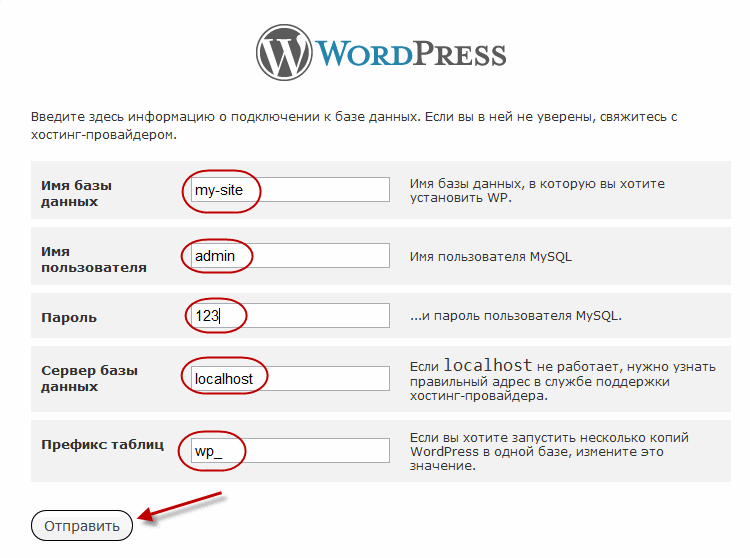
The installation wordpress window will appear, it will warn you that further we need to specify: "Database name", "Database username", "Database password", "Database server address".
We created all this data in the previous lesson when we created the database in phpmyadmin. We press the button "Forward!"

Now we have to fill in the information about the connection to the database.
In the "Database name" field - enter the name that you assigned for the database (my-site).
In the field "Database username" - enter the name that you assigned to the user (admin).
In the field "Password to the database" - enter the password that was invented when creating the database (123).
In the field "Database server address" - enter localhost.
Leave the "Table prefix" field unchanged (wp_). We press the button "Send".
In the next window, click
2. Connecting the database to the wordpress blog
Having unpacked the downloaded wordpress archive into the my-site.ru folder (you may have a different folder), we need to create and configure the file wp-config.php.
To do this, find (in the folder with our blog) the wp-config-sample.php file and rename it to wp-config.php.
Now open it (a file named wp-config.php), for this I use the Notepad ++ program and fill in the following fields:
Database name for WordPress
Here we indicate the name that you assigned for the database in the phpmyadmin panel. Find the line define ("DB_NAME", "database_name_here"); where we change database_name_here to our name (I have my-site).
Find the line define ("DB_USER", "username_here"); where we change username_here to the name that was assigned to the user in the phpmyadmin panel (I have admin).
Find the line define ("DB_PASSWORD", "password_here"); and change password_here to the password that was set when creating the database in the phpmyadmin panel (I have 123).

Since we are using a local server, then in the line define ("DB_HOST", "localhost"); localhost must be specified.

Database encoding for creating tables
We use utf8 encoding, so you should have a line like this: define ("DB_CHARSET", "utf8");
If everything is done, then save the file.
Now open any browser and specify the path to your blog folder in the address bar
| http: // localhost / my- site. ru |
http: //localhost/my-site.ru
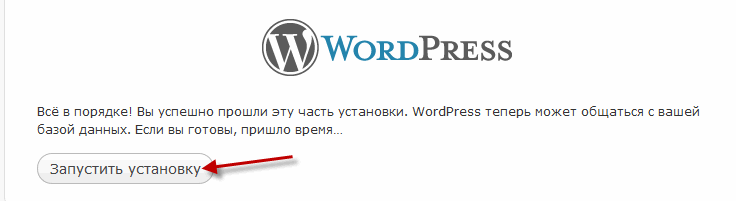
It doesn't matter which way you connect the wordpress database first or second, all the same, in the end you will come to this window, in which you need to enter the data to enter the admin area of \u200b\u200bwordpress.
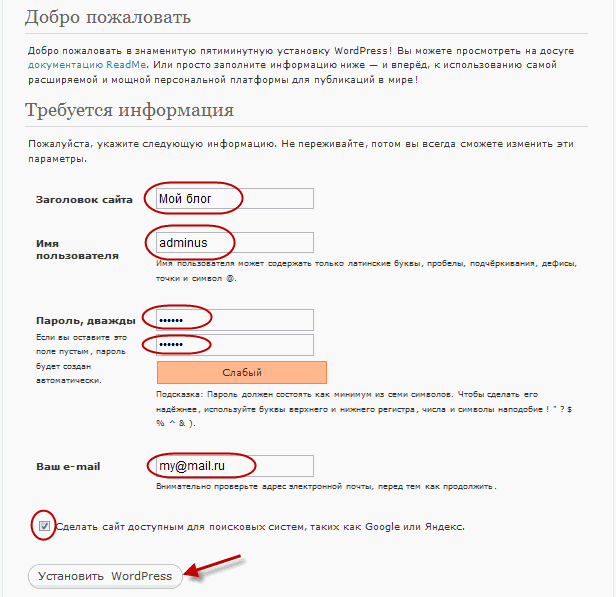
Site title - we indicate the name of the site, it can be changed in the future.
Username - specify any name to enter the administrative area of \u200b\u200bthe engine.
Password - specify any password to enter the admin area wordpress.
Your e-mail - indicate your e-mail. This e-mail will receive messages from visitors, etc.
After filling in these fields, click the button below "Install WordPress"... After the installation of wordpress is over, this message will appear, in which we click "To come in" Today you learned how to install wordpress on Denver, if you have any questions, ask, I will help everyone, but for today that's all. Next time, we'll look at how to do the initial WordPress setup to stay up-to-date. subscribe to update blog articles. Bye everyone!
I think you have completed the task, since without completing the previous lesson, you simply cannot do lesson number 5. Now let's move on to the direct installation of WordPress itself, which I talked about from the very beginning of blogging.
2. Now copy the contents of this folder into a folder, let's call it “web” (we create this folder ourselves at D: \\ Server \\ home \\ localhost \\ www \\. That is, what was in the downloaded archive is now located at address: “D: \\ Server \\ home \\ localhost \\ www \\ web.” Folders wp-admin, wp-content, wp-includes and other files should be located at the following address: “ D: \\ Server \\ home \\ localhost \\ www \\ web", and NOT IN THE WORDPRESS FOLDER! 

3. Now you need to start, click on the desktop “Start Denwer
6. Now open the address http: // localhost / tools / phpmyadmin /. The program for creating the database will open in the browser.
7. We name the database for example "web", and click the "create" button, as shown below:
9. There we change the settings to the following values
// ** MySQL settings - you can get them from your hosting provider ** // / ** Database name for WordPress * / define ("DB_NAME", "web"); / ** MySQL username * / define ("DB_USER", "root"); / ** MySQL database password * / define ("DB_PASSWORD", ""); / ** MySQL server - sometimes you need to change this value. for example on Masterhost * / define ("DB_HOST", "localhost"); / ** Database encoding used when creating tables. * / define ("DB_CHARSET", "utf8");
10. Also, for safety, you need to change the lines where it says ‘izmenite na unikalnuyu frazu’ (I showed these lines below). And moreover, they need to be changed so that all this is unique. That is, no need to copy what is below, just paste a dozen completely different English letters into the words ‘izmenite na unikalnuyu frazu’! I repeat, there should not be any coincidences with others, just insert ANY letters, preferably more than 7. These lines look like this for me (yours should not match mine):
Define ("AUTH_KEY", "izmenccfg2sdfsdf34hfghite eto na unikhfghalnuyu frazu"); define ("SECURE_AUTH_KEY", "izmxenrwerifghfhdsfste eto nhdhfga unikalnuyu frazu"); define ("LOGGED_IN_KEY", "izmenfghwssdfsdrewfgixxte eto na ufghfgnikalnuyu frazu"); define ("NONCE_KEY", "ieto na ungfhikalnuyu frazu");
11. Now go to the encoding tab and select Encode in UTF-8 (no BOM): 
12. Next, save this file under a different name, save it as wp-config.php in the same folder!
13. After saving this file in the browser, type localhost / web and the installer will open, do everything as shown in the figure (you can change them later, do not think too much about the name):
16. Now you can go to your browser at localhost / web and your blog should open. It roughly looks like this:
Congratulations, you have installed WordPress on your local computer! You have become one step closer to your cherished dream. I advise you not to do anything else with your blog for now, the most important thing now, try to think about what topic you will write, and if you are 100% confident in your choice of blogging topics, then I recommend typing about 10 in some simple text editor. articles written by you, and preferably more than 300 words, but not too large (I think, less than 2000 words), you can use Microsoft Word to count the words.
And, if you have not yet decided on your blog topic, I advise you to wait a bit, and we will “together” choose a topic for your blog, conduct an analysis, etc.
Solving all kinds of problems
Problem number 1.The following error occurs: Warning: Cannot modify header information - headers already sent by (output started at Z: \\ home \\ localhost \\ www \\ web \\ wp-config.php: 1) in Z: \\ home \\ localhost \\ www \\ web \\ Decisions
e.edit all files using Notepad ++ only !!!Problem # 2.
When I try to access localhost / web, it says that:Address not found:
You tried to access localhost / web address, which is currently unavailable. Make sure the web address (URL) is entered correctly and try to reload the page.
Decision:
Turn off Skype (Skype) - right-click on the Skype icon near the clock and click Exit. Edit all files using Notepad ++ only!Problem number 3.
I did everything again according to the lesson, but after entering localhost / web into the address bar of the IE browser, the installer does not open, but the page opens:Index of / web
Name Last modified Size Descrition
{!LANG-04d4e115b7f2f8078634ab2a524c7f42!}
Parent Directory
wordpress
when clicking on wordpress, the text appears: Parse error: syntax error, unexpected '<‘ in Z:\home\localhost\www\web\wordpress\wp-config.php on line 24
and Pandy i Skype turned off, and studied the above posts, in short, please tell me what could be the problem?
Decision: The wordpress files were in the D: \\ Server \\ home \\ localhost \\ www \\ web \\ wordpress folder, not D: \\ Server \\ home \\ localhost \\ www \\ web \\, fix that.
Problem number 4. I tried to go to localhost / tools / phpmyadmin, but a blank white screen appears and nothing else.
Decision. Whoever has a blank screen (white) at localhost / tools / phpmyadmin, try to delete your Denver and download it from here: //site/denwer_3.zip. Also check Z: \\ home \\ localhost \\ www, is there a web folder there? If not, create a web directory in virtual disk - Z and copy WordPress there.
Other problems: “Nothing works, I tried all the solutions!”
Decision: Download programs (WP, denwer and notepad) exactly from and, if they were previously downloaded, delete them.
See you in the next blog tutorials!
WordPress is the most popular CMS in the world according to Google for 2019. It is this engine that is most often installed by novice webmasters on their resources. But for inexperienced hands, WordPress can be a real nightmare, because the installation process is not intuitive and obvious.
Installing WordPress on a Local Server: Step by Step Guide
1. It all starts with downloading the necessary software from the official website:
Denwer / OpenServer are toolkits that include:
- the web server itself, such as Apache;
- database management system, it can be MySQL, MariaDB and others;
- PHP modules;
- PHP applications.

They allow you to check the health of your resource. You don't need an internet connection to debug.
2. Setting up a local server isn't tricky. You can see step-by-step instructions for Denver.
5. Then you have to work a little with the file system. At the root we find C: \\ WebServers \\ home \\ and create a folder in it. Its name is the domain of your site, we will use wptest.ru as an example. Inside this folder you will have to create another one with the name www ... Ultimately you should end up with the following folder path www: .
6. Unpack your CMS to a folder C: \\ WebServers \\ home \\ wptest.ru \\ www... Next, we'll take a closer look at the process of installing WordPress on Denwer.
7. Create a new database for the site, for this you need to type in the browser http: // localhost / Tools / phpMyAdmin /. This is followed by the registration process with login and password (login - root, but no password). In the window that opens, we are looking for the line "Create a new database" and write the name in it, in our case it will be: wptest. Nearby is a field in which you must select a comparison with utf8_general_ci. Next, the database is created.
8. This is the final step in which we will complete the installation of WordPress on a local server. To install WordPress, you need to register the domain name in the browser window - http://wptest.ru, after loading the page, click on "Create settings file", then the "Next" button and fill in all the empty fields:
- database name - the database name from step 7 is used (wptest);
- username is the username that you entered when you created your account (root);
- password - your account password (in our case, there is no password);
- database server - leave the default;
- table prefix - also leave everything by default.
Now press the button "Submit", the installation process starts in the window that opens. You just need to enter the name of the site, your own email address, where the password from the administrative panel will be sent. After entering all the data, you just need to click: "Install WordPress".
In order to enter the admin panel of the site you created, you need to follow the link - http://wptest.ru/wp-admin/, and to view the site - http://wptest.ru... This completes the installation of WordPress on Denwer and in the future you will be able to customize the created site at your own discretion.

This is where our step-by-step installation of WordPress on a local server comes to its logical conclusion. In fact, this is a single instruction covering topics such as:
- installing WordPress on Openserver;
- installing WordPress on Apache;
- installing WordPress on Denwer;
- installing WordPress on a local server;
Installing WordPress on hosting: step by step instructions
Since the issue of installing on a local server has been successfully resolved, it remains to find the answer to the remaining one: how to install WordPress on hosting? There is nothing difficult about it, you just have to have a set of necessary tools at hand: hosting, domain, FTP access, FTP manager and WordPress installation files.

1. We create a database in the control panel of our hosting. Usually, to create a database, you need to select your domain, then "MySQL databases" and then "Create Database"... After that, you need to enter the following data:
- database name (for example Michaelch_demowp);
- database username (for example dbuser);
- password of the user to be created (for example 12345).
2. Now we find (among the installation files) the file - wp-config-sample.php, rename it to wp-config.php and edit its settings. You will need to change the following piece of code:
Given the settings used in the example, the appearance of the code will be changed as follows:
// ** MySQL settings ** //
define ('DB_NAME', 'Michaelch_demowp'); // Database name
define ('DB_USER', 'dbuser'); // MySQL username
define ('DB_PASSWORD', '12345'); // password
define ('DB_HOST', 'localhost'); // should not be changed
define ('DB_CHARSET', 'utf8');
define ('DB_COLLATE', ”);
3. The next step in installing WordPress is to upload all the necessary files to your hosting. To do this, it is better to use an FTP manager, in which we enter the initial data (host, domain, hosting username and hosting password, port - 21). After the program is working, you need to open public_html and load the folder with WordPress files into it:
4. After completing the above steps, enter in the address bar of your browser - http: // your_site_address /wp-admin/install.php... You will be required to fill in the lines with the title and email address. After that we press the button "Install WordPress"... Now you just have to go to the address - http: // your_site_address / wp-admin and enter the received data in the appropriate fields.
This concludes the instructions for installing WordPress on hosting.
Conclusion
We hope that after reading this material, all your questions about how to install WordPress on hosting have found their answers. Creating your own resources is one of the vital skills for any successful webmaster. Never neglect the basics if you want to start a successful business.
The article was written a long time ago when I used Denver as a local server for my needs. there are more interesting local builds as of today, but Denver and the Denver WordPress installation remain and may be interesting.
From the author
A WordPress installation in Denver is not much different from a similar WordPress hosting installation. The principle is the same: (1) there is a domain and a site directory, the unpacked WP archive is loaded into the directory, (2) a database is created in the database management system, the data of which is written in the WordPress configuration file.
How to install WordPress on a local site step by step and in detail, you will learn from this article. As an example, I'll show you how to install WordPress on a local Denver server.
We assume that the Denver platform is installed on the local computer.
Installing WordPress in Denver step by step
- Download the latest version of WordPress 4.3.4;
- Create a domain and directory for the local Denver site;
- Create a database from phpMyAdmin Denver;
- Upload WordPress to the local site directory;
- Modifying the WordPress config file;
- Finish the installation by running wp-admin.
Download WordPress
- Download the latest version of WordPress from ru.wordpress.org.
- Unpack the ZIP archive to the "WordPress" folder.
The wordpress distribution is ready for further work.
Create a domain and directory for a site in Denver
For a local site, you need to create a local hosting (aka site domain) and a directory for folders and site files.
To create a local hosting, create a folder with any Latin name in the Z: \\ home \\ directory, where Z is the Denver virtual disk. For example, let's create a domain (directory) WP-denver.
In the created directory, create a folder, this is a directory for folders and files of the created local site.
Using Windows tools, upload the WordPress directory to the local site directory. That is, the unpacked WordPress distribution is loaded into the folder.


Note: Installing WordPress for a local site does not require using FTP. The WP archive is uploaded directly or through any Commander.

Create a database (DB) from phpMyAdmin Denver
Any site needs a database. WordPress is no exception and we will create a database for it in phpMyAdmin Denver.
To log into phpMyAdmin, use the page with hint links http: // localhost / denwer / or type in the address http: // localhost / tools /.
The phpMyAdmin Denver panel is logged in with a name and a blank password.
To create a database, open the "Databases" tab in the upper horizontal menu.
We give the base a Name. You need to select the collation (utf8_general_ci). If you haven't changed the Denver settings, then the mapping is already set correctly. For example, I created a database: wpdenver.


Creating all projects under one user is not correct in working with MySQL, therefore, for each project, we create a new user with full rights (AllPriveleges).
Full rights are set as follows. Open the list of databases (the "Databases" tab) and in the line of the created database, click the "Check privileges" button. Rights must be AllPrivelegis.


Overloading Denver.
DB and user are created. The WordPress directory is located in the local site directory. Let's move on to editing the WP configuration file.
Editing the WordPress config file
Find the wp-config-simple.php file in the WordPress directory and rename it to wp-config.php.

- We enter the data of the created database. In the latest versions of WordPress, the wp-config.php file is well translated and in the explanations you can see where to enter.
- Enter the Database Name, Username, Password.
- We leave hosting, encoding.
- Save the edited file.

Finish the installation by running wp-admin
In the address bar, enter: http: //WP-denver/wp-admin/index.php.WP-denver, this is the domain created for the example.
How the installation of WordPress for a local site is completed, see the screenshots.

Many novice users who decide to try WordPress on their computer for customizing, customizing WordPress templates, testing plugins and other tasks have no idea how to properly install WordPress on their computer. Therefore, we will try to reveal this issue in as much detail as possible.
Training
1. Download Denver from the site http://www.denwer.ru/
What Denver is is a gentleman's web development kit that contains the following distributions: Apache, PHP, MySQL, Perl, etc. Which are used by web-developers (programmers and designers) to debug sites on "home" (local, localhost) computers, without the need for Internet access.
2. Install Denver (you can read more about the installation here - http://www.denwer.ru/base.html).
3. Next, download the latest version of WordPress from the site - http://ru.wordpress.org/
Installation
1. Launch Denver to do this, open the C: \\ WebServers \\ etc folder, and run Run.exe.
2. Next, in the C: \\ WebServers \\ home \\ folder, create a folder with the name of your site - for example wptest.ru
go to this folder and create a www folder in it. As a result, we get the following path: C: \\ WebServers \\ home \\ wptest.ru \\ www  3. Unpack the archive with the latest WordPress version to the C: \\ WebServers \\ home \\ wptest.ru \\ www folder
  4. Create a database, for this, in the address bar of your browser, type http: // localhost / Tools / phpMyAdmin / enter your login and password (by default, the username is root, there is no password). In the window that opens, in the "Create a new database" field, write the name of the database (for example, wptest), in the adjacent field, select the comparison with utf8_general_ci and press the "create" button.
5. Next, launch and install WordPress - for this, in the address bar of your browser, type http://wptest.ru - in the window that appears, press the button "create settings file", then the button "Forward!" fill in all the fields in the window that appears.  In the "Database name" field, enter the name of the database, in our case wptest.
In the "Username" field, enter the database username, in our case, root.
In the "Password" field, enter the database password, in our case, leave it NULL.
Leave localhost in the "Database Server" field.
In the "Table prefix" field, leave wp_, then click the Sumbit button, then in the window that appears, click the "Start installation" button. Next, enter the title of your site and your email (you will receive a password for access to the admin panel on it, as well as information about new comments on the site) and click the "Install WordPress" button. This completes the WordPress installation. We rewrite or copy the login and password and enter your new site - http://wptest.ru to go to the admin panel http://wptest.ru/wp-admin/
This completes the installation, use it!
P.S. If something is not clear or does not work, ask a question in the comments.


