Step-by-step guide to recover deleted files on android. Recuva does not see my phone How to recover deleted files with recuva
Recuva is a free file recovery utility from the developers of the British company Piriform. The fully functional version of the program can be downloaded for free, but there is also a paid edition of Recuva, which adds an automatic update function and support for recovery from a virtual disk.
Recuva benefits
You can download the program on the official website of the developer. The Recuva installation file weighs a little over 4 MB, the installed utility occupies 6 MB of hard disk space. Other advantages include:
- Completely free work.
- Russified interface.
- The presence of a recovery wizard that allows you to flexibly configure the procedure for finding deleted files.
- Ability to add the option "Search for deleted files" to Explorer and the Trash.
The "Search for deleted files" option in Explorer allows you to quickly start scanning a specific folder from which data was erased.
For example, a photo was stored in the Pictures folder. If you accidentally erased a snapshot, right-click on the Images directory and search for deleted files. Only that specific folder will be scanned.
Purpose of the program
Recuva is a universal recovery program that can find and recover files of any format. In one of the windows of the recovery wizard, you can specify what type of files to search for. 
Such a filter allows you to speed up the search for erased data. If, for example, a document created in Word, Excel or one of the LibreOffice applications is deleted, then you just need to mark the appropriate option so that the program does not look for other formats.
Recuva is able to find data that was on a formatted drive.
Some of the files will be damaged, but 90 percent are usually recovered without problems - not bad for a utility that can be downloaded for free. However, in the event of a failure of the file system of a flash drive or disk, it is problematic to return information using this program.
Recovery order
Recuva has a friendly interface, but a small instruction manual will not hurt: it is useful to know how to use the program in order to achieve maximum effect.

After the scan is complete, you will see a list of found data. Each file has a colored circle next to it. 
The color indicates the degree of damage:
- Green - no damage, ready to repair.
- Yellow - there are problems, the file may not open.
- Red - data is damaged, cannot be recovered.
To return files, select them and click "Recover". When restoring data, select a folder that is located on a different drive.
You cannot save the found files to the disk from which they were deleted!
If you are not satisfied with the recovery wizard, you can go to the advanced Recuva mode. To do this, when starting the program, close the wizard window by clicking Cancel. In advanced mode, you can specify which media to scan. Pay attention to the "Settings" button. 
Recuva is designed for recover deleted files, has a pleasant look, simple and ascetic interface, immediately after installation suggested data recovery
I have 2 in the hospital windows 7 one for experiments :), so after a failed experiment, I deleted the system files (standard system file recovery did not help), and the system did not function properly because of this, I decided to try it all the same, although I honestly did not hope for success, since the program is free, and it is intended for file recovery of a different plan, it is unlikely that something will work out, I thought, but still continued to follow the instructions of this program  About system files as you can see nothing is said, but no, no, I continued, I still don’t lose anything, although it is possible that there were some interesting pictures, or the video can be restored, I chose drive C on which the system is installed, as you can see in the screenshot below it is possible recover files from a flash drive but we're not talking about that ...

As you can see, I didn't bother too much and started with data recovery the program started searching for deleted files on the entire disk
 It took me about 15 minutes, during which time the program had to scan the dick and find deleted files, at the end of the scanning process, the flashing icon reminded me of the completed task and I opened the program

As you can see, there are a lot of files - there were lost , these files were marked in red, that's exactly what I needed to restore by selecting them all, I clicked on " recover data"Waited for completion and decided to switch to the" broken "system to see if it would function normally or not ... No, everything remained the same, only photos and unnecessary video were recovered and some other documents, apparently I erased the system specifically)))
Conclusion: You can try file recovery from a flash drive, but not system data.
Convenient free file recovery software (photo, video, music), as well as documents and archives from flash drives for phones and cameras and other gadgets using drives, quickly, simply, conveniently, although not everything can be restored, preferably in hot pursuit, use the program, if deleted, formatted a thousand times this program, and others are unlikely to help. And know that file recovery is better done immediately and not after half a year :)
Another program for recovering deleted files
R.saver Free data recovery software
This program is also free and easy to use to learn more how to recover deleted files with help R.saver I suggest watching a video dedicated to this.
Piriform's Recuva program is one of the worthy representatives of tools for recovering deleted data (for example, after formatting or damaging removable drives). By the way, Piriform has made another good program - Speccy, we have it.
You can download Recuva for free on the official website. There is also a paid version (as of February 2018, its cost is 800 rubles), but it does not provide serious advantages. When installing, do not forget to select Russian and refuse to install CCleaner:
How to recover data with Recuva
After starting the program, a wizard will automatically start to help you recover the lost data. You can specify the type of files you want to recover, this will speed up the search (you can select the types: images, videos, documents, etc.):

Be sure to specify the path to the drive where you want to search, because by default Recuva will search for files wherever possible. It will take a very long time, and it will be difficult to find anything in the huge number of results.
If the files were simply deleted, Recuva will find them without any problems and offer to restore them:

If your drive has been formatted, and in other difficult cases, Recuva will offer you to do an in-depth analysis - agree. It can take quite a long time, depending on the size of the disk:

After the end of the search, click the "Switch to advanced mode" button, you will see something like this:

There can be quite a lot of items, because Recuva will find files and folders deleted long ago. You can sort files by type, size or location. It remains only to select the necessary files and click the "Restore ..." button.
Modern smartphones and tablets are used to store information and process information just as often as computers. Accordingly, the problem of accidental data loss is no less relevant here: valuable photos, videos, important documents - sometimes the loss is irreparable.
As with the return of lost data on a computer, the key to successful recovery of deleted files on Android is the exclusion of further recording to the media. Simply put, as soon as you find that the files you need are erased, you need to immediately pull out the memory card or turn off your smartphone completely. These precautions will help prevent overwriting memory locations.
Using a computer
The easiest way to recover files deleted on an Android device is from a computer. Special programs like Recuva or 7-Data Android Recovery will help to do this. But to take advantage of their capabilities, you first need to enable USB debugging on your phone or tablet - this is necessary for the device to be recognized in the system as a removable disk.
Enabling debugging:
If there is no For Developers section, follow these steps:
- Open "Settings".
- Scroll down the menu to the About Phone section.
- Find the item "Build number" and tap on it 7 times. As you tap, a notification will appear telling you how many more times you need to tap to become a developer.
After enabling debugging, the smartphone connected to the computer will be detected as an external drive from which you can recover almost any deleted data.
7-Data Android Recovery
7-Data Android Recovery, like Recuva, works without root rights, recovering files deleted from media. The only unpleasant moment is that you will have to pay for using 7-Data software.

Save the found data to your computer, not to the phone memory. When the recovery is complete, just transfer the files to your smartphone.
Recuva
The Recuva utility allows you to recover data from any media, incl. from microSD cards and internal memory of the smartphone. The procedure does not differ from the recovery algorithm via 7-Data Android Recovery:

After scanning, you will receive a report on the data found that can be recovered. There is a circle next to each file, the color of which you need to pay attention to:
- Green - information can be restored without problems.
- Yellow - the file is possibly damaged.
- Red - data cannot be returned.
You just have to select the files and click "Recover" to get back the lost information. 
The EaseUS Mobisaver and Undelete for Root Users programs operate in a similar way, however, they require root access, so it is better to first try to solve the problem using Recuva and 7-Data.
Application use
If there is no way to recover files on Android via a PC, then you will have to resort to using special applications. The main disadvantage of this method is the need to obtain root rights - without them, the application will not gain access to memory.
As an example, let's see the Undeleter program, which can recover files from an external flash card and internal memory. Unfortunately, without purchasing the full version, only the function of returning images is available, but if you are satisfied with the work of the application, then a small financial investment should not be a problem. 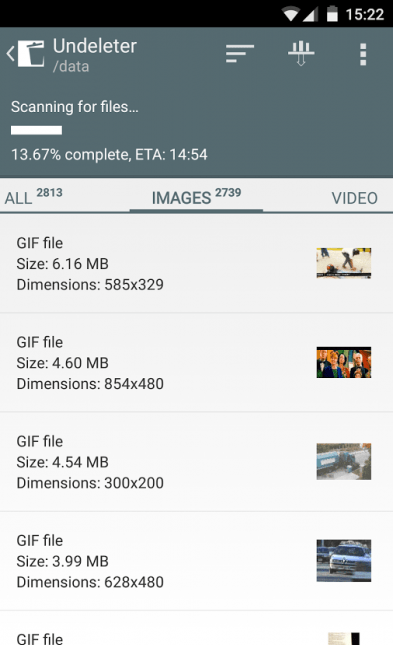
The application interface is friendly to novice users. You need to specify the folder in which the deleted data was stored, after which a memory scan will start. As a result, the program will issue a full report containing files that can be recovered from the phone.
It is often easier to prevent a problem than to deal with the consequences later. Deleting important information is definitely one of those unpleasant situations that should be avoided. Therefore:

Let's take the Dumpster app as an example. After installing it, you specify what types of files are sent to the Trash and how long they will be stored there. If necessary, you do the same as with the Recycle Bin on your computer - empty it or restore accidentally deleted files.
Who among us hasn’t ripped our hair out after a thoughtless press of the "Delete" button? Probably only someone who has never dealt with a computer. Sometimes months of work and tons of valuable files can go down the drain with incorrect finger movement. Well, if you realized it right away, a program for recovering deleted files can help you.
How data recovery programs work
The fact is that, like nature, the computer's file system abhors a vacuum. If you delete a file, then, as a rule, only the file header is deleted from the file system, that is, information about its location on the disk. The file seems to exist, but it does not seem to exist, since it is "without documents". And, until something else is written over this file, it is possible to restore it in rights. For this, special programs have been created like Recuva, which we will consider further.
Installing Recuva
It is best to install this program before the "loss of loss" is detected, as it is possible to install the program over the lost files. That is, it turns out that the doctor came and sat down to the patient with a sore. But, if the files are already lost (as is usually the case), all that remains is to pray that the program is not installed on them.
So, let's move on to installing Recuva... Download the archive with the program from the official Piriform website
and extract from it the folder called Recuva... Go to the folder and run the Recuva.exe file. A window will appear with the choice of the program language. Russian is suggested by default. If there are no objections, click "Ok".
A window appears with a greeting from the program:

Push "I accept", confirming that we agree with the license agreement (otherwise the program will not be installed). The next window will offer to create icons for quick launch of the program and enable automatic check for new versions:

After selecting the necessary checkboxes, click "Install"... At the end of the installation, the last window opens with a proposal to run the program after installation. Push "Done", and here we have a recovery wizard:

Work through the recovery wizard
If you wish, you can skip it and go straight to manual recovery, but, for the first time, it's still better to use its help. Push "Further" and the wizard asks what type of files are we looking for?

Let's say we are looking for lost photos. We choose "Images" and press "Further"... New window asking about the estimated location of the lost files:

As a rule, we remember exactly where they lay (at least approximately). We indicate this place and click again "Further"... Now the wizard is ready to start searching, which he tells us about:

Push "To begin", we observe the search process and as a result we get a list of found files. As a result, we get something like this (although, depending on the settings, it can be in the form of a list, as in the photo below):

Here some of the pictures will be replaced with the inscription "View not available"... This means that some new information has already been written over them, and it will not be possible to restore them. To restore those that were saved, mark them with checkmarks and press the button "Reestablish" in the lower right corner of the window.
The Recovery Wizard will ask you to specify the folder where you want to place the recovered files. We point him to the folder and click "OK"... Now, if you open this folder in "Explorer", you can find the recovered files there.
Advanced file recovery mode
Let's see what is behind the button. "Switch to advanced mode":

Here we see a list of recovered files in the form of a table. In this window, you can view the contents of each file (tab "View"), parameters (tab "Summary") and title.

From here, you can also start a new restore session, specifying the same parameters that the wizard requested.
Recuva settings
Now press the button "Settings" and see what you can customize here. There is no point in describing them, the pictures speak for themselves.
The process of searching and recovering files is very simple, as well as the program interface itself. The search result for deleted files can be sorted by type (graphics, music, documents, videos, archives) and you can immediately view the contents.

If you need to recover many files and at the same time preserve the folder structure, then you need to tick this option in the settings.

To restore, select the files we need with checkmarks and click on the button "Reestablish"

In addition to recovery, Recuva is also able to completely erase files so that they cannot be restored with such programs. To do this, you need to select a method of wiping the magnetic surface of the disk on which the file (s) to be erased is located.

After choosing the method, you need to mark the files to be deleted and select the appropriate item in the context menu (right mouse button).

The program is actually quite simple and intuitive, you shouldn't have any complications.

Sometimes the question is asked why the program was unable to recover something from the lost files? The fact is that on hard drives something is always erased and something is written, some temporary files, some background Internet downloads, etc. AND, since files on the disk are usually stored out of order, but in small fragments, the less free disk space and the longer it takes from the moment of deletion, the more likely it is that the necessary fragments will be overwritten with new ones. Losing any piece of a file is usually tantamount to losing the entire file. Therefore, also small files are much more likely to remain intact than large ones.
Do not install this program on the disk from which you want to recover deleted files, it may overwrite deleted files.


