The nano team editor. How do I use Nano on Linux? (nano text editor). Creating a new file in Nano
The nano editor may well play the role of a shock absorber for a novice user. Yes, it's not emacs, or even joe. But he copes with the task of configuration successfully. And in the development and handling - as simple as a rake. It is no coincidence that many Linux distributions offer it as a system-wide one. In Gentoo Linux, where the need for manual editing of configuration files arises quite often during installation, this is simply the only editor available during the installation phase of the system. In CRUX and Archlinux, however, during installation, it sits next to vi - imitating the original one, and therefore may also be preferable.
The nano editor is launched on the command line with the following syntax nano / path_to_file / file. fig. 1

If you specified a non-existent file, it will be created.
After running the above command, you will see something similar to Fig. 2.

I think there is no point in explaining that moving the cursor, as well as deleting text, is done with the corresponding keyboard keys, as in other editors. The rest of the nano functions are controlled using control sequences, the list of which is taken from http://posix.ru/apps/nano_editor/ and is given below.
There are two types of control sequences in nano - control sequences themselves, Control+ letter, and meta-sequences, Meta+ letter. Through the former, text editing and file operations are carried out. Control sequences are partially duplicated by function keys F1-F16 (call F13-F16 - by combining Shift+F1-F4). Meta sequences are used to change editor settings (the same result is achieved with command line options).
Let me remind you that on a PC keyboard, the Meta-key is usually played by pressing Alt (in some layouts - specifically Alt"and right, or, on the contrary, left), or pressing and releasing a key Escape.
All major Control Sequences are listed at the bottom of the terminal window.
The control sequences are as follows (in parentheses are duplicate function keys and sometimes Meta sequences):
- Control+G (F1) - call the full help menu;
- Control+X (F2) - exit the program;
- Control+O (F3) - write the current file;
- Control+R (F5) - insert a file into the current one;
- Control+W (F6) - search for text in the current file;
- Control+\ (F14 or Meta+R) - replace text in the current file; the replacement text is entered first, then after pressing Enter - replaceable;
- Control+Y (F7 or PgUp) - move to the previous screen;
- Control+V (F8 or PgDwn) - move to the next screen;
- Control+K (F9) \u003d deleting (Cut, cut) the line at the cursor position, saving it to the buffer (cutbuffer);
- Control+U - (F10) - inserting the contents of cutbuffer "a into the line at the cursor position; if the latter has not changed, it plays the role of Undo (undo), which is not normally provided; can also be used for unlimited cloning of lines in an arbitrary part of the text - after deleting, it is enough to move the cursor to the desired place;
- Control+C (F11) - output information about the position of the cursor in the form of vr
- Control+T (F12) - spell check (using an external spelling program, if it is installed and the corresponding option is enabled in the config, see below);
- Control+P - move the cursor one line up;
- Control+N - move the cursor down one line;
- Control+F - move the cursor one character forward;
- Control+B - move the cursor one character back;
- Control+A - moving the cursor to the beginning of the current line;
- Control+E - moving the cursor to the end of the current line;
- Control+L - redrawing the current screen;
- Control+^ (Meta+A) - selection (and placing in the buffer) of the text, starting from the current cursor position;
- Control+D - deleting a character at the cursor position;
- Control+H - deleting a character to the left of the cursor;
- Control+I - insert a tabulation character;
- Control+J (F4) autocomplete the current paragraph;
- Control+M inserting a line feed character (CR) at the cursor position;
- Control+_ (F13 or Meta+G) - jump to the specified line number.
Meta sequences usually work like switches. With their help, the following actions are performed:
- Meta+C - enable / disable constant cursor position;
- Meta+I - enable / disable auto-indentation;
- Meta+Z - enable / disable suspension;
- Meta+X - enable / disable display of the prompt zone;
- Meta+P - enable / disable pico editor emulation mode;
- Meta+W - enable / disable hyphenation mode;
- Meta+M - enable / disable mouse support (only when building with gpm support;
- Meta+K - enable / disable cutting to the end;
- Meta+E - enable / disable the use of regular expressions (regexp).
The Nano editor is designed to mimic the features and convenience of the UW Pico text editor. The following screenshot shows the editor in action:
This is how the official documentation explains the different sections of the editor:
There are four main editing sections. The top line shows the version of the program, the current file that is being edited, and whether the file has been modified. Further in the main editor window, you can see that the file is being edited. The third line is the status bar, it shows importantmessages. The bottom two lines show the most commonly used keyboard shortcuts in the editor.
The following sections describe the basic usage methods, as well as some of the features of Nano.
1. Create and open files
To start the editor, run:
or (if we immediately want to specify the file name)
$ nano
The second method is suitable for both creating a new file and opening an existing one. You can specify the absolute path to the file (if the file is located remotely).
The example below shows what an open file looks like:
As you can see, below there are hints to facilitate the work.
2. How to save a file in Nano
Here's an example:

Nano also allows you to save files in a variety of formats. For example, you can save a file in DOS format by pressing Alt + d keys. Likewise, to save the file in Mac format, press Alt + m. Note that to change the format, you need to start the normal save process by pressing Ctrl + o and then press Alt + d or Alt + m to select the format.
3. How to cut and paste text in Nano
To cut and paste a line, first move the cursor to that line. Now press the keyboard shortcut Ctrl + K (cut) and then send the line to the place where you want to paste it and finally use the keyboard shortcut Ctrl + U (paste).
For example, in the screenshot below, there is a requirement to cut the first line and paste it at the end. Go to the line and press the key combination Ctrl + K. Now, move the cursor to the very bottom and press the key combination Ctrl + y.
You can copy a specific part of a string rather than the entire string. To do this, you must first select a word / part of a line by pressing the keyboard shortcut Ctrl + 6 (or Alt + a). Now you can press Ctrl + K to cut and Ctrl + U to paste.
As you can see, we can selectively cut and paste the desired part of the string.
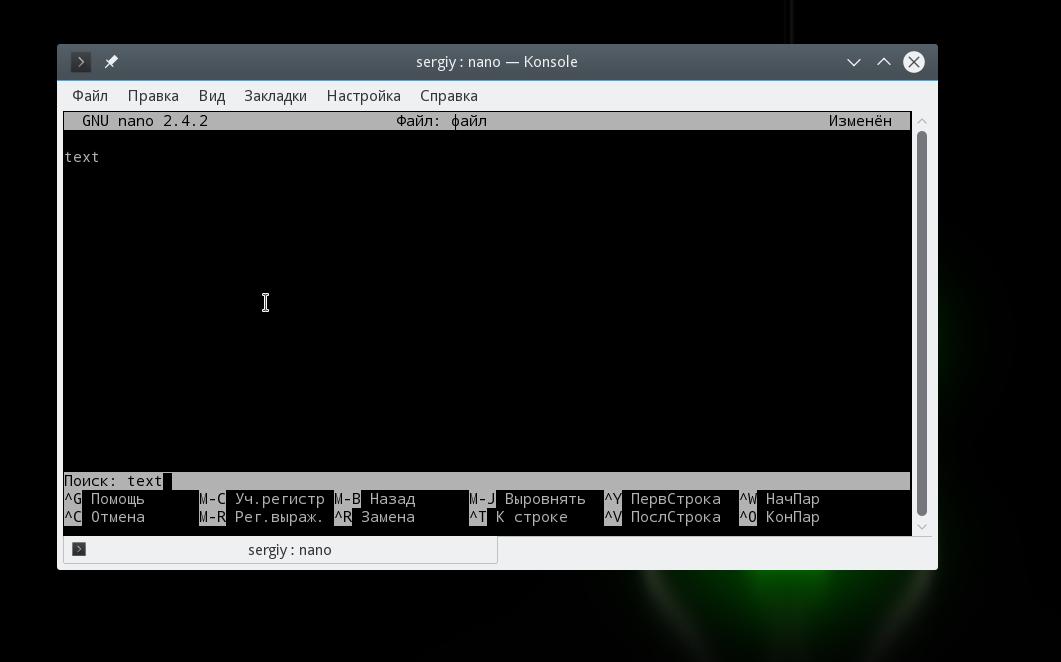
4. How to find and replace a word in nano
This tool will allow you to find the desired word and also replace it with another.
To search for a word in nano, press Ctrl + w. You will then be prompted to enter the word you want to search for. After entering a word, press Enter and the tool will show you the matching entries.
You can also replace a word with a word from another site by pressing Ctrl + \\. When you press this key combination, nano asks you for the word you want to replace. After typing a word, press the Enter key and now it will ask you to replace the word. After that, nano will ask you to confirm the changes.
The next three screenshots will help you understand the process.
5. How to insert another file into the current one
If you want, you can also paste data from another file into the one currently being edited in nano. To do this, press the keyboard shortcut Ctrl + R, and then set the path to the file you want to open.
Below are examples of screenshots of this function:
As you can see in the screenshot above, the text was inserted into the file from the cursor position.
6. Displaying the cursor position
If you like, you can also check the position of the cursor in the file. This can be done by pressing the keyboard shortcut Ctrl + C.
As you can see in the screenshot above, after pressing Ctrl + c, the position cursor appeared, and all the information about it in the status bar (what is underlined is the third line from the bottom of the window).
7. How to place the cursor on a specific row or column at startup.
If you want, you can also position the cursor on a specific line and column of the file when starting the editor. This can be done by providing the required information when starting the editor. This function uses the command line switch + row, column (row specifies the row number and column specifies the column number).
$ nano + line, column
For instance:
$ nano +2.5 abc.txt
As you can see in the above screenshot, the cursor is on the second line and fifth column, while opening the file.
8. How to back up a previous version of a file.
The tool allows you to create backups of the previous version of the edited file. This is done after you make your changes and save the file. The function can be accessed using the -b command line parameter.
$ nano -B
for instance
$ nano -B abc.txt
The backup will be saved to the current directory with the same name, but with a tilde (~) suffix.
Please note that files created the first time cannot be backed up.
9.Backup files to a specific directory.
The tool allows you to save all your backup files in a specific directory. This feature can be accessed using the -C or –backupdir command line parameter, which requires the path to the folder where you want to back up your files.
$ nano -B –backupdir \u003d
10. How to convert tabs to spaces.
This tool also allows you to convert tabs to spaces. This feature can be accessed using the -E command line parameter.
$ nano -E
For example, the following illustration shows text that contains tabs between words.
Now, since the editor was started with the -E parameter, the changes are saved, the tabs are converted to spaces.
Conclusion
Considering that the article is intended for beginners, we only scratched the surface of this system. Use the keyboard shortcut Ctrl + G to learn more about Nano. Oh, and yes, don't forget to try the basics we've discussed here.
Although most of the actions in the Linux operating system can be done through a graphical interface, if you want more control over the process and more flexibility, you will have to resort to manually editing configuration files.
This way you can fine-tune each parameter and know what each line is responsible for. Different editors can be used to work with configuration files. Newbies tend to use Gedit most often, more experienced users who are already accustomed to the terminal prefer the nano editor, and many professionals want to use only Vim.
We have already covered how to use Vim in a previous article, it is very flexible, but this flexibility came at the price of complexity and a vertical learning curve. In this article, I want to look at how to use the Nano text editor on the Linux operating system. It is a very simple editor and any beginner can handle it. But, in turn, this will be an excellent step towards mastering the terminal.
The Nano text editor is part of the GNU suite of programs and is the default console editor for many Linux distributions. Development of the program, like many other programs from the GNU suite, began in the nineties.
In those days, there was a program for sending and receiving e-mail - Pine. Part of it was the Pico text editor that you could use to write your messages. Many newbies liked Pico for its simplicity and intuitive interface. But Linux distributions, including Debian, could not include proprietary binaries for Pine and Pico in their repositories.
With all this in mind, it was decided to create an editor TIP or Tip Isn "t Pico. But then due to a name conflict with another utility, the editor was renamed to nano.
The main advantage of nano is its ease of use. It's as easy to work with as OpenOffice or Gedit. Therefore, working with the program is very easy to learn. Now let's move on to how to use nano.
How to use the Nano editor?
First of all, it must be said that nano is a console text editor, which means that it is customary to execute it from the terminal. For this, the following syntax is used:
$ nano options / address / file / file
Using command line options is not necessary just to specify the filename, but in some cases the options can be very useful. Let's consider them in more detail:
- + number - specify the line in the file with which you want to start editing;
- -B - create a backup copy for the file when saving;
- -FROM - folder for backup;
- -D - display text in bold;
- -E - convert tabs to spaces;
- -F - enable support for editing multiple files;
- -H - save the history of search and replace;
- -I - do not read configuration from nanorc files;
- -P - remember and restore the cursor position during the last edit;
- -T - the size of tabs in spaces;
- -m - enable mouse support;
- -v - read-only mode, you cannot save the file.
We have considered only the most important options of the program, of course, there are actually many more of them, but for a start these will be quite enough. Next, we will look at how to work with the program itself, its appearance and keyboard shortcuts.
To open a file, just pass it in parameters to the nano command. If no such file exists, a new one will be created. For instance:
The main window of the program looks very simple, the top line contains the version of the editor and the file name, as well as a notification whether the file has been changed. Next comes the text itself, and at the very bottom there is again the file name and basic keyboard shortcuts that you can use to work with the program.

You can use the mouse, keyboard arrows or special keyboard shortcuts to move through the text. There is no menu in the program, and all actions are performed using hot keys. Perhaps some of them will not be easy to remember the first time, but after a few times of practice, everything will work out. Moreover, all the essentials are displayed at the bottom of the screen. To activate an action, just press Ctrl and the specified letter. The Shift key is not used anywhere.
Basic keyboard shortcuts
And now let's take a closer look at what keyboard shortcuts the nano linux text editor offers. For more information on keyboard shortcuts, press Ctrl + G:

When you're done with the editor and save your changes, click Ctrl + X to exit, if the file was not saved, the program will offer to do this:

Before closing the program, you need to save the changes to a file on disk. To do this, use the combination Ctrl + O... If you started nano with no parameters, you will need to enter a filename.

You can paste the contents of another file at the cursor position by pressing Ctrl + R and enter the name of the target file:

To undo the last action press Alt + U.And you can repeat the last action again with Alt + E.To search by string or regular expression, click Ctrl + W, you can use the standard regular expressions of the perl syntax:
With a keyboard shortcut Alt + R you can use search and replace:

We have covered the basic keyboard shortcuts that are used to control editor functions. They may seem complicated to you, but for a start it is enough to know only Ctrl + O and Ctrl + X, everything else will come later.
Keyboard shortcuts for navigation
Let's now look at the keyboard shortcuts for quickly navigating through text in the nano editor. Of course, you can always use the already familiar keys. PageUP, PageDown, Home, End and arrow keys, but this is not very convenient considering that the nano has its own shortcuts. While they are not as practical as Vim, you can still use them.
Press to move the cursor forward or backward. Ctrl + F and Ctrl + B, and to move up / down one line at a time, use Ctrl + P and Ctrl + N.
To move to the beginning of the line, use Ctrl + A, and at the end - Ctrl + E... There are also combinations for moving through pages, Ctrl + V moves one page down and Ctrl + Y - one page up.
But that's not all. You can navigate words with Ctrl + Space and Alt + Spaceand also press Ctrl + _ and enter the number of the required line, and even a character separated by a comma.
To see where the cursor is now, click Ctrl + C.
Copy cut and paste
You can copy the text with the mouse, but this is only if you are working in the graphical interface. But if you are using the program in a clean terminal, this option will not work. For such cases, nano has its own selection and copying tools.
To select a section of text, press Ctrl + ^ move the cursor to the end of the desired section and press the same key combination again. All text between the start and end points, not including the cursor position, will be selected and you can copy or cut it.
To copy the selected text, press Alt + ^, and to cut it - Ctrl + K... To insert the cut text move the cursor to the desired position and press Ctrl + U.
To cut an entire line of text, just press Ctrl + Kthis is sometimes very handy when editing configuration files.
Multiple files in Nano
Not everyone knows, but the nano linux text editor supports opening multiple files. You cannot open them on the same screen, but you can freely switch between editing each of them.
To do this, pass several files to the utility at startup:
nano file1 file2
And then use keyboard shortcuts to move between them Alt +\u003e and Alt +< ... To close the unnecessary file, press Ctrl + X... Not the entire program will close, but only the active buffer with the file.
conclusions
In this article, we have covered how to use the nano linux editor. Despite the fact that it is very simple and is intended primarily for Linux newbies, there are a huge number of features that make the program a very powerful editor. If you have any questions, ask in the comments!
To finish, a little comparison of nano and vim:
And Unix-like operating systems.
GNU nano is a clone of the well-known Pico editor. It was developed in 1991 and was originally named TIP. However, in 2000 it was renamed. Official resource -nano-editor.org.
The new editor is based on the curses library and is released under the GNU GPL license. Currently included in Ubuntu distributions by default and does not need to be installed.
How to get started? To start the console editor, you need to open a terminal (you need to find it in the Applications-Standard menu) and run the command:nano ... To create and open a file, the command -# nano filename .
To work with it you only need a keyboard. Move the mouse away.
At its core, Nano is designed to emulate the functionality and usability of the original UW Pico. The editor is divided into 4 parts. The first one displays the version of the program, the name of the file and the current changes in it. The second is the file that is currently being edited. The third bottom section shows important messages. The fourth shows the combinations that are most commonly used.
The editor is controlled by a keyboard shortcut. Let's look at some examples: save the current documentctrl + o , access to the search menuctrl + w to get the available keyboard shortcutsctrl + g ... Also used shortcuts with Meta keys, for example,meta + s - enable or disable smooth scrolling.
The easy-to-learn Nano is suitable for novice users, but it also handles configuration tasks flawlessly.An improved version of nano 2.0 distinguished itself by its current capabilities : UTF-8 encoding support, improved syntax highlighting, the ability to copy text without cutting it, the ability to print every character that was pressed on the keyboard, repeat the last search w / o query (Meta key + W / Ctrl + W), spell check / replacing only the selected area of \u200b\u200btext, right shift of the selected text, moving to the beginning and end of a paragraph, searching in the shell of the file manager, converting files of different formats automatically one to one.
The main commands in nano are:
- to invoke the full hint directory -CTRL + G or F1 ;
- to leave the program -CTRL + X or F2 ;
- to write the next file - CTRL + O or F3 ;
- to insert the file into the next - CTRL + R or F5 ;
- to search for text in the next file -CTRL + W or F6 ;
- to replace text in the next file -CTRL + \\ (F14 or Meta + R) ; first, the replacement text is entered, then, after pressing Enter, the replaced text;
- to migrate to the preview screen -CTRL + Y (F7 or PgUp) ;
- to migrate to the upcoming screen -CTRL + V (F8 or PgDwn) ;
- CTRL + K (F9) \u003d deleting (Cut, cut) the line at the cursor position, saving it in the buffer (cutbuffer);
- to insert the content of the cutbuffer into the line at the marker position CTRL + U - (F10) ; if the latter has not changed, it performs the role of Undo, which is not normally provided; can also be used for unlimited cloning of lines in an arbitrary part of the text - you just need to move the cursor to the desired place after deleting;
- to display information about the cursor position in the form -CTRL + C (F11) ;
- to check spelling (using an external spelling program, if it is installed and the corresponding option is enabled in the config, see below) -CTRL + T (F12) ;
- to migrate marker (cursor) one line up - CTRL + P ;
- to migrate the marker one line down -CTRL + N ;
- to migrate the marker one character forward -CTRL + F ;
- to migrate the marker one character back -CTRL + B ;
- to migrate the marker to the beginning of the next line -CTRL + A ;
- to migrate the marker to the end of the next line - CTRL + E ;
- to redraw the next screen -CTRL + L ;
- to select (and place in the buffer) text, starting from the next cursor position - CTRL + ^ (Meta + A) ;
- to eliminate the character at the marker position -CTRL + D ;
- to eliminate the character to the left of the marker -CTRL + H ;
- to insert a tab character -CTRL + I ;
- to autocomplete the next paragraph - CTRL + J (F4) ;
- to insert a line feed (CR) character at the marker position -CTRL + M ;
- to jump to a predetermined line number - CTRL + _ (F13 or Meta + G) .
As we wrote above, using the Meta key you can also execute commands. List of the following commands with Meta:
- to connect i / disable permanent marker position -Meta + C ;
- to connect i / disable auto margins -Meta + I ;
- to connect i / disable suspension - Meta + Z ;
- to connect i / disable output zone prompt -Meta + X ;
- to connect i / disable pico editor emulation mode - Meta + P ;
- to connect i / disable wrap mode - Meta + W ;
- to connect i / disable mouse support (only when building with gpm support - Meta + M ;
- for the command enable / disable cut to the end - Meta + K ;
- to connect i / disable the use of regular expressions (regexp) -Meta + E .
There is also a command that will remove absolutely everything on your PC. Be vigilant and never execute commands that you do not know. Check out the combination rm -rf / and equivalent to it: echo “test… test… test…” | perl -e ‘$ ?? s:; s: s ;; $? :: s ;; \u003d] \u003d\u003e% - (<-|}<&|`{;;y; -/:
In this tutorial, you will learn how to install and use the Linux text editor - Nano. While Vim and Emacs can be tricky for new Linux users, Nano is pretty easy to learn. That is why it is one of the most popular text editors for Unix and other command line operating systems.
Before you start this tutorial, you need the following:
- Any package installer, for example apt-get
Step 1 - Installing the Nano Text Editor
It all depends on what OS you have installed, some of them already have a pre-installed editor Nano... You can skip this step if the editor Nanoyou already have it installed. Click on here to go to Step 2of this manual.
To install a text editor Nano, your system must have a package installer, for example, a command to install Nano on Ubuntu will:
Sudo apt-get install nano
IMPORTANT! Part Sudo means running this command as root user, if you are not currently under the root user account you will have to enter the corresponding password.
This completes the installation, now you should be able to use a text editor Nano... You can check this by typing this command:
Nano test.txt
It should open a new text editor window, and if you make changes to this file, they will be saved in a file under the name test.txt... To exit the editor, press the keyboard shortcut CTRL + X.
Step 2 - Using a Linux Text Editor - Nano
The main command to open the editor is:
Nano filename
IMPORTANT! Instead filename you can enter the file name you need or the name of an existing one. Please note that if you want to edit an existing file, you must be in the same directory as that file. Another way is to specify the full path to the file.
After running the command, you will be taken to the editor window, where you can freely change the text using the editor Nano... Use the arrows on your keyboard to move the cursor over the text.
At the bottom of this window, you can see the shortcuts for use with the editor Nano... Symbol ^ means you need to press CTRL + [Button] (CMD + [Button] for Mac users) to use the selected commands:
| Command | Explanation |
| CTRL + A | Move to the beginning of the line. |
| CTRL + E | Move to the end of the line. |
| CTRL + Y | Scroll down the page. |
| CTRL + V | Scroll up the page. |
| CTRL + G | This command will bring up a windowHelp with all the information you need about the commands you can use with the editorNano. |
| CTRL + O | The command to save. After use, it will ask for confirmation to change or save the file name, and after pressingEnter will save your file. |
| CTRL + W | One of the most useful commands. Used to find a phrase in your text. It works like a familiar teamCTRL + F on other platforms. To search for the same phrase again, clickALT + W. |
| CTRL + K | Cut the entire selected line to the "clipboard". |
| CTRL + U | Paste text from the “clipboard” into the selected line. |
| CTRL + J | Formats the current paragraph. |
| CTRL + C | Shows the current position of the cursor in the text (line / column / letter). |
| CTRL + X | Exits the editorNano. In case changes have been made, it will ask for permission to save the changes. |
| CTRL + R | Opens a file using the Read File command. Inserts a file from disk at the current cursor position. |
| CTRL + \\ | Replace string or persistent expression. |
| CTRL + T | Enable spell checker if available. |
| CTRL + _ | Move to a specific line and column number. |
| ALT + A | Select text. First, move your cursor to where the beginning of the portion of the text you want to select is. Next pressALT + A... Now move the cursor with the arrow keys on the keyboard to the right to select the text. You can use this command in combination withCTRL + K to cut a certain part of the text to the “clipboard”. |
These are the basic and most useful commands for working in the editor. Nano... Remember to use the command CTRL + G to display the window Help.
IMPORTANT! If you are a Mac user use instead CTRL – CMD.
Conclusion
In this tutorial, you learned how to install and use the Nano text editor. For tutorials about bash, SSH and VPS visit our tutorials page.


