Self-diagnostics of the computer. Description of the steps for diagnosing a computer Tools for checking the health of the computer hardware
Many PC owners face various errors and malfunctions of their computer, but cannot determine the cause of the problem. In this article, we will look at the main methods of diagnosing a computer, allowing you to independently identify and fix various problems.
Please note that high-quality computer diagnostics can take a whole day, allocate it in the morning especially for this, and do not start closer to the evening.
I warn you that I will write in detail as for beginners who have never disassembled a computer, in order to warn about all possible nuances that can lead to problems.
1. Disassembling and cleaning the computer
When disassembling and cleaning your computer, do not rush, do everything carefully so as not to damage anything. Store the components in a safe place prepared in advance.
It is not advisable to start diagnostics before cleaning, since you will not be able to identify the cause of the malfunction if it is caused by clogged contacts or the cooling system. In addition, the diagnostics may fail to complete due to repeated failures.
Unplug the system unit from the outlet at least 15 minutes before cleaning to allow the capacitors to discharge.
Disassemble in the following sequence:
- Disconnect all wires from the system unit.
- Remove both side covers.
- Disconnect the power connectors from the video card and remove it.
- Take out all memory sticks.
- Disconnect and remove the ribbon cables of all drives.
- Unscrew and remove all discs.
- Disconnect all power supply cables.
- Unscrew and remove the power supply.
It is unnecessary to remove the motherboard, processor cooler, case fans, you can also leave the DVD drive if it works normally.
Carefully blow out the system unit and all accessories separately with a powerful air stream from a vacuum cleaner without a dust bag.
Carefully remove the cover from the power supply unit and blow it out without touching the electrical parts and the board with your hands and metal parts, as there may be voltage in the capacitors!
If your vacuum cleaner does not work for blowing, but only for blowing, then it will be a little more difficult. Clean it well so that it pulls as hard as possible. We recommend using a soft bristle brush when cleaning.

You can also use a soft brush to clean out any lingering dust.

Thoroughly clean the heatsink of the processor cooler, having previously considered where and how much dust it got clogged with, as this is one of the common causes of processor overheating and PC crashes.

Also make sure that the cooler mount has not broken, the clip has not opened and the heatsink is firmly pressed against the processor.
Be careful when cleaning the fans, do not let them spin too much and do not bring the vacuum cleaner head close if it is without a brush, so as not to knock off the blade.
At the end of cleaning, do not rush to collect everything back, but go on to the next steps.
2. Checking the motherboard battery
The first thing after cleaning, so as not to forget later, I check the battery charge on the motherboard, and at the same time I reset the BIOS. In order to pull it out, you need to press with a flat screwdriver on the latch in the direction indicated in the photo and it will pop out by itself.

After that, you need to measure its voltage with a multimeter, it is optimal if it is within 2.5-3 V. The initial voltage of the battery is 3 V.

If the battery voltage is below 2.5 V, then it is advisable to change it already. The voltage of 2 V is critically low and the PC is already starting to fail, which manifests itself in resetting the BIOS settings and stopping at the beginning of the PC boot with a suggestion to press F1 or some other key to continue booting.
If you do not have a multimeter, you can take the battery with you to the store and ask to be checked there, or just buy a replacement battery in advance, it is standard and very inexpensive.
A clear sign of a dead battery is the constantly flitting date and time on the computer.
The battery needs to be replaced in a timely manner, but if you do not have a replacement at hand now, then simply do not disconnect the system unit from the power supply until you change the battery. In this case, the settings should not fly off, but problems can still arise, so do not delay.
Battery check is a good time to do a full BIOS reset. This resets not only the BIOS settings, which can be done through the Setup menu, but also the so-called volatile CMOS memory, which stores the parameters of all devices (processor, memory, video card, etc.).
Errors inCMOS are often the causes of the following problems:
- the computer does not turn on
- turns on every other time
- turns on and nothing happens
- turns on and off itself
I remind you that before resetting the BIOS, the system unit must be disconnected from the outlet, otherwise the CMOS will be powered by the power supply unit and nothing will work.
To reset the BIOS for 10 seconds, close the contacts in the battery connector with a screwdriver or other metal object, this is usually enough to discharge the capacitors and completely clear the CMOS.

A sign that the reset has occurred will be a misplaced date and time, which will need to be set in the BIOS at the next computer boot.
4. Visual inspection of components
Carefully inspect all capacitors on the motherboard for swelling and streaks, especially around the processor socket.

Sometimes capacitors do not swell up, but downward, which leads to their tilting, as if they were just bent a little or soldered unevenly.
If some capacitors are swollen, then you need to return the motherboard for repair as soon as possible and ask to re-solder all capacitors, including those that are next to the swollen ones.
Also, inspect the capacitors and other elements of the power supply, there should be no swelling, drips, traces of burning.

Inspect the disc contacts for oxidation.

They can be cleaned with an eraser and after that it is imperative to replace the cable or power adapter with which this disk was connected, since it is already damaged and oxidation is likely due to it.
In general, check all cables and connectors so that they are clean, with shiny contacts, tightly connected to the drives and the motherboard. All loops that do not meet these requirements must be replaced.
Check if the wires are properly connected from the front of the case to the motherboard.

It is important that the polarity is respected (plus to plus, minus to minus), since there is a total mass on the front panel and non-observance of polarity will lead to a short circuit, which may cause the computer to behave inadequately (turn on once, turn off or restart itself) ...
Where the plus and minus in the front panel contacts is indicated on the board itself, in the paper manual for it and in the electronic version of the manual on the manufacturer's website. On the contacts of the wires from the front panel, it is also indicated where the plus and minus are. Usually, the white wire is a minus, and the plus connector can be indicated by a triangle on the plastic connector.

Many even experienced collectors make a mistake here, so check it out.
5. Checking the power supply
If the computer did not turn on at all before cleaning, then do not rush to assemble it, the first step is to check the power supply. However, in any case, it will not hurt to check the power supply unit, it may be because of it that the computer crashes.
Check the PSU fully assembled to avoid electric shock, short circuit, or accidental fan breakage.
To test the power supply, short the single green wire in the motherboard connector with any black one. This will signal the PSU that it is connected to the motherboard, otherwise it will not turn on.

Then plug the power supply into the surge protector and press the button on it. Don't forget that the power supply itself may also have an on / off button.
A spinning fan should indicate that the power supply is turned on. If the fan does not spin, then it may be out of order and needs to be replaced.
In some silent power supplies, the fan may not start spinning immediately, but only under load, this is normal and can be checked during the operation of the PC.
Measure the voltage between the pins in the peripheral connectors with a multimeter.

They should be around the following range.
- 12V (yellow-black) - 11.7-12.5V
- 5V (red-black) - 4.7-5.3V
- 3.3V (orange-black) - 3.1-3.5V
If any voltage is absent or greatly exceeds the specified limits, then the power supply is faulty. It is best to replace it with a new one, but if the computer itself is inexpensive, then repair is allowed, PSUs lend themselves to this easily and inexpensively.
The start of the power supply and normal voltages are a good sign, but by itself it does not mean that the power supply is good, as failures can occur due to voltage drops or ripple under load. But this is already determined at the subsequent stages of testing.
6. Checking power contacts
Be sure to check all electrical contacts from the outlet to the system unit. The socket must be modern (for a European plug), reliable and not loose, with clean elastic contacts. The same requirements apply to the surge protector and the cable from the computer's power supply.
Make sure the contact is secure and there must be no loose, sparking or oxidized plugs or connectors. Pay close attention to this, since poor contact is often the cause of failure of the system unit, monitor and other peripheral devices.
If you suspect the quality of the outlet, surge protector, power cable of the system unit or monitor, then change them as soon as possible to avoid damage to the computer. Do not delay and do not save on this, as repairing a PC or monitor will cost significantly more.
Also, poor contact is often the cause of PC malfunctions, which are accompanied by a sudden shutdown or reboot, followed by failures on the hard disk and, as a result, disruption of the operating system.
Failures can also occur due to voltage dips or ripples in the 220 V network, especially in the private sector and remote areas of the city. In this case, crashes can occur even when the computer is idle. Try to measure the voltage in the outlet immediately after a spontaneous shutdown or restart of the computer and observe the readings for a while. So you can identify long-term drawdowns, which will save you from a linear-interactive UPS with a stabilizer.
7. Assembling and turning on the computer
After cleaning and inspecting the PC, carefully reassemble it and carefully check that you have connected everything you need. If the computer refused to turn on before cleaning or turned on every other time, then it is advisable to connect the components in turn. If there were no such problems, then skip the next section.
7.1. Phased PC assembly
First, connect the motherboard power connector and the processor power connector to the motherboard with the processor. Do not insert RAM, video card and do not connect disks.
Turn on the power of the PC and if everything is normal with the motherboard, the fan of the processor cooler should spin. Also, if a buzzer is connected to the motherboard, a beep code usually sounds, indicating the lack of RAM.
Install memory
Turn off the computer with a short or (if not possible) long press of the power button on the system unit and insert one stick of RAM into the color slot closest to the processor. If all slots are of the same color, then just go to the one closest to the processor.
Make sure that the memory strip is inserted evenly, all the way and that the latches snap into place, otherwise it may be damaged when you turn on the PC.

If the computer starts up with one memory bar and there is a buzzer, then a code usually sounds indicating that there is no video card (if there is no integrated graphics). If the beep code signals a problem with the RAM, then try to insert another bar in the same place. If the problem continues or there is no other bar, then move the bar to another nearest slot. If there are no sounds, then everything is possible, continue on.
Turn off the computer and insert the second memory strip into the slot of the same color. If the motherboard has 4 slots of the same color, then follow the instructions for the motherboard, so that the memory is in the slots recommended for dual-channel mode. Then turn it back on and check if the PC turns on and what beeps it emits.
If you have 3 or 4 memory sticks, then simply insert them in turn, each time turning off and on the PC. If the computer does not start with a certain bar or issues a beep memory error code, then this bar is faulty. You can also check the slots of the motherboard by moving the working bar to different slots.
Some motherboards have a red indicator that glows in case of memory problems, and sometimes a segment indicator with an error code, the decoding of which is in the manual for the motherboard.

If the computer starts, then further memory testing occurs at a different stage.
Installing a graphics card
It's time to test your graphics card by inserting it into the top PCI-E x16 slot (or AGP for older PCs). Do not forget to connect additional power to the video card with the appropriate connectors.

With the video card, the computer should start normally, without sound signals, or with a single sound signal, indicating a normal self-test.
If the PC does not turn on or emits a beep error code for the video card, then it is most likely faulty. But don't jump to conclusions, sometimes you just need to connect a monitor and keyboard.
Monitor connection
Turn off the PC and connect the monitor to the video card (or motherboard if there is no video card). Make sure that the connector to the video card and the monitor is firmly connected, sometimes tight connectors do not fit all the way, which causes no image on the screen.

Turn on the monitor and make sure that the correct signal source is selected on it (the connector to which the PC is connected, if there are several).

Turn on the computer and the graphic splash screen and motherboard text messages should appear on the screen. Usually this is a suggestion to enter the BIOS by pressing the F1 key, a message about the absence of a keyboard or bootable devices, this is normal.

If the computer turns on silently, but there is nothing on the screen, most likely something is wrong with the video card or monitor. The video card can only be checked by moving it to a working computer. The monitor can be connected to another work PC or device (laptop, player, tuner, etc.). Do not forget to select the desired signal source in the monitor settings.
Connecting a keyboard and mouse
If everything is fine with the video card and monitor, then move on. Connect the keyboard first, then the mouse in turn, each time turning off and on the PC. If the computer freezes after connecting the keyboard or mouse, then they need to be replaced - it happens!
Connecting drives
If the computer starts up with a keyboard and mouse, then we begin to connect hard drives one by one. Connect the second non-operating system drive first (if available).
Do not forget that in addition to connecting the interface cable to the motherboard, you also need to connect the connector from the power supply to the disk.
Then turn on the computer and if it comes to BIOS messages, then everything is fine. If the PC does not turn on, freezes or shuts down by itself, then the controller of this disk is out of order and needs to be replaced or taken for repair to save the data.
Turn off the computer and connect the DVD drive (if any) with an interface cable and power supply. If problems arise after this, then the drive has a power failure and needs to be replaced; it usually does not make sense to repair.
At the end, we connect the main system disk and prepare to enter the BIOS for initial configuration before starting the operating system. We turn on the computer and if everything is fine, go to the next stage.
When you turn on your computer for the first time, enter BIOS. Usually, the Delete key is used for this, less often others (F1, F2, F10 or Esc), which is indicated in the tips at the beginning of the download.

On the first tab, set the date and time, and on the “Boot” tab, select your hard disk with the operating system as the first boot device.
On old motherboards with classic BIOS, it might look like this.

On more modern ones with a graphical UEFI shell, it is slightly different, but the meaning is the same.

To exit the BIOS while saving the settings, press F10. Do not get distracted and watch as the operating system is fully loaded to notice possible problems.
After the PC boots up, check if the fans of the processor cooler, power supply and video card are working, otherwise there is no point in further testing.
Some modern video cards may not turn on the fans until a certain temperature of the video chip is reached.
If any of the case fans do not work, then this is not a big deal, just plan to replace it in the near future, do not be distracted by it now.
8. Error analysis
Here, in fact, the diagnostics begins, and everything described above was just preparation, after which many problems could go away and without it there was no point in starting testing.
8.1. Enabling memory dumps
If during the operation of the computer, blue screens of death (BSOD) appeared, then this can greatly facilitate the identification of the malfunction. A prerequisite for this is the presence of memory dumps (or at least self-written error codes).
To check or enable the dump recording function, press the "Win + R" key combination on the keyboard, enter "sysdm.cpl" in the line that appears and press OK or Enter.

In the window that appears, go to the "Advanced" tab and in the "Startup and Recovery" section, click the "Options" button.

The field "Write debug information" should be "Small memory dump".

If so, then you should already have dumps of previous errors in the C: \\ Windows \\ Minidump folder.

If this option was not enabled, then the dumps were not saved, enable it at least now to be able to analyze errors if they are repeated.
Memory dumps may not have time to be created during severe failures with rebooting or shutting down the PC. Also, some system cleaning utilities and antiviruses can delete them, you must disable the system cleaning function during the diagnosis.
If there are dumps in the specified folder, then proceed to their analysis.
8.2. Analysis of memory dumps
For analyzing memory dumps in order to identify what leads to failures, there is a wonderful utility "BlueScreenView", which you can download along with other utilities for diagnostics in the "" section.

This utility shows the files that crashed. These files belong to the operating system, device drivers, or some program. Accordingly, by the ownership of the file, you can determine which device or software was the fault of the failure.
If you cannot boot the computer in normal mode, try booting in safe mode by holding down the F8 key immediately after the motherboard graphic splash screen or BIOS text messages disappears.

Go through the dumps and see which files are most often identified as the culprit of the failure, they are highlighted in red. Right-click on one of these files and view its Properties.

In our case, it is easy to determine that the file belongs to the "nVidia" video card driver and most of the errors were caused by it.

Besides, in some dumps the file "dxgkrnl.sys" appeared, even from the name of which it is clear that it refers to DirectX, directly related to 3D graphics. This means that it is most likely that the video card is to blame for the failure, which should be subjected to rigorous testing, which we will also consider.
In the same way, you can determine that the fault is a sound card, a network card, a hard drive, or some kind of program that deeply crawls into the system such as antivirus. For example, if a disk fails, the controller driver will crash.
If you cannot determine to which driver or program this or that file belongs, then look for this information on the Internet by the file name.
If the sound card driver malfunctions, it is most likely out of order. If it is integrated, then you can disable it through the BIOS and install another discrete one. The same can be said about the network card. However, network failures can be caused, which is often solved by updating the driver of the network card and connecting to the Internet through a router.
In any case, do not make hasty conclusions until the diagnosis is complete, maybe your Windows just crashed or a virus got in, which is solved by reinstalling the system.
Also in the "BlueScreenView" utility you can see error codes and inscriptions that were on the blue screen. To do this, go to the "Options" menu and select the "Blue Screen in XP Style" view or press the "F8" key.

After that, switching between errors, you will see how they looked on a blue screen.

You can also find the possible cause of the problem on the Internet by the error code, but it is easier and more reliable to do this by file ownership. To return to the previous view, you can use the "F6" key.
If different files and different error codes appear in errors all the time, then this is a sign of possible problems with the RAM, in which everything crashes. We will subject it to diagnostics in the first place.
9. Testing RAM
Even if you think the problem is not with the RAM, check it first anyway. Sometimes the place has several problems, and if the RAM fails, then it is quite difficult to diagnose everything else due to frequent PC crashes.
It is imperative to run a memory test from a bootable disk as it is difficult to get accurate results on a Windows operating system on a failed PC.
In addition, Hiren’s BootCD contains several alternative memory tests in case Memtest 86+ does not start, and many more useful utilities for testing hard drives, video memory, etc.
You can download the "Hiren's BootCD" image in the same place as everything else - in the "" section. If you do not know how to properly burn such an image to a CD or DVD disc, refer to the article where we examined, everything is done in the same way.
Configure BIOS to boot from DVD drive or use “Boot Menu” as described in, boot from “Hiren’s BootCD” and run “Memtest 86+”.

Testing can take from 30 to 60 minutes, depending on the speed and amount of RAM. One full pass should be completed and the test will continue on the second round. If everything is normal with the memory, then after the first pass (Pass 1) there should be no errors (Errors 0).

After that, testing can be interrupted by pressing the "Esc" key and the computer will restart.
If there were errors, then you will have to test each bar separately, taking out all the others to determine which one is broken.
If the broken bar is still under warranty, then take a photo from the screen using a camera or smartphone and present it to the warranty department of the store or service center (although in most cases this is not necessary).
In any case, it is not advisable to use a PC with a broken memory and carry out further diagnostics before replacing it, since various incomprehensible errors will pour in.
10. Preparation for component tests
Everything else, except for RAM, is tested under Windows. Therefore, in order to exclude the influence of the operating system on the test results, it is advisable to do, if necessary, temporarily and most.
If this is difficult for you or there is no time, then you can try to test on the old system. But, if failures occur due to malfunctions in the operating system, some driver, program, virus, antivirus (i.e. in the software part), then hardware testing will not help determine this and you can go down the wrong path. And on a clean system, you will have the opportunity to see how the computer behaves and completely eliminate the influence of the software component.
Personally, I always do everything as it should be from start to finish as described in this article. Yes, it takes a whole day, but ignoring my advice, you can beat for weeks without determining the cause of the problem.
The fastest and easiest way is to test the processor, unless of course there are clear signs that the problem is in the video card, which we will discuss below.
If your computer starts to slow down after a while after being turned on, freezes when watching videos, playing games, suddenly reboots or turns off under load, then there is a possibility of processor overheating. In fact, this is one of the most common causes of such problems.
During the cleaning and visual inspection, you had to make sure that the processor cooler is not clogged with dust, its fan rotates, and the heatsink is firmly pressed against the processor. I also hope that you did not remove it when cleaning, as this requires replacing the thermal paste, which I will talk about later.
We will use “CPU-Z” for a stress test with processor warming up, and “HWiNFO” for monitoring its temperature. Although, it is better to use a proprietary motherboard utility to monitor the temperature, it is more accurate. For example, ASUS has "PC Probe".
To begin with, it would be nice to know the maximum allowable thermal package of your processor (T CASE). For example, for my Core i7-6700K it is 64 ° C.

You can find out by going to the manufacturer's website from a search on the Internet. This is the critical temperature in the heat spreader (under the processor cover), the maximum allowed by the manufacturer. Do not confuse it with the core temperature, which is usually higher and is also displayed in some utilities. Therefore, we will focus not on the core temperature as measured by the processor sensors, but on the overall processor temperature as measured by the motherboard.
In practice, for most older processors, the critical temperature above which to fail is 60 ° C. Most modern processors can operate at 70 ° C, which is also critical for them. You can find out the real stable temperature of your processor from tests on the Internet.
So, we launch both utilities - "CPU-Z" and "HWiNFO", find the processor temperature sensor (CPU) in the motherboard, run the test in "CPU-Z" with the "Stress CPU" button and observe the temperature.

If after 10-15 minutes of the test the temperature is 2-3 degrees lower than the critical one for your processor, then there is nothing to worry about. But, if there were failures at high load, then it is better to run this test for 30-60 minutes. If your PC freezes or restarts during testing, you should consider improving cooling.
Please note that a lot also depends on the temperature in the room, it is possible that in cooler conditions the problem will not appear, but in hotter conditions it will immediately make itself felt. So there is always a need for oversized cooling.
In case of CPU overheating, check if your cooler is adequate. If not, then you need to change it, no tricks will help here. If the cooler is powerful enough, but does not cope a little, then you should change the thermal paste to a more efficient one, at the same time the cooler itself may be installed more successfully.
From inexpensive, but very good thermal pastes, I can recommend Artic MX-4.

It should be applied in a thin layer, after removing the old paste with dry and then cotton wool soaked in alcohol.
Replacing the thermal paste will give you a gain of 3-5 ° C, if this is not enough, then simply add case fans, at least the most inexpensive ones.
14. Testing disks
This is the longest stage after the RAM test, so I prefer to leave it for last. To begin with, you can test the speed of all disks using the "HDTune" utility, to which I give "". This sometimes helps to identify freezes when accessing the disk, which indicates problems with it.

Look at the SMART parameters, where "disk health" is displayed, there should be no red lines and the general disk status should be "OK".

You can download a list of the main SMART parameters and what they are responsible for in the section "".
A complete surface test can be performed using the same utilities from under Windows. The process can take 2-4 hours, depending on the size and speed of the disk (about 1 hour for every 500 MB). At the end of the test, there should be no broken blocks, which are highlighted in red.

The presence of such a block is an unambiguous verdict for the disc and a 100% guarantee case. Save your data faster and change the disk, just don't tell the service that you dropped your laptop
You can check the surface of both conventional hard drives (HDD) and solid-state drives (SSD). The latter do not really have any surface, but if the HDD or SSD disk freezes every time during the check, then the electronics are likely to fail - you need to change or repair (the latter is unlikely).
If you are unable to diagnose the disk under Windows, the computer crashes or freezes, then try to do it using the "MHDD" utility from the "Hiren's BootCD" boot disk.
Problems with the controller (electronics) and the disk surface lead to windows with errors in the operating system, short-term and complete freezes of the computer. Usually these are messages about the inability to read a particular file and memory access errors.

Such errors can be mistaken for problems with the RAM, while the disk may well be to blame. Before you panic, try updating the disk controller driver, or vice versa, return the native Windows driver as described in.
15. Testing the optical drive
To test an optical drive, it is usually sufficient to simply burn a verification disc. For example, using the program "Astroburn", it is in the section "".

After burning a disc with a message about successful verification, try copying its entire contents on another computer. If the disc is readable and the drive reads other discs (except for poorly readable ones), then everything is fine.
Drive problems that I have encountered are electronics failures that completely hung up or prevented the computer from turning on, breakdowns of the sliding mechanism, contamination of the lens of the laser head and damage to the head as a result of improper cleaning. In most cases, everything is solved by replacing the drive, since they are inexpensive and even if they have not been used for several years, they die from dust.
16. Checking the case
The case also sometimes breaks, then the button sticks, then the wiring from the front panel falls off, then it closes in the USB connector. All this can lead to unpredictable PC behavior and is solved by careful inspection, cleaning, tester, soldering iron and other improvised means.
The main thing is that nothing is short-circuiting, which may be evidenced by a non-working light bulb or connector. When in doubt, disconnect all wires from the front of the case and try to work at the computer for a while.
17. Checking the motherboard
Often, checking the motherboard comes down to checking all the components. If all the components individually work fine and pass the tests, the operating system is reinstalled, but the computer still crashes, it may be the motherboard. And here I will not help you, to diagnose it and identify a problem with a chipset or processor socket only an experienced electronics engineer can do.
An exception is the crash of a sound or network card, which is solved by disabling them in the BIOS and installing separate expansion cards. Capacitors can be soldered in the motherboard, but, say, replacing the north bridge, as a rule, is not advisable to produce, since it is expensive and there are no guarantees, it is better to buy a new motherboard right away.
18. If all else fails
Of course, it is always better to find the problem yourself and determine the best way to solve it, since some unscrupulous repairmen strive to hang on your ears and strip off three skins.
But it may be that you follow all the recommendations, but you will not be able to determine the problem, I have had this. In this case, the matter is more often in the motherboard or in the power supply unit, maybe there is a microcrack in the PCB and it makes itself felt from time to time.
In this case, there is nothing you can do, take the entire system unit to a more or less well-established computer company. You do not need to carry components in parts, if you are not sure what the matter is, the issue will never be resolved. Let them figure it out, especially if the computer is still under warranty.
Specialists of a computer store usually do not bother, they have a lot of different components, they just change something and see if the problem has gone away, thus quickly and easily fixing the problem. They also have enough time to conduct tests.
19. Links
Transcend JetFlash 790 8GB
Western Digital Caviar Blue WD10EZEX 1 TB Hard Drive
Transcend StoreJet 25A3 TS1TSJ25A3K
If you notice any interruptions in the operation of your computer, then you need to know how to diagnose the computer yourself.
In case of any serious breakdowns, you will need to contact the repair service . However, before that, you yourself can check the computer using special utilities.
Both third-party developers and standard Windows tools have a large list of utilities for various tests.
Checking the hard drive
According to statistics, a hard drive is one of the fastest breaking components in a computer. Hard drive problems are indicated by errors such as freezing on the desktop, for example, when you try to open a folder.
Games and other applications also take a long time to start and load. If you want to check your hard drive for possible errors, there are several utilities that can be used. 
Windows has a built-in hard drive check utility. To do this, you need to go through the explorer to the list of disks, then go to “properties” and select “service”. There will be an item “check disk”. This process is usually long, if you are using a laptop, then it is worth connecting it to the network before discharging the battery.
With this check, you can correct the errors found, for this you need to select the item "check and repair bad sectors".
In addition, there is a large list of utilities from the hard drive manufacturers themselves. For example, SeaTools from Seagate or Drive Fitness Test from Hitachi. They can also be used for initial diagnostics and error correction.
Checking the video card
Problems with the video card are indicated by such problems as the appearance of graphic artifacts or stripes on the screen, the appearance of a blue screen of death, flickering or freezing of the image on the screen.
Benchmarks are usually used to check the video card. To do this, you can use the FurMark utility. With its help, you can run a test, at the end of which, a window with the results will appear.
There will be written the temperature, the parameters of the video card, and it will be shown how stable it works. You will be able to find out about all the malfunctions and errors in the operation of the video card.
For the same purposes, you can use the AIDA 64 diagnostic program. You can see the fan speed, temperature, and run a stress test.
RAM check
RAM is also a very important part of a computer. In case of problems with it, there will be freezes when launching games or demanding programs. Also, with prolonged use of the computer, freezes begin and various errors occur.
To diagnose RAM, you can use a standard Windows tool called the Windows Memory Checker and is available in versions 7, 8, and 10.
After its launch, a reboot will begin and search for errors. If, according to the result of the check, no errors are detected, then the system message “No memory errors were found” will appear. If errors are found and you have several RAM modules installed, then you should try disabling one of them and try to test the modules one by one.
This is how you find the problem bar. However, if the program finds errors in each of the modules, then the problem may not be in the RAM, but the motherboard is faulty.

Processor check
You can also use the AIDA 64 program for diagnostics. There you can see the temperature, fan speed, and core voltage. You can run a stress test, but it is better to use the Linx program to check the processor.
Normally, the temperature should be less than 45 degrees at low load, and 65 degrees during the launch of resource-intensive processes.
Besides this program, you can use the Linx program. Running a stress test will show how the processor can handle high loads. This test is one of the most revealing when testing a processor. It shows how stable your processor is under high loads.
Checking the motherboard
The list of problems arising from motherboard malfunctions is extensive:
- the computer may freeze or not turn on at all;
- the usb ports may not work. The system will not see connected external hard drives and flash drives;
- the computer may shut down or restart spontaneously;
- general system slowness.
AIDA 64 can also be used to diagnose the motherboard. The diagnostic test lasts about 20 minutes, at this time you also need to monitor the temperature of the motherboard (this is also monitored in the program).
Based on the results of the test, a window will appear with information about whether the motherboard is working properly or not. If the temperature is too high, you will need to check the cooling system.
Checking the power supply
Most often, if there is a problem with the power supply, the computer will not turn on at all. Or it can turn on for a few minutes and then turn off automatically. Unnatural fan noise may be heard from the system unit.
The OCCT program is used to diagnose the operation of the power supply. Diagnostics includes several tests, during which a high load on all batteries drops.
Therefore, initially, it is better to consider the power supply inside the system unit. Perhaps the fans are just clogged with dust - in this case, it is worth cleaning them. Also, with various damages, burnt elements of the power supply may appear and a burning smell may be felt. In this case, repairs will be required.
Outcome
As you can see, there are many diagnostic programs. It is recommended to diagnose your computer from time to time to avoid breakdowns. AIDA 64 turned out to be especially useful, with its help you can see the temperature and carry out tests for almost any part of the computer.
Now, in the event of a malfunction, you can diagnose yourself before contacting the service center.
Most users work carelessly on a computer and do not think about the fact that at some point the computer may turn off and no longer turn on at all. And quite often a problem arises - a newly assembled or updated computer does not turn on. It’s even worse if the computer suddenly stops working. In this case, the main thing is to correctly identify the breakdown. After all, repairs may not be needed.
Why and why?
First, you need to figure out the reasons that can cause this phenomenon. As you know, dust and unfavorable climatic conditions worsen the condition of PC components. Accordingly, the failure of iron can be caused by oxidation of contacts, dust (and, consequently, static electricity) on microcircuits and connectors, and their overheating. Overheating can also be caused by poor cooling.
Also, all these horrors can also be the result of a power surge, instability of the power supply, as well as improper grounding. The first thing that can be recommended here is to use surge protectors, UPS and computer ground. But remember, it's better not to ground your computer at all than to ground it incorrectly. First, the PC case and the modem with the telephone line must be grounded separately. You should not ground the case to the heating battery, because your neighbors can ground, for example, a refrigerator, a washing machine or a hammer drill, to the same riser. In this case, this "ground" will already become a phase with a potential difference. It is undesirable to ground multiple devices to the same ground at the same time. By the way, therefore, it is not recommended to connect household appliances to the same surge protector with a computer, but it is better to power the monitor, printer and system unit from one surge protector.
A short-circuiting of a wire or power supply to the ground contact can lead to a good fireworks from microcircuits. Therefore, you should always monitor the quality of the cable connection and their condition.
Typical problems
Well, if a trouble happened, then you have to diagnose it. So, let's begin. To begin with, here are some useful statistics to roughly know where the dog may be buried.
If the computer is in a state of clinical death, then, first of all, an autopsy should be done and try to find the characteristic burning smell and find out where it comes from. If it is not there, then it is worth checking the reliability of the power connection. If the check did not help, then you should turn on the PC and check if the fans of the power supply unit (PSU), the case and the processor cooler are spinning (at the same time, check the mounting of the cooler). If they do not spin, and the hard drive does not emit the characteristic spindle spinning sound, then the power supply has failed. The presence of voltage at its output can be checked with a tester by measuring the voltage at the contacts of the motherboard in the place where the power wiring harness is connected to the power supply unit. It is worth connecting a new power supply unit and checking the integrity of the remaining components. To begin with, they must be visually inspected for the presence of burnt elements.
Despite the fact that the working monitor breaks down quite rarely, it is worth checking whether signals are being sent to it from the video adapter. To do this, use an oscilloscope on pins 10 and 13 (ground and synchronization, respectively) of the 15-pin D-Sub connector of the video adapter inserted into the motherboard, you need to check for the presence of working signals.
To facilitate the task of finding a faulty component, I will give the most common symptoms of breakdowns of various equipment. When the processor fails, most often traces of burning are visible on its legs.
In motherboards, the most common failure is the failure of discrete elements, especially capacitors in the VRM (Voltage Regulation Module, is an LC filter). And this block itself can burn out. Often, electrolytic capacitors simply swell up, requiring replacement. Also a common moment is the "knocking out" of transistors in the area of \u200b\u200bthe north bridge, memory modules and VRMs. They can be identified by burnt legs and darkening in this area. There are also failures of clock generators and delay lines, as well as burnout of ports.
Also, a sometimes encountered phenomenon is a broken contact on the board. This can be caused by placing the expansion board into the slot not to the end, bending the board, shorting the contacts on the back of the board to the case, lack of length of wires going from the power supply unit to the motherboard.
The most vulnerable spot in hard drives is an overheated controller and an IDE connector. A burned-out controller can be identified by darkening near its attachment points. Overheating of the microcircuit also leads to deterioration of the contact between the HDD controller and the HDA. The mechanical problems of the hard drive motor can be identified by the strong vibration of the HDD case when the disks rotate. Massive problems were noticed with IBM DTLA and Ericsson drives (70GXP and 60GXP), Maxtor 541DX, Quantum Fireball 3, Fujitsu MPG series.
In CD drives, the optical-mechanical part most often fails. In particular, the mechanism for laser positioning and disc detection. As a rule, such a breakdown is caused by a malfunction of the MCU (system control microprocessor), which generates control signals, as well as the laser reader motor driver, which is responsible for the excitation signal. To check them, it is necessary to measure the output signals on the corresponding contacts of the MCU. A typical symptom of a malfunction of the MCU is the lack of movement of the laser reader during the initial power up. In floppy drives, the most common mechanical failures associated with the lifting and clamping of the floppy disk.
Hardware and software diagnostics
If all of the above did not help to determine the breakdown, then you will have to go to hardware and software diagnostics. And in order for it to pass successfully, you need to know exactly what is the order of turning on PC devices.
So let's take a look at the boot order of the computer.
- After turning on the power supply, the PSU performs a self-test. If all output voltages are correct, the power supply sends a Power_Good (P_G) signal to the motherboard on pin 8 of the 20-pin ATX power connector. It takes about 0.1-0.5 s between turning on the PC and giving the signal.
- The timer microcircuit receives the P_G signal and stops generating the reset signal applied to the microprocessor. If the processor is defective, the system freezes.
- If the CPU is alive, then it starts executing the code written in the ROM BIOS at the address FFFF0h (the address of the system reboot program). This address contains the JMP unconditional jump command to the address of the start of the system boot program through a specific ROM BIOS (usually this is the address F0000h).
- The specific ROM BIOS code starts executing. The BIOS starts checking the system components for operability (POST - Power On Self Test). Upon detecting an error, the system will beep because the video adapter has not yet been initialized. The chipset and DMA are checked and initialized and the memory size determination test is performed. If the memory modules are not fully inserted or some memory banks are damaged, then either the system freezes or you hear long repeating signals from the system speaker.
- The BIOS image is unzipped into RAM for faster access to the BIOS code.
- The keyboard controller is initialized.
- The BIOS scans the memory addresses of the video adapter, starting with C0000h and ending with C7800h. If the BIOS of the video adapter is found, then the checksum (CRC) of its code is checked. If the CRCs match, then control is transferred to the Video BIOS, which initializes the video adapter and displays information about the Video BIOS version on the screen. If the checksum does not match, then the message "C000 ROM Error" is displayed. If the Video BIOS is not found, then the driver written in the BIOS ROM is used, which initializes the video card.
- The ROM BIOS scans the memory space starting from C8000h looking for BIOS for other devices such as network cards and SCSI adapters and checks their checksum.
- The BIOS checks the meaning of the word at 0472h to determine whether it should be a hot or cold boot. If the word 1234h is written to this address, then the POST procedure is not executed, a "hot" boot occurs.
- In case of cold boot, POST is performed. The processor is initialized, information about its make, model, etc. is displayed. One short beep sounds.
- RTC (Real Time Clock) is being tested.
- Determining the CPU frequency, checking the type of video adapter (including built-in).
- Testing standard and extended memory.
- Assigning resources to all ISA devices.
- Initialization of the IDE controller. If a 40-pin ribbon cable is used to connect an ATA / 100 HDD, a corresponding message will appear.
- FDC controller initialization.
- The ROM BIOS looks for the system floppy disk or MBR of the hard disk and reads sector 1 on track 0 of side 0, copies this sector to address 7C00h. Then this sector is checked: if it ends with the signature 55AAh, then the MBR looks through the Partition Table and looks for an active partition, and then tries to boot from it. If the first sector ends with any other signature, an Int 18h interrupt is called and the message "DISK BOOT FAILURE, INSERT SYSTEM DISK AND PRESS ENTER" or "Non-system disk or disk error" is displayed.
In general, that's all. As for the last point, the errors indicated in it indicate a malfunction of the hard drive (software or hardware). Now you just have to identify at what point your computer stops working. If this occurs before the messages appear on the monitor, the fault can be identified by audible signals. The most common sound signals are shown in the table.

It should be noted that the audio signals may differ from the above due to the difference in BIOS versions. If the sound signals did not help to determine the malfunction, then we can only rely on hardware diagnostics. It is produced by several means.
Hardware diagnostics
The first remedy is very commonplace, but quite effective. Individual units can be checked for proper operation by touching them with your hand to check if they are hot. After switching on for a minute, the chipset, processor, memory chips and video card units should warm up. If they seem warm, then this is enough to conclude at least that these elements are powered. With a high degree of probability, they should be working.
The second tool is more scientific and requires some engineering training. It consists in measuring the potentials on various elements. This requires a tester and an oscilloscope. It is advisable to have a motherboard layout card, as it is multi-layered and the signal path is not so obvious. It is worth starting measurements with the power elements of the input circuits and stabilizing and shunt capacitors, check for the presence of +3.3 and +5 V in the appropriate places on the motherboard, and the operation of clock generators. After that, it is worth checking the presence of standard signals on the processor socket pins. Next, check for signals in slots and ports. Last but not least, it is worth tackling the logical elements (although repairing them often turns out to be unreasonable). This requires knowledge of the port and slot assignments. This information is shown in the tables.


The third and final diagnostic tool is professional hardware diagnostic tools. These include the use of diagnostic cards of the DP-1 type and the PC-3000 complex, created by the ROSK company. The diagnostic board is installed in a free slot of the motherboard, and after turning on the PC, an error code is displayed on its indicator in hexadecimal form. The use of such a board significantly increases the likelihood of fault localization. The use of DP-1 is designed for the correct operation of the processor, and the CPU breaks down extremely rarely.
At the moment in Russia diagnostic cards, test ROM BIOS and other diagnostic tools are produced by ACE Laboratory.
With hardware diagnostics, it should be borne in mind that in most cases only one device fails, and the easiest way to identify it is to replace it with a similar one that is guaranteed to work.
As for power supplies and peripheral devices, diagnosing faults in them is a topic for a separate conversation, but about monitors, you can give a number of tips. Quite often, the intermediate line transformer, which is connected between the front-end and the output line-scan transistor, fails. Its main malfunction, as a rule, is a short circuit of turns. This transformer is part of a high voltage line scanner. This high voltage is applied to the CRT. Therefore, often the absence of a glow on the screen and the absence of a raster indicate the absence of high voltage. Typically, a vertical bar on the screen also indicates a line scan failure. You can check for high voltage on the CRT by sliding your hand over the surface of the screen. If high voltage is applied, you should feel some vibration or static crackling.
Software diagnostics
If your computer nevertheless turns on, but is unstable, freezes at boot, “falls out” into a blue screen, then this is most often a consequence of overclocking, local overheating or “glitchy” memory, as well as errors in HDD operation (these include “ fall "Windows).
The stability of their work can be checked under DOS by booting from the system floppy disk or disk. To do this, use the utilities CheckIT, PC Doctor, Memtest 86, Stress Linux, Norton Diagnostics, The Troubleshooter. For professional testing and HDD recovery, you should use HDDUtility and MHDD, but they work correctly only under MS-DOS 6.22. The first thing to do with them is to check the SMART attributes of the HDD state. You can also use Norton Disk Doctor to diagnose, check and mark bad sectors.
It should be remembered that a full hardware check can only be performed under Windows, testing the stability of work in burn-in tests for at least 24 hours. These tests include CPU Hi-t Professional Edition, CPU Stability Test, Bionic CPU Keeper, CPU Burn, Hot CPU Tester Pro, HD_Speed, DiskSpeed \u200b\u200b32, MemTest.
In general, as you know, it is much easier to prevent an event than to correct its consequences, therefore it is much easier to regularly (at least once every few weeks) monitor the parameters of the voltages issued by the power supply, watch the HDD SMART parameters (Active SMART, SMARTVision, SMART Disk Monitor), study the temperature of the processor, check for good cooling and the absence of extraneous sounds. It would also be useful to lubricate the fans with machine oil, at least once every six months.
As practice shows, the capabilities of their own computer suit users only for the time being - sooner or later they have to resort to an upgrade. Everything is trite simple - new versions of the OS and applications used, as a rule, require more and more resources. The easiest way to update your PC is to purchase a new system unit with modern "stuffing", which, if you have money, is not difficult. However, this is not always wise - often it is enough to resort to replacing individual components to increase productivity.
To choose an upgrade strategy, you need to find out what hardware is installed and understand what the computer lacks for faster operation - processor power, video system capabilities, memory size, hard disk read / write speed, etc. But this is only one side of the coin. After purchasing a new system unit or upgrading an old one, you will need to quickly find out whether the “filling” of the system unit matches the one declared at the time of purchase (without opening the unit itself, since there may be a seal on it), assess how much the performance has increased, and understand whether the computer is really stable working.
Any professional collector (and all overclocking enthusiasts) can easily solve the listed tasks, since he has in his arsenal a lot of various and highly specialized information and diagnostic tools. An ordinary user does not need to acquire such solutions, however, it is still necessary to install a simple complex utility to obtain information about the hardware and test the computer. It is these programs that we will consider in this article.
Retrieving hardware data
Theoretically, any information and diagnostic utility is able to recognize the "stuffing" of the system unit. However, not every program is able to identify new models of processors, video cards and other hardware (it all depends on the completeness of the database and the regularity of its updating), and the amount of information on the identified components can be different - from minimal to exhaustive.
Among the solutions considered, the program has the most detailed information. AIDA64, which knows almost everything about any hardware, including the latest innovations. For example, this utility will be able to recognize recently appeared on the market solid-state drives Intel 510 and 320, video cards AMD Radeon HD 6790 and NVIDIA GeForce GT 520M, five new mobile video cards of the Quadro M series from NVIDIA, etc.
Using AIDA64, you can easily find out everything about the processor, motherboard, video card, network adapter, storage (including the latest SSD) and input devices, multimedia, as well as ports, external connected devices and power management. The program is able to determine the type of flash memory, controller model (reading SMART-information of controllers manufactured by Indilinx, Intel, JMicron, Samsung and SandForce is supported) and data transfer rate. Moreover, the utility recognizes USB 3.0 controllers and devices that are compliant with this new standard.
The amount of data provided by AIDA64 is impressive - access to them is provided from the tree-like menu of the sections that unite the main modules of the program. So, through the section Computer It is easy to get aggregate information about hardware components, system and BIOS, as well as data on processor overclocking, power supply features, state of system sensors, hardware monitoring, etc. (Fig. 1).
Figure: 1. Summary information about the computer (AIDA64)
In other "iron" sections, more detailed information is provided - so in the section Motherboard there is detailed information about the CPU, motherboard, memory, BIOS, etc. Display it is easy to get information related to the graphical interface of the system (in particular, data on the video adapter and monitor - Fig. 2), and in the section Multimedia learn about the multimedia capabilities of the system (multimedia devices and installed audio and video codecs).

Figure: 2. Video card data (AIDA64)
In chapter Data storage provides information about hard disks and optical drives, as well as the logical and physical structure of hard disks, values \u200b\u200band statuses of SMART parameters. You can find information about network adapters in the section Net, and about buses, ports, keyboard, mouse, etc. - in the section Devices... Also from the menu Service panel opens AIDA64 CPUID (Fig. 3), which displays data on the processor, motherboard, memory and chipset in a compact form.

Figure: 3. Panel AIDA64 CPUID
Program SiSoftware Sandra It is also very informative and allows you to get comprehensive information about almost all hardware components of a computer system. In particular, the utility displays summary data about the computer as a whole (Fig. 4) - that is, basic information about the processor, motherboard, chipset, memory modules, video system, etc. (tab Devices, pictogram System information).

Figure: 4. Computer Summary (SiSoftware Sandra)
Along with summary information, in the tab Devices The utility also provides more detailed information about the motherboard and processor, display and video adapter (Fig. 5), memory, buses and devices installed in them, about disks, ports, mouse, keyboard, sound card, etc. With regard to readings of various monitoring sensors, then to obtain them you will need to run not an informational, but a diagnostic module Environment Monitor (tab Tools). This module provides display of text and graphic information about processor temperature, fan speed, voltage, etc.

Figure: 5. Video System Data (SiSoftware Sandra)
Utility PC Wizardprovides access to information about the main hardware modules installed in the computer: motherboard, processor, video card, memory, I / O ports, drives, printers, multimedia devices, printers, etc. All this data is available on the tab Iron... By activating the icon on it General information about the system, you can determine in one click what exactly is in the system unit (Fig. 6) - which motherboard, which processor, etc. Other tab icons Iron help to get more detailed information about the components (fig. 7); the amount of data provided is quite sufficient for the average user. Also, through the menu Tools → Overclocking information you can find out whether some of the system components (processor, bus or memory) have been overclocked, and if so, to what limits, and also take readings from some sensors.

Figure: 6. Aggregate information about the computer (PC Wizard)
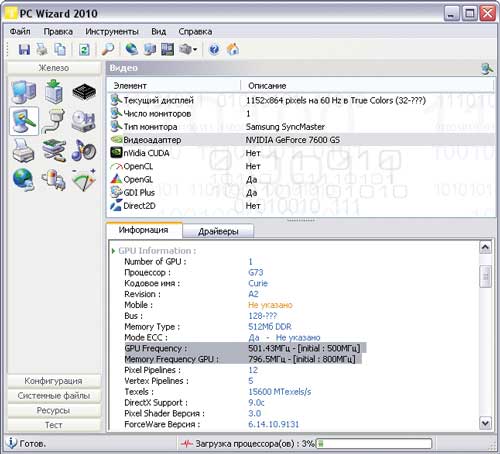
Figure: 7. Data about the graphics subsystem (PC Wizard)
Utility HWiNFO32 will also allow you to learn a lot of interesting things about the hardware of the computer. Immediately after launch, it begins diagnostic studies and in a matter of seconds displays a window System Summary with a compact display of data about the processor, motherboard, memory, chipset, disks, etc. (Fig. 8). This window can also be called up on the screen while working with the utility - by clicking on the button Summary... In addition, HWiNFO32 displays detailed information about the processor, motherboard (Fig. 9), memory, video adapter, and more in the appropriate tabs - Central Processors, Motherboard, Memory, Video Adapter etc. The data on the processor, memory modules, motherboard, buses and disks are quite detailed, information on other devices is more modest. If necessary, it is easy to get readings of the sensor sensors installed on the motherboard (temperature, voltage, etc.) by clicking on the button Sensors.

Figure: 8. Summary information about the computer (HWiNFO32)
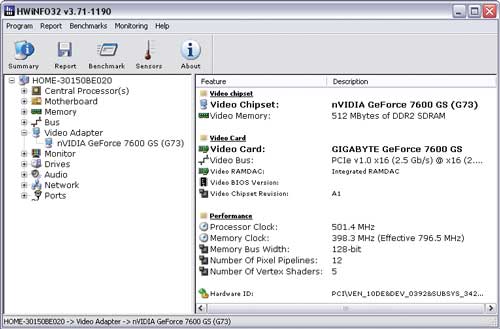
Figure: 9. Graphics card data (HWiNFO32)
Program Fresh diagnose allows you to find out information about any iron components, however, not always detailed. For example, in the tab Hardware System you can find out about the motherboard, processor, cache memory, buses, BIOS, CMOS memory, etc. Section Device contains information about the video card (Fig. 10), peripheral devices (keyboard, printer, monitor, optical drives, etc.) and ports. In chapter Multimedia combined data on various multimedia devices, DirectX, audio and video codecs.

Figure: 10.Video card data (Fresh Diagnose)
Performance evaluation
Before upgrading, you need to assess the performance of the computer and its individual components in order to understand which hardware needs to be replaced immediately, and which components can wait until better times (after all, in times of crisis, not everyone decides on a complete upgrade). It is quite easy to do this by performing a couple of specific benchmarking tests in the environment of a suitable diagnostic utility. After purchasing a new computer or upgrading an old one, it also does not hurt to conduct testing to make sure that the computer has become more productive. Of course, you can feel the result of the upgrade in the course of normal work in applications, but for the sake of completeness, it is better to make sure that the performance is improved with the help of specially designed tools for this purpose.
When conducting tests, in order to obtain a more objective assessment, it is better to close all applications, do not use the mouse and keyboard, run the same test (in the same version of the utility) several times and focus on the average result. In addition, it should be borne in mind that the same synthetic tests in different utilities are implemented in a far from identical way, so the programs show different results. And the results obtained should not be taken literally, since they do not reflect real performance, but only indicate the level of performance when performing strictly specific tasks. Nevertheless, conducting such testing allows us to understand how outdated the hardware components installed in your computer are in comparison with the reference samples, as well as assess the level of performance before and after the upgrade, which is what interests us in this article.
Of greatest interest from the testing point of view are the AIDA64 and SiSoftware Sandra programs, some benchmakers of which are used even by professionals in different hardware testing methods. The capabilities of the other utilities considered in the article are limited in this regard, although they also provide some test functionality.
In a programme AIDA64 a wide range of benchmarking tests are presented. So, in the section Test 13 synthetic tests are combined, the first four of which evaluate memory performance - read / write / copy speed (Fig. 11), and also measure latencies (testing the average time the processor reads data from RAM). The rest of the tests from this section evaluate the processor performance in integer and floating point operations, when creating ZIP archives, when performing encryption using the AES encryption algorithm, etc. (tests CPU Queen, CPU PhotoWorxx, CPU ZLib, CPU AES, CPU Hash, FPU VP8, FPU Julia, FPU Mandel, FPU SinJulia). All benchmarks compare performance against other systems, including the newest ones.

Figure: 11. Assessment of processor performance (CPU Queen test; AIDA64)
Through the menu Service three more benchmarking tests are available: Disc test, Cache and memory test and Monitor diagnostics... The disk test measures the performance of hard drives, solid state drives, optical drives, and more. The Cache and Memory Test measures the bandwidth and latency of the processor and memory caches (Figure 12). In the test Monitor diagnostics the quality of display of LCD- and CRT-monitors is being checked.

Figure: 12. Test cache and memory (Cashe & Memory Benchmark; AIDA64)
In terms of testing for a wide range of users, the program is even more interesting SiSoftware Sandra, with which you can not only evaluate the performance of your PC in comparison with other reference computer configurations, but also test your computer for the need to upgrade it. Modules designed for testing the most important computer subsystems are combined on the tab Benchmark tests... A whole group of synthetic benchmarks are designed to test the processor - arithmetic and multimedia benchmarks, multi-core efficiency benchmarks, power efficiency benchmarks, cryptographic performance, and GPGPU cryptography. Several tests are responsible for testing physical drives - including the file system test, and modules for testing physical disks, removable / flash drives, CD-ROM / DVDs, and Blu-ray optical drives. Tests for testing memory are provided: memory bandwidth test, memory latency test, and cache and memory test. In addition, there are tests for assessing the rendering speed and video memory performance, an audio / video encoding / decoding test, a network bandwidth test, an Internet connection speed test, etc. When testing a number of components (processor, RAM, etc.), the results are given in comparison with reference models that are more similar in characteristics. At the same time, it is possible to independently select standards for comparison, including the most modern ones (Fig. 13), which is very convenient and allows you to quickly understand how outdated the hardware components installed in the computer are and which models are better to replace them with.
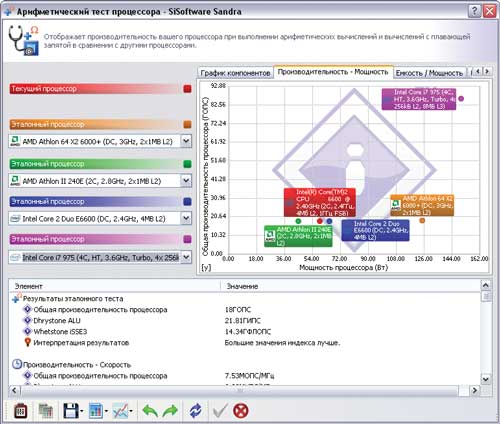
Figure: 13. Assessment of processor performance
(arithmetic test; SiSoftware Sandra)
Two interesting test modules are presented in the tab Tools are modules Performance Index and Analysis and recommendations... Using a test Performance Index the overall performance of the computer is assessed during the arithmetic and multimedia tests of the processor, the determination of the memory bandwidth, as well as testing of physical disks and a video card (Fig. 14). Reference models of components for comparison are selected by the program or by the user. Module Analysis and recommendations provides a detailed analysis of the PC for a possible upgrade. At the end of this analysis, the program gives a list of recommendations on which of the hardware components is best to replace in order to improve performance (Fig. 15), and draws attention to possible problems (for example, the complexity of adding memory due to the occupancy of all slots, too high CPU temperature (and suggests checking cooling), etc.).

Figure: 14. Assessment of the overall performance of the computer (SiSoftware Sandra)
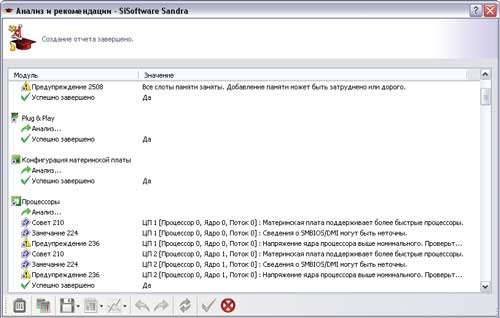
Figure: 15. Analysis of the computer for an upgrade (SiSoftware Sandra)
Utility PC Wizard also includes certain functionality for testing hardware (tab Test). With its help, you can visually assess the overall performance of your computer (icon Global Performance) in comparison with other configurations and based on the test results, to understand which of the subsystems in terms of performance significantly falls short of the selected (from the pre-installed list) reference sample - that is, they need updating, and which are quite at the level (Fig. 16).

Figure: 16. Assessment of the overall performance of the computer (PC Wizard)
There is also a number of synthetic tests in the arsenal of PC Wizard, which allow evaluating the performance of the processor, L1 / L2 / L3 caches and memory in general (bandwidth, timing), as well as the video subsystem, hard disk, optical drive, etc. In particular, for The processor provides baseline tests for Dhrystone ALU, Whetstone FPU, and Whetstone SSE2 to evaluate its performance in integer and floating point operations. The test results are displayed in text and graphical form, in a number of tests it is possible to compare the results obtained with the test results of the selected reference subsystem (Fig. 17).

Figure: 17. Testing the processor (PC Wizard)
Utility HWiNFO32 is able to assess the performance of the processor (CPU, FPU, MMX), memory and hard disk during express testing (button Benchmark). Test results are presented in two versions - in numerical form and in the form of a comparative diagram. The diagram contains many reference components, including modern ones, so it is easy to understand how much the processor (or other component) installed in the computer is inferior in performance to modern models (Fig. 18).

Figure: 18. Processor Performance Assessment (HWiNFO32)
Program Fresh diagnose has a toolkit for determining the performance of individual system components. These are seven synthetic test modules in the section Benchmarks... They can be used to evaluate the performance of the processor (Whetstone, Dhrystone and multimedia tests), memory, video system, hard drives, optical drives and network adapter. The test results are compared with the base systems and presented in the form of visual histograms. True, in our opinion, they are not very useful, since outdated reference systems are selected for comparison (Fig. 19).

Figure: 19. Processor Testing (Fresh Diagnose)
Checking your computer for stability
Unfortunately, it is not a fact that the updated computer will be stable in operation. Why? There are many reasons - for example, the power supply unit may not cope well with the increased load due to the replacement of the processor or video adapter with newer models.
If such a picture takes place, then the situation should be dealt with as soon as possible - that is, before there are obvious signs of instability in the form of a blue screen of "death", etc. This means that you need to find out the temperature of the processor, motherboard and other important hardware and understand whether any component overheats under load, and also evaluate how the computer generally behaves under stressful conditions. This can be done by stress testing.
Most stability tests place an intense computational load on various blocks of the CPU, system memory, GPU, and system logic set - that is, they make the computer work under stress conditions. Unfortunately, none of these tests by themselves guarantee 100% system stability, but if the test detects a failure in the system or was not completed, then this is a clear signal that you need to pay attention to the hardware.
Provided in AIDA64system stability test (available through the menu Service) is intended for stress testing the processor (testing of cores separately is allowed), memory, local disks, etc. (Fig. 20). The test results are displayed on two graphs: the upper one records the temperature of the selected components, the lower one - the processor load level (CPU Usage) and the clock skip mode (CPU Throttling). Mode CPU Throttling it is activated only in case of overheating of the processor, and it should be understood that activating this mode during testing is an alarm signal calling to pay attention to the operation of the cooling system. During the test, the heating of the system is controlled by constant temperature monitoring.
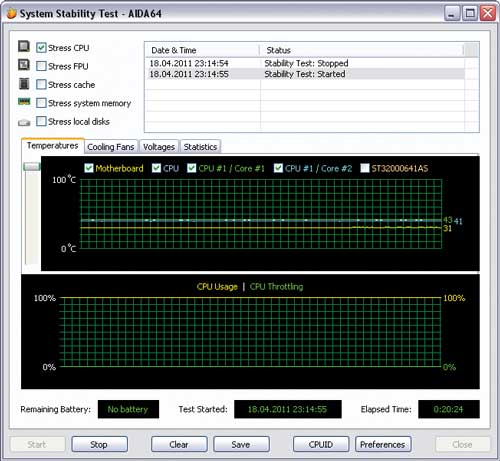
Figure: 20. Processor stress testing (AIDA64)
In addition to the temperature, the graphs of which are displayed on the first tab during stress testing, the program provides other useful information on other tabs - about the fan speed, voltage, etc. It should be borne in mind that the system stability test in AIDA64 can last indefinitely, so it is stopped manually, making sure that everything works fine (after 30 minutes), or when suspicious results are detected (for example, severe overheating of one of the components).
Using the stability test SiSoftware Sandra (tab Tools), you can also stress testing (Fig. 21). It will allow you to orientate yourself regarding the stability of the system and identify its weaknesses by analyzing the operation of the processor, memory, physical disks and optical drives, power efficiency, etc. selected test modules. During testing, the utility monitors the state of the system and stops the process when errors appear or in case of overheating (critical temperatures are set by default or manually).
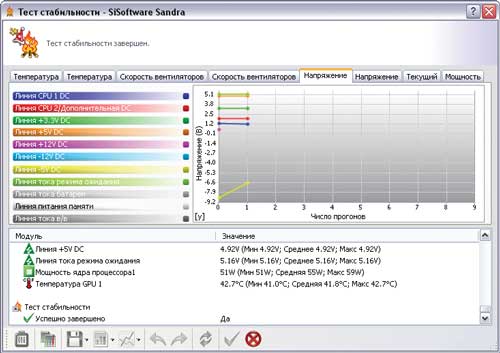
Figure: 21. Stability test (SiSoftware Sandra)
Utility features PC Wizard in terms of testing the system for stability (test System Test Stability from the menu Tools) are limited to testing the processor and motherboard. During testing, the processor is maximally loaded and in such conditions it works for a long time, during which the temperatures of the processor and motherboard are measured at a certain frequency, and the results are displayed on a graph (Fig. 22).
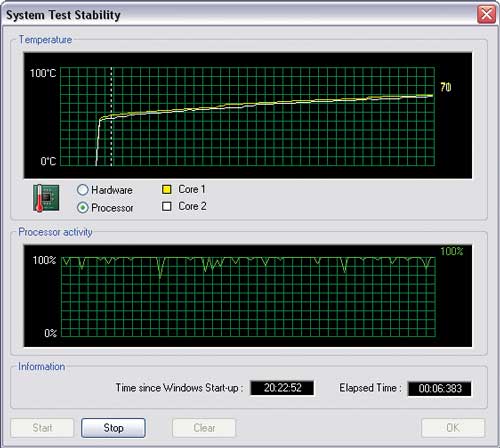
Figure: 22. Testing the processor for stability (PC Wizard)
A quick tour of the utilities
AIDA64 (Extreme Edition) 1.60
Developer:FinalWire Ltd
Distribution size: 11.7 MB
Price:US $ 39.95
The AIDA64 program is an updated version of the well-known information and diagnostic solution EVEREST, designed for diagnostics of hardware and software computer resources and versatile computer testing. The utility can be run from a hard disk, CD / DVD / BD disks, as well as from flash drives. The program is presented in two editions: AIDA64 Extreme Edition and AIDA64 Business Edition, AIDA64 Extreme Edition is designed for home users. The utility is regularly updated and supports the vast majority of modern models.
SiSoftware Sandra 2011 (Lite)
Developer: SiSoftware
Distribution size: 53.3 MB
Price:free (for personal and educational use)
SiSoftware Sandra Lite is the best free diagnostic information software. It provides detailed information about the computer and any of its hardware and software components, and also allows you to test the PC for performance, the need for an upgrade, etc. The utility can be used to analyze, diagnose and test a PDA or smartphone. The program is released in several editions, for home use the capabilities of the free edition of SiSoftware Sandra Lite are enough. The utility is updated regularly enough and supports the vast majority of modern models.
PC Wizard 2010.1.961
Developer: CPUID
Distribution size:5.02 MB
Price: is free
PC Wizard is an information and diagnostic utility used to diagnose hardware and software components and conduct versatile testing. In the basic version, the program is launched from a hard disk; it can be loaded from portable devices - for example, from a flash drive (a special version of the Portable PC Wizard). The utility is updated not as often as we would like (the last update was from August 2010), although it supports many modern models (of course, there is no talk of new products).
HWiNFO32 3.71
Developer: Martin Malik
Distribution size:2.26 MB
Price:is free
HWiNFO32 is an information diagnostic utility that allows you to get detailed information about the PC hardware and test the performance of the processor, memory and hard drives. The program is updated monthly - as a result, all novelties that have appeared on the market are included in its database in a timely manner. There is a special portable edition of the utility that can be run from a removable USB drive or other portable device.
Fresh Diagnose 8.52
Developer:FreshDevices.com
Distribution size: 2.08 MB
Distribution method: freeware (http://www.freshdiagnose.com/download.html)
Price: free (registration is required; in the unregistered version, the use of tests is impossible)
Fresh Diagnose is an information diagnostic utility designed to obtain information about all hardware and software components of a PC, as well as to test it. The program is regularly updated and supports many modern models, but among its shortcomings is a poorly thought-out interface and poor-quality Russian-language localization (therefore, it is wiser to use it with an English-language interface).
If you are interested in such issues as checking the speed of your Internet connection, testing the monitor or supporting stereo sound by the device's speakers, then our article will help you make the necessary tests quickly and without installing any software!
Knowing everything about your computer is quite important. Firstly, it allows you to better understand the potential capabilities of your PC, and secondly, to compare the results of your system with the results of other users.
In order to fully test your PC, you can use special complex utilities, like, and the like. Something about the system can be found in the properties of the computer, but there are a number of indicators that are easier, faster and more convenient to find out using special online services. It is about them that will be discussed in this article.
What cannot be tested and why
No matter how powerful modern Internet resources are, the fact that they work only in a browser environment imposes a number of restrictions on them. Specifically, with their help we cannot get direct access to the system and its parameters. Accordingly, there is no, for example, online testing services for RAM or video cards.
True, there are several portals that have found how to get around this limitation. They offer to install a special plug-in client that collects data about your PC, transfers them to the server, where they are processed and displayed as a finished result in a browser window. It's not a pure online service, but still. From similar Russian-language sites I recommend DriversCloud.com:
After clicking on the "Start analysis" button, the plugin loader should be automatically downloaded, which in the installed form takes a little more than 11 megabytes (if the download has not started, you can download it manually on the page "How can I remove the plugin?"). If everything is already installed, then testing will start, the result of which will be something like the following summary table:

We will receive generalized information about almost all PC components. However, this is far from all the data! To the right of each description module there is a "Plus" button, by pressing which, you can select a number of additional characteristics in each category.
But that's not all :) As you might guess from the name, DriversCloud also allows for all main nodes of your computer! In order to view the proposed list of updates, click the "Find Drivers" button under the table of your PC specifications.
In a word, the DriversCloud service is quite intelligent, but, alas, it is not completely independent of third-party software. Fully online, using a regular browser, we can only test what concerns multimedia capabilities or network parameters:
- work of the microphone (requires) and speakers;
- monitor settings (display dimensions, color parameters, brightness, contrast, etc.);
- working with files;
- network connection parameters (speed, browser used, IP address, etc.).
I offer you everything I could find :).
Internet speed test
Probably the very first and most logical thing that asks for verification is the speed of the Internet connection. Let's not break the logic :)
There are quite a few different services for testing Internet speed. Each of them can produce different results, so to get more accurate data, I would advise you to double-check the readings on different sites and calculate the average value, which will be as accurate as possible.
Here is a list of the most successful Internet speed testing services:
The essence of all of them is the same: your computer connects to a server, downloads certain test files from there, and then sends them back. Based on how quickly the data is received and downloaded, the server calculates the average speed of your Internet connection. The received data is displayed in the form of beautiful pictures or plain text.
From the above list, one of the most accurate and beautiful Internet speed testing services is SpeedTest.net:

A characteristic feature of this service is that before starting testing, you can select any available server in any city on the map! If you don't, SpeedTest will choose the one that is closest to your current location, which is calculated from the IP address.
To start testing, just click the "Start Test" button and wait until the data is downloaded and sent. By the way, the whole process is animated and you can see the progress of the transfer of test files. Upon completion of the test, a result will open, which will reflect the ping time, as well as the speed of receiving and transmitting data in megabits per second:

The most informative, in my opinion, is the Internet speed test from Yandex:
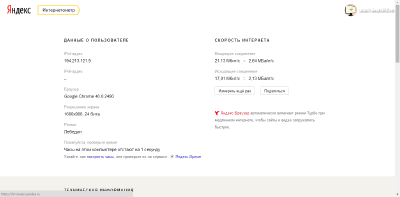
There are no embellishments here, however, there are a couple of nuances that distinguish the Internet meter from other services. Firstly, the measurement results are displayed not only in bits, but also in bytes, which allows us to quickly estimate the actual useful download speed in the form we are used to. Secondly, if you scroll down the page, we will see a whole section with various technical and reference information!
The rest of the services mentioned work almost identically. It is worth paying attention to the fact that of them, the fastest is InetZamer.ru, MainSpy.ru allows you to see the dynamics of speed changes at different stages of testing, and 2ip.ru has a number of useful and even entertaining services that you may like.
Monitor testing
When buying a monitor, many users do not even think that it can and should be configured. Usually, the work of the monitor is assessed by us according to the criterion: "shows-does not show" :) So it has been with us for years without calibration by colors, brightness, etc. And, by the way, it is recommended to check the monitor settings a couple of times a year!
As in the previous case, I offer you a number of services for testing and adjusting the parameters of your display:
Each service allows us to define:
- Uniformity of color rendering and absence of "broken" pixels.
- Screen refresh rate (especially important for CRT displays).
- Sharpness of the image.
- Display brightness and contrast.
- The correctness of the geometric proportions of the screen.
Before moving on to considering the services themselves, let's define a little bit about the algorithm of our actions. For displays on cathode-ray tubes, you need to carry out all the tests in turn and correct each deficiency found along the way using the on-screen menu, called up by buttons on the monitor.
However, LCD monitors tend to require fewer tests, as they are not as prone to knock out settings as their CRT counterparts. First of all, you should pay attention to the uniformity of color rendering when filling the screen with one color. If you find one or more dots of a different color on a plain background, these are "broken" pixels ...
Sometimes you can get rid of them by "warming up" the matrix with a dynamically changing image (for example, white noise) for a couple of hours. You can use the JScreenFix.com service for spot "treatment" of dead pixels.
The second common mistake in LCD monitor settings is incorrect brightness and contrast settings. To correct it, test pictures are usually used with grayscale gradations up to its lightest tones, turning almost into white. If you see all the gradations, then everything is correct, if not, try changing the brightness and contrast parameters.
I think now it will be easier for you to figure out why and how to use the offered online monitor tests. Therefore, now let's talk a little about each of them. And the first in the list is the Monteon.ru service:
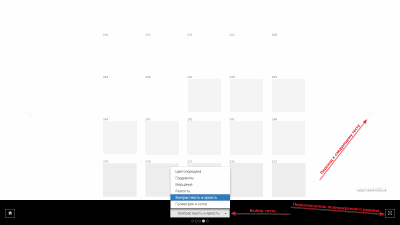
This is a Russian-language service that contains the entire set of classic monitor tests. It is better to run all tests in full screen mode by pressing the F11 key on the keyboard or a special button on the lower toolbar. For CRT displays, it is advisable to run all tests. And for LCD, you can selectively check color rendition and brightness / contrast settings.
Fans to do everything quickly, as well as fans of cats, will like another Russian-language service from the creators of online CatLair:
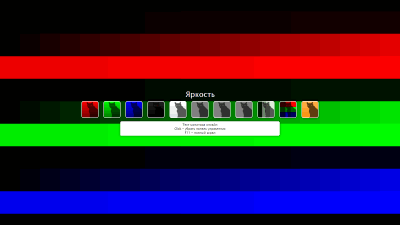
There are not so many tests here as on the previous resource, but all tests contain images of cats on button icons :). To hide the cats and all the panels with tips, you just need to click on the screen. A second click will return everything to its place. Naturally, it is better to test in full screen mode as well.
The last service on our list is English-speaking, however, it provides us with a number of very interesting and useful (especially for CRT monitors) tests:

All tests here are divided into three large subgroups: "Color range" (color rendering), "Trailing" (dynamics) and "Homogenuity" (uniformity). Of particular interest is the second section, which allows you to test the display's capabilities to dynamically change the position of objects on the screen without distorting their shape. There are settings for background and object colors, as well as movement speed.
The only drawback of the service is that a flash player of at least version 8 must be installed on the computer to work.
Sound check
It would seem that you can check in the sound: it is either there or it is not :) However, knowledgeable people working with sound or just audiophiles can tell you that there are many tests that allow you to determine the frequency characteristics of sound reproducing equipment, noise level and other parameters ...
For the average user, this whole theory is not particularly important. However, there are also practical cases from real life. For example, you bought headphones, but there are no marks on them where the left and where the right channel is ... The AudioCheck.net service will help you to accurately determine the correct stereo online:

We just need to go to the site, connect the headphones to the computer and press the channel check button (for example, "Left" for the left one). If you hear sound in the left earpiece, it means that you inserted them into your ears correctly, otherwise you will have to swap them :)
The service, alas, is English-speaking, but knowledgeable people on it can find many useful things. Here are collected and tests to determine the frequency characteristics, and to check the dynamic range, and even, an online hearing test! A list of all tests can be found at https://www.audiocheck.net/soundtestsaudiotesttones_index.php.
Virus check
The last thing you can check online on our computer is the. They are gigabytes of storage on our PC's hard drives and some of them can be very insecure! If you have downloaded something from the Internet and you do not trust it, check it with the recognized online antivirus scanner VirusTotal.com:

This service allows you to test any type of data up to 128 megabytes using more than 50 anti-virus engines with the latest databases. All that is required of you is to select the file to be tested on the computer, send it for analysis and wait for the results. If your file has been tested before, the results can be almost instant!
A number of popular services work in a similar way, such as VirusScan.Jotti.org (up to 5 files no more than 50 MB at a time), VirScan.org (up to 20 files no more than 20 MB) or Metascan Online (1 file up to 140 MB). However, the Total Virus is the most well-known and authoritative. However, one can say that no one can say 100% whether a file is dangerous. Virus scanners only assume a threat, and it's up to you :)
If you want to scan the entire computer, and not just specific files, then there is such an option. True, for this you have to use Internet Explorer and a special extension to it. However, if this does not bother you, then I bring to your attention ESET Onlie Scanner:
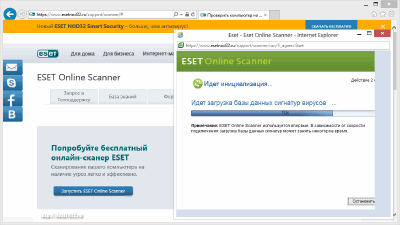
This is a service from the developers of the popular NOD32 antivirus. It allows you to use the real ESET database to identify dangerous software on your computer using a special plug-in for IE. All you need to do is open the service, click the "Launch ESET Onlie Scanner" button and confirm the installation of the add-on, and then launch it.
However, it should be said right away that, alas, you cannot cure the found viruses using the service. The scanner only detects their presence and offers to download and install a trial version of the ESET Smart Security antivirus package. However, you receive the List of unsafe files and nothing prevents you from manually deleting everything that you think is necessary!
conclusions
Modern Internet services, as we could see, have reached almost the limit of their capabilities, which are limited only by the peculiarities of browsers. And some even try to "jump" the established restrictions by using their own online clients and plugins.
Of course, in some cases online services do not reach the level of full-fledged programs. However, for solving a certain range of tasks, they are even better than the usual software, since they practically do not depend on the power of your PC and can work in general on any device with a browser!
P.S. It is allowed to freely copy and quote this article, provided that an open active link to the source is indicated and the authorship of Ruslan Tertyshny is preserved.


