External report in 1s. Adding an external report to the database. Generating a Report Using the Output Form Designer
Working with software products supplied by 1C involves not only the input and systematization of primary information (filling out directories and timely entry of documents), but also the formation of various printed forms based on these data. For these purposes, a special object has been created - reports. Reports in 1C help to analyze the current situation in the company in the context of various indicators and provide an opportunity to make competent management decisions based on this information.
Reports and processing
Generally speaking, there are no significant differences between these two types of objects:
- They can contain layouts of printed forms;
- They can have procedures in their modules for making changes to information;
- They can be internal or embedded;
- External reports and external processing in typical configurations are stored in the same directory.
It is possible to conditionally separate the report and processing according to the principle of use. Layout is necessary to display information in a user-friendly form, processing is created to make changes to the database. Additionally, in the output tables, you can specify the main layout scheme, which will serve to form the appearance of returned documents, as well as settings for storing parameters.
Objects physically considered in the article differ from external processing by the file extension:
- External processing - epf;
- External report - erf.
External and embedded reports
If you look closely at the tree of any configuration in 1C, you will notice that there is also a branch of reports (Fig. 1)
There are practically no differences between external and internal handlers. Moreover, any ert file can be embedded in the configuration and vice versa, the built-in mechanism can be uploaded to an external resource. For example, if we want to make changes to the standard handler "Analysis of Fund Fees", we must call the context menu of the corresponding object and select the submenu "Save as external ..." (Fig. 2)
 Figure: 2
The reverse action is called the "Replace with external" submenu, but for this the configuration must be open for modification.
The only difference between the built-in object is that it can be accessed from the program code of the modules; for an external report it is quite difficult to do this if you do not enter it into the appropriate reference.
Creating an external report
You can create an external report only in the Configurator mode; for this you will definitely need knowledge of the built-in programming language and, most likely, the ability to work with the language and the query designer.
Basically, the programmer has two possibilities to compose data retrieved from database tables:
- Use the data composition system (ACS) mechanism;
- Programmatically fill in a spreadsheet document using a pre-prepared layout.
In the second case, the developer will have to independently think over the interface, selections, groupings and other things that can be created in the ACS during the user's work.
But, regardless of the selected mechanism, you need to start from the "File" menu, "New" submenu. A menu for selecting the object to be created opens before the developer (Fig. 3).
 Figure: 3
 Figure: 4
Here we see:
- A name that summarizes the purpose of the object as accurately as possible;
- Synonym and comment are intended for a complete description;
- Main layout scheme - here you can set the scheme that will be used to print the report;
- The "Open Scheme ..." button opens the processing result constructor;
- Window for describing forms, requisites and layouts.
By clicking the "Actions" button, you can open the module of the object being created.
Layout diagram
Using the ACS to create a report greatly simplifies the developer's work:
- There is no need to think over and create the shape of the object;
- Selections, groupings, columns of the displayed form can be dynamically changed in the user mode;
- It is possible to create and store several options for the formation of the final table.
That is why the data composition scheme is becoming more and more popular in modern solutions. If you click the corresponding button, the ACS designer opens in front of the developer. (Fig. 5)
Figure:  5
5
The scheme is stored in the object's layouts.
In addition to internal and built-in reports, there is one more possibility of storing and accessing these objects - the "Additional processing" directory.
Registering external objects in the database
For managed forms, on which modern 1C software products are based, the form for registering external processing in the database has changed significantly.
If earlier (on ordinary forms) it was enough to create a new element in the corresponding directory, specify the type of the stored handler and define the path to the file in the ert format, then on managed forms registration occurs from the module of the registered object.
For this, the export function ExternalProcessing Information must be defined in the handler module. (Fig. 6)
 Figure: 6
Figure 6 shows an approximate set of commands that will register a file in the directory.
In addition to a function with information, there is another procedure (AddCommand) and a function (GetCommandTable). Their contents are shown in Fig. 7
 Figure: 7
Let's consider the creation of an external report in 1c 8 without using a data composition system. To create an external report, we will use the Accounting 2.0 configuration, the initial data: “Write a report on 62 accounting accounts in which the turnovers for the specified period will be displayed in the context Counterparties and Contractor agreements.
1. Create a report
First of all, we will create an external report file, for this we go to 1c 8 in the mode Configurator, go to the menu File -\u003e New, or click on the icon new document.
In the list, select the item External report... After creating the external report, give it a Name (for example Simplest Report) and save it to disk. We also add two props: Beginning of period and End of Periodtype date, we will need them to limit the time interval for data sampling when generating a report.

2. Creating a layout for an external report
To generate a report in 1c 8, you need a layout, this is a template for outputting data in which all the necessary parameters are set, tables are drawn, etc. Let's add a new layout, for this, in the report metadata tree, select the item Layouts and press the button Add to, when creating we select the type for the layout Spreadsheet document.

Our layout will have 4 areas:
- Header - in this area we will display the name of the report, the period for which it was generated and the header of the table;
- DataContractor - in this area we will display data on the counterparty in the table;
- Contractor Agreement Data - in this area we will display data on the counterparty agreement in the table;
- Basement - in this area we will display the totals for the entire report for the Income and Expense fields.
Let's start creating areas of the layout. In order to create an area in the layout, select the required number of lines and press Table Menu -\u003e Names -\u003e Assign Name(Or Ctrl + Shift + N). To the area A capwrite the name of the report: Turnover 62 accounts, draw with the tool Borders report header, as well as set parameters Beginning of period and End of Period... Using the parameters, you can display the necessary data in the report, we will deal with this at the next stage of development, namely when writing the program code of the report. To create a parameter in the layout, select the desired cell, write in it the name of the parameter (without spaces), right-click on it, select the item in the menu that opens Properties... In cell properties on a tab Layout select filling Parameter.

After that, in the cell the parameter name will be enclosed in angle brackets (”<>“). As a result, the area A capshould look like this:

In the area of DataContractor we will create parameters for displaying the name of the counterparty, as well as for the income and expense for 62 accounts, using the tool Borders Let's arrange the area as a table row.
In the area of DataContractor Agreement we will create parameters for displaying the name of the contract, as well as for receipts and expenditures on account 62, using the Borders tool we will arrange the area as a table row. Indent a little before the parameter Contractor's Agreement(This can be done by splitting and merging cells. Right-clicking on a cell -\u003e To combine or Break cell), it is needed so that it can be seen in the report that the line under the contract is lower in the hierarchy than the line for the counterparty.
In the area of Basement Let's create parameters for receipts and expenditures totals.
As a result, we should get a layout like this:

3. Creating a report form
For data output, setting the formation period and buttons To shape our report will need a form. To create a form, find the item in the metadata tree of the external report Forms and press the button Add to... There is no need to make any changes on the first page of the form designer, you just need to click Further.

On the next page of the constructor, we select both available props ( Beginning of period, End of Period) for placement on the form.

As a result, we get the following form:

But in this form it does not suit us, we will make some changes to it:
- Drag the button To shape from the bottom pane of the report to the top one (this will be more convenient for the user);
- Stretch the shape vertically and horizontally;
- Arrange the fields Beginning of period and End of Period horizontally;
- Add to the form a control element Field of a spreadsheet document (our report will be displayed in it), give it a name TabDoc;
- Let's create a button for selecting a period (when you press it, a dialog with a convenient choice of the required period will be displayed). We won't write the program code for it yet, so we'll just place the button next to the period fields.
As a result, our form will look like this:

4. Programming
After creating the report form, let's start programming. To begin with, we will create a procedure for displaying the period selection dialog (we have already created a button for this in the previous step). Right-click on the button and select the menu item Properties, in the properties of the button, go to the tab Developments, where, using the button with the magnifying glass icon, create a procedure Button 1 Press in the form module.

You can switch between the form and its module using the tabs at the bottom of the form

To call the period selection form, we will use the standard procedure Accounting 2.0 from the general module WorkingWith Dialogues - HandlerSettingPeriodPressing, you need to pass the report details to it as parameters Beginning of period and End of Period.
Procedure Button 1 Press (Element) WorkingWith Dialogues.ProcessorPeriodSettingPressing (PeriodBeginning, PeriodEnd); End of ProcedureNow let's move on to writing the code that will generate and display our report. There is already a procedure in the form module ButtonShapePresswhich will be executed when the button is pressed To shape, that's where we'll write our code. Let's start by initializing the required variables. First of all, let's create a variable for spreadsheet document fields into which we will output the data, this is not necessary, just the recording of calls to it will become shorter, which means the program code will be more understandable for reading.
TabDoc \u003d Form Elements.TabDoc;
Get the layout of the external report using the function Get Layout (<ИмяМакета>) , we will pass the name of the layout to the parameter, and if such a layout exists, the function will find it.
Layout \u003d Get Layout ("Layout");
After the layout is received, we will create variables for each of its areas, we will use the layout method for this GetArea (<ИмяОбласти>) .
AreaHeat \u003d Layout.GetArea ("Header"); ScopeDataContractor \u003d Layout.GetScope ( "DataContractor"); ScopeDataContract \u003d Layout.GetScope ("ContractData"); AreaFooter \u003d Layout.GetArea ("Footer");
Let's clear the field of the spreadsheet document. This is necessary so that with each new generation of the report, the old data is deleted.
TabDoc.Clear ();
Now that the initialization of the variables is complete, let's move on to alternately filling and displaying areas of the layout. Let's start with the cap. If you remember, we created two parameters in this area Beginning of period and End of Period, we will transfer the values \u200b\u200bof the report generation period there, for this we will use the property Parameters area of \u200b\u200bthe layout.
AreaHead.Parameters.PeriodStart \u003d PeriodStart; AreaHead.Parameters.EndPeriod \u003d EndPeriod;
No more scoping A cap the manufacturer is not necessary, so we display its field in the spreadsheet document.
TabDok.Display (AreaHap);
Next, we will write a query to the database, with which we will take the turnovers on the account 62 from the accounting register Self-supporting... Let's define a variable in which our request will be located.
Request \u003d new Request;
Before we start writing the request text, let's pass the required parameters to it. Since we are writing an invoice request 62 accounting, then first of all we will create a parameter for it
Request.SetParameter ("Account62", Account Plans. Self-supporting.FindByCode ("62"));
It is also necessary to transfer the report generation period to the request. Do not forget that for the formation period we have special details of the report, and we pass them as parameters.
Request.SetParameter ("PeriodBeginning", PeriodBeginning); Request.SetParameter ("EndPeriod", EndPeriod);
Let's start writing the request text, we will do this using the query constructor. Many tutorials write that you need to be able to write a query both manually and using a constructor, but in practice this is not the case. In the tasks that are constantly faced by the 1C programmer, the priority is to write code quickly and efficiently, and when making a request to the database manually, this is almost impossible to achieve, you will spend a lot of precious time trying to correctly reproduce all query constructs, find typos which you did while writing, etc. Therefore, do not waste your time trying to write queries manually, but use the query constructor. It will save you time and allow you to write complex queries effortlessly. To start writing the request text, write in the code:
Request.Text \u003d "";
After that, put the cursor between the quotes, press the right mouse button and select the item Constructor request. The query designer window will open.

Now we need to select the table of the 1C 8 database we need. We need a virtual table Turnovers accounting register Self-supporting... Let's find it on the left side of the constructor window

Let's move it to the area Tables and let's fill in the parameters. For all virtual query tables, there is a special set of parameters that allow you to select the desired data from the main table (in our case, the main table Accounting Register Self-supporting). Let's open the virtual table parameters window.

Let's fill in the parameters of the period that we passed to the request. To use a parameter in the request text, write the symbol before its name ampersand (&)

It remains to fill in the condition for the account bukh. accounting. To do this, find in the parameters of the virtual table the line Account Condition and write there
Account in the HIERARCHY (& Account62)
You can also use the constructor for drawing up conditions by clicking on the button with three dots.

There is no need to impose any more conditions on the virtual table, so press the button OK in the virtual table parameters window. Next, you need to select the fields we need from the table Self-supporting.Turnovers(namely: Counterparty, Counterparty Agreement, Income and Expense). To see the list of fields available in the table we have selected, press the "+" symbol next to its name. After that, drag the required fields to the rightmost area of \u200b\u200bthe query designer, which is called Fields. If we open the chart of accounts of accounting, we will see that for the account 62 analytics for Counterparty is Subconto1and by Contractor's Agreement - Subconto2.

Therefore, from the fields of the virtual table, select Subconto1 and Subconto2... Since we need the income and expense by the amount, we also select the fields AmountTurnoverDt and AmountTurnoverKt

Fill in the aliases of the fields we have chosen, for this we go to the tab Unions / Aliases and set the required field names.

Since in our report the data will be displayed hierarchically (the Counterparty is on the first level, and all his contracts on the second), we will configure the output of data in the hierarchy using Totals. Let's go to the bookmark in the constructor Outcome... In the grouping fields, drag sequentially Counterparty and Contractor's Agreement, and in the final Coming and Consumption.

This completes the work in the query constructor, press the button OK and we see that the text of our request has appeared in the program code.
Request.Text \u003d "SELECT | Self-supporting Turnovers.Subkonto1 AS a Counterparty, | Self-supportingTurnovers.Subkonto2 AS A Contractor's Agreement, | Self-supportingTurnover.AmountTurnoverDt AS Parish, | Self-supportingTurnover.AmountTurnoverKt AS Consumption | FROM | Ledger of Accounting. Self-supporting.Turnovers (& Beginning of Period, & End of Period, Account IN HIERARCHY (& Account62),) AS Self-supporting Turnover | RESULTS | SUM (Arrival), | AMOUNT (Consumption) | Software | Counterparty, | Contractor's Agreement ";
After we have finished writing the request, let's start filling in the areas DataContractor, DataAgreementContractor and Basement... We will fill all these areas with the data obtained when executing the request. Since our query contains groupings ( Counterparty and Contractor's Agreement) select data from it as follows:
SelectContractor \u003d Query.Run (). Select (QueryResultIndo.OnGroups);
Thus, we will receive records with totals for all counterparties.
Before traversing the sample data using a loop, we initialize the variables designed to calculate the total results for the report:
TotalIncome \u003d 0; Total Consumption \u003d 0;
In order for the report data to be displayed with a hierarchy (and spreads along "+"), let's set the beginning of the autogrouping of the rows of the spreadsheet document:
TabDoc.StartAutoGroupLines ();
All preparations are over, now let's start traversing the query results. We will carry out the traversal using the loop While
While SampleContractor.Next () Cycle EndCycle;At the beginning of the cycle, set the parameters to zero Coming and Consumption areas DataContractor... What is it for? Imagine a situation that for a counterparty Uncle Vasya, income 10, and expense 5, and for it the next counterparty Uncle Petya there is neither income nor expense, in this case, if we do not reset the parameters Coming and Consumption, then by in line by counterparty Uncle Petya will get income 5 and expense 10.
ScopeDataContractor.Parameters.Prihod \u003d 0; ScopeDataContractor.Parameters.Expense \u003d 0;
After that we fill the area DataContractor sample item data
FillPropertyValues \u200b\u200b(ScopeDataContractor.Parameters, SelectionContractor);
After filling with data, you can display the area in Spreadsheet documentSince we use autogrouping of lines, we need to indicate the level of the line in the grouping (there will be two levels in our report, the first for contracts is the second for contractors).
TabDok.Withdraw (ScopeDataContractor, 1);
Now, for this counterparty, we will make a selection by its contracts.
SelectionContractorAgreement \u003d SelectionContractor.Choose (BypassResultResult.In Groupings);
We will carry out the traversal using the loop While.
While SampleContractor Agreement.Next () Cycle End of Cycle;In the cycle under contracts of counterparties, we will reset the parameters Coming and Consumption, fill the area Data Agreementfrom the selection and display it in a spreadsheet document at the second level of records.
ScopeDataContract.Parameters.Prihod \u003d 0; ScopeDataAgreement.Parameters.Expense \u003d 0; Fill inProperty Values \u200b\u200b(ScopeDataContract.Parameters, SelectionContractorAgreement); TabDok.Withdraw (ScopeDataContract, 2);
Also, in this cycle, add the current values \u200b\u200bto the variables for calculating the total values \u200b\u200bfor income and expense.
TotalIncome \u003d TotalIncome + SelectionContractor Agreement.Income; TotalExpense \u003d TotalExpense + SampleContractor Agreement.Expense;
This concludes the data output in the area DataContractor, DataAgreementContractor completed, it remains to complete the autogrouping of the rows of the spreadsheet document.
TabDoc.FinishAutoGroupLines ();
Fully cycles responsible for data output in the area DataContractor and DataAgreementContractor look like this:
TabDoc.StartAutoGroupLines (); While SampleContractor.Next () Cycle RegionDataContractor.Parameters.Prihod \u003d 0; ScopeDataContractor.Parameters.Expense \u003d 0; FillPropertyValues \u200b\u200b(ScopeDataContractor.Parameters, SelectionContractor); TabDok.Withdraw (ScopeDataContractor, 1); SelectionContractorAgreement \u003d SelectionContractor.Choose (BypassResultResult.In Groupings); While SelectionDogovKontragenta.Sleduyuschiy () Cycle ScopeDataDogov.Parametry.Prihod \u003d 0; ScopeDataAgreement.Parameters.Expense \u003d 0; Fill inProperty Values \u200b\u200b(ScopeDataContract.Parameters, SelectionContractorAgreement); TabDok.Withdraw (ScopeDataContract, 2); TotalIncome \u003d TotalIncome + SelectionContractor Agreement.Income; TotalExpense \u003d TotalExpense + SampleContractor Agreement.Expense; End of Cycle; End of Cycle; TabDoc.FinishAutoGroupLines ();
It remains to output the totals to the area Basement and display the area itself in Spreadsheet document.
AreaBoard.Parameters.TotalIncoming \u003d TotalIncoming; AreaBoard.Parameters.TotalExpense \u003d TotalExpense; TabDok.Display (Area Basement);
This completes the process of writing an external report for 1C 8 without using the ACS. Now it can be generated in 1C: Enterprise 8 mode and added to the directory External treatments You can download the report file considered in the article by.
Watch a video on creating an external printable for a managed application:
I hereby (hereinafter - the Person) give my consent to IE Zabolotnov Alexey Vladimirovich INN212702621854, OGRNIP 313213018300022 (hereinafter - the Company) to process my personal data specified when placing an application on the Company's website (https: // site) to process my order, an application or any other method of contacting the Company (hereinafter referred to as the Order), and communication with me as part of the processing of my Order, as well as other related purposes within the framework of the current legislation of the Russian Federation and the technical capabilities of the Company.
The processing of personal data of a Person can be carried out using automation tools and / or without using automation tools in accordance with the current legislation of the Russian Federation and the provisions of the Company. This consent of the Person to the processing of his / her personal data specified when placing an Order on the Company's website, sent (filled in) using this website, is valid from the moment the Order is placed on the Company's website until it is withdrawn. Consent to the processing of personal data specified when placing an Order on the Company's website, sent (completed) using this website, may be revoked by the Person upon submitting a written application (recall) to the Company. The processing of the Personal data of the Person is terminated within 2 months from the date the Company receives the written application (withdrawal) of the Person and / or if the purpose of the processing is achieved and is destroyed within the period and on the conditions established by law, unless otherwise provided. Anonymized personal data of a Person may be used by the Company for statistical (and other research purposes) after receiving a statement (withdrawal) of consent, as well as after achieving the purposes for which this consent was obtained.
This site allows IE Zabolotnov Alexei Vladimirovich to receive information containing the personal data of the Person, namely the surname, name, patronymic, contact phone number, e-mail address, as well as other personal data that can be used to identify the Person ("Your personal data"), in case if the Person voluntarily provides it to the company.
The person agrees to the individual entrepreneur Alexey Vladimirovich Zabolotnov (TIN INN212702621854, OGRNIP 313213018300022) to process his personal data, namely: surname, name, patronymic, contact phone number, e-mail address, as well as all personal data that are necessary for communication with the Person and execution of the contract for the provision of information services.
In order to fulfill obligations under the agreement, the Person grants the individual entrepreneur Zabolotnov Alexey Vladimirovich (INN INN212702621854, OGRNIP 313213018300022) the right to carry out any actions (operations) with his personal data without restriction: collection, recording, accounting, systematization, storage, clarification (update, change), extraction, accumulation, depersonalization, blocking, deletion, destruction; use for statistical purposes, for analysis purposes, in order to inform the Person (via SMS or e-mail) about the products and services of the Company, as well as to carry out any other actions taking into account the current legislation.
Privacy policy
Any other information transmitted by the Person in connection with visiting the site ("Other information" that is not personal data of the Person and cannot be used to identify the Person) may be included in the databases that belong to the individual entrepreneur Alexey Vladimirovich Zabolotnov (INN INN212702621854, OGRNIP 313213018300022) or his representatives. IE Zabolotnov Aleksey Vladimirovich retains all rights to these databases and the information stored in them. Other information that we collect may include your IP address and other information collected through cookies (see below).
This site may use a technology known as a cookie. A cookie is a message that a web server sends to a Person's computer when a Person visits the site. On a second visit, our website will check if there is one of our cookies on the Person's computer. Our cookies increase the functionality of the site and help us to more accurately analyze how the site is used.
This website uses Internet Protocol (IP) addresses. An IP address is a number assigned to a computer by an ISP to access the Internet. Typically, the IP address changes whenever you access the Internet (this is a "dynamic" address). However, if you are using a high-speed connection, depending on the circumstances, it is possible that the IP address or even the cookie we use contains personally identifiable information. This is because with some types of high-speed connections, your IP address does not change ("static") and can be associated with the Person's computer. We use the IP address of the Person to provide general information on the use of the site, as well as to improve it.
This site uses technology to locate the Person.
A person is obliged to leave this site if he does not want the above data (cookie, data on IP address and location) to be processed.
This site is not intended for persons under the age of 18. We do not collect personal data from persons who, according to the information we have, have not reached the age of 18. This site where information is collected uses industry standard Information Security Protocol (SSL) encryption. However, to use this option, the browser must support cryptographic closure (Internet Explorer 3.0 onward). IE Zabolotnov Aleksey Vladimirovich reserves the right to provide information to state authorities upon appropriate requests or in cases provided for by law.
To remove information about the Person from our contact lists, please contact the following address: IE Zabolotnov Alexey Vladimirovich, tel .: +7 8352 441133. Or by e-mail: [email protected]website
The individual may continue to receive materials while our listings are updated. The Website Privacy Policy may be updated from time to time. After the update, these rules will be available on this page.
Reporting is one of the main functions of any accounting system. What types of reports exist in 1C Accounting 3.0, how reports are configured in 1C Accounting 8.3 and what tools exist for creating new reports - we will consider today.
Types of standard reports
A wide range of reports is preinstalled in the 1C accounting software, which allow you to receive all the necessary information. A complete list of them is presented in the section "Reports / Standard reports":
Also, in each section of the program, other types of standard reports are presented, for example, salary reports in 1C 8.3 are stored in the "Salary and HR / Salary reports" section.
Each report has the ability to "customize" the report, namely, you can add or remove some additional fields, add grouping, selection, etc.
Let's consider the setup option by the example of adding an additional field to the standard report "Balance sheet by account" (select 10 account). To do this, from the "Show settings" button go to "Additional fields", add a new field, and in the selection form go to the field we need, for example, to reflect the item number in the report, select the "Item number" field, which is located inside the "Nomenclature" field (to expand the field, you need to click "+"):

After clicking "Generate", an additional field selected by us appears.
As an example, let us consider a situation when the report needs to include the entire list of the nomenclature containing the word “boots” in the name. What do I need to do? By clicking "Show settings", go to the "Selection" tab, add a new field, and in the window that appears, expanding the "+" field "Nomenclature", select "Name".

After generating the report, we get the nomenclature, which contains only the value we have specified in the name.
Formation of reports in the context of documents
In the section "Standard reports" there is a universal report that allows you to display information from such configuration objects as:
- Document;
- Directory;
- Accumulation register;
- Information register;
- Calculation register.
Let's consider examples of situations when a report will help the user not to resort to the development of external reports, but to use a typical settings mechanism.
For example, we need to generate a report that will reflect all received goods from a specific counterparty for a certain period. To do this, in the report header, select from the drop-down list the type of object - "Document", the type of object - "Receipt (acts, invoices)", and specify the type - "Goods".
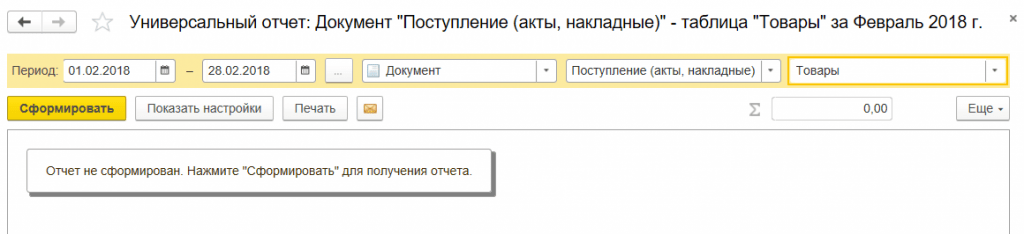
* Initially, the Counterparty field is not there.
In the field "Comparison type" set "Equal", in "Value" select the required counterparty from the directory.

At the top of the report, indicate the required period and generate a report.

For the settings we have made, you can save: for this, press the "More / Save" button.
Let us consider a situation when, for the correct formation of regulated reporting, it is required to check all movements in the "Separate VAT accounting" register in terms of documents.
To do this, in the report header, select the object type - "Accumulation register" from the drop-down list, in the next field select the object type - "Separate VAT accounting", in the last field, select the type - "Balances and turnovers".
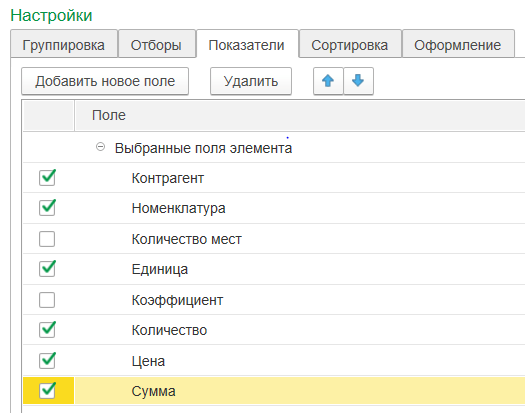
In order for the information to be reflected in the report in the context of documents, click the "Show settings" button to go to the report settings, then to the "Indicators" tab, add a new field and in the window that appears, select the "Registrar" field ("Registrar" is the document that movement on the accumulation register was formed). The newly added field is displayed by default at the bottom of the list of fields: using the "blue arrows" move the "Registrar" field to the top of the list.

In this article, we examined what options exist for working with reporting in 1C Accounting 8, how to use the report settings and what information can be obtained using a universal report.
To connect external processors, reports, printed forms for the 1C: Enterprise 8.2 platform, a new standard has been developed for working in a managed application (a standard from the subsystem of standard libraries 8.2). There were "chips" that were not there before, namely:
The type of processing has been expanded: filling an object, creating related objects. Now in documents you can add your own buttons for filling the entire document, as well as your own buttons for entering on the basis.
One processing can contain a list of several operations (commands) at once, i.e. you can do one processing, where there will be several menu items at once: printing and consignment note, printing a sales receipt, printing a warranty card. (Author's note: earlier in the old standard, to do such things, you had to do everything at once (even if you didn't need to) and you didn't need to close, or draw your own form, on which there were the necessary buttons to select the required operation)
You can enter on the basis and fill objects at once based on several objects, rather than one
You can schedule the execution of server commands (on the server).
You can set the mode "Safe" or "Unsecure", i.e. start processing taking into account the restriction of rights or ignore them (as under full rights)
You can set the use mode: Do not use, debug, use. "Do not use" - not in use, "Debug" - visible only to administrators, "Use in work".
Can include use in object forms and in list form
You can link a processing or a report to all objects at once.
You can configure quick access to certain commands for external processing.
It is possible to specify in which sections of the interface additional processing and reports should appear.
So what can be plugged into standard configurations?
From the point of view of the platform, you can connect:
- external processing (files with the “epf” extension);
- external reports (files with the "erf" extension).
From the point of view of the application area (configuration), you can connect external processing and reports with the view *:
- Additional processing
- Just additional processing. It is possible to customize
- Additional report
- Just an additional report
- Filling the object
- Its buttons for filling objects (document), previously there were only buttons for filling the tabular section.
- Print form
- Additional printable (the button "Additional printable" is added)
- Report
- The report attached to objects (to directories and documents).
- Creating linked objects
- Your input based on (the button “Create related objects ...” is added to the “Input based on” menu item)
* on the example of the editorial office “Management of a small company, ed. 1.2 "
Let's take a look at how it all works. For connecting external processors and reports, there is a standard that describes the interface for interacting with external processing and a report, and there are general requirements for all types, but there are specific requirements for each type of processing or report.
Let's start with general requirements for all types of processing and reporting. In order to create a pluggable external processing or report, it is necessary to declare the export function ExternalProcessingInformation () in the object module, which should fill the structure that describes the behavior. An example of this function:
External Processing Information () Function Export
RegistrationData \u003d New Structure;
RegistrationData. Insert ("Name", "Example of using external processing 8.2.");
RegistrationData.Insert ("SafeMode", True);
RegistrationData. Insert ("Version", "1.0");
// Additional Processing
// Additional Report
// FillingObject
//Report
// PrintForm
// Create LinkedObjects
RegistrationData.Insert ("View", "AdditionalProcessing");
RegistrationData. Insert ("Information", "Processing is done according to the new standard for connecting external processors 8.2. An example of processing" "Hello Word" "");
///////////// commands /////////////////////////
tzCommand \u003d New Table of Values;
tzCommand.Columns.Add ("Identifier");
tzComand.Columns.Add ("View");
tzComand.Columns.Add ("Modifier");
tzKomand.Kolonki.Add ("ShowAlert");
tzCommand.Columns.Add ("Usage");
CommandString.ID \u003d "1";
CommandString.View \u003d "command" "Hello Word" "(OpeningForms)";
CommandString.Usage \u003d "Form Opening";
CommandString \u003d tzCommand.Add ();
Command string.ID \u003d "2";
CommandString.View \u003d "command" "Hello Word" "(CallClientMethod)";
CommandString.ShowNotification \u003d True;
CommandString.Usage \u003d "CallClientMethod";
CommandString \u003d tzCommand.Add ();
CommandString.ID \u003d "3";
CommandString.View \u003d "command" "Hello Word" "(CallServerMethod)";
CommandString.ShowNotification \u003d True;
CommandString.Usage \u003d "CallServerMethod";
RegistrationData.Insert ("Commands", tzKomand);
////////////// purpose (in which objects it is used) /////////////////////////
// for printing forms, filling, entering linked objects
// Assignment Array \u003d New Array;
//ArrayAssignments.Add("Document.* "); // all documents are assigned
//AssignmentArray.Add("Document.AvansReport ");
//ArrayAssignments.Add("Document.OrderBuyer ");
//RegistrationData.Insert ("Assignment", AssignmentArray);
Return Registration Data;
EndFunction
So, as you can see, the function fills in the RegistrationData structure, which has the following elements (parameters):
- Commands - A table of values \u200b\u200bthat lists the commands used. Columns of the table of values:
- Identifier - any string (command identifier)
- View - command description
- Modifier - string (used for additional printable forms)
- ShowNotification - an alert window will appear before and after execution (for client and server commands without a form)
- Usage - processing start mode:
- Form Opening - the processing form will open
- ClientMethod call - call client export method form
- ServerMethod Call - call the export method from the processing module
Name - short name of the treatment
Version - information about the processing version
Safe mode - is responsible for whether the processing should be performed considering user rights. If you set the value to "False", then the processing or the report will be performed without regard to restrictions of rights (as under full rights). This feature appeared in 8.2, where, when creating external processes and reports, the mode is specified as the second parameter.
View - type of processing or report. I listed the possible values \u200b\u200bat the beginning of the article, and the possible values \u200b\u200bfor setting in the code are indicated in the comment
Depending on the type of processing or report, as well as on the "Use" command launch mode, methods defined in the form module, object module are called. The list of passed parameters is also different. Examples of calls and use of all types of processing are attached.


