Instructions for setting up a Distributed Information Base (DIB) via FTP resource. Distributed information base. Step-by-step instructions and pitfalls Processing the creation of a rib image
To create a distributed information base, you need to enter the program in 1C: Enterprise mode. To create distributed database nodes, select from the menu: Operations - Exchange plans. The “Select object: Exchange plan” window will open.
1. Consider the option with the “Full” exchange plan.
The exchange will be carried out across all organizations located in the distributed information base.
Let’s choose the “Full” exchange plan. The “Full Exchange Plan” window will open.
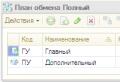
We fill out two entries:
Let's call the first entry “Main node”, indicate the code “GU”,
Let's call the second entry “Subordinate node”, indicate the code “PU”.
As we can see from the figure, the first entry has an icon with a green circle; this is the “Main Node” icon.

To create a copy of the “Main node” information base, click on “Slave node” and click on the “Create initial image” icon. This will be the “Subordinate Node” information base.

The “Creating an initial information security image” window will open, select “On this computer or on a computer on the local network”, click “Next”.

In the “Infobase Directory” field, select the location where the copy of the “Main Node” will be installed, and click “Finish”.

After creating the “Subordinate Node” infobase, the following message will appear:

Click “Ok”.
Add the “Subordinate Node” information base to “1C: Enterprise”. We go to the subordinate database in the "1C: Enterprise" mode. Let's open: Operations - Exchange Plans. The “Select object: Exchange plan” window will open. Let’s choose the “Full” exchange plan. The “Full Exchange Plan” window will open. We see that the “Main Node” icon is orange, which means that this node is the main node for the information base in which we are located.

We make the following settings in both the Master and Slave nodes:
1.
Add a prefix for the distributed infobase.
This is done so that there are no conflicts in the numbers and codes of documents and directories created in two databases, so in each database we indicate a prefix that will be added to the document numbers and directory codes. Open: Tools - Program settings - “Data exchange” tab. In the “Node prefix for a distributed infobase:” field, enter “PU” in the subordinate database, and “GU” in the main database.

2.
Add a setting for data exchange between nodes:
Open: Service - Distributed Information Base (DIB) - Configure RIB nodes. The “Data Exchange Settings” window will open.

Click “Add” and the “Data exchange settings” window will open. Enter the “Name” of your setting.

A node will automatically appear in the “Node” field, for the “Master node” there will be a “Slave node”, for the “Slave node” there will be a “Master node”.
In the “Directory” field, select the folder into which the exchange data will be sent; it is best to specify one directory for the main and slave databases.
In the “Exchange Type” field, we configure the transfer of data between databases: through a file or FTP resource. Let’s choose, for example, “sharing through a file resource.”
We do not change anything in the remaining fields.
Click “Ok”. We see that a setting has appeared.
3.
To exchange data we do the following:
First, in the database in which the changes were made, click on the “Exchange according to the current setting” icon, as shown in the figure.

After uploading, the upload result window will appear.

Then, in the database to which you want to transfer the changes, click on the “Exchange according to the current setting” icon and the data will go to the database you want.
2. Consider the option with the “By organization” exchange plan.
The exchange will be carried out among selected organizations located in a distributed information base.
To create distributed database nodes, select from the menu: Operations - Exchange plans. The “Select object: Exchange plan” window will open.

Let’s choose the exchange plan “By organization”. The “Exchange Plan By Organization” window will open.
We fill out two entries:
Let’s call the first entry “Main Node”, indicate the code “GU”, we see the difference from the “Exchange Plan: Full”, a table has appeared in which we indicate the Organizations for which the exchange will take place.
Let's call the second entry “Subordinate node”, indicate the code “PU”, indicate the organization.

In all other respects, the setup is absolutely the same as with the “Exchange Plan: Full”.
The technology of distributed information bases (RIB) allows you to create a geographically distributed system based on 1C Enterprise configurations. This allows you to have a common information space even with those departments that do not have a reliable communication channel, combining high autonomy of nodes with the ability to quickly exchange information. In our articles we will look at the features and practical implementation of this mechanism on the 8.2 platform
First of all, let’s ask ourselves: why autoexchange? Modern technologies, combined with inexpensive and fast Internet, make it possible to organize remote work without any difficulties. The choice of methods is as wide as ever: RDP, thin and web clients, connecting networks using VPN - there is a lot to think about. However, all these methods have one significant drawback - a strong dependence on the quality of the communication channel.
Even with ideal operation of the local provider, it is impossible to guarantee 100% availability of the communication channel. Problems with the backbone provider, lack of power supply, physical damage to the communication line and many other factors make this task insurmountable. At the same time, the inaccessibility of the information base at a remote warehouse or retail store leads to quite significant losses. And finally, let’s not forget that there are places (for example, industrial zones on the outskirts of cities) where providing a high-quality communication channel is expensive and/or problematic.
The RIB mechanism allows you to get rid of these shortcomings; each department has its own copy of the information base with which you can work autonomously even in the complete absence of communication with the outside world. And the small amount of transmitted information allows you to use any communication channel for exchange, including the mobile Internet.
RIB on platform 8.2 is not something fundamentally new, representing a further development of RIB platform 7.7, only now this technology has become more accessible and simpler. Unlike the RIB component, which had to be purchased separately, the RIB is an integral part of many standard configurations and works entirely in user mode, allowing you to do without the Configurator even at the setup stage.
At this point it would be time to move on to the practical part, but we will have to make one more digression. The fact is that the transition to the 8.2 platform, which seems to have already happened, in fact led to the emergence of two types of configurations: based on a managed application, “native” for the 8.2 platform, and adapted from 8.1, continuing to use outdated technologies and mechanisms. Since a significant part of the configurations (enterprise accounting, payroll and personnel management) are adapted or transitional, they cannot be discounted, therefore the first part of our article will be devoted to these configurations (essentially the 8.1 platform), while in the second we will examine setting up auto-exchange for configurations based on a managed application (platform 8.2).
Let's consider a practical task: setting up automatic exchange via FTP for the Enterprise Accounting 2.0 configuration. Despite the fact that RIB allows you to exchange using email or file shares, we recommend using FTP as the simplest and most reliable method of communication. You can read how to set up your own FTP server, or you can use the FTP service of any hosting provider.
First of all, we need to configure exchange nodes. To do this, launch the configuration with administrator rights and select Transactions - Exchange Plans.
In the list that appears, select Full plan or By organization, if records are kept for several companies in one database and the exchange needs to be made only for one of them. In the window that opens, there is already one node - the central one, we need to edit it by indicating the code and name.
Then we will create another node for the branch, filling it in the same way (to add, click the green circle with a plus). The next step is to create an initial image for this node, which is a ready-made information base in file mode. To do this, right-click on the desired node and select from the drop-down list Create a starting image.
Now let's move on Service - Distributed Information Base (DIB) - Configure RIB nodes.
In the window that opens, click the button Add and configure a new exchange by specifying the remote host, exchange type (via FTP) and server connection parameters.
Bookmark Automatic exchange allows you to set up an exchange schedule, exchange by events (start and end of work, etc.), these settings are made for the user on whose behalf the exchange will be performed, so make sure he has rights to exchange data.
Don't forget to specify the node prefix for document numbering (otherwise you will receive different documents with the same numbers) in Tools - Program Settings; here you can also configure some other exchange parameters. On the same tab, you should select a user to perform exchange tasks; if you do not do this, the schedule will not work. Remember that the exchange will only be made if the user is logged into the program.
This completes the configuration of the central node; now you need to make similar settings for the peripheral node, connecting the initial image as an existing information security system. After which you can start exchanging data. To control you should use Communication monitor, it allows you not only to monitor the success of the upload/download, but also shows any collisions that have arisen or delayed movements (if the user who made the exchange does not have enough rights to perform any actions in the database). The presence of this tool allows you to quickly and effectively solve various types of problems that arise during autoexchange.
At this point, the exchange setup can be considered complete and you can begin working in distributed mode. It is worthwhile to dwell specifically on updating or making changes to the configuration. These actions are only available on the central node; all changes made will be automatically propagated to the peripheral nodes during the next exchange. To make changes automatically, the peripheral database must be in exclusive mode, otherwise you will need to run Configurator and execute Updating the Database Configuration manually.
In 1C 8.3 or in 1C 8.2? Setting up a distributed infobase. Step by step instructions.
Information base distribution is used when it is necessary to maintain joint records in databases that cannot, for various reasons, have a physical connection. An example would be accounting in one company that has a division in a large city or small village without the ability to connect to the Internet. Or in some special cases of periodic need to simultaneously work with one database in the office and outside the office, for example at home. In such and similar cases, the use of a distributed information base (DIB) is justified and necessary.
In this article we will look at organizing the distribution of one information database in the 1C Accounting for Russia version 8.3 configuration through a local or network directory. In version 8.2 1C, this instruction will also be useful, because describes essentially one process with significantly small differences.
==== Setting up for the main base ====
Having opened 1C 8.3 in “Enterprise” mode, let’s go to the “Administration” section. In version 1C 8.2, to get started, you need to go to the main menu “Service” - “Distributed Information Base (DIB)” - “Configure RIB nodes”.

Next, we will consider the process in the context of information security version 8.3. So, going to the “Administration” section, select “Program settings”. In the settings, go to the “Data Synchronization” section. Here we check the box “Use data synchronization” and specify the database prefix. Let us indicate “CB”, implying a central base.
After this, the “Data Synchronization” item appears in the right menu. Let's choose him. In the child window that opens, click the “Set up data synchronization” button. In the drop-down menu, you can select settings for different synchronization use cases. We select “Distributed information base...”.

For general development, familiarize yourself with the contents of the next window and click “Next”.

In the next window, fill in the directory through which the . We will specify data compression to reduce the size of the upload, and you can immediately specify a password for the archive with the data. It is important not to forget him. Confirm the filling with the “Next” button.

The next two windows are designed to specify settings for cases of exchange via an FTP server and via email. As stated earlier, we are considering the exchange method through a directory, so we are skipping the settings for FTP and email.


The next window is intended for specifying exchange parameters in the peripheral database part. Let's indicate its name and prefix. Next is the “Next” button.

Let’s check the exchange parameters we have created and confirm their correctness with the traditional “Next” button.

The necessary set of settings for exchange will be automatically created. This will take some time.

Important! Creating an initial image for a slave node takes a significant amount of time. The size of this significance depends on the computer resources and the volume of accounting in the main database.
Let's assume that we decide to create an image. After clicking on the “Finish” button in the previous window, we will enter the settings to create an image of the slave information security. We will consider the simplest case for local operations. To do this, indicate the necessary details in the window that opens. Let us pay special attention to the “Full name of the file base” parameter. It must be specified in full UNC format, which requires the formation of a local path in a “network” format. For example - “\\Server1C\Databases\RIB”. To the specified path we will add the name of the database file - 1Cv8.1CD.
After clicking on the “Create initial image” button, the process of generating an image for the slave database starts.

After the process is completed, a database file will be created in the specified directory. This newly created database needs to be configured before full use.
==== Setting up for a peripheral base ====
To do this, you need to connect it to 1C. You will find how to do this in the instructions in our article - After connecting, you need to launch the new database in configurator mode and create users. Next, the information security needs to be launched in 1C “Enterprise” mode.
If, for some reason, the creation of users needs to be postponed to a later time, after connecting, you can simply launch the database in 1C “Enterprise” mode. You will be prompted to create an “Administrator” user, agree to it, and the initial filling will be done.

Then you need to continue setting up pairing with the main base. This setting is similar to that discussed above for the main database.


A setup for communication with the main base will be created.

============================================
So, now we have created the main and peripheral bases. Synchronization settings have also been created in each of these databases. Now you can move on to editing these settings and bringing them into a suitable form. You can create automatic exchange rules or perform the exchange manually.
Let's do this in the main database. The peripheral base is configured in the same way.
Editing can be applied to data synchronization rules and schedules.

By clicking the “Configure” button in the “Data synchronization schedule” section, you need to edit the scripts to automatically schedule the work of uploading/loading data for the selected database. You don’t have to edit it, just agree with the default options.

To edit the parameters, just click on the link with the automatic schedule data. And then we edit the temporary parameters for launching tasks. By going through the bookmarks you can change both the time and the dates and days of the week of the launch.

By clicking the “Run task” button in the main script window, you can manually run the task.
By clicking the “Configure” button in the “Data synchronization rules” section, you can perform operations to change task launch scripts, as well as view the log of uploads/downloads. The latter is quite important for administering access and monitoring the regularity of exchanges.

Having finished creating and editing scripts for automatically starting distributed database exchange, you can proceed to uploading and then loading data.
At this point, the configuration of the distributed bathhouse database for the central and peripheral nodes is basically completed.
Download illustrated instructions
Distributed information base. Step by step instructions
Distributed Information Base (RIB) 1C:Enterprise
Creating a distributed infobase and setting it up
how to set up rib in 1s 8.2
How to set up a distributed information base in 1C
How to set up in 1C
How to set up in 1C
Setting up a distributed information base (RIB) in 1C
Example of setting up RIB for 1C:Accounting 8
Creation of a distributed infobase and configuration
Often in practice there are situations when different divisions or branches are geographically located in different places. At the same time, data entered into the program in remote departments must somehow get to the head office so that general records are maintained.
Currently, this problem is often solved by providing geographically remote employees with remote access to a common database. It can be done by publishing the database on a web server, via a remote desktop, etc.
However, situations are not uncommon when there is simply no Internet in a geographically remote office, or it is not stable enough to work in a common information database. For this purpose, 1C has a mechanism for setting up a distributed database.
Simply put, the head office is where the main base is located. The remote department uses a subordinate. There may be several such slave bases. As a result, such a distributed database is united into one through synchronization. It can be done either automatically according to a schedule or manually.
In this article we will look at setting up a distributed database for 1C: Accounting 3.0. Despite this, the instructions are suitable for most other 1C 8.3 configurations.
Please note that all necessary configuration modifications should be made only in the main RIB database. During synchronization, these changes will be transmitted to all slave databases and take effect.
Main information base
When using a distributed database, the main settings fall on the main database. They need to be done in the “Administration” section, as shown in the image below.
In the window that opens, immediately check the “Data synchronization” checkbox. At the bottom, specify the prefix of the main (current database). It can consist of no more than two characters. In our case, the prefix will be “BG”, since we mean that this RIB 1C is “Main Accounting”.
Now you can begin setting up the synchronization itself, namely, specifying with which database (or databases) the data will be exchanged. To do this, follow the “Data synchronization settings” hyperlink. It will be available for navigation only if the checkbox on the left is checked.

In the window that opens, select “Full...” from the menu. It will allow us to specify any 1C information base for synchronization.

In the first window for connecting a subordinate database, which is located in a geographically remote office, check the box that the connection will be made through a local or network directory. In our case it is “D:\DB\InfoBase”. We will also check in advance whether you can write to it.

Be sure to specify different prefixes for different databases. The fact is that when synchronizing data, data overloaded from each database is assigned its own prefix. If they are duplicated, the work will be incorrect, so the program will not give you this opportunity.

When the program prompts you to create a startup image, select this option. This procedure will take some time, after which save it to your computer with the name “1Cv8.1CD”.
The synchronization itself can be done either automatically according to a schedule that you can set up yourself, or manually. In the second case, just click on the “Synchronize” button at a time convenient for you.

RIB slave node
The number of settings made in the slave database is significantly less. In the same section, set the “Data synchronization” flag and by clicking on the corresponding link, the “Synchronize” button will be available.

In our example, two item items were added to the main database: “Beam” and “Board”. After synchronization, they ended up in the slave database. As you can see in the picture below, they were given the prefix "BG". The remaining two positions (“Lathe” and “Pallet”) are assigned the prefix “BP”, since they were created directly in the subordinate database.

Please note that the numbering of elements in our case is continuous, but only within the same prefix.
This material contains detailed instructions for setting up the RIB exchange for 1C:Enterprise 8 and the problems that the author encountered.
1. Creating nodes
We create new nodes (master and slave): in the user mode "Operations / Exchange Plans / Full"
Let's choose the exchange plan "Full"
We create two records:
- let’s call the first record “CB” (main node), indicate the code “CB”,
- let's call the second entry “Subordinate node”, indicate the code “PU”.
Icon with a green circle - "CB" (main node)
For the slave node, click on the “Create initial image” icon. (Requires exclusive access)
Create a starting image
Next, in the window that opens, fill in the parameters of the new database. When finished, click the “Finish” button.
Creating an initial information security image
The creation of the initial image of the slave node of the distributed infobase will begin, and upon completion the message “Creation of the initial image has been successfully completed” will appear. Click the "OK" button.
We add the base of the slave node to the list of bases and launch it.
In this subordinate database, we open the full exchange plan - the “CB” icon is red, this means that this node is the main node for the information base in which we are located.
2. Setting up prefixes
For each database, in the accounting parameters settings (in the UPP "Service / Accounting Parameters") on the "Data Exchange" tab, we set prefixes. This is done so that there are no conflicts in the numbers and codes of documents and directories created in two databases.
For automatic exchange, check the box "Use automatic exchange mechanism..."
Tab "Data exchange"
3. Add a setting for data exchange between nodes
Open: "Service\Distributed Information Base (RIB)\Configure RIB nodes"
Click "Add" and the "Data exchange settings" window will open.
Setting up data exchange
Click on the "Exchange according to current settings" icon
Execute the exchange according to the current setting
Now about the pitfalls
1. Data exchange can be carried out automatically and can be initiated in the following cases:
* When starting the program. The exchange will be performed when the program starts,
* When you finish working with the program. The exchange will be performed before the user finishes working with the program,
* When the catalog appears. The exchange will be performed only if the directory specified by the user was invisible, but has now become visible. The setting can be used to perform automatic exchange when connected to a local network or flash card. The program will periodically check the visibility of the directory specified in the settings and note its current state,
* When the file appears. It is recommended to use data mode when you need to exchange if an incoming data exchange file appears. In this case, it is enough to specify the full path to the incoming data exchange file. The program periodically analyzes the presence of the file, and as soon as it appears, the exchange will be performed, and after the exchange, this file will be forcibly DELETED (this is done so that the exchange procedure is not carried out constantly),
* Periodic data exchange. The exchange will be carried out according to the settings for periodic data exchange. If the infobase operates in file server mode, then periodic exchange is performed only for the user who is specified in the accounting policy settings as “User for routine tasks in file mode.” In the Client-server version, the exchange is performed on the 1C:Enterprise server.
I have a Client-Server option - for routine auto-exchange to work I had to overload the server
2. Windows encoding.
The exchange was interrupted by an error because the file was not compressed. This is due to a Cyrillic error in the command line during compression.
It can be treated by correcting the encodings in the registry.
For example, for Windows Server 2008 -
Code
REGEDIT4
"1250"="c_1251.nls"
"1251"="c_1251.nls"
"1252"="c_1251.nls"
"1253"="c_1251.nls"
"1254"="c_1251.nls"
"1255"="c_1251.nls"
3. When creating a copy of the database (for example, for modification) in the client-server version, it is NECESSARY that the ROUTINE TASKS OF THE COPY OF THE DATABASE be OFF. Blocking routine tasks for copy ON
If they are not blocked, then the copy will make exchanges on the same schedule as the main database. This means that some messages to remote nodes will be generated from the working database, and some from a copy, which will lead to desynchronization of configurations.
Related posts:
 Distributed information base
 Adjusting video card performance for games through the NVIDIA control panel How to enter nvidia settings
 High magnification monoculars - features and benefits Monocular magnification 50
 World of Tanks crashes on startup - fixing errors World of tanks crashes after every battle
 Server key 1c over the network


