Headphones do not work on windows 10 pc. Ways to connect headphones with a microphone or a telephone headset to a computer
Microsoft's new operating system is good. Compared to previous versions, Windows 10 is faster and more stable. You quickly get used to good things, so users react painfully to new problems with this OS. One of these troubles is the lack of sound in the headphones after installing or updating the operating system. Usually the reason lies in damaged or incompatible drivers, so you shouldn't blame the developers of the new OS. Let's take a look at how to set up headphones on a Windows 10 computer and return music to your headset speakers.
Checking physical connection parameters
Sometimes no specific action is taken to fix the problem. It is worth checking the primary causes of the problem - perhaps the solution lies on the surface.
Attention! After installing the chipset software, reinstall the audio driver.
Headphone setup methods
There are two methods for setting up your headphones.
Driver update
This is the main way. 90% of all audio reproducibility issues are related to the problematic driver package.
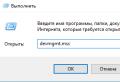
- Press Win + R and enter the command devmgmt.msc in the appropriate field. Confirm the action with the Enter key.

- In the "Task Manager" we find the sound card, right-click on it and click "Update driver".

Attention! Windows might install a generic audio driver that might not work. So go to the developer's official website and download the latest compatible driver.
- In the window that appears, select the option "Search for drivers on this computer" and browse the path to the downloaded file.

- Reboot your system.
Configuring Realtek Manager
If the driver updates didn't help, go to the second method.
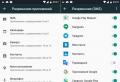
- Open Control Panel and select Realtek HD Manager (could be Dolby Digital or Sound Booster).

- In the window that appears, click "Additional device settings".

- Select “Share all output jacks as independent input devices”. Confirm with OK.
here . - Physical damage to connectors or sound card. In this case, you need to contact the service center.
That's all. Now you know how to set up headphones in Windows 10 and diagnose the root cause of the problem.
Often, users of a new operating system complain that the front panel for headphones on Windows 10 does not work and the laptop does not see the connected device. This problem can be software or physical. And if in the first case it is possible to return the headphone jack on the front panel to work, then in case of physical breakdown you will have to contact the service center.
Ways to solve the problem with a non-working laptop front audio panel
For the front panel with headphone and microphone jacks to work properly, Realtek Manager must be installed on Windows 10. Its icon can be seen on the taskbar or along the path "Start", "Control Panel", "Realtek Manager".
If the headphones do not work on the laptop and there is no Manager, you should go to the address "C: \\ Program Files \\ Realtek \\ Audio \\ HDA" and check for the file "RtHDVCpl.exe". If you run it, a new window with audio device settings will open.
In order for the headphones on a laptop with Windows 10 to work correctly, you should go to the "Speakers" tab and click "Additional device settings".

A small window will open. There are two boxes to check here: "Separate all output jacks as independent input devices" and "Disable front panel jack detection".

After these settings, the headphones in Windows 10 will work correctly. However, if there is still no sound, it may indicate missing drivers or physical damage to the connectors. In this case, it is worth updating the audio driver or rolling it back to an earlier version. If this does not work and the connector on the front panel is still not recognized by the system, you will have to open the laptop or open the side cover of the system unit (not recommended for inexperienced users) and follow these steps:
- We find the audio jack. We check if it is connected to the correct pins on the motherboard, and also if the lead wires are not deformed. Two types of pads can be used to connect the front panel: AC'97 and HD Audio, separate connectors with precise marking. It is important to consider this point.

- The AC'97 type is rarely used today, but the HD Audio (High Definition Audio) standard is very widespread. On the motherboard, the front panel HD Audio connector is usually labeled with a letter, for example, F_Audio.

- However, if there is no such connector or you have pads with different designations, there should be a connection diagram in the instructions for the board or laptop.

- The plan for connecting individual connectors to AC'97 is as follows:

- If you have correctly connected all the connectors to the computer, the system should see the connected gadget.
It is worth noting that there is another way how to enable the front audio connectors through the BIOS settings. To do this, follow these steps:
- We reboot the computer and boot into the BIOS (press F1 + Del, there may be other combinations).
- Find the "Advanced" section, then the "Onboard Devices Configuration" item.

- The option that controls the front soundbar is called “Front Panel Type”. In different BIOS versions it can be labeled as "Front Panel Support Type", "High Definition Front Panel Audio" or "Legacy Front Panel Audio". By default, this option is set to “HD Audio”. It needs to be changed to "AC97".

- After saving and rebooting the system, it is worth checking if the headphones or speakers connected to the front panel are working.
IMPORTANT! If your BIOS is set to "AC97", then switch to "HD".
If after the above manipulations the headphones for some reason do not work, it is worth making a few more settings through the "Control Panel".
- Click "Start", "Control Panel", "Sound".

- In the "Playback" tab, check that the "Speakers" are set by default. Also, in the "Sound" tab, "Microphone" should be set by default.

- Then right-click on an empty space and put the checkboxes "Show disconnected devices" and "Show disconnected devices".

- In the "Playback" tab, press the same right button on the active device and select the "Properties" item. In the "General" section, look at the list of connectors. The item "Front panel 3.5 mm jack" should be present.

- We also do all the same actions with the "Microphone" in the "Recording" tab.
After making changes to the system settings, reconnect the headset to the PC.
If the methods on how to connect headphones to a laptop with Windows 10 did not help solve the problems, it is worth checking the jack for serviceability. For this it is worth contacting the master.
After installing Windows 10 or updating the system, many users face the problem when the headphones do not work or the system does not see the connected device. This problem is related to missing, damaged or incompatible drivers. To set up headphones in Windows 10, we offer the following methods.
Ways to set up headphones in Windows 10
If you are faced with such a problem when headphones do not work in Windows 10, it is worth checking the following parameters:
- Connect headphones to the front and then to the back of your PC. Check which panel is not working for you.
- Check if the outputs are properly connected to the sound card (if you are connecting to the front panel). The outputs may be loose, loose, or not connected at all.
- Make sure the correct pinout is set. For example, you connect headphones to the front panel. Windows 10 does not support such a type of audio jack connection as AC'97. As a result, the laptop does not see the connected headphones. You need to change the connection type to HD Audio and set up your headphones.
- Connect other headphones to your PC. The headset may not be working.
- Make sure you have installed frameworks and drivers for the chipset before installing the drivers.
If, after performing these manipulations, the headphones on the laptop or computer still do not work, it is worth updating the drivers. To do this, we perform the following actions:
- Press "Win + R" and enter "msc".

- Device Manager will open. We find "Sound, game, video devices". Select the sound card and click "Update Driver".

- Then let the system find the driver. However, it should be noted that in this case, universal software from Microsoft can be downloaded. Therefore, it is worth downloading the Realtek High Definition Audio driver from the developer's site and in the next window click "Search for drivers on this computer".

- After installing the driver, it is worth restarting your laptop or PC.
- Go to the "Control Panel" and select "Realtek Manager" (or other programs such as Sound Blaster, Dolby Digital). A new window will open. We select "Additional device settings", which is located in the upper right corner. In the new window, put the checkbox “Separate all output jacks as independent input devices”.

- This is so that sound is directed to all input devices, not just the speakers.
- Also, in the speaker settings, it is worth checking the "Disable front panel socket detection" checkbox.

If you still don't hear sound from your headphones, make sure you are playing a supported format. Perhaps you do not have all the codecs installed and the file format is unknown to your player. Install the Windows 10 Codec Pack and retest your headset.
We are often faced with the work of headphones on a computer. What happened was that the headphones for some reason did not work or the device itself for some reason did not see them. Moreover, this problem is often associated not with the malfunction of the headphones themselves, but with the fact that, for some reason, special ones are missing or damaged on the device itself, or there is simply an incompatibility of the driver itself and the connected equipment. So, how to connect headphones to a computer in several ways. Read how to set up headphones in windows 10.
All configuration methods
In order to configure headphones in Windows from the tenth version, you must first check the following parameters:
- alternately try connecting the device itself to the back and then to the front. This is necessary to check which particular panel has failed;
- go back to the sound card and study it in detail, perhaps it is here that the correct inputs are incorrectly connected (for the case when the connection is made directly through the front panel).
The video shows some information on the correct connection of the inputs.
Maybe it's not about the correctness of the connection itself, but just some kind of contact is loosely connected or for some reason just disconnected;
- take into account the moment that the unpacking is set correctly. For example, you connected headphones to the front panel, but this system does not support this type of audio jack connection. This is how the laptop does not see the connected devices. In this case, you need to change the connection type itself to HD Audio type and then configure;
- try connecting other headphones, the headset itself may be faulty in your case;
- then you need to make sure that before installing the drivers, you did not forget and also installed the drivers for the chipset and frameworks.
If these actions did not make your device work, then you will need to try to update the current drivers.
Steps to update drivers
- We press the combination of "R" and "Win" at the same time and after that we press this input "msc";

- The Device Manager is now open for you. In it we find “sound, game, video devices”. Then select the sound card and then "update the driver";

- Then it will take some time for the system to find the driver. Only one feature should be taken into account that with such an impact, universal software from Microsoft can be downloaded. To prevent this from happening, you should download a driver named Realtek High Definition Audio from the developer's website in advance and only then click in the next window "search for drivers on this computer."

- Do not forget to reboot the device after the drivers have been updated. The installation will complete successfully.
Driver installation video.
Work after installing the driver
After the installed driver is turned on through the control panel. Click "additional device settings". Then be sure to tick the box "Separate all output jacks as independent input devices."

This influence is necessary so that the sound is directed not only to the speakers, but also to all input devices.
During speaker settings (volume control), you will need to check the "disable front panel socket detection" checkbox.

Here's a video on how to set up the sound on your headphones.
Now you yourself know how to turn on the headphones and how to make them work fully on the device. Not always not receiving sound through the earphone is only a malfunction of the earphones. Often the problem lies behind the PU itself. It is worth checking everything carefully and trying to fix the problem yourself in record time.
Headphones with microphone
Simple headphone installation does not always result in the microphone device working. If you are wondering how to configure and install this unit, just watch the following video.
Now you know everything about connecting a headset and why it may not work. Use a headset and feel comfortable. The computer always requires updating and correct settings, just see how to do it yourself and use it yourself and help other users.