Detailed review of android 6.0. Setting and setting priorities. Back up app settings
More recently, a new operating system from Google has been released - Android 6.0 Marshmallow. The preview of new items appeared on May 28, 2015. The release date for the latest version, which is already available for update on many devices, is September 29, 2015. In comparison with the shell, it has acquired new features, for example, setting security parameters and locking using a fingerprint. The developers position the system as energy-saving - users can independently configure the parameters that are responsible for battery power consumption. The very first gadgets to get access to the update were Nexus 5, 6, 7, 9, Player. It is very easy to upgrade to the new operating system from the previous versions of Android - 5.0 and 5.1, which are currently installed in most of the flagship mobile devices from Sony, HTC, Samsung, LG. On October 5, 2015, an image for updating Nexus devices became available for download on the official website.
Review of new features of the new operating system Android 6.0 from Google
The review of the new operating system showed that one of the significant innovations was changes in the functioning of applications. Now users have access to the daily saving of all application data. This system works very simply - once a day, the user can write information to Google Drive. Thus, not only program settings are saved, but also their state. It will now be much easier for gamers to return to the passed level of the game in case of errors. Previously, they were forced to start the passage of their favorite game anew. This innovation has simplified the work by quickly restoring program settings that do not have to be installed manually after a device failure.
One of the main differences between Android 6.0 and older versions is manual security settings that can be set when working with applications. It works very simply. Previously, it was necessary to allow access to all data and devices during the installation of the program - contacts, camera, microphone, location. Users were forced to open full access to all requested parameters without the ability to select only a few of them. The simplest wallpaper application "required" access to contacts, a microphone. For the manual selection of parameters, some used root-rights, which restrict the possibility of warranty service for a phone or tablet and require certain skills to obtain them.

The developers of Android 6.0 have provided a choice of parameters that the application will use. For example, the program requests access to the microphone, camera and contacts. During the installation of the program, the user can manually select only access to the microphone. In this case, at the moment when the application needs access to the camera, a corresponding request will appear on the screen. Thus, until the program uses the information for the first time, access to it will be closed.
This innovation has long been anticipated by many users who are interested in security and privacy issues. This is due to the fact that the policy of many developers is not loyal to privacy. Today, many applications require permissions that are unnecessary for this application. For this reason, most owners of non-flagship mobile devices are waiting for the release of Android 6 for their gadgets. It is believed that such a privacy policy will attract more clients in the business sector, for whom information security is a key principle in using modern technologies.
Using the fast payment system
The next innovation is not key for users of the Russian Federation, Ukraine, Belarus. It's about Android Pay technology. Previously, Google has already tried to implement a system for using mobile phones and tablets as electronic wallets called Google Wallet, which, unfortunately, did not lead to a successful result. That being said, many modern gadgets come with a built-in fingerprint scanning function. Among them are Huawei Ascend Mate 7 and Samsung Galaxy Alpha. Most modern smartphones and tablets support NFC technology.
This allowed the developers to implement the Android Pay technology into the new operating system, which will make it as convenient as possible to make payments. Credit and debit card information is stored on the mobile device. This allows you to make payments in both virtual and real stores.

The new technology is expected to allow Google Wallet to be reloaded in Android. For this, it is necessary to involve credit institutions in the project. In fact, this is an attempt by Google to introduce widespread use of mobile gadgets to make quick payments. This system works successfully on Apple devices. Apple Pay's success shows that the future lies with mobile payments. Thus, Android Pay technology is not an attempt to compete with Apple, but rather, the desire of Android developers to create a convenient operating system that supports high-tech standards.
Power saving mode
Android 6.0 has acquired a new feature - Doze. Basically, it will be useful for tablet owners, since it is these devices that users sometimes use for many hours in a row. Doze allows you to set settings that reduce power consumption. It is no secret that many flagship models of mobile devices have high display resolutions and allow a large number of background processes to run. Fast performance and multitasking results in reduced battery life.

Each new version of Android is designed to improve power consumption. Version 6.0, which is primarily intended for flagship gadgets, has a Doze function. It works very simply. Users are now able to view information about which processes consume the most energy. You can set various energy settings for specific processes and preinstalled programs. Doze resembles hibernation on a desktop computer. Google experts say that thanks to the introduction of such a function, the Nexus 9's battery life has doubled.
Fingerprint recognition
Modern mobile devices can recognize fingerprints. Previously, to take advantage of this feature on your phone or tablet, you had to install third-party applications. The new operating system supports fingerprint recognition. This function can be used not only for making payments via Android Pay technology. You can customize device unlocking by scanning your fingerprint and make the software easier to use.

Developers of third-party applications will receive the necessary APIs, which will allow introducing the new Android feature into software products created by various companies. This leads to the conclusion that fingerprint scanning will soon become even more popular. This method doesn't just speed up tasks on your mobile device. It guarantees the safety and security of all data.
Google Now changes
Updated operating system Android 6.0. supports the well-known Google Now function. With its help, you can receive tips that appear at the right time. The assistant analyzes the user's actions in the system and shows useful information in the application that he is using at the current stage. Most often, information is presented by search queries for a word in Google.

Google Now on Tap works very simply. It is enough to hold the Home button for a few seconds to activate the assistant. After that, you can find out any information, be it the text of your favorite song, cinema rating, store location. It should be understood that the assistant analyzes the data that is now.
The new Google Now assistant contains another interesting tool that is integrated into Android 6.0. It's called Google Fit. This feature allows you to track the time of your morning run or bike ride. Such a tool will make working with your mobile device even more convenient and comfortable.
Interface changes
At the first acquaintance with a new software product, it is impossible not to pay attention to how the interface has improved. In Android 6.0 Marshmallow, the app menu has been changed. Pages with programs have disappeared. Instead, they have a convenient menu that can be scrolled up and down. Thanks to this innovation, it will be much easier and faster to find the required program. It should be noted that, as in the previous version of Android, all applications are sorted in alphabetical order. At the same time, the developers have not implemented the ability to group applications into folders.

The application menu contains a convenient search. The developers made sure that users did not have problems finding and opening the required program. Now it is enough to enter the first characters of the application name in the search bar. This interface looks pretty attractive. In addition, the four most important are displayed at the top of the application menu. The developers have applied a special algorithm that analyzes which programs are most frequently used, which ones have been launched recently. Thanks to this, the system offers four pinned applications at the top.

The changes have affected the clock on the home screen. The developers managed to improve their appearance. Many people will pay attention to the number that is displayed below the hours. The date is written in capital letters, but it is also bold.
An interesting innovation is the notes that are displayed on the lock screen. Now everyone can create the text that they would like to see when the device is locked. The text will be displayed in lowercase just below the time and date. Thanks to this function, you can record the most important information.
Other handy changes
A review of a few more innovations deserves attention. One of them is volume control. The developers took into account the complaints of Android 5.0 users. and returned the convenient Do Not Disturb button. In this case, pressing the side volume switch allows you to open. They can set not only the call volume. On the right, you can see an arrow that opens the alarm and media volume settings.

Android 6.0. Supports modern USB Type-C technology and USB 3.1 standard. It is no secret that this technology is gaining popularity. With USB Type-C support, you can speed up your mobile device charge time and data transfer time.
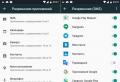
The new operating system Android 6.0 Marshmallow has a section "RAM". It allows you to view information about which applications are using the most RAM. Previously, these purposes required the installation of third-party programs. Thanks to the new function, you can find out which applications have used the RAM of the mobile device in the last 3, 6, 12, 24 hours. This allows you to determine which programs are slowing down the device.
This article will tell you, including all examples and details, how to install Android on your tablet, smartphone, or other devices.
There will also be a lot of tips on this.
Step # 1. Installing and getting ROOT rights
- Click on this button and the program is downloaded;
- Click on the downloaded file and open the Kingo Android ROOT program. (Press "YES" if the system asks for permission to start.);

- Inside the program, we can see that the device is not connected yet. We connect our phone via usb;

- We will also need to enable debug mode (the program itself will contain pictures with instructions on how to do this). If the instructions are not enough for you, then you need to find the "menu for developers" and enable the option "USB debugging";

1.6. After our program has seen the device, the "ROOT" button will appear;
1.7. Click on it. Done! You have received ROOT rights to your device.

Step # 2. Recovery update on your device
The next step is to update Recovery.
Recovery or special boot mode is a special mode on the device, thanks to which you can restore the system or download updates for it.
Installing Recovery
To install Recovery, we will use the ROM Manager application, this program is specially made for easy access to the Recovery system.
- First, we have to go from our gadget to the ROM Manager website;
- Click on the download button and download this application;

- Next, go to downloads and click "Install application";
- We go to the ROM Manager. And we immediately see the "CloclworkMod" button in the main menu.

Click on it and the application is updated to the latest version;
- The top line will contain the model name of your gadget. Click on it;

- Next, Recovery will be installed and downloaded to your device (This action requires an Internet connection);

- Recovery has been updated and you can move on to the next item with peace of mind.
Advice! Use ROM Manager carefully and follow the instructions, do not press unnecessary buttons, otherwise you can turn your phone into a brick.
Step # 3. Data backup
Backup is the saving of your data on the device, it can be partial or complete. In our case, complete.
Start backup
For this, we will also use the same ROM Manager.
- We go to the ROM Manager;

- Then we select the line to save the current ROM. We save the file so that we can find it at any time (write all the names, save the file under a convenient name for us, also set the current date of saving);

- After that, the phone / tablet will perform a standard reboot. All actions will take place as usual;
- Also, the backup will be saved on your device in a specific folder that you specify;
- The backup is complete.
Advice! Do not under any circumstances delete the backup you have saved. If you downloaded Android and something went wrong, you won't be able to do anything back!
Step # 4. Downloading and installing Android
So we moved on to the Android download itself, all the actions that we performed earlier were only preparation for installation.
- We find on the Internet on the computer the program itself - Android. And download this archive to yourself;
- We connect our device on which we want to install Android to the computer (via a usb drive);
- Then we copy the archive to our device, to the internal storage of the phone (Important! The archive does not need to be unpacked);
- Next, go to the ROM Manager and go to the tab with the name of our device. Click on it, see the "reboot" button, click on it. After that, the recovery is rebooted;

- We find in the application a return to the factory settings. We carry out this action. We confirm the execution;
- We do the same when we configure WipeDalvikCache;

- On the screen of your device there will be an item Choose ZIPfromSdcard, click on it;

- We type any name for our file, firmware, after that we press save;
- Press the "Yes - Install" button and perform the operation;

- We are waiting for the started process to end, it may take a couple of minutes;
- We select the "reebot" button, after that the device will restart. The reboot can also take a couple of minutes of your time;

- Done! Now you have Android installed on your phone! My congratulations.
- If you have previously done firmware on your phone, then you should not update the recovery;
- In case of an error, just roll back the phone;
- Perform all actions with a full charge of the phone! What will you do if your phone runs out of power during this process ?;
- Also, select the most current firmware for your device.
Android is the most popular operating system in the world with billions of devices installed around the world, so it's no surprise that many mobile device users are waiting for the latest version of Android 6.0 Marshmallow.
Android 6.0 Marshmallow has a number of improvements and new features. While the system will initially be available only for Nexus devices, most Android phones will soon be able to update completely free of charge.
Typically, smartphone manufacturers are in the process of updating the operating system, and it may take several months for the manufacturer to test the new software and make sure it is compatible with mobile devices.
If you don’t want to wait that long, we’ll tell you how to download and install Android 6.0 Marshmallow right now.
1. Check the phone for compatibility

At the moment, a preview of Android 6.0 Marshmallow has been released for the Nexus 5, Nexus 6, Nexus 9 and Nexus Nexus Player. You can try to update your Android smartphone, however we strongly recommend not to do this, as most likely, you simply will not succeed, and in the worst case, you will get a broken phone. So, you have been warned, and we continue!
2. Back up your device

Before you start updating your Android device to Android 6.0 Marshmallow, you must back up your phone. Upgrading to a newer version of the operating system always carries a risk.
Backing up your smartphone means that if something goes wrong, you can quickly and easily restore your photos, videos, and other data.
The fastest way to copy your photos is to connect your Android device to your PC via USB, and copy them to your computer.
You can also set up automatic backups of your photos. To do this, you need to go to the Photos app, tap on Settings\u003e Backup & sync, and then make sure backup is enabled and connected to your Google account.
Also make sure to enable the backup of your data. To do this, go to Settings\u003e Backup & Reset, and then make sure Data Backup and Automatic Restore are enabled.
3. Enable USB debugging

Now you need to enable USB debugging. To do this, you need to go to Android developer mode, namely Settings and scroll down to "About phone". Press this button seven times and it will tell you that developer mode is enabled - now you will see this mode on the settings page. Click it and then enable USB debugging.

After that, you need to enable OEM unlocking - but keep in mind that after this step, all files on your device will be deleted.
4. Download 15 seconds ADB Installer

You will need an additional Windows tool to install Android 6.0 Marshmallow on your smartphone. The program is called 15 seconds ADB Installer. You can download it from this link.
A window will appear to confirm the installation of ADB and Fastboot. Enter Y from the keyboard to confirm. Press Y again when asked to confirm the installation of ADB on the whole system and if you want to install the drivers. Then a new window will open for installing drivers. Confirm the installation again, and then click the Restart Now button to restart your computer.
The program will be installed at C: \\ adb (if C: \\ is the default hard drive).
5. Download Android 6.0 Marshmallow

Head over to Google's Android Developers site, which lists the Android 6.0 Marshmallow system hardware images.
Each hardware system image is for a separate Nexus device, so make sure you download exactly the image you intend to install Android 6.0 Marshmallow on.
After downloading the compressed a.tgz file, you will need to extract the files and folders using programs such as WinRAR. Find the file you downloaded, right click and select "Extract files ..." and extract the files to the ADB folder we created in the previous step (for example, C: \\ adb).
6. Install Android 6.0 Marshmallow

You can now install Android 6.0 Marshmallow on your device. Turn off your mobile phone and connect it to your computer. Now you need to start your device in fastboot mode. If you have a Nexus 6, then press and hold the volume down and power buttons. For Nexus 5 - Press and hold the volume up button and the volume down button, and then press and hold the power button.
For Nexus 9 - press and hold the volume down button, then press and hold the power button and for the Nexus Player, just press and hold the power button.
Attention! The first step is to back up all your data. Copy all photos, videos, documents and other information you need on your device to a safe place.
A manual update will inevitably erase all user data from the device's memory, and with the right luck, it can turn your Nexus into a brick. All subsequent actions you perform at your own peril and risk!
Downloading the image
Manual Android installation comes from an image. You can find and download the desired image on the corresponding page of Google Developers. In our case, Android 6.0 is being installed on the Nexus 5, and therefore we find this device in the list.

Download and install the tool to download the image to the device
In order not to waste time and effort downloading and installing the entire Android SDK, it is recommended to turn to the ADB Installer utility available at XDA-Developers. Here is a direct download link from Google Drive. The utility weighs only 9 megabytes, its installation is extremely simple and takes less than a minute.
Don't be intimidated by the DOS-style interface. We confirm each request with English "y" and pressing Enter.

Agree and install Google USB Driver.

Now, if you look at the root of the C drive of your computer, you will find a new folder there adb... It contains everything you need to manually install an Android image.
Returning to our image, which has already been downloaded and stored on disk as a TGZ archive. It must be unpacked with any suitable archiver. For example, 7-Zip.

The TGZ archive hides another archive, this time in the TAR format. It also needs to be unpacked. As a result, you will have a folder with such content.

For reasons of convenience, it is better to give this folder some short name (for example, I chose a60m). A little later, you will understand the meaning of the short name. Also, don't hide it in a dozen subfolders. It seemed to me optimal to place the folder with the unpacked image inside the adb folder. It turned out like this.

The preparation process is almost complete, and all that remains is to make the necessary settings on the mobile device itself.
First, enable USB debugging. To do this, go to "Settings" and scroll to the very bottom of the screen. Here you need to find the item "For developers".

If this item is not there, then go to "Settings", find "About phone", the last in the list is "Build number". We tap on it seven times.

After the message about receiving the developer status, go back to "Settings" → "For Developers", find the item "Debugging via USB" and enable it. A warning will appear - we confirm.

Turn off your mobile device and turn it back on. At the very beginning of the download, you see a black screen and a white Google sign. If an open lock is drawn at the bottom of the same screen, you can skip the next step.

If there is no lock, then we have to unlock the bootloader.
We connect the mobile device to the computer via USB and enable debugging.

Run Windows Command Prompt as administrator.

On the command line, write:
adb reboot bootloader

Such a menu will appear on the mobile screen.

Pay attention to the LOCK STATE line. The bootloader is now locked.
Attention! Executing the following command, in fact, will reset to factory settings, all your data and applications will be deleted from the device!
To unlock the bootloader, write in the command line:
fastboot oem unlock

A warning will appear on the screen of the mobile device and ask to confirm the operation. Use the volume buttons to select Yes and press the power button.

We are waiting for the OK message and the Finished message to appear in the command line interface.

The LOCK STATE setting on the bootloader screen has now changed to Unlocked and your Nexus is ready to accept the new Android.

The magic begins
We return to our unpacked image. Inside, among other files, you can find a script flash-all... Our task is to run it through the command line. You can do this by being in the image folder. Changing the folder in the command line is done with the command cd.
If you did everything in the same way as I did, then your image folder is also called a60m and is located in the adb folder in the root of the C drive. To get into this folder via the command line, run the command:

And here it is - the moment of truth. We write flash-all on the command line.

Installation begins. The process takes a fair amount of time.


Please be patient and wait for the command line interface to prompt you to press any key to exit the command line.

For safety's sake, it makes sense to close the bootloader again. To do this, we sequentially execute two commands in the command line with a mobile device connected to the computer, and then press the power button.
adb reboot bootloader
fastboot oem lock
Don't forget to turn off USB debugging in developer settings. You can also delete the folder with the unpacked image from your computer.
Done!
Please accept my sincere congratulations. You can now manually install any supported version of Android on your Nexus.
As you all know, Google has released official images of Android 6.0 Marshmallow firmware for most Nexus devices. For those who do not intend to wait for an OTA (Over The Air, over the air) update for their device, we present you with a kind of instruction on how to install Android Marshmallow on your Nexus. I want to say right away that if you have ever stitched ...
As you all know, Google has released official images of Android 6.0 Marshmallow firmware for most Nexus devices. For those who do not intend to wait for an OTA (Over The Air, over the air) update for their device, we present you with a kind of instruction on how to install Android Marshmallow on your Nexus.
I would like to say right away that if you have flashed your device at least once, then this instruction is practically no different, the only difference is in the presence of a new firmware image. And if you do this for the first time, then this instruction will definitely come in handy for you.
For those who do not want to read or like to watch everything with their own eyes, at the very bottom of this material there will be a video of the journalists of the Androidauthority.com website. Despite the fact that the video is flashing an older version of Android, the steps that you need to follow, this does not change.
What do you need to get started?
- Nexus device and USB cable for connecting to laptop or computer.
- The bootloader on your device must be unlocked.
- Installed Android SDK with ADB and Fastboot programs. Download here from this link!
- Factory image of Android 6.0 Marshmallow firmware. You can download it here! Currently, Android Marshmallow images are available for devices such as Nexus 6, Nexus 5, Nexus 7 (2013), Nexus 9, and even the Nexus Player.
- An archiver installed on a computer that can work with formats such as .tar and .tgz
Now you can get down to business. ATTENTION!!! You do everything at your own peril and risk, despite the fact that it is very difficult to programmatically kill Nexus, we are not responsible for the actions that you perform. Read the instructions carefully and you will succeed.
- Turn on your device in bootloader mode (fastboot mode). In order to do this, you need to turn off your smartphone / tablet, and then hold down the volume down button and press the power button (Volume- + Power button).
- If you have not done this before, then connect your device to your computer and execute the "oem unlock" command, by this action you will unlock the bootloader. WARNING: All files from your device will be deleted!
- Using an archiver, extract all files from the .tgz archive. Then use the archiver again to extract all files from the .tar archive. When you complete these steps, you should have a folder with several files inside.
- Move all the files that you received from the above archives to the "Platform Tools" folder, which is located in the already installed Android SDK.
- If all the steps are correct, then after connecting the device, all ADB commands should already work. To check the correct connection, enter "fastboot devices" at the command line. If your device appears in the list, then you did everything right.
- In the folder with the firmware, which is already in the Platform Tools, there is a file called "flash-all". Double clicking on this file will launch the Android Marsmallow installation process on your Nexus.
- After starting the firmware process, in no case, do not disconnect your device from the computer. If you do this, you can definitely get a "brick".
- After the firmware process is over, your smartphone / tablet will reboot and that's it ... Congratulations, you are now the owner of a Nexus device running Android 6.0 Marshmallow.