Create an iso from your installed system. Creating ISO images. What is a system image? How to create a system recovery disk image
Due to our own erroneous actions on the computer or a virus attack, it is not possible to download Windows 7 by any means?! Or the operating system boots, but working in it is simply unbearable?! If you are familiar with these situations and would like to correct the situation within a minimum time, you need to prepare in advance for such problems and sometimes (once a month/every two months) make an image of the system and, if necessary, restore the operating system by rolling back to the created image. Windows 7 has a built-in system archiver, which is very simple and intuitive; you don’t need to install additional programs to create an image of your system, much less spend money on these programs.
How to make a system image of Windows 7? There are several ways to launch System Archiving, here is one of them. Come along the way
In the window that opens, you will see on the left "Creating a system image"- this tool will allow you to create a system archive once, if you look at the right side of the window, you will see a button, i.e. It is possible to configure archiving automatically.  It's up to you to choose which method suits you; in this article I will describe both of these methods.
Creating a system image
Click "Creating a system image", in the window that opens, select the location where the system backup will be stored, the ideal option is an external hard drive, you can use a CD/DVD, but keep in mind that you will need a lot of them. It is also better not to use a local disk, since in the event of a virus attack, recovery from the local disk is not always possible.
 After choosing a location to save the backup, you need to choose what to archive. If you have enough space, save all local drives. In this example, I will only save drive C.
 In the next window, confirm our choice and click "Archive".
 Next comes the archiving process/creating a system image; it can last for quite a long time, it all depends on the amount of space being archived and the power of the computer.

At the end of archiving, the system will offer to write the data to disk, since I’m archiving to an external hard drive, I don’t need this, click “no”, besides, I don’t really want to write 32 GB :)
 This completes the process of creating a system image, the backup is located on a removable disk, the folder name is WindowsImageBackup.
Setting up automatic system image creation
I remind you that we originally came along the way “Start-Control Panel-Backup and Restore”,press "Set up backup", in the window that opens, select the location where the system backup will be stored, please note that the specified backup location must be available when it is launched according to a schedule. The ideal option is an external hard drive; CD/DVD is not entirely suitable, since it will not be very practical to spend several disks on each backup. It is also better not to use a local disk, since in the event of a virus attack, recovery from the local disk is not always possible.
 In the next window, we select what we will archive or present the choice to the system, i.e. leave it as default, in this example I will leave it as default. Click "Further".
 In the next window, select the schedule for executing the system image, I recommend once a month, although this is individual, it all depends on how often you make changes to the system.
 After clicking "Save settings and start archiving", the archiving process will begin. System archiving can take a long time, up to several hours, it all depends on the amount of data and the speed of the computer.

I hope you will never need a system backup, but situations are different and to be on the safe side, I strongly recommend making an archived image of the system.
Need a quick and easy way to back up and restore Windows without using backup tools or cloud computing for your personal data?
There are several third-party Windows backup and recovery tools available, but they can be complex and time-consuming to use. So, why not learn how to create an ISO image of your Windows PC?
Why should you choose a Windows 10 image backup?
We all know that backing up our data is important, especially when upgrading to a new version of Windows. But instead of fiddling with partitions for specific data or syncing to the cloud, why not just back up your entire Windows installation?
You can add personal folders to the image backup, but skip apps and games. In addition, you can create an image of the entire system disk. Naturally, you will need a suitable amount of storage for such a backup.
Thanks to the ISO image format, you can create backup copies of your entire PC. Essentially, it creates an exact copy of your entire drive or selected directories. You will be able to restore the backup image in the event of a disaster.
ISO files can also be used to backup existing CDs and DVDs
What are ISO files and how can you create, use and burn them for free in Windows 7
ISO files can be created from any CD or DVD you have. They are called "disk images" because they are an exact image of the disk. The ISO file contains an exact representation...
Read more
Creating a Windows 10 ISO System Image Using DataNumen
One popular way to use disk images is to create a clone of the hard drive (HDD or SSD) that may end up in the last place.
DataNumen Disk Image (a.k.a. "DDKI") is one such solution, works on all versions of Windows and is available as free software.
After downloading and installing the utility, use clone tab for selecting the disk from which you want to make an image; to clone multiple disks use Batch clone Tab.
Select a destination and assign a file name to Output image file as field where you have to select the target drive. This is the device you use to save your backup. This could be an existing external drive or a hard drive you recently purchased.
Click Start cloning This copies your disk to the target device, ready for use. Our view on HDD cloning
How to clone your hard drive
Copy the entirety of one hard drive to another. This is called cloning, and it is an important process if you want to replace or upgrade the primary hard drive on your computer. Cloning is not the same...
Read more
Covers this topic in more detail.
Creating an ISO Disk Image in Windows 7
Even though cloud backup is easy, there is no reason not to prepare an ISO disk image for disaster recovery scenarios. You can make an image of the system in its current state. Alternatively, you can create an image of a recently installed operating system. This may include some apps and games you have installed.
If you are using Windows 7, backing up to an ISO disk image is part of the Windows 7 Backup and Restore feature
How to Set Up and Use Windows 7 Backup and Restore
It's no secret when I say that sooner or later you will need a backup of your personal data. Do you have one right now? What prevents most people from preparing regular backups...
Read more
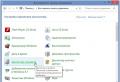
To create a system image in Windows 7, open Start > Get Started > Back Up Files. In the left pane, click Create a system image and select your destination.
This could be an external hard drive or another large volume. You can also burn to DVDs (you'll need more than one) or Blu-ray.
Do you have a home server or some large network storage, perhaps in the form of a purchased NAS? If so you can use Online option. If you want to use a USB flash memory device, please connect it to your computer in advance and select it as the destination.
Also make sure that the system drive is selected (C: drive by default).
A confirmation screen will indicate how much space will be taken up by the backup. Check this to ensure that the design matches the remaining space on the target device. Continue with the backup and wait for it to complete. The duration will depend on the backup size and disk speed.
Recovering a Windows 7 disk image
Once completed, Windows will prompt you to create a system repair disc. This is a good idea, so find a blank disk and follow the instructions. You can then use this to boot your PC and choose the option to restore the ISO disk image of your Windows installation after a disaster scenario.
Creating an ISO Disk Image in Windows 8.1
The same disk image tool is available in later versions of Windows. Ideally, you will need to upgrade Windows 8 to Windows 8.1 before proceeding.
To find the System Image Tool, click Get started and enter " file history". Automatic search will show Recover your files from File history recording first, so click this button to open File history tool, then System Image Backup in the lower left corner.
You can then continue as described in the Windows 7 section above. After creating a backup ISO, follow the Windows 8.1 steps below to restore the image to Windows 10. In case of a disaster recovery, you will need to boot into Windows 10's equivalent of Safe Mode.
How to Boot into Safe Mode in Windows 10
Safe Mode is a built-in troubleshooting feature that allows you to fix problems at the root without the intervention of non-essential applications. You can access Safe Mode in a variety of ways even if Windows 10 no longer boots.
Read more
Restore image.
Recovering a Windows 8.1 disk image
If upgrading to Windows 10 doesn't work for you (you might end up with a reboot loop), having an ISO image to fall back on is a huge advantage. You can restore a Windows 8.1 disk image in Windows Advanced settings screen which you will find by pressing F8 several times when your computer boots (or holds SHIFT when you press Run again).
IN Additional launch options, Choose Repairing your computer > System image recovery and follow the instructions, ensuring that Windows can find the ISO file.
Note that even if you have Windows 8.1 installation media, you can still restore the disk image. On Install now screen, use Fix your computer link and then Repair,
From here you will be redirected to the Advanced Startup menu, so select Troubleshoot> Advanced options > Restore a system image by following the instructions for restoring a Windows ISO system image.
Backup your Windows PC using an ISO image
As you can see, creating an ISO image backup of your entire Windows system is ideal for backup before a major system update. Additionally, the speed with which an ISO can be created and subsequently restored should make it a much more attractive option than simply backing up your data and hoping for the best.
Once your ISO is made, you may need to boot your computer from it after a system crash. Try one of these tools to create a bootable USB from your ISO file
10 Tools to Create Bootable USB from ISO File
Installing an operating system from a USB drive is fast and portable. We test several ISO-USB tools to find the best one for you.
Read more
Learn more about: data backup, data recovery, disk image, ISO.
How to Run Really Old Software on a 64-bit PC: 6 Methods
Today, almost every home has a computer. When you bought a computer, it either already had an OS or it didn’t have one. Typically, many computers are sold without operating systems. When the computer does not have an operating system, you need to install it yourself. But often computers are sold with an installed operating system and even some set of necessary programs.
Further, over time, when using a computer, problems and problems arise in the software. We are all accustomed to the fact that programs can fail. After this, you have to either reinstall the program itself, which is crashing, or in extreme cases, reinstall the operating system itself. The process of reinstalling the operating system itself is lengthy. Previously, this was done within 4-6 hours, but today it takes up to an hour. But you can save a lot of time and effort if you create an image of the operating system when you first start using your computer. What is a system image - let's figure it out.
The concept of a system image
The operating system itself and all programs are located on the system drive “C”. The operating system image is a copy of this disk. To be more precise, by default those disks that make it possible to run the operating system are written to the image. The image also includes the operating system itself and its settings, files and programs. That is, you can write into the OS image everything that is on the C drive and that is necessary for using the computer. Then, if some inevitable problem arises, for example, the hard drive fails, the image is launched and the system is restored. The peculiarity of system recovery is that it is impossible to select a single specific element to restore. In other words, all programs and parameters will be overwritten to those in the image.
Another feature of images is that they can contain the user’s own files. But this is not very useful, and a much better backup would be made using operating system backup programs.
What is a Windows 8 system image
Next, we'll look at how to create images for different versions of Windows. A Windows 8 system image is created as follows. To do this, you will need to use the command line, and you will also have to use the Resigm utility. Using this tool, an image will be created that will include programs, their settings, and in addition the entire complex of Windows system files. At the command line, you need to enter the recigm / createimage command and specify which disk you want to backup.
Windows 8 has another option to back up data files virtually on the fly. This can be done using the File History function. In order to enable this function, you need to press the key combination windows + w on your keyboard, and in the window that appears you need to enter the name of our function in the search field. There will be two options and all the necessary steps will be described.
The concept of a Windows XP system image
The Windows XP system image is created in the following sequence. Select “Control Panel” from the Start menu. Next, select the “System and Security” category, then “Archiving computer data” and at the end select the “Create a system image” item. After this, follow all the instructions that will appear and your image will be created.
Creating a system image
You can also record a system image using special software. There are quite a lot of such programs, although most of them are not free, but they are reliable. Such programs include Norton Ghost, DriveImage XML, GParted. But the most effective is the Acronis system image. When using this software product, you first need to create a boot disk. After this, the “Start Page” tab is selected in the program, and the “Backup” section appears in it. There we indicate with a tick which disk will need to be copied. After that, in the next section “Archive storage” we indicate the path where our image will be recorded. It is worth saying that it will be written in iso format, the operating system image will be placed in this file. And then all you have to do is click on the “Proceed” button.
Creating a system imageWindows 7. You can’t imagine how many times this image has helped me out during serious system crashes and various troubles, and how much time it has saved me. I hope that you will be able to successfully apply this information in practice.
Note: Friends, this article was written two years ago, read our more complete article on this topic - using a standard archiving tool on DVDs, or on a portable USB hard drive and how to recover from these images, you will also learn how to connect a SATA, IDE drive or an old hard drive to your laptop, netbook and store your backups on it.We also have an article - or another hard drive using the tools built into the operating system.
Creating a system image
Sometimes, due to our own erroneous actions on the computer or a virus attack, it is not possible to download Windows 7 by any means. Or it will be possible to load the operating system, but working in it can be simply unbearable, due to serious problems and malfunctions, and if you imagine that there is not one computer, but ten. There are also many friends who, unfortunately, also have computers and in the evenings you have to solve their problems, such a life would truly seem like a nightmare if such a tool as Creating a system image.
This image may be useful if none of the remedies did not help you, and therefore all our previous articles did not either. First I will describe how create a system image Windows 7 using the Computer Data Backup tool, then we will restore our Windows 7 from the image. Below are examples of how to restore individual files of your data from an image.
- It is important to know that when you restore Windows 7 from a system image, all information from the hard drive partition to which you are deploying the image will be deleted and replaced with the contents of the image. By the way, this operation can be carried out using the program.
Creating a system image
Start->Control Panel->Backup computer data->Create a system image.
In the dialog box that appears in front of us - Where should the archive be saved? The operating system will give us a hint, for example, in my case, Windows 7 selected the Local disk (E:), with a capacity of 339.19 GB, located on the second hard drive (I have two hard drives), one contains the system itself, and the second contains System Images Windows 7 made using our Computer Data Backup tool. If you have one hard drive, then the system image needs to be created on a free partition.

Just in case, I am attaching a screenshot of the Disk Management window on my computer.

Important Note: The ideal option for storing system images is a portable USB hard drive or a specially purchased SATA hard drive. If you choose DVD discs, you will need a lot of them; this option, in my opinion, is the most inconvenient; you can also store images online, but this method deserves a separate article. You also need to know that, unlike the archives of our data, the system image can only be saved on a disk with the NTFS file system.
Which partitions of your hard drive should be included in the backup? By default, the Local disk with the Windows 7 operating system will always be selected, in our case (C:). You can additionally choose to include in the system image any disk with your personal data or all disks, this means that the System Image you create will contain all the information stored on your computer, as long as there is enough space on the media where you are creating the image. Click next.

We confirm the archiving parameters, we see a warning that to create a system image in my case you will need 9.42 GB, your requested space may be more. Click Archive, the process of creating a System Image will begin, which may immediately result in an error if we do not have enough space to store the image.


At the end of the process, you are prompted to create
The new backup utilities in Windows 7 are truly impressive. System imaging is available in all editions of Windows 7. Today we'll look at a way to create a backup image of your machine without using third-party utilities like Ghost or True Image.
Let's say you've just finished installing a fresh copy of Windows 7 on your computer and configured it the way you like. Now the first thing you need to do is create a disk image that will help you quickly recover in case of failure. An image is an exact copy of everything on your disk. It is best to create it when the system is still clean and organized. This will make the image smaller in size, and will allow you to quickly restore your system in case of unforeseen circumstances.
Creating an image in Windows 7
To create an image, go to Control Panel - System and Security - Backup and Restore.

You can include multiple hard drives in your image, but this will increase the final image size. The drive on which Windows is installed will be enabled by default. Also, the image cannot include the disk where you are going to save your image (unless, of course, you are saving it to disk).

In the confirmation window you will be able to see how big your image will be and what drives will be included in it. If you find an error here, you can go back and correct everything.

A progress bar appears as the image is created. In our example, creating a disk image with 15GB of data on an external drive took approximately 20 minutes. However, the creation time varies depending on the system and where the image is saved.

Once the process is complete, you will be prompted to create a recovery disk. To which you must give your consent and ensure that the disk is stored in a safe and secure place.
When it comes to recovery (if it comes), you can use your recovery disk and its System Image Recovery option in System Recovery Options to get your system back.
Vista Ultimate, Business and Enterprise also allow you to create a system backup image. True, Vista Home and Home Premium do not have this feature. The process is similar to creating an image in Windows 7. To begin, simply type backup in the Start menu search box and then click on Backup and Restore Center.

Then click the Back up computer button and you will see a backup wizard that will guide you through the image creation process.

Conclusion
All the utilities described above are extremely convenient and really work well. It's also good that they will be available in all editions of Windows 7, and not just in the higher ones (like, for example, Vista). This will allow you to save your money (approximately $50-80) on third-party utilities.
It is necessary to create an image when the system is still fresh, so that it does not turn out to be huge and allows you to quickly recover in the event of a failure. For example, we created an image after installing the operating system, the Office 2007 office suite, and several other programs we use most frequently. As a result, the image took us 10GB, which we could easily place on an external hard drive.