How the glass on the phone changes. How to remove the protective glass from the phone screen? We remove the old broken protective glass. Protective glass from a smartphone - put a new one
When replacing a protective glass on a smartphone, few people do not worry about observing the rules and perform re-gluing with improvised tools. As a result: scratches remain on the phone, the coating is uneven, covered with bubbles, or simply does not stick tightly
When replacing a protective glass on a smartphone, few people do not worry about observing the rules and perform re-gluing with improvised tools.
As a result: there are scratches on the phone, the coating is uneven, covered with bubbles or simply does not stick tightly.
Instructions: how to install a protective glass on your phone
We have prepared a short instruction manual for those who want to install the glass on their own.
The article contains basic information, but for completeness, we recommend watching the video with detailed description stages of installation.
Removing old glass: what is important to remember
You have to understand that glass does not stick to the screen because of a special adhesive coating. The adhesion of the film to the smooth surface of the touchscreen occurs due to static. An attempt to remove it by prying it with your fingernail or (much worse) with a knife will result in damage to the screen and the phone case.
Even using a special suction cup can lead to unpleasant consequences. Remember, do everything smoothly. Pressing firmly on the Velcro, you risk damaging the cables or ripping off the screen module. A vacuum forms between the glass and the film, which will resist the adhesion of the coatings. But even if the suction cup adheres well to the film, there is a chance of damage to the sensor when removing the protective glass. Therefore, proceed consistently and carefully.
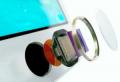
What to prepare for installing a protective glass:
a pick (or a thin plastic card) - it is better to take 2 pieces;
silicone suction cup (if you already have experience with reinstallation, you can do without Velcro);
a napkin or a piece of lint-free cloth;
an alcohol-based glass cleaner (pure alcohol or perfume will also work);
medical gloves (silicone or rubber).
Once armed with these tools, the job will take less than two minutes.
Brief description of the process
Make sure your hands are free of dust or lint before starting work. It is impossible to see the smallest particles on your fingers, so play it safe and wear medical gloves. They are thin and fit snugly on the arm, so they will not interfere with your work.
Next, install the suction cup on the area of \u200b\u200bthe phone with damaged glass, where there are fewer fragments and cracks. Gently attach the velcro to the corner of the screen, and then press down slightly, glue it to the glass. Take the pick and pull the suction cup towards you, only gradually increase the force, otherwise the glass will come off along with the screen.
As soon as you feel that the glass is peeling, deepen the pick.
When the glass around the perimeter peels off ~ 80%, feel free to pull the suction cup and tear off the old screen.
We glue new glass
Remove dust and fingerprints before applying a new coating. A lint-free cloth is suitable for this: first moisten the screen with a glass cleaner and degrease the surface with a prepared cloth.
Take the protective glass by the edges (put on gloves first).
Carefully remove the adhesive protective surface on the film (keep the glass near the phone, otherwise air dust will stick while you carry the film).
Place the glass as close to the screen as possible (align with the center, make sure that all openings for buttons, connectors and the camera pass through the film).
Slowly lower the screen protector, press down and smooth from the center to the corners at the same time. Use a dry, lint-free cloth or a thin plastic card to do this.
Remove the shipping protection tape.
It is not always possible to glue the glass to the phone without dust and lint getting in. If you see that there are debris under the film, peel off the glass exactly to the place where there is dirt.
You can also use a compressor, a technical vacuum cleaner, or a can of compressed air to blow out dust particles.
If you don't have one at hand, use tweezers.
Once the dirt is removed, stick the glass back.
P.S. And remember, just by changing your consciousness - together we are changing the world! © econe
The main function of the protective glass in a smartphone is to take a hit on itself. This protects the touchscreen from damage. Protective glass often deteriorates after impact. It becomes covered with cracks, chips and other damage. From this, the level of protection drops significantly. The visibility of the display deteriorates and the smartphone itself loses its attractiveness. To replace the cover with a new one, let's look at the features of how to remove the protective glass from the phone.
Precautions
Before removing the protective glass from your phone, you need to consider a rather important point. Due to the fact that touch screen perfectly smooth surface, glass adheres very firmly to it. It is often held not by glue, but by electrostatic forces. This is how two flat surfaces come into contact, and it will not work to remove the glass by simply prying it with a fingernail. If you use the first available tool, for example, a knife, then there is a risk of damage to the case and display of the smartphone.
It is not enough to use one silicone suction cup. If it is strongly glued to the damaged glass, then a vacuum under it will not form, and when force is applied, it will jump off. With good grip, the suction cup will not come off, but another problem will arise. The sensor in the housing is fixed using glue or double-sided adhesive tape. Their tensile strength is lower than that of protective glass and touchscreen. If you overdo it, you can completely disrupt the screen module, damaging its loops. It is necessary to act consistently and deliberately.
Removing glass from your phone
Before removing the cracked protective glass of the phone, you need to prepare and arm yourself with a special tool kit.
We will need:
- Lint-free napkin.
- Medical gloves are optional.
- Silicone suction cup is optional.
- A glass cleaner (preferably containing alcohol), vodka, alcohol or alcoholic perfume (cologne, perfume) - your choice.
- A thin plastic stick, spatula, or guitar pick.
Often the protective glass is equipped with the necessary fixtures.
Let's see how to remove an old phone film:
- Before removing the protective glass from the phone, wash your hands with soap and water and dry them. Otherwise, wear rubber gloves. This is required to prevent smudges and fingerprints on the screen surface.
- To replace the protective glass on the phone, you need to find the most complete corner, where there are no chips and other damage (or they are, but in the smallest amount). There it is necessary to attach with a suction cup, at the same time pressing it against the screen.
- The mediator pushes on the corner where the suction cup is glued. This is necessary to peel off the edge of the glass. It is necessary at the same time to slightly pull the suction cup towards you. Here it is important not to overdo it, so that the screen does not rip off until a gap forms between the glass and it. If there is no suction cup at hand, then it will be enough to smoothly insert the pick into the formed gap deeper.
- As the broken protective glass peels off, you need to deepen the card / spatula / pick. If the screen is large, then you need to work with two tools at once. They should be promoted in different directions.
- The final touch to replacing the screen protector on your phone is to pull the suction cup towards you until the glass comes off completely. You can grab the edge with your fingers and do the same.
Bonding new glass
For a high-quality replacement of the protective glass on the phone, all procedures should be done in a clean room free of dust.
- When you have already figured out how the protective glass is removed from the phone, and completed this action, we proceed to gluing a new one. We clean the screen with an alcohol-based liquid.
- Remove the film from the new protective glass from the side that is attached directly to the phone. The glass should be kept as close to the surface of the gadget as possible. Align it carefully and make sure all holes match. After that, the glass is completely lowered onto the screen.
- If bubbles appear, they are easily squeezed out after passing over the glass with a dry napkin. The last step is to remove the second tape. Your phone is now secure.
Removing and gluing the protective glass is very easy. To complete this process, you do not need to contact service centres, everything is quickly done with your own hands.
We remove the old broken protective glass in a couple of minutes.
And those who do not know what it is can watch my video: https://youtu.be/xV8qQth30zo
At the end of the video, I outline this in general terms.
The main function of the protective glass is considered to save the phone from shock, cracks and scratches. This element takes care of everything. Over time, it becomes unusable as it loses its attractive appearance... This reduces the level of protection of the device. To replace it, you must first learn how to remove the protective glass from your iPhone. This procedure is straightforward. You just need to follow simple rules.
Before you get acquainted with how to remove the protective glass from the "iPhone 6" and 5, you must familiarize yourself with the reasons for replacement:
- The appearance of the phone deteriorates.
- The protective functions of the device are lost.
- If you want to change to a new glass.
When the phone has a new protective glass, the device looks neat. There are special accessories for the iPhone that fit perfectly. But you can also use universal ones that need to be glued correctly.
It is necessary to take into account one important nuance before removing the protective glass from the iPhone 5 or 6. Since the surface of the screen is perfectly smooth, the glass is fixed to it securely. It is held not only by glue, but also by electrostatic forces. The two surfaces are firmly in contact, and therefore the glass cannot be easily removed. You need to pry it off with your fingernail. If you use another object for these purposes, for example, a knife, then there is a possibility of damage to the display.

A silicone suction cup alone won't help here either. If it sticks securely to the damaged surface, there will be no vacuum under it, it rebounds with force. When the grip is good, the suction cup will not come off, but another complication will appear.
The sensor is attached to the body with double-sided tape or glue. They are less durable than a touchscreen and protective glass. If you apply force, you can tear off the entire screen module, which will damage its loops. Therefore, actions must be deliberate. Only then can you use the instructions on how to remove the protective glass from the "iPhone 5s" or other type of device.
The work must be done carefully. Before removing the protective glass from the iPhone, you need to prepare everything for the procedure:
- Mediator.
- Silicone suction cup.
- Lint-free napkin.
- Wiper.
- Medical gloves.
Some glass sets include everything needed to complete the procedure. If these details are there, then the work is easy.
How to remove protective glass from an iPhone so that everything works out neatly. Before the procedure, you must wash your hands with soap and dry. You can use rubber gloves. This is to prevent fingerprints and smudges. The screen will look neat.

On the damaged glass, you need to find a whole corner where there are no chips or other damage. In it, you need to attach a suction cup, pressing it to the device. The corner with the suction cup must be pry off with a pick, a spatula, so that the glass peels off. To do this, you need to pull the suction cup in your direction.
The procedure must be performed carefully so that the screen is not torn off before a gap forms. If there is no suction cup, you can smoothly insert the pick into the gap that appears. When peeling, you need to deepen the pick. With a large screen, you have to use two tools. At the end, you need to lift the suction cup towards you to completely eliminate the glass.
When the user knows how to remove the protective glass from the iPhone, you can safely follow the procedure. Then you will probably need to glue a new element. To get a good result, work should be done in a clean room. Before sticking on a lint-free cloth, you need to apply a cleaner and treat the surface with it. This is necessary to completely eliminate dust and degrease the surface.

Take the glass by the edges. Hands should be washed and dried. You can work with medical gloves. Then you need to pull on the tab of the protective film that is on the adhesive surface and remove it. The glass should be kept closer to the smartphone so that no dust particles adhere during operation.
The glass is placed away from the sensor and needs to be centered and aligned. Make sure that all the holes match. The product must be lowered onto the display, pressing it down a little. Bubbles must be removed immediately by wiping the surface with a dry cloth. At the end, you need to remove the film, which served to protect the product during transportation.
It is better to immediately remove dust particles that have fallen under the glass. It is necessary to carefully peel off the glass by removing debris. You can use a napkin or tweezers to do this. Then the glass is put in place. The phone will then be protected from damage again. The procedure for removing and gluing glass is the same for all iPhones. You just need to choose the right accessory.
There are several ways to remove tempered glass from your phone screen. The one you need to use will depend on how well the glass is attached to the display. Before you start removing the protective glass from the smartphone screen, warm up the screen for about 15 seconds at a low air temperature. It should slightly melt the glue on the protective glass. It is important not to overdo it, bringing the nozzle of the hair dryer too close, this can damage the screen. Then you can use just your fingers or some flat thing that will help make a gap between the screen and the protective glass. The final step will be to carefully remove the glass.
First, you can try to remove the protective glass with your own fingers, without using any available tools. It may have been loosely secured to allow this operation to be carried out effortlessly. You just need to try to hook the edge of the glass with your fingernail. This should be done from the side that suffered the least from cracks or chips.
If the protective surface easily succumbed to this effect, and moved away from the screen on at least one side, then you can continue removing. As soon as it starts to rise, you need to move further under the protective film with your fingers, and not remove in one jerk. This will help prevent cracking. This should be done slowly and evenly, otherwise many glass shards may form.
If the protective glass is too easy to remove, you can try using a toothpick to pry one of the corners. As soon as it turns out to raise the corner of the glass up, you need to pull it with your fingers, as in the previous method, slowly and evenly. In addition to a toothpick, you can use a credit card, a piece of thin cardboard, or any flat item. You just need to insert the existing item into the gap between the screen and the glass, and then slowly press on it to lift the protective glass off the display.
Installing a new protective glass on the smartphone screen
There are two ways to install a protective glass on a smartphone screen. They provide for dry and wet glass mounting, respectively. The first method is for protection with tempered glass, which is not supplied with a special solution.
First you need to clean your phone screen with a lint-free microfiber cloth. Then you need to detach the glass from the sticky side from the factory protective film. Then you need to carefully attach the protective glass to the screen, making sure that the Home button, speaker and camera holes are located exactly in their places. You can use a credit card or any other tool to ensure an even coverage and prevent bubbles.
Wet mount is designed to be protected with tempered glass, which is supplied with a spray bottle (usually containing alcohol) to aid in installation. Some people prefer to apply protective films and glass in this way, as this method completely prevents dust and fine hairs from entering. Then you should repeat all the steps from the previous method.
The main function of the protective glass is considered to save the phone from shock, cracks and scratches. This element takes care of everything. Over time, it becomes unusable, as it loses its attractive appearance. This reduces the level of protection of the device. To replace it, you must first learn how to remove the protective glass from your iPhone. This procedure is straightforward. You just need to follow simple rules.
Why is replacement required?
Before you get acquainted with how to remove from "iPhone 6" and 5, you need to familiarize yourself with the reasons for the replacement:
- The appearance of the phone deteriorates.
- The protective functions of the device are lost.
- If you want to change to a new glass.
When the phone has a new protective glass, the device looks neat. There are special accessories for the iPhone that fit perfectly. But you can also use universal ones that need to be glued correctly.
Precautions
It is necessary to take into account one important nuance before removing the protective glass from the iPhone 5 or 6. Since the surface of the screen is perfectly smooth, the glass is fixed to it securely. It is held not only by glue, but also by electrostatic forces. The two surfaces are firmly in contact, and therefore the glass cannot be easily removed. You need to pry it off with your fingernail. If you use another object for these purposes, for example, a knife, then there is a possibility of damage to the display.

One won't help here either. If it sticks securely to the damaged surface, there will be no vacuum under it, it rebounds with force. When the grip is good, the suction cup will not come off, but another complication will appear.
The sensor is attached to the body with double-sided tape or glue. They are less durable than a touchscreen and protective glass. If you apply force, you can tear off the entire screen module, which will damage its loops. Therefore, actions must be deliberate. Only then can you use the instructions on how to remove the protective glass from the "iPhone 5s" or other type of device.
Preparation
The work must be done carefully. Before removing the protective glass from the iPhone, you need to prepare everything for the procedure:
- Mediator.
- Silicone suction cup.
- Lint-free napkin.
- Wiper.
- Medical gloves.
Some glass sets include everything needed to complete the procedure. If these details are there, then the work is easy.
Dismantling features
How to remove protective glass from an iPhone so that everything works out neatly. Before the procedure, you must wash your hands with soap and dry. You can use rubber gloves. This is to prevent fingerprints and smudges. The screen will look neat.

On the damaged glass, you need to find a whole corner where there are no chips or other damage. In it, you need to attach a suction cup, pressing it to the device. The corner with the suction cup must be pry off with a pick, a spatula, so that the glass peels off. To do this, you need to pull the suction cup in your direction.
The procedure must be performed carefully so that the screen is not torn off before a gap forms. If there is no suction cup, you can smoothly insert the pick into the gap that appears. When peeling, you need to deepen the pick. With a large screen, you have to use two tools. At the end, you need to lift the suction cup towards you to completely eliminate the glass.
New glass sticker
When the user knows how to remove the protective glass from the iPhone, you can safely follow the procedure. Then you will probably need to glue a new element. To get a good result, work should be done in a clean room. Before gluing, it is necessary to apply a cleaner and treat the surface with it. This is necessary to completely eliminate dust and degrease the surface.

Take the glass by the edges. Hands should be washed and dried. You can work with medical gloves. Then you need to pull on the tab of the protective film that is on the adhesive surface and remove it. The glass should be kept closer to the smartphone so that no dust particles adhere during operation.
The glass is placed away from the sensor and needs to be centered and aligned. Make sure that all the holes match. The product must be lowered onto the display, pressing it down a little. Bubbles must be removed immediately by wiping the surface with a dry cloth. At the end, you need to remove the film, which served to protect the product during transportation.
It is better to immediately remove dust particles that have fallen under the glass. It is necessary to carefully peel off the glass by removing debris. You can use a napkin or tweezers to do this. Then the glass is put in place. The phone will then be protected from damage again. The procedure for removing and gluing glass is the same for all iPhones. You just need to choose the right accessory.