Installing ubuntu from a USB stick over the network. Create a bootable drive and install Ubuntu from a USB stick. Creating a system partition
Linux is a fairly common open source operating system. It is used in many enterprises, both on work computers and on servers. This is due to the undeniable advantages OS, although it has a number of disadvantages:
Benefits:
- The system is distributed is free, no license required
- Requires little or no protection antivirus
- You can find an OS version for a computer of almost any power
disadvantages:
- Some versions are strong differ from familiar Windows
- Many Windows programs on Linux does not work
- A small amount of software compared to Windows
- There may be problems with the installation drivers
The huge advantage of Linux is the ability install it to a USB flash drive. To be precise, you can install Windows and run a USB flash drive, but this will require creating a special image. And Linux has an official portable assemblywhich can be downloaded for free from the official website.
Before downloading, you should decide on the version of the system. If the PC has 2 or more nuclear cPU, and RAM more 2 GB that makes sense download version for x64 systems. It is more modern and will allow you to realize all the capabilities of a PC, up to UEFI support.
Installing on a USB flash drive in Windows
It is assumed that the operating system has already been downloaded from the official website in ISO format. To proceed with the installation, you need to acquire a special program... For these purposes, it is quite suitable Universal USB Installer.
For installation you need a flash drive at least 2GB in size.
Launch program. 
Let's analyze customization:
- Step 1 - offers to select the type of operating system. In our case, this is Ubuntu.
- Step 2 - you must select the location of the system image
- Step 3 - selection of the drive on which the system will be installed. When you check the We will format as fat32 checkbox, the flash drive will be formatted in Fat32 format
- Step 4 do not touch, leave the slider as it is.
After pressing the button Create imaging begins, which usually takes several minutes. Then the flash drive can be used.
You can use another application UNetbootin... The procedure is not much different from the one described above:

Installing on Ubuntu
If you need to make a bootable USB flash drive in Linux, then the procedure is about the same as in Windows. In this case, you do not need to download any third-party programs.
We search through the search for the standard utility “ Create a boot disk». 
In it we indicate way to the pre-loaded image and drive for installation. It remains only to click on " Create bootable disk”And the process will begin, which will end with the creation of the required drive.
How to start Linux from a flash drive
After the flash drive with the system is ready, it must be run... This requires change the order of loading in BIOS. You can get into it by pressing the buttons Del, F2 or F12 when the computer boots up. If you cannot enter BIOS, then you can see the button required to click on the original loading screen. 
When the flash drive is loaded, a menu will be displayed on the screen in which you need to click on TryUbuntuwithoutinstalling... The system will start in the Live, i.e. without installation.
Check Linux compatibility
When the Live USB boots up, you can see the operating system desktop. By its appearance it will be possible definewhether the computer hardware is suitable for this version of the system. Can verify driver to know if all the hardware has been installed correctly. 
It is worth noting that working from a flash drive will be noticeable slowerdue to the USB bandwidth. To evaluate the operation of the OS on a computer, it is best to use virtual machine... One of the most popular is Virtualbox.
We will not describe the settings, but there should be no problems. Intuitive prompts make it easy to set up your car.
Existing alternatives
Ubuntu isn't the only free operating system right now. There are several dozen of them, but we will touch on the most popular:
Debian Is an old OS that is constantly evolving. Served as the basis for many similar systems, including Mint and Ubuntu. The disadvantages are that it is aimed at advanced users. 
openSUSE Is also a fairly popular system. The advantage is the built-in YAST software package for system configuration. 
LinuxMINT Is one of the most popular systems, not inferior to Ubuntu. It features a friendly interface, let's go with Windows, which makes it convenient for novice users. 
Gone are the days when in order to install Linux on a computer, you had to first. I used to have, and still have, a large bunch of disks with different versions of Linux. Now that every computer can boot from a USB flash drive, you don't have to buy disks at all.
I downloaded a Linux image from the Internet, installed it on a USB flash drive, and then install it on a computer from this USB flash drive. Grace! But not all young Linux users know yet how to install Linux from a USB stick and for them this little article.
How to install Linux from a USB stick yourself?
To install Linux from a flash drive, you will need a flash drive, of course, at least 4 gigabytes for a medium-sized distribution kit and at least 8 gigabytes for a full version of Linux, which can usually reach 4 gigabytes.
After that, we need to download the Linux image that we will install. Which Linux should you choose? Do I prefer the ones described in this article? However, you can choose any that you like. The downloaded file must have the extension .ISO This is usually always so, but some developers may upload images in other formats.
After that, we need to install Linux on a USB flash drive, as described in the article? The process is quite simple and after reading that article, you can easily install any Linux on your removable media. After you have installed Linux ON a USB stick, you can also install Linux From a USB stick.
The next step is booting from this flash drive, and this can cause some difficulties. The fact is that many computers are configured to boot from your hard drive, and by plugging the USB flash drive into the computer and rebooting, nothing happens. To install Linux from a USB flash drive, you need to change the BIOS settings.
Do not be alarmed, there is nothing wrong here, just read the article and you will understand everything. Let's assume that you managed to boot from a USB flash drive, and you saw your new operating system working in live disk mode (in our case, in live flash drive mode :)
But that's not all, of course, Linux has not been installed yet, although you can already use it directly from a USB flash drive. But our task is precisely to INSTALL Linux from a USB flash drive.
Is the Linux installation described in this article? All installation steps are well described there, how to partition the disk, and so on. So there shouldn't be any difficulties.
But if something is not clear to you, then write in the comments and I will try to help you with advice, since I have done this operation more than once and personally it seems to me that everything is simple. But on the other hand, there may be situations that I have not encountered and I will gladly add an article.
In conclusion, I would like to feel sorry for the people who use Windows, it still does not know how to boot from a USB flash drive and does not have a LIVE mode of operation. Shame and shame!
Did not find an answer to your question? Use the site search:
4 comments
Good day. I can't install ubuntu in any way. I made a bootable USB flash drive, and put everything in the BIOS, but it still does not start.
ps formatted the flash drive in fat32, after using the unetbootin-windows-608 utility I wrote down ubuntu 14.04.2 desktop amd64, freed up space in the hard drive by biting off 50 gig from drive D using standard programs and left the space unoccupied so that ubuntu itself would create a partition from this space with its file system (could not find how to create Ex3 / 4 (((
Help pzh that I'm doing wrong.
Ubuntu is an operating system. Before installing Ubuntu, you need to figure out where the boot will come from. If you have a floppy drive, it is better to use a disc with boot files. If you do not have a floppy drive or disc to burn Ubuntu, you will have to create a bootable USB flash drive.
A bootable flash drive is more practical and convenient than a disk
Bootable USB stick for Ubuntu
Before we figure out how to install the operating system, let's create a bootable USB drive. To do this, we need an ISO image with the latest Ubuntu version. If you have not, download from the official site. Next, we find the Unetbootin program. Now we will format the flash drive, as indicated below.
The Unetbootin program does not require installation, so after loading we run it. Now we follow the steps:
- We indicate the location of the image with software
- The program finds the USB flash drive on its own, or we indicate the letter with which it is designated
- Click "OK" and wait for the completion of the work.
When working with Unetbootin, there is a hang during the installation phase. Don't rush to undo the action. You may have to wait 10 minutes for the program to hang up and continue working.
Unetbootin does not require installationNow it remains to install the operating system on the computer. How to do this, we'll figure it out further.
BIOS to help
Installation will not cause you any difficulties, except for the direct initial boot of the USB drive. If you have not faced a similar question, then you will have difficulties. If you insert a bootable USB flash drive into your computer and reboot, then the automatic installation of the operating system will not start in all cases. To do this, you will have to go into BIOS mode and configure the PC boot from the desired media there.
To enter BIOS immediately after turning on the PC, press Del or F2To enter this mode immediately after turning on the PC, press Del or F2. These are common keys for entering BIOS. If you didn't succeed, when the PC boots up, carefully look at the startup screen, there is a button that will start the mode. Depending on your PC model, you will have a menu in which you change the startup order.
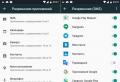
In addition to BIOS, the Boot Menu can help you. It is by calling it at the beginning of the download that you can specify the desired way to start the PC. This method is used for a one-time change:
- password change
- OS installation
- Virus scan
Therefore, this method is best used in our case. To call the Boot Menu, you need to immediately click on:
One of these buttons will bring up a blue Boot Menu windowInstalling Ubuntu from a USB stick: step by step instructions
Installation of OS from a USB flash drive can also be carried out on an empty hard disk. The process is simple, you just have to click Next and select the values \u200b\u200byou want. In the "Installation Type" section, you can select "Other Option". You will see a plate indicating the hard drive. Now let's create a few more sections. Click "New partition table". Let's create three sections:
- Root with OS location
- home section where files will be stored
- swap section - the same one in case of insufficient memory
For each of them, you need to select a certain amount of memory, depending on the capabilities of the PC. For the location of the OS, we define 30 GB, for the auxiliary one, 2 GB will be enough, but we distribute all the rest of the memory to the home one, to place personal files. Then we determine the location of the bootloader (this is the hard drive) and click "Install now".
How to install Ubuntu alongside another OS
If your PC is running Windows, but you want to install a second operating system, you need to learn how to do it without losing data. The installer will detect and indicate that there is another OS on the PC. You will be prompted for automatic installation, complete removal of the previous version, and manual configuration. We select the last "Other option".
Before us is the most difficult boot step - disk partitioning. Due to the fact that we need or another OS, we will have to allocate another partition on the hard disk for the new OS. Before us is a table with an already existing disk or disks. All partitions are allocated for the current OS, so we need to allocate space for the installed one. Next, select:
- "Free space" - "Add".
- As in the first case, we create the root partition "/". We choose the volume, from 20 to 30 GB.
- Add the home partition and allocate the required possible amount (you can allocate all the remaining memory, just do not forget to leave 2GB)
- We need these 2 GB for the swap partition.
- Select the hard drive as the storage location for the bootloader and click "Install Now"
WATCH THE VIDEO
Installing ubuntu alongside windows 7 is a dangerous business for newbies, and if you don't understand it, it's best to go to the professionals. Indeed, in the event of some error, all your data from the PC can fly off. By the way, installing windows on ubuntu thanks to VirtualBox also doesn't take long.
Installation in other ways
This thread has a way: Install ubuntu over the network. This option is very time consuming and requires some knowledge. Therefore, if you do not have a baggage of knowledge in this area, then it is better not to take on this. It is much easier to install the OS via disk or USB stick.
Once the download is complete, setup after installing ubuntu is simple. You complete all the required steps during installation. This is the choice of the interface language, the choice of location, time, PC naming and setting a password. Otherwise, you will be provided with the required starter programs.
And finally
You may need a dedicated server. Installing ubuntu server will fix this problem. But the process itself is very difficult. In addition to the ubuntu server program, you will need to have the patience and knowledge that will allow you to understand this topic. After installation, you are waiting for the ubuntu server network setup. As a result, you will get your own dedicated server on Ubuntu OS for work and your own projects.
Now you know everything about installing Ubuntu from a USB stick.
At your request, we are publishing an article about installing Linux from a bootable USB flash drive. This article is useful for those who want to have a bootable Linux flash drive and those who want to install Linux on a computer but do not have a drive. (e.g. netbook)
First, we need the flash drive itself. The size is taken into account based on the drive you selected. If you want to upload a DVD to it, then you need a medium with a volume of 8 GB or more, and for the CD version of Linux 4 GB is enough. As a tool for creating a bootable USB flash drive from Windows, I highly recommend using Linux Live USB Creator ... Softina is able to create a bootable USB flash drive both from a disk in the CD-drive of your computer, and from a disk image (ISO, IMG, ZIP-archive). In addition, she can download images from the Internet ... Having received the coveted disk, having downloaded and installed the program, we proceed to creation. The program has a user-friendly interface and divides the process into 5 stages.
1. Selecting Installation Media... Everything is simple here - select the flash drive on which the image will be uploaded.
2. Choosing a source... As I said, this can be an image or a real disk in your drive. If not, download it through the same program or in any other way.
3. Settings file... After Linux Live usb creator scans the image of your choice and you select a USB flash drive to upload, you can reserve space for the files you create and install programs. Everything that will be created and installed by you in the process of work directly from the flash drive itself will be stored here.
4. Settings... There are only three of them: a) Hide generated files (hides the presence of an uploaded Linux image). It can be useful if you want to use a USB flash drive not only as a bootable one, but also for normal file transfer. Hidden files will not be an eyesore to you; b)Formatting USB to FAT32 ( the data on the disk will be destroyed !!!) ;from) Allow LinuxLive-USB to run on Windows (Internet connection required).
When the program checks the correct execution of all the points, the "traffic lights" will light up green and you can safely press the "Create" lightning button. When the bootable USB stick is ready, restart your computer and boot from the USB stick. When the download is successful, start the installation or use the Linux OS directly on removable media.
2015-12-12T14: 38: 03 + 00: 00 adminWhere to start? Live CD Articles, InstallationAt your request, we are publishing an article about installing Linux from a bootable USB flash drive. This article is useful for those who want to have a bootable Linux flash drive and those who want to install Linux on a computer but do not have a drive. (eg netbook) First, we need the flash drive itself. The size is taken into account based on the selected ...
[email protected] Administrator Tutorial LINUXMany Linux users know that Ubuntu is a lively operating system. After trying several distributions, you will know what we are talking about. Ubuntu also gained recognition for its live boot. Live-CD is the ability to fully work in an operating system without a hard disk.
It is enough to boot from the Ubuntu CD and the operating system with basic capabilities works without installation. What can I say - a proven and very useful "magic wand" if the computer crashed.
However, a disc is not the best medium for booting an operating system. The speed of reading from the CD does not allow operating the OC comfortably. In addition, the drive will be constantly busy. All records are made in RAM and are stored only until reboot. The alternative is obvious - a flash keychain.
We have already used it more than once to work with portable- ("portable") programs and even wrote about installing Windows on a USB flash drive. Well, it's time to talk about Linux too. In general, what are the additional "pluses" of OS on flash media? How many things. We get a complete system with installed applications and basic settings. If you use Linux for specialized tasks and occasionally, it is not necessary to install it on the hard disk, especially if you later uninstall the OS anyway. And with the widespread adoption of the Aspire One and Eee PC netbooks ubuntu install with flash has its undoubted advantages.
Few users know that with version 8.10 in Ubuntu, and quite officially, a special installation wizard has appeared on a USB drive.
Installing linux on a USB flash drive: preparing the tools
To install Ubuntu, we need nothing less:
- Flash keychain. Volume matters, of course. The more the better, but it is advisable to start with 2 GB (this is the minimum) or more. The dependence of the price of a flash drive on its volume is not so high today, especially if we recall the prices two years ago ... Theoretically, it is possible ubuntu install with flash and 1 GB, but with a volume of 4 GB, at least you can use a flash-key for other purposes than storing the distribution kit. In addition, you must understand that the operating system tends to grow. In the future, it can and will need to be updated and software installed.
- Ubuntu distribution. We take into account the latest release - version 8.10. You can get it in a variety of ways, we offer the following:
- download ISO-image (size - about 700 MB). True, you will have to wait for the parcel from two or more weeks;
- order a free distribution kit with free shipping;
- take from friends / acquaintances;
- buy.
Method number 1. Installing Ubuntu on a USB flash drive using OS tools
First of all, we will describe ubuntu install with flash in the standard way. Since version 8.10, in Ubuntu this is possible without the help of various online tutorials and console commands. All actions are performed with just a few clicks in the Ubuntu menu. But before that you need to carry out preparatory work.
Step 1. Burn the distribution to CD
If you downloaded the Ubuntu image from the Internet or your local network, you must transfer it to CD. To burn an image, the functionality of a package or any other burner that allows you to burn an ISO image is enough. The declared capacity of the "blank" should not be 650, but 700 MB.
So, open up Nero Express. The option to choose from the list is Disk Image or Saved Project.
You do not need to activate any additional options, except for one. Since the Ubuntu 8.10 image size is 730 MB, you need to check the Disk-at-once overburning option for burning. Although, in the end, the recorded space contains a little less - 715 MB of data.
Step 2. Launching the Live-CD
Insert the Ubuntu Live-CD into your CD drive and select Try Ubuntu without any change to your computer when booting. By clicking, you can set Russian as the interface language. We wait a few minutes - and we get to the interface of the operating system.
Step 3. Launch the recording wizard and select a source
In the system menu, select Create a USB startup disk (System\u003e Administration\u003e Create a USB startup disk). The Make USB Startup Disk setup wizard starts.
The Source disk image will automatically list the Ubuntu disk you booted from. Optionally, you can select the ISO image that is stored on your hard drive. To do this, press the Other… button and select the desired file.
Step 4. Selecting the boot type and completing the configuration
If you just want to create a bootable USB stick for installation on systems without CD / DVD drives, select Discarded on shutdown, unless you save them elsewhere. In this case, the flash drive ( ubuntu install with flash) will become a complete analogue of the Live-CD and will delete all saved settings and documents on each reboot.
Note. Having installed and configured the operating system on one computer, you cannot expect to load it on another configuration.
Stored in reserved extra space - indicate how much space to reserve for documents and settings.
Then click the Make Startup Disk button.
Step 5. Setting up computer boot from USB
After the files have been copied, restart the computer and set the computer to boot from USB in the BIOS properties. How to do it? In BIOS, you should select the flash drive as the boot device. Settings are made in the Boot device priority or Boot Sequence section, depending on the BIOS. The 1st Boot Device cell should display the name of the USB device, in our case a flash drive. In the remaining cells, switch everything to Disabled mode. Thus, we have described ubuntu install with flash one method, now we turn to the second.
Method number 2. Installing Ubuntu as Live-CD
This method was suggested by the Pendrivelinux site, which also provides instructions for installing other Linux distributions. We provide the Ubuntu installation guide here.
The method is more convenient than the one described above, since it allows you to install Ubuntu on a USB flash drive directly from the Windows environment. The toolkit requirements remain the same. We emphasize once again that the actions concern Ubuntu version 8.10. Among other things, we need the U810p.exe program.
Step 1: Copy the U810 Program and Ubuntu Image
Download and run U810p.exe, which is a self-extracting archive. Recommendation: do not open an archive on a disk that does not have 1-4 GB of free space. This is required to unpack the casper-rw. Specify the source address where you want to copy the unpacked files.
Step 3. Setting up computer boot from USB
After completion, restart the computer and in the BIOS properties set the initial computer boot from USB, in the case, as with the previous method.
Warning. Still, there was one "but". A flash drive, in comparison with a hard drive, tends to wear out with constant access to it. On average, the lifespan of a flash medium is 100,000 cycles. The good news is that not a single case of device failure is described as a result of use Ubuntu... But do not forget that constant access to flash-memory accelerates its wear.
Note. The casper-rw file is responsible for saving the settings. By default, a 1 GB area is reserved on the key fob. In order to increase its size, you need to replace casper-rw on the bootable USB flash drive.
When you overwrite the file, you will lose all previous settings and files that were previously saved in the casper-rw area!