Measure the distance between the elements of Photoshop layout. Measurements in Photoshop or how to display a ruler in Photoshop. How to change the scale units
"Photoshop", the evolution of which can be traced in the picture below, was replenished with new buttons or underwent minor transformations for ease of use.
Each tool, as soon as you point at it with the cursor, will kindly "introduce itself" by highlighting a hint, however, if you have a checkbox on the "Interface" tab in the "Preferences" dialog box (in the "Edit" menu, below) that allows "Show hints ".
Where are the rulers
A user who begins to comprehend the wisdom of a brilliant editor probably already has an idea of \u200b\u200bthe role of each tool, but it also happens that when the need arises, for example, in elementary alignment of an object on the canvas, we, not knowing how to turn on the ruler in Photoshop, in vain feel with the cursor toolbar hoping to "hear" the hint.
The "Photoshop" editor would not be "Photoshop" if it could not offer any command to execute in different ways. This also applies to the "Rulers" command in the "View" menu, by choosing which, we will "attach" the rulers in the work area at the top and left. If you are too lazy to reach with the mouse to the menu, you can press Ctrl + R to call the rulers. They are hidden by the same combination.

Having figured out how to turn on the ruler in Photoshop, another user is faced with another problem, not knowing how to change the division scale.
Units and Guides
By default, we will be offered "centimeter" rulers, but by right-clicking on any ruler anywhere, you can select pixels, millimeters, inches, points, peaks (at a peak of 12 points) or percentages.

From both rulers, as from a magician's sleeve, you can drag out an unlimited number of guide lines with the mouse, which can also be called by the New Guide ... command in the View menu. But if the rulers are not turned on, the guides will be fixed. Guides do not tolerate the Ctrl + H keyboard shortcuts and disappear instantly.

Measuring ruler with protractor
On the toolbar, under the Eyedropper button, there is a "namesake" of the coordinate rulers that frame the work area. The Ruler tool in Photoshop is used to determine the coordinates of the starting point of the line to be measured, measure the width and height of the object, the length of the line, and calculate the angle of inclination.
By clicking on the desired point, from it, without releasing the key, they pull out like a tape measure, measuring a line, following its parameters on the settings panel at the top. When you click again, the new line is stretched and the old one disappears. The line (ruler) can be dragged and rotated by grasping the crosses at both ends with the mouse, as well as the line itself.
In the settings panel at the top, X and Y are the coordinates of the starting point, W and H are the width (horizontal distance) and height in relation to the starting point, Y is the angle relative to the centerline, and L1 is the length of the segment between two points.
If, by pressing Alt, move the cursor to the cross of the starting point, it will take the shape of a protractor, indicating that you can draw a line at an angle to the stretched ruler, and this angle will be defined (L2) in the settings panel.
The cursor over the "By Measurement Scale" button does not cause everyone to understand the prompt "Calculate data from the Ruler tool by Measurement Scale". By ticking this option, we confirm the use of the ruler unit of measure selected in the settings (Edit\u003e Settings\u003e Units and Rulers).
You can also choose the units of measurement in the panel options on the Info palette by clicking on the small triangle in the upper right corner.
As already noted, all the tools in Photoshop can be opened in two or even three ways. In this sense, our "roulette" is not deprived of attention, since you can turn on the ruler in Photoshop by pressing and holding Shift + I until the ruler icon appears on the Eyedropper tool button. In the same way, the ruler will hide, replacing the button with the icon of the next tool "Comment", or removed by the button "Delete" on the rightmost panel of the settings panel.

How to align with a ruler
The ruler can also be used to straighten the image. To do this, you need to stretch the ruler in the picture, specifying the straightening horizon for it, and click the "Align layer" button with the tip "Align active layer to create a ruler level". In this case, you will sacrifice parts of the image that have gone beyond the limits of the document ("Photoshop" will crop them), but if "Align Layer" with the Alt key pressed, everything will remain in place, which you will see by increasing the canvas (Image\u003e Canvas Size) , or with Move on, drag the hidden parts into view.
Everything is still in CS6
As the modernization progressed, Photoshop was gradually enriched with new functions and capabilities, but there was no such a sharp, qualitative leap as during the transition from CS5 to CS6 (27 points of changes) throughout the entire history of the program's development. However, the answer to the question of how to enable the ruler in Photoshop CS6 remained unchanged. The same checkmark in the "Rulers" line in the "View" menu, the same Ctrl + R combination, and in the same way, you can grab the square at the top left (where the rulers converge) with the mouse and, dragging down, select a new starting point on the image. Where we release the mouse button, the zeros of both rulers will be in that place, and you can return them "to their homeland" by double-clicking on the same square in the top left corner.
And in conclusion - about one rare, but still occurring misunderstanding. Another user, starting the editor, begins to "lay out the tools", trying to get the rulers, but none will be executed, since you can turn on the ruler in Photoshop, like all other tools, only before opening or creating a document.
Very often, especially when editing a picture taken from different sources, the question arises of how to find out its size. This is especially important if, after work, it will be used for placement on the site or as a texture for 3D Max.
Very often, especially when editing a picture taken from different sources, the question arises of how to find out its size. This is especially important if, after work, it will be used for placement on the site or as a texture for 3D Max.
Study
Photoshop IS FREE!This can mean both the size of the picture in width and height, and the size of its file. And Photoshop can easily provide the answer for any situation.
The easiest option is to just look in the Image menu. There is a corresponding point where you can see the necessary numbers in any unit of measurement - from pixels to millimeters. There you can also change them to any others.But there is an even easier way - viewing in the status bar, which is under any image opened in the program. By default, the file size is indicated there, but you can easily select "Document Size" and see not only the physical parameters of the picture, but also the resolution. The video tutorial shows exactly where this information is located and how you can change its options.
Greetings to the conquerors of Photoshop!
Today we will talk about such a tool in Photoshop as a ruler. The ruler tool allows you not only to measure the distance between points, but also to rotate the image, placing it strictly horizontally.
Where is the ruler?
The tool is located in the same place as the "Eyedropper" For quick access, you can use the combination Shift + I, press these keys, the program will iterate through all the tools of the Eyedropper block until it reaches the Ruler. 
A black arrow with a small ruler will appear on the screen. With the left mouse button, specify the first point, without releasing the mouse, move the cursor to the second point of the measured segment. Photoshop will draw the line.
To make an absolutely straight line, hold down the Shift key, now you can set the segment exactly horizontally, vertically, and also at an angle of 45 degrees in any direction.
After the second point of the line is specified, the program will show all the parameters on the additional panel, which is located above the work area.

Ruler functionality
Here information is presented in blocks. The first shows the coordinates of the first point of the line with respect to the X and Y axes.
The second block shows the projection of the drawn line on the X and Y axis. This is not the length of the line.
For example, if a rectangle is drawn on the image, and the Ruler tool indicates the diagonal of this rectangle, then the second block will show the distance between the sides of the rectangle. This is the direct projection of the segment on the X and Y axes.
The next block displays the angle of inclination of the line. And only further you can see the direct length of the line, it is indicated in the "L1" parameter.
The L2 parameter specifies the angle between two lines drawn with the Ruler tool. After specifying one segment, hold down the Alt key, move the cursor to any end of the segment, the cursor will change its appearance, now draw another segment, be sure to start from any end of the first line.
You can always move or change the drawn line of the segment. Move the cursor over the body of the line, hold down the left mouse button and move the segment to any place.
If a segment needs to be reduced or lengthened, press the left mouse button, placing the cursor at one of the ends of the segment, it will become possible to change the segment and specify its new end point.
Select the check box if you want the Ruler tool options to display in the same units as the alignment ruler around the entire image. To change the display of the alignment ruler, move the cursor to it, press the right mouse button and select a convenient ruler scale from the list.
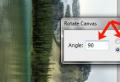
To rotate the image so that any line in the picture is strictly horizontal, use the next block called "Straighten Layer".
Draw a line with the Ruler tool along any element and click the function of that block. The image will rotate so that the drawn segment will be located strictly horizontally, at whatever angle it was earlier.
As an example, I'll show you how you can straighten a coastline in a landscape using the Align Layer block. 
The last block allows you to delete the drawn line. The previous line is removed automatically if you start drawing a new line. If the drawn segment is not deleted, it is not displayed when printing - it is an auxiliary, not a graphic element.
That's all. Thank you for attention!
Let's take a look at such a useful tool in Adobe Photoshop as View-Rulers ... The ruler allows you to precisely set the dimensions of the document and its individual elements. In addition, there is a setting for displaying the ruler in Photoshop - for example, you need to put millimeters or centimeters instead of pixels, etc.
In order to enable rulers in Photoshop, we need to go to the menu View-Rulers ... Also, pay attention to other menu items such as Snap ... Using this function, you can bind rulers to:
- Guides
- Grid
- Layers
- Slices
- Document Bounds

To show the grid, as well as the convenience of setting guides, turn it on in the menu View-Show-Grid ... Do not forget to use hotkeys - they will facilitate access to the menu and speed up the editing process (there is a separate item on our website where you can learn more about the keys).

After turning on the grid, you should see additional data on the screen. Agree, snapping guides will now be much more convenient.

This is done (turning on guides) also through the menu or by pressing the keys CTRL +;.

Now let's go to the ruler settings menu, right-click to launch the parameter selection function. To do this, just press CTRL + R ... Here you can choose how your space and the current document will be measured (units of measurement) - these are pixels, inches, centimeters, millimeters, points, ticero (4.23333333 millimeters), percent.

In order to measure the distance of a certain fragment in the image, we need a tool Ruler Tool ... All that is needed is to draw a line in the desired direction and look at the results obtained at the top of the screen (on the tool control panel).
18.01.2017 27.01.2018
Greetings to all fans of the wonderful Adobe Photoshop program!
Often, when working in the program, it becomes necessary to measure the exact distance from the object to the object, draw a rectangle with sides of certain sizes, position the photo at a given distance, etc. For such purposes, there is a Photoshop program the Rulers tool. Not to be confused with ruler tool, which is located in side toolbar!
How to turn rulers on and off in Photoshop
Enable the Rulers tool) can be done in two ways: press the keyboard shortcut Ctrl + R or go to the menu View-Rulers.
A new mini-panel with a scale will appear on the left and at the top:

To hide the ruler scale, press again Ctrl + R.
How to change the scale units
The default unit will be centimeters. To change the units of the scale, you need to right-click on ruler panels and in the drop-down menu select the desired unit of measurement:

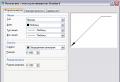
You can change the scale gradations by going to the menu Editing-Settings-Units and Rulers (Edit-Preferences-Units & Rulers):

The following settings window will open:

The same window can be opened by double-clicking the left mouse button on the ruler scale:

How to add a guide
We have already learned how to add rulers, but how do they help us in placing objects or drawing a rectangle, you ask? In order not to get lost in the huge variety of dashes on the ruler, Photoshop has provided another useful function - Guides (Guide).Guides are of two types - Horizontal and Vertical.
You can add a guide in several ways. The easiest one - with any active Photoshop tool, move the mouse to ruler scale, and drag the mouse button from top to bottom to add Horizontal guide, and left to right to create Vertical guide... Release the mouse button at the desired mark. This is what the guides look like on the canvas:

You can also add a guide through the menu View-New Guide (View-New Guide):

The following window will appear where you can select a location guide and enter the numerical values \u200b\u200bof its position:

So we learned how to enable rulers in Photoshop. It wasn't difficult, was it?