Scratched DVD disc. Do-it-yourself wheel polishing. We resort to folk wisdom
There are many ways to recover CD / DVD discs on the net. There are exotic ones, like rubbing with a banana or toothpaste. Having tried a bunch of options, I nevertheless came to the conclusion that there is no better mechanical polishing. When there are a lot of discs and each disc has been in the hands of a child, the ideal option is a disc polisher. Such a machine is easy to make with your own hands.
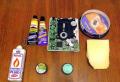
So, we need: a broken CD drive or motors from it, an empty box of CD / DVD discs, silicone sealant, GOI paste, gasoline, a piece of foam rubber, any CIATIM lubricant or solid oil. 
Cut a circle out of foam rubber, with a diameter equal to the distance of the space for recording CD data. 
Preparing a polishing compound. In a small container, crumb the GOI paste and moisten it with gasoline. Then add the sealant. Ratio: for one part of the sealant - two parts of GOI paste. If the composition is too thick, it can be diluted with gasoline. Apply the resulting paste to the foam circle and let it harden. By the way, this way you can make polishes for manual polishing. 
We are preparing a substrate on which the patient will rest. It is needed to protect the back of the disc. An uncoated disc is suitable for this, it is used as a packaging disc. Apply and spread sealant on this disc. Before applying the sealant, the disc must be sanded, it will hold better. The back of the disc and the bottom of the box should be rubbed with grease and wiped dry. If grease remains, it will slow down rotation. 
We make a roller from any plastic, for example, from the second cover. We cut out four circles: two with a diameter for a foam rubber circle, and two 2 mm smaller. 
We glue them together. 
In the bottom of the box we cut holes for the motor and the drive roller. The video is made from an eraser. The eraser is not suitable for everyone. There are erasers that crumble. If you can pinch off a piece from it with your fingernail, then it will not work. The old Soviet "Architect" is ideal. 
We attach the second motor to the box lid. There we install a roller made of plastic circles on the screw. On top of the roller we glue foam rubber with GOI paste on the sealant. 
Everything. A super useful device is ready. Place the CD / DVD backing down, with a shiny layer at the top. Moisten lightly with water and run. The motors are connected to a universal power supply. Despite the fact that they are designed for 6 volts, you can safely set 9. Otherwise, they will spin sluggishly. It took me about 4 minutes to polish one disc even with deep scratches.

How often does it happen that you gave someone a disc with music or a game, and that person, inadvertently handling it, scratched it? Or a disc with some data has stopped being read due to scratches, but there is no backup? Probably quite often. And you take a cloth, polish and start polishing the disc for hours.
On the Internet, I found this design, which allows you to automate this process and there is a fairly high chance that the disk will become readable.
Step 1: Bearings

As you can see from the photo: old roller skates, or rather wheel bearings, as well as bushings. From a pair of roller skates, you get 16 bearings and 16 bushings. You will also need a pair of 3/4-inch CPVC (non-PVC) fittings.


The bearings fit perfectly with this fitting. You will need to cut off the protruding part, cut off part of the fitting, press in the bearing and the previously cut part there. You also need to cut one sleeve shorter than the bearing width - these two sleeves will center the axis on which the bearing will be fixed.

Step 2: turntable
The turntable is cut from any CD case.

It is easy to cut and the plastic is flexible.
Disc centering sleeve ... Look at bookshelves, shelves in kitchen cabinets. See what they hold on to? These nylon bushings are what we need, or rather just one.

Fasten the disc cut from the disc box to the bearing hub with three screws, mark and drill the holes. The disc pad is cut from the mouse pad, as in the photo above. Glue it to the disc. (I think it is possible to use an old CD by gluing the liner to it)


Step 3: Polishing disc.
The base of the disc is cut from the lid of a plastic container, 7.5 cm in diameter.

The center hole allows access to the screw head for height adjustment.
The disc is divided into 6 parts for reference. Felt 12 mm wide is glued to it. It is glued in pieces according to the sectors marked earlier. This keeps the disk flexible.


After gluing the felt, it must be cut flush with the edges of the disc. The disc is mounted on a second bearing sleeve.
Step 4: positioning

This shows the position of the polishing wheel relative to the disc. The leading edge of the polishing disc should cross the edge of the CD as close to the perpendicular as possible. Consider this when assembling. Scratches and polishing marks that will be directed along the tracks, and not perpendicularly, will prevent the disc from being read.
Step 5: base
The platter motor is used from the microwave. This is the motor that rotates the dish at 5 rpm. In the author's photo, this is a 110v engine.

I have come across DC motors with a gearbox at such speeds. Any drive belt can be used, but the location of the motor will depend on its length. Do not secure the motor until you have determined the length of the belt.


Step 6: Polishing disc motor.
The design uses a motor from a 12V cordless drill.

You can connect it via a PWM controller. Slide on the drive belt without pulling it tight, but so that it does not slip.

The motor with the polishing disc is mounted on a board, which in turn is attached to the uprights with brass studs so that it can pivot.

To do this, you need to drill holes from the sides not exactly along the axis, but slightly offset, and press the bushings there, as shown in the photo, so that you can adjust the pressure of the polishing disc.
In order to prevent the drive belts from slipping off, it is necessary to install limiting brackets made of 2 mm wire on top of them. They are pressed into the drilled holes.

Step 7: setup

The position of the polishing disc in relation to the base can be seen in the photo. It touches the CD at a slight angle. The work is done only on the front of the polishing disc, the back does not touch it. By adjusting the height of the rack, you can change the angle, and by adding weight to the bar with a polishing disk, you can increase the pressure.


Step 8: check how it works


The author uses polycarbonate polish, you can use your own means. I usually use GOI paste mixed with oil for polishing. I put a little oil on the surface, on the felt the same oil mixed with GOI paste. Make sure that the surface is not dry, otherwise new scratches will appear. You can try toothpaste with water. You need a cheap toothpaste, one with chalk based. Run the assembled structure for 10-15 minutes. Do not set high speed on the polishing disc - splashes will scatter in all directions. There are no special recommendations for setting the disc angle, pressure, rotation speed, you need to select this experimentally.
The working surface of optical discs is easily damaged - the protective layer is covered with scratches, even with moderate use. Deep defects often lead to the impossibility of extracting information from a damaged medium. Next, we will tell you how to restore a scratched disc by polishing with toothpaste, GOI paste, and also consider some "harmful" tips from the Network for resuscitation of compacts.
Handling damaged optical discs
We must say right away that an unreadable medium with deep scratches can be restored in this way only partially at best. Moreover, you will have to act very carefully, otherwise the surface can be completely spoiled. It would be better to first practice on old unnecessary media before restoring a disk with valuable information - this way you can evaluate the effectiveness of the method and, as they say, fill your hand.
And do not try to immediately resort to using the method described below when a reading error occurs - check the disc on another computer - it is often the DVD drive that is the cause of the problems. In addition, there are many applications that allow you to extract the most information from scratched discs thanks to a modified reading algorithm. One of the most effective solutions is Durable Copy.
It is also advisable to use the program for working with discs that have already been restored by polishing, because we have already noted that severely damaged media can never be reanimated 100%.
How to polish a disc with toothpaste at home
The most affordable and safest way to polish is with toothpaste:

The movements during the polishing process should not be too intense, so that the surface does not heat up quickly. You don't need to put pressure on the disc either. After 15-20 minutes, rinse the disc thoroughly in warm water. Its surface can become dull due to the appearance of many microscopic scratches, but deep damage will become much less noticeable, which should have a better effect on the readability of the disc.
Dry your optical drive, try inserting it into your DVD drive. If your goal is to extract photos, important documents, and more, use Durable Copy or similar. Surely there will be much more undamaged information copied this time.
If necessary, the restoration of the working surface using the method described above can be repeated, but it makes sense to carry it out for no more than an hour. As practice shows, too long polishing with paste already causes the opposite effect - the readable data on the carrier becomes less.
Professional polishing method
For really valuable and expensive discs, you should no longer use such artisanal methods. To obtain an acceptable result, the polycarbonate base will need to be polished with a fine abrasive GOI paste (sold in hardware stores) using an electric drill with a grinding attachment:

If you do not have a power tool, polishing with GOI paste can also be carried out manually, but a positive result is far from guaranteed, and the process can be very delayed.
How not to recover optical discs
You can often read a lot of alternative ways to recover scratched CDs on the Internet. For example, sometimes it is advised to polish simply with a soft or denim cloth. It is clear that you cannot polish the surface with non-abrasive materials. It will simply overheat and the media will no longer be recoverable.
Another extreme option (real advice from "experts" from the Web) is polishing with fine-grained sandpaper. In this way, you can immediately ruin the surface without even exerting effort. The same applies to heating the disc in the microwave, under a table lamp, etc.
Another popular advice from the Internet is to cover the scratch with "brilliant green" or even completely treat the surface of the compact with it.

Darova, hackers!
You probably have a disc that is scratched to the unreadability by your CD-ROM,
yes, for sure he is not one, but a whole bunch. Favorite music, movies, software games,
etc. And what are the reasons for the unreadability of information?
The main one is damage to the first layer of the disc. Information recorded on
metal between two layers of plastic. When reading information from a disk, the laser penetrates through the first layer of plastic, hits the foil and reads information from it. If the first layer is damaged, then the laser refracts at the damaged areas without hitting the foil. As a result, we see a blue screen with the words “Insert into disk with number ????? into CD-ROM and press OK to cancel ESC ”or listen to the song only in small parts, or watch a jerky movie.
You get depressed, throw an unreadable disc into the farthest corner, or even wipe it with a soft cloth. Especially when your disk is taken from you,
and bring it unreadable, anger pours over the edges, it starts by itself
torment: "Nafig I gave him this disk ... I won't give anything to anyone else ... etc".
A friend of mine collected unreadable discs.
His collection impressed me.
I took a microscope and began to study the structure of the disc,
its damage. The disc itself in section
looks like that:
The laser goes through the first layer of plastic, hits the foil, is reflected and hits the head
CD-ROM'a. Passing through the faulty sections of the first layer, the laser beams are refracted in different directions, not hitting the foil, or not being reflected from it onto the head.
This is if the first layer is faulty.
If the foil itself turns out to be faulty, then this case is the most hopeless. You can check by looking through the disc at the light source; if the foil is damaged, holes are visible through which light penetrates.
Damage to the second layer does not affect the information in any way, if these damage did not reach the foil. Since the second layer is very thin,
in comparison with the first, you need to treat it very carefully, although this is an unreadable side. On some discs, the second plastic layer is absent, instead a layer of paint or glossy paper is applied, the latter type of discs is afraid of water. Water dissolves non-plastic layers and the foil falls off the disc, which is the worst sentence for a CD.
Conclusion: If you restore the first layer, then the disk will return to working condition.
How can you restore it? Why polish cars? To refresh, color and remove scratches. I also undertook to polish the disc. I bought a polish and started rubbing… rubbed for a very long time. Result
- recovery of information by 10% ... Sucks. What to do? And how do they polish cars? Grinding with machines.
Making a CD grinder! To create it, you need an electric motor, 150-200 watts, no more than 1000 rpm. And it would be even better with speed control. But, I don't have that.
And you also need a small table to mount the engine to. You will also need the work of a turner.
The detail shown below can be made of iron, but it is recommended to make it from duralumin, this will reduce weight, and everything will do without rust, since the work must be carried out with water.
As you can see, this is a simple and inexpensive job. You can also dispense with the threads on the upper shaft by clamping the disc with a rubber washer that fits tightly onto the shaft.
X (X) denotes data that you can substitute at your discretion. For example, the hole in the center of the lower shaft of the part must be equal to the diameter of the motor shaft on which the part will be fitted. When
When pushing the part onto the shaft, it is necessary to heat the lower shaft for easier fitting. (When heated, the body increases). You will set the length of the lower shaft depending on the thickness of the table. (Do not make the shaft too long, it will increase the runout).
You set the thickness of the disc depending on the kind of metal from which the part will be. If from iron, then no more than 4 mm, and if from
duralumin it is possible 6-8 mm, as it is lighter.
I installed everything like this:
I think everything is clear with the installation. And for those who are in the tank, I advise you to leave it.
Now that the CD grinding machine is ready, let's move on to the grinding itself. To get rid of scratches
you need to remove the layer from the disc with a depth of the scratch.
Do not get carried away by removing too thick layers, as the thin disk can be broken by centrifugal force, or the laser will burn the foil at a closer distance. Don't be alarmed
often scratches are not as deep as
it seems.
Grinding consists of several step-by-step actions:
First, the disc is sanded with sandpaper under the brand 2000 with water, it is better to use an emery sponge instead of sandpaper. It has the same properties as paper, it is convenient that a lot of water is absorbed into it, which cools the disc. NG is a little more expensive, but it will last you much longer. Sanding without water is the end for the disc, the temperature rises to the melting point of the plastic, which will begin to coagulate with the dust particles. After 2000, sand with 4000 emery sponge.
After 4000, you need to polish with polishes:
1.abrasive (contains hard particles)
2.Medium (Medium particles)
3. "milk" (The softest polish)
The polish is applied to a medium hard sponge. Depending on the brand
polishes you can use water. If you have all this, then you can recover a completely unreadable disk in a few minutes, if not then
you will need a hard and soft sponge and time to spare.
First polish with a hard sponge and water. Then soft,
also necessarily with water. This method is long enough, but it works. If you have opened a disk recovery office, then you will need all of the above.
That's it! Assemble the machine and grind to health!
Use the people! Invent and Suggest!
The worst enemy of CDs / DVDs is scratches. One small scratch can cause you to lose a backup or an important file that was written 10 years ago. But if the disc is no longer readable, there is a fairly high chance of saving it by polishing the working surface. See the DIY polishing machine assembly instructions.
With such a gadget, you can even open a small business to "recover information from disks." The machine is fast and can recover a dozen discs per hour. Five minutes is enough for a perfect polish on one disc.
The design consists of a pair of motors: one slowly rotates the disc, turned upside down, and the second motor rotates the cleaning head. For the lower motor, the author took a 5 rpm motor from a microwave oven and rubber bands from a vacuum cleaner.


Roller skate bearings can be used to mount the disc and polishing pad, the disc stand is made of any plastic with a soft pad.

The cleaning pad is made of a thin plastic base covered with felt.


The main rule is that the rotation of the pillow should be perpendicular to the location of the tracks. The direction is shown by arrows in the illustration.

The pad does not have to be pressed against the disc with its entire surface. That's okay, the front of the cleaning pad will do the job.

Do not forget about the polishing gel, it is better not to be cheap with it.