How to twist an object in Photoshop. How to rotate a layer in Photoshop. How to rotate a layer in Photoshop
In this program, it is also quite often necessary to select different parts of the picture in order to cut, replace or rotate them. The article, Selecting Objects in Photoshop, describes various ways on how to do this.
Now let's figure out what you can do if you need to flip the image in Photoshop mirrored or a few degrees. This will come in handy if the picture or photograph stored on the computer is rotated 90 degrees clockwise or counterclockwise, due to the fact that during the shooting the person was holding the camera or phone at the wrong angle. Or you need to make a collage of several photos or pictures. Then the frames rotated at different angles will look more interesting on it.
How to rotate a photo through the menu
Open the image you want to work with in Photoshop. Then click on the "Image" menu item at the top and select "Image Rotation" from the list. The additional menu will have several different items.
Here you can choose to rotate 180 degrees or 90 degrees clockwise ("CW") or counterclockwise "CCW". "Flip Canvas Horizontal" - used if you want to flip flip. Accordingly, "Flip Canvas Vertical" is a vertical reflection of the picture.
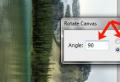
Selecting the item "Arbitrary" (Arbitrary) will appear here such a window. In it, specify the exact angle to rotate the picture or photo in the "Angle" field. Then use a marker to mark which direction to rotate: "CW" - clockwise, "CCW" - counterclockwise. Click OK.

The picture will be flipped by the specified angle: exactly 90 or 180 degrees, or by an arbitrary value.

Using Free Transform
You can also rotate the image in the following way. But before you activate this mode, you need to make sure that the layer with the picture that we will twist is not blocked - there should not be a lock opposite it.
In the example, the layer is locked. To remove the lock, double-click on the layer. A window like this will appear. There is no need to change anything in it, just click "OK".

Now press "Ctrl + T" on the keyboard. A frame with markers appears around the object. Move the mouse cursor outside the picture to any marker. When the cursor changes to an arrow, press the left mouse button and rotate the drawing. After turning, release the button.
In free transform mode, you can rotate the image as you like, or specify the exact value of rotation in the corresponding field of the top menu.
If, while rotating the picture with the mouse, press and hold "Shift" on the keyboard, then the rotation will occur at a clearly specified step: each time plus 15 degrees. That is: 15, 30, 45, 60, 75, 90 degrees, and so on.

By activating free transform, you can rotate the active layer separately or a previously selected area on this layer. To exit the mode, press the "ESC" button.
Rotate the layer with the Rotate View tool
Another method that you can use is the Rotate View Tool button. You can select the appropriate menu item on the toolbar, or you can use hotkeys and press "R".

After that, move the cursor over the picture. Click on it with the left mouse button and, without releasing it, rotate. An arrow similar to a compass arrow will appear. When you rotate the image to the desired angle, release the mouse button.

Choose the method suitable for you to rotate the desired image layer. Rotation through the "Image" menu is suitable if you have one layer: a picture or a photo. If you are making a collage, then it is better to use free transform, so that you can rotate a certain layer or a selected object in the picture in Photoshop. Use Rotate View to see how the layer will look from a specific angle.
Rate article:We are looking for the word "Image" on the top panel, it is on the third line from the left. Click on it with the left mouse button. And what do we see? A menu appears in which there are buttons such as "Crop", "Trimming", "Canvas Size" and so on. Here we need to find a button, like "Rotate Canvas", it is the ninth one from the bottom and from the top. Remember, if a small triangle is drawn next to such a button on the right, it means that a menu drops out of it. And so we press the button "Rotate the canvas" and see in it such actions as "180 degrees", "90 degrees clockwise", "90 degrees counterclockwise", "Arbitrary" about. There are two more points, but we'll deal with them later.
If we press "180 degrees", then the image that we opened at the beginning of the task is turned upside down.
If we press "90 degrees clockwise", then our image turns out to be rotated right edge to the bottom.
If we press "90 degrees counterclockwise", then the image is rotated left edge down, and right up.
There is one more interesting item "Freely" here. Having selected it, we have a window in which we can independently set the degree of rotation. Also in this window you can choose in which direction the turn will be made.
We have dealt with this. Let's move on to those mysterious two buttons that I talked about earlier, "Flip Canvas Horizontally" and "Flip Canvas Vertically." If you want to make a mirror image of this picture, then these two magic keys will just help us. Let's select the item "Flip the canvas horizontally" and what did we get? Such an effect, as if a mirror was substituted for our picture on the right.
We will see the same effect only the mirror will no longer be on the right, but on top, if we select the item "Flip the canvas vertically".
But remember that in these ways we rotated the entire canvas. And in order to rotate only the selected image in the "Layers" window, you need to go to the "Edit" - "Transform" menu. In this menu you will find everything the same as in the canvas rotation menu. It is worth remembering that you cannot rotate a pinned image like this. The pinned image has a lock next to the mini-icon in the "Layers" window. In order to unlock it, you need to click on the thumbnail in the "Layers" window and, in the window that appears, click "OK".
Hooray, we figured out the first way of turning. We will continue to explore the boundaries of image rotation in the next lessons. You can watch them right now. In the article "you can find another way to rotate an image. See you soon!
Often, beginner photoshoppers do not know how to rotate a picture in Photoshop. In fact, everything is extremely simple. There are several ways to rotate a photo in Photoshop.
The first and fastest way is the free transform function. Called by pressing a keyboard shortcut CTRL + T on keyboard.
A special frame appears around the object on the active layer, which allows you to rotate the selected element.
To rotate, move the cursor to one of the corners of the frame. The cursor changes to an arched arrow, which means it is ready to rotate.

Key pressed SHIFT allows you to rotate an object in 15-degree increments, that is, 15, 30, 45, 60, 90, etc.
The next way is the tool "Frame".

Unlike free transform "Frame" rotates the entire canvas.
The principle of operation is the same - move the cursor to the corner of the canvas and, after it (the cursor) takes the form of a double arc arrow, rotate it in the desired direction.

Key SHIFT in this case, it works the same, but first you need to start the rotation, and only then clamp it.
The third way is to use the function "Image rotation"which is in the menu "Picture".

Here you can rotate the entire image 90 degrees clockwise or counterclockwise, or 180 degrees. You can also set an arbitrary value.

In the same menu, it is possible to flip the entire canvas horizontally or vertically.
You can also flip the image in Photoshop during free transformation. To do this, after pressing the hot keys CTRL + T, you need to right-click inside the frame and select one of the items.

Practice and choose for yourself one of these ways of image rotation, which seems to you the most convenient.
Rotating images, objects, layers in Photoshop is what we do every time we create photo manipulations, text and other digital artwork. Many people do it intuitively, and for beginners, using the Rotate Tool can be a real challenge.
In this tutorial, I will cover some of the things you should know about the Rotate Tool. You will see how you can achieve a variety of rotation effects using the various parameters of this tool. Knowing some of the tricks can save you time and effort.
Step 1
In this tutorial, I'll show you how to rotate an object, image, and canvas in Photoshop. I will be using Photoshop CS5, so there may be slight differences in menu names, but functionality remains the same.By objects, I mean text, shape, and any details that are set apart from the background. For example, as a butterfly image that I will use.
To rotate an object, go to the menu Editing\u003e Transform (Edit\u003e Transform) and select Rotate (Rotate), or use the hotkeys CTRL + T.
To call the Free Transform tool (
", this, event," 320px ");"\u003e Free Transform) press Ctrl + T (Win) or Command + T (Mac). After that, a bounding box will appear around the object. Move the mouse cursor to one of the extreme markers - it will take the form of a double-headed arrow. Now rotate the object.
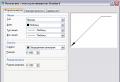
If you want to use additional features of the Rotate Tool, you can use the Free Transform tool menu (
", this, event," 320px ");"\u003e Free Transform): for example, you can enter the exact rotation angle, as shown in the screenshot:
When rotating objects, images, text, there are some standard rotations, such as Flip Vertical, Rotate 180, Rotate 90 CW, Rotate 90 90 CCW) - these items are found in the menu Edit\u003e Transform (Edit\u003e Transform).
In the screenshot below, the first butterfly is rotated 180 degrees and flipped vertically, the second is rotated 90 clockwise, and the third is 90 counterclockwise:

In addition to the Rotation Angle, there is a Reference Point parameter, which is available when the Free Transform tool (
", this, event," 320px ");"\u003e Free Transform) and is located in the properties panel at the top of the screen. If you click on one of the eight numerical values, you can get different results when rotating, scaling, even if the angle of rotation remains the same.
Step 2
Using the example of a nature image, we will consider another way to use the Rotate Tool - to rotate an image.
As you can see, when you rotate an image with the Rotate Transform tool, the image may go outside the canvas area. To work around this issue, go to Image\u003e Image Rotation and choose one of the options provided. But in this case, along with the image, all the layers that it contains will be rotated. So it is best to use this command to rotate images that do not contain layers.

Step 3
The next way to rotate is to rotate individual letters in the text. Photoshop makes it easy to rotate, flip, and scale entire words or lines of text in a document. But what if you need to transform only one letter in a word or transform several letters in different ways: rotate one, and flip others horizontally or vertically?To do this, make the active text layer and go to Layer\u003e Type\u003e Convert to curves (Layer\u003e Type\u003e Convert to Shape). The text layer will now be converted to a masked shape layer. Select the Path Selection tool (
", this, event," 320px ");"\u003e Path Selection Tool) and click on any letter.After the letter is selected, you can transform it by calling the Free Transform tool (
", this, event," 320px ");"\u003e Free Transform). The letter can be rotated, enlarged or reduced.If you want to flip a letter vertically or horizontally, with the Free Transform tool active (
", this, event," 320px ");"\u003e Free Transform) right-click inside the bounding box and select Flip Vertical / Horizontal. After, press the Enter key to apply the transformation.