How to check the capacitive touchscreen before installation. How to check the sensor on Android: is a broken pixel guaranteed? Diagnostic programs
You purchased a new one touch screen for your device? Do not be lazy and be sure to check its performance before installing! If you nevertheless come across a non-working or partially working sensor, you can contact us for warranty repair or replacement of the purchased spare part. For a warranty replacement, you need to fill out a claim form, with a detailed description of the malfunction. To do this, fill out an application in yours, where you can monitor the status of the application and view your entire history of applications. You will receive a positive decision if all warranty conditionswhich can be found. The warranty does not apply in such cases:
- traces of installation, operation, mechanical and thermal damage;
- missing, damaged or re-installed protective films, covers, stickers, gaskets, adhesive films, warranty seals;
- the warranty period has expired.
Please note that to check the working condition of the purchased spare part, you need to disassemble the device, and in some cases even dismantle the old faulty spare part.
Before dismantling the old touchscreen, tape the entire area of \u200b\u200bthe touchscreen. This will protect your hands from cuts, and the display from accidental damage by glass shards that can fly in different directions when you remove the sensor. Disconnect the touchscreen ribbon from the board. It is convenient to peel off the touch screen using a soldering station. In the hot air gun settings, set the air temperature in the range of 100-150 ° C and slowly walk around the perimeter of the touch screen in order to warm up the glue (scotch tape) with which the sensor is glued.

Use a thin tool to pry off the touchscreen and begin peeling it off in a circle. Experienced people can use metal tools, but if this is your first time, we recommend using only plastic tools so as not to accidentally damage the display surface.

Warm up the sensor around the perimeter again if necessary. After removing the sensor, we recommend sticking a protective film to the display - this will protect the display surface from micro-scratches and dust.

Before installing (before complete installation) a new touch screen, it is imperative to check its functionality. To do this, connect the touchscreen ribbon cable to the board without removing the protective films, warranty stickers, seals, and the like. If the touchscreen cable is incorrectly inserted during connection, it can be damaged - such damage is considered not a warranty case and cannot be replaced. During the entire process of checking and installing the sensor, be careful not to break the loop.

The sequence should be as follows: insert the ribbon cable, connect the touch screen contacts to motherboard, we connect the power in order to turn on the device and check the performance of the sensor. When installing the device, the touch screen is glued onto double-sided tape of the appropriate thickness, so that the sensor does not directly touch the display. This avoids "sticking" or random triggering of the touch screen. When replacing a sensor, it is often placed directly on the display, as a result of which it cannot work correctly. To prevent this, hold the sensor with your fingers or place strips of thin non-conductive material. After that, turn on the device and check the functionality of the touch screen.

Don't forget to check if the navigation buttons work. If the sensor does not work, you need to check the connection contacts - perhaps the connector is not fully inserted, and also check if the sensor is touching the display. If necessary, correct the contacts on the loop and reboot the phone. You may have chosen the wrong touch screen model, so check the labeling, sometimes you need to replace the software with a different version.
After you have verified that the touchscreen is working, you can reassemble the device. Choose the correct thickness of the adhesive tape - if the layer is too thick, the sensor will bulge out of the frame of the case, if too thin, it will touch the display, and in the future it may be accidentally triggered or "sticking". If necessary, the tape can be glued in several layers. You can also use glue and sealant, but in this case, it is difficult to find the right thickness. After the tape is glued around the perimeter of the front panel, you can remove the protective film from the display. We remove all dust particles, remove the inner protective film and glue the sensor. We connect the contacts of the touch screen, check the reliability of the connection, correct the connector if necessary. We finally assemble the device, once again check the operability, and only after that you can remove the outer protective film from the sensor.
Also, problems often arise when substituting a display module. Very often, the display module is connected without dismantling the previous one. In this case, the new display module cannot be in place, the loop for connection is in a tense (stretched) state, and the contacts on the loop are not fully connected, which can damage the loop and damage the display module.
The instruction is relevant for Android smartphones version 4.2. This method suitable for most sony smartphones Xperia differences may vary depending on installed version Android.
Using the Adnroid service code.
One of better ways check touch screen on Android smartphone is to use the built-in diagnostic tool. To do this, we need to run service menu, you can do this by typing a specific service code.
To dial this code, you need to open the dial pad on your phone. home page phone in the lower corner of the display, press the call key.
We dial the following service code * # * # 7378423 # * # * or * # * # SERVICE # * # *. A menu will open that will allow you to customize your phone in more detail, check its parameters or run diagnostic tests. If, after entering the code, the menu does not appear automatically, try pressing the call button to execute the command. If nothing happens, this code does not work for your phone model.

After you have typed the code, a service menu will appear.

Selecting Service Tests
In order to diagnose the sensor, go to the Touch screen item. In our example, everything is obvious, on other phones the menu items may be called differently.

Click the Touch screen option and proceed to diagnostics.
You should see a black screen on your Sony Xperia... All you need to do is move your finger or stylus over problem areas of the screen. The screen shows all touch points and you can detect areas in which the sensor does not respond or does not work properly. This checks the functionality of the touch screen.

When buying a smartphone / tablet or out of a sense of their own curiosity, many users want to check the functionality of the device, the main functions and sensors.
The external state of the gadget can be assessed without additional utilities, but the "filling" requires a more thorough approach. The easiest way to test basic sensors and functions is by application. They are very convenient and easy to use, but there are two significant drawbacks:
- Provide insufficient information.
- They do not work on all smartphones (for example, some chinese smartphones understand only half of the requests).
Diagnostic programs
The developers offer a huge list of utilities with similar functions to check the functionality various sensors, Wi-Fi, Bluetooth, cameras, processors and more. We have selected the most functional and useful ones and tested them on our experimental Xiaomi Redmi 2.
The order of software review is random. In general, the apps are equivalent, but Phone Doctor Plus has a slight advantage - it's simple and focused on.
The home screen displays general information about the device. To make them as comprehensive as possible, you need to go to the second tab, where more than 20 tests are located, including multitouch, accelerometer, GPS and much more (see screenshots). Each of them is performed separately, some ask you to do a simple action, for example, shake the phone or insert headphones. Upon successful completion, a green icon with a check mark appears - this means that the function is working correctly.


The program came from the computer sphere (Windows), where it managed to prove itself from the best side. The Android version is no exception, which is why it was included in our selection.
The main screen looks plain, there is not even a hint of a minimalist design. But we are not here for that, so let's move on to the functionality. AIDA64 provides information on the following points:
- System: device model, board, RAM, storage and more.
- CPU: exact processor model, technological process, bitness, number of cores, frequency range and, most importantly, load. If the latter is constantly striving for 100 percent, then either the smartphone is clogged and requires a complex one, or there are serious problems with the chipset.
- Display: All display data, including resolution, technology, diagonal, video accelerator and OpenGL version. Pay attention to the "GPU load" - it should only occur in games or when working with graphics. In normal mode, on the tested gadget, the indicator was at zero.
- Network: operator, country, provider code and other details. To check the connection, it is easier to just call someone and go to the Internet.
- Battery: charge level, battery status, temperature and capacity. For a detailed battery check, see.
- Android: version, API level, build ID, and so on.
- Devices: Rear and front cameras with descriptions of features such as stabilization, auto exposure, flash and other functions. Comprehensive information about the video processor.
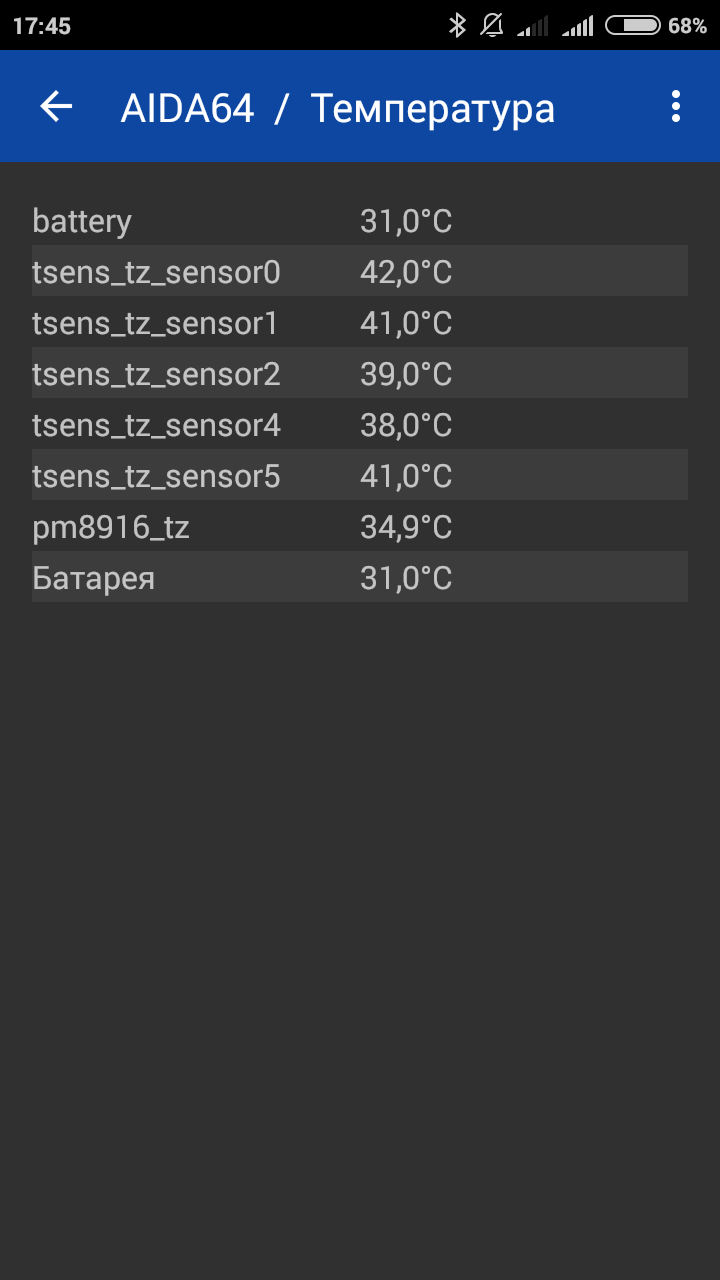
- Temperature components in Celsius ().
- Sensors. Lines with constantly changing numbers will appear on the screen. They characterize the operation of a gyroscope, compass, accelerometer and others. With a slight movement of the smartphone, the numbers should change. As a reminder, this is much easier to check with Phone Doctor.
- Applications... List installed games and programs.
- Codecs, folders, system files.


The main screen immediately presents a list of tests. Let's get started!
- Sensor status: by analogy with AIDA64, only more understandable in Russian. There are also properties for each of the sensors.
- Wi-Fi status: information about the connection, little useful.
- Telephony: operator, signal, provider code and other uselessness.
- GPS status: satellites, signal transmission accuracy, latitude, longitude, bearing.
- Battery: charge level, capacity, technology, voltage, temperature and battery status.
- Multi-touch test: touch the screen with all fingers, check the display. For this it is better to use.
- Camera: basic information, the previous program has a more informative and complete list.
- System information.


Calibration activities include adjusting the touch screen so that the device can correctly execute certain commands by touching the sensor with your fingers. Of course, the device may well work without this procedure, but the owner should prepare for the fact that he will have to observe all sorts of failures when working with the sensor. Next, we will consider in detail the main points that are associated with calibration and the methods that allow this procedure to be carried out.
Why calibration is needed and what it can fix
Calibrating the screen of an Android device is most often necessary after the phone has been dropped and other mechanical damage. It is also necessary if the display had contact with liquid - this, as a rule, violates the susceptibility of the electrodes, despite the fact that most gadgets are equipped with capacitive screens. They have replaced the resistive ones and are more reliable and more sensitive.
For what reasons debugging required:
- sensor does not recognize commands correctly. In this case, for example, tap works fine, but pinch or swipe can work periodically;
- the touchscreen does not always work. Actions may not be recognized and devices may ignore them;
- incorrect command definition. In this case, you can specify the letter "A", and instead, "B" will be displayed;
- the waiting time for a response to the action being performed has increased significantly;
- in some graphics applications interruption of selection may occur certain areas images or lines being drawn.
Consider when problems like this occur:
- the phone is used in for a long time... This is the main reason the sensor desensitizes, it has to do with physical factors. Also, this in detail directly depends on what quality the touchscreen is installed. It is important to note the fact that such failures can occur due to prolonged inactivity;
- sensor initially incorrectly configured... To avoid problems, we strongly recommend debugging immediately after purchasing the phone. Also, after replacing the touchscreen elements, calibration is required;
- viral activity and change system settings... In some cases, incorrect operation is caused by viral activity or the user accidentally set the sensitivity parameters in the phone settings (some gadgets provide this function);
- mechanical damage screen. Abrasions, scratches, improper application of the screen protector, falls and a broken display will significantly reduce the sensitivity of the sensor. This item also includes dirt on the screen.
Calibration by means of Android
You can debug with standard tools operating system Android:
Optimization using the engineering menu
The engineering menu is a hidden section for flexible customization and smartphone optimization, in order to use it you need:

Specialized applications
Power bubble
Free app to calibrate the screen of an android device. Distinctive features of Power Bubble are an intuitive interface, easy navigation, work on tablets and phones.
Instructions:

Important! On some devices, the program may be unstable or not respond at all to commands.
TouchScreenTune
A free program that allows you to optimize the sensitivity of your smartphone screen. It also adjusts the sensitivity of the sensor for handwriting on some devices, for example Samsung Galaxy Tab 10.1 and Asus Transformer... It should be noted that for its use you need superuser rights... Among other things, TouchScreenTune will help you set the parameters to ignore touches. The only drawback of the program is that there is no Russian-language interface and there are failures during use.
Clinometer
Free application for Android that allows you to calibrate the accelerometer. Also the Clinometer can with accurate to several degrees determine the angle to the surface.
Instructions:

Touchscreen Calibration
Free application for Android that allows you to calibrate and adjust the sensor, debug the sensitivity and response time.
Instructions:

Quick TuneUp
Free application for sensor calibration on android devices. Quick TuneUp also has the ability to optimize the smartphone battery and built-in memory.
Instructions:

Display calibration
A small utility that allows you to optimize and adjust the sensitivity of the sensor. Display calibration has an intuitive interface and a set of settings on display debugging.
Instructions:

Calibration via computer
If the sensor does not respond to commands, or if there are malfunctions after calibration, then in this case it will be necessary to perform optimization via a computer. To do this, we need to install the program - MSP RemoteAlignment.
Utility features:
- calibration without installing software on the phone;
- saving the procedure log on the computer;
- debugging the touchscreen and saving the log with the results.
After the installation has been done software, go to the process itself:
- run the program and a window will appear on the screen, where several tabs will be presented;
- then we connect the phone to the computer using USB;
- if you need to perform automatic debugging, press the "Skip" button, and to carry out all actions manually " Alignment»;
- after the completion of the process, you can save the log by clicking the button " Retrive».
How to check the touchscreen for performance
After the calibration, you need to make sure that the touchscreen is working, you can do this as follows:
- go to Play Market and download the Screen Touch Test utility;
- install it on your device and launch it;
- a field will appear on the main screen where you need to draw a rectangle right around the perimeter of the screen;
- with proper sensor operation, the line will be straight and clear, without gaps. If deviations are observed, the line is interrupted, various kinds of dots appear, this indicates that the touchscreen is unstable.
There is a similar function in standard settings Android.
Sensitivity check and adjustment
Additionally, you can take advantage of special features and independently adjust the sensitivity of the sensor:

How to calibrate the screen on an iPhone
On iPhone, you cannot perform the usual calibration that is performed on Android. Of any special programs there is no for this, and also there is no advanced functionality in the settings. Therefore, only auto brightness sensor optimization... This can be done as follows:
- open "Settings";
- looking for a room where the light is dimmest;
- in the list of parameters select the tab “ Display and brightness»;
- deactivate the option “ Automatic brightness»;
- a slider will appear, with which you need to adjust the brightness of the screen, reduce the parameter to the very minimum;
- then we reactivate the parameter “ Automatic brightness”And the display becomes much brighter. The sensor will correct this option and move the slider to the optimal position.
Calibration Proximity sensor
Proximity sensor - is a proximity sensor. it small device, which reacts to the physical proximity of the smartphone to an object. It is thanks to him that at telephone conversation the screen turns off.
Instructions:

Sensor optimization program "Proximity sensor: Reset":
- download the program from the application store;
- press " Calibrate Sensor»;
- close the upper part of the device with your hand (the location of the sensor) and press "Next";
- remove the hand from the sensor and press "Next" again;
- then tap "Calibrate" and confirm the execution of the actions " Confirm". We reboot the device.
Potential Calibration Problems
Optimizing the touchscreen may not help in the following cases:
- first of all is hardware failure phone. One of the options is damage to the screen with cracks arising in the process. In this case, calibration will no longer help, you need to contact service center to replace the sensor;
- manufacturing defects... In some cases, we can talk about a factory marriage. The touch panel may be unevenly adjacent to the glass, somewhere it fits close to it, somewhere not. In this case, spontaneous operation or lack of reaction is observed in some areas of the screen. Here you will also have to contact the service center.
- Incorrect repair... After replacing the touchscreen, the sensor may not work or work poorly. This also includes the mirror operation of the touchscreen, when all actions and touches are mirrored on the display. It is impossible to determine the breakdown yourself. It is better to take the device to the service center that carried out the repair. Usually, in such cases, the sensor is connected incorrectly.
Touch screens (A touch screen is an information input device that is a screen that responds to touch. Wikipedia) are increasingly used in modern electronic technology. The vast majority of devices (about 90%) are now equipped with resistive touch screens.
The resistive touchscreen consists of a glass panel and a flexible plastic membrane. A resistive coating is applied to the panel and membrane. The space between the glass and the membrane is filled with micro-insulators, which are evenly distributed over the active area of \u200b\u200bthe screen and reliably insulate conductive surfaces.

When the screen is pressed, the panel and membrane are closed, and the controller, using the ADC, registers the change in resistance and converts it into touch coordinates (X and Y). In general terms, the reading algorithm is as follows:
A voltage of + 5V is applied to the upper electrode, the lower one is grounded. The left and right are short-circuited and the voltage across them is checked. This voltage corresponds to the Y-coordinate of the screen.
+ 5V and "ground" are supplied to the left and right electrodes, the X-coordinate is read from the upper and lower electrodes.
The above algorithm is for 4-wire screens.
But at one "beautiful moment" the screen looked like this:

We disassemble a device with a non-working screen. We are looking for a cable from the sensor (4-wire), for example, as in the photo below:

Based on the principle of operation of such a screen described above, the test method is reduced to measuring two touchscreen resistances. They should not be abnormal, that is, less than 50 ohms and more than 1500 ohms. In case of mechanical damage, the coating layer breaks and the resistance will be infinitely large. To do this, it is not necessary to break the screen, it is enough to press down strongly at the point of contact of the loop with the layers so that this contact comes off.
Those. we take an ordinary multimeter, set it to measure resistance up to 2 kOhm and try to ring the screen. With absence mechanical stress two pairs of two contacts should ring among themselves (resistance up to 1 kOhm, usually 300 or 600 Ohm), and pairs of contacts MUST NOT ring between themselves (they call only when the screen is touched).