Creating a new console. MMC or mega powerful console
Many gadget lovers began their knowledge of the world of electronics with game consoles and consoles. These were not modern Xbox and PlayStation at all, but Nintendo / Dendy and Sega with pixel graphics, hardcore difficulty and no saving of game progress.
To remember old feelings, go through games that were not passed in childhood, or simply show your children games that were 25 years old, you can install console emulators on your computer.
We'll have to tinker with the settings different systems, dance with a tambourine for gamepads to work and play on a small laptop screen. And the emulation quality will be so-so.
Much easier build a small play station yourselfwhich supports more 50 emulatorsold consoles. Connect the device to a large TV and play with any available gamepads.
1. We buy everything you need to assemble a retro console

- single board computer Raspberry Pi - from 2588 rubles.
- microSD memory card 8 GB or more - from 254 rubles.
- hDMI cable - from 66 rubles.
- gaming gamepads USB or Bluetooth - from 200 rubles.
- you can buy a separate stylish case for 1517 rubles.
Of course, much of this can be found in the bins of any gadget lover. For those who will buy the missing goods, I will give some advice.
Buy the latest model "Malinka" (Pi 3 B +), it has a more powerful quad-core processor that can handle even 3D games from the first generation PlayStation, 1 GB random access memory, there is Wi-Fi and Bluetooth.
Such a box does not have to be connected to the network via a wire or fiddled with "USB whistles", and gamepads can be connected both via wire and Bluetooth. It is better to take a computer with a case and a suitable power supply immediately.

Game controllers are preferable to take trusted brands. If you have old Xbox or PlayStation remotes, they will work fine, you can get replicas of the original input devices from Sony or Microsoft.
You shouldn't take radio joysticks or completely unknown gamepads, they may simply not connect to our console.
2. Select the operating system on which the console will run

After selecting the components, you should decide on the operating system of the future console. At the moment, there are three good builds that are suitable for our task:
Lakka - build with a beautiful visual interface in the style of PlayStation. The project is developing quite slowly, Lakka still has many glitches and shortcomings.
RecalBox - a more advanced all-in-one solution. After installation, the image will already contain a couple of dozen classic games for different platforms. In addition, a media center is integrated into the image. KODI... In a couple of clicks, you can turn the game console into a media combine for playing videos from a removable drive, from the Internet or network storage... It is possible to set up IPTV.
RetroPie - another multifunctional emulator of old game consoles. Initially, the image does not include games and there is no media player like KODI, however, it is possible to install RetroPie over the native operating system for Raspberry - Raspbian... This means that the gaming service can work on the "Malinka" simultaneously with other services, for example, with connecting smart gadgets in the house.
The choice is between the last two options. RecalBox - a simple image with games out of the box and a KODI media center, and RetroPie for those who want to tinker and install on top of Raspbian.
3. Install the operating system on the game console

Installation game system to an already running Raspbian is produced via the terminal. We will leave this for the future, now we will try the option for beginners. All emulators described above are installed the same way.
First, I recommend trying RecalBox... Here is the most understandable and user-friendly interface, the setup is extremely simple, most of the chips are included out of the box, and as a bonus we get a media center KODI, which can easily replace a budget TV box for watching movies from a flash drive, over the network or online.
1. Download the selected image from the developer's site.
2. Download and install the Etcher application to write an image to a memory card.
3. We write the image to the memory card.
4. After finishing the recording, install the memory card in the Raspberry and connect it to the TV.
During the first start, the system will be installed and initial configuration... Nothing is required from the user, we just wait a few minutes before launching the visual shell.
The system will immediately prompt you to configure the joystick. It can be either a USB accessory or a wireless one. It's better to have a keyboard on hand to make all the settings in case of problems with the connection of the gamepad.
4. Configuring the prefix

Of course, the main thing is to teach Raspberry to work with a suitable gamepad. Wired models almost always start out of the box, from the wireless ones I immediately connected Dualshock 3, the rest had to be manually configured from the system parameters.
You can connect up to five gamepads, I think this is superfluous, because most of the old games were designed for 1-4 players.
From the key settings, you need to do the following:
1. Switch the interface to Russian. Main Menu (Enter on the keyboard) - System settings - Language... Initially, the key is used to confirm actions. "A".
2. Connect to home Wi-Fi networks for easy loading of games. Main Menu - Network Setting activate item Turn on Wi-Fi, enter your home network name and password.
3. Configure the web interface. After connecting to the network, we remember the IP address and drive it into the browser on the computer.

Several games are already preinstalled on the system for different consoles, but many supported systems do not appear in the menu. Don't worry, there are hidden consoles for which no games are loaded. It is worth throwing in desired folder relevant data and the console will appear in the main menu.
The rest of the parameters are configured at will.
5. We put the games, well, then you understand

All that remains is to find the images of the games. You can figure it out yourself. The data can be downloaded from well-known sites or special portals, of course, for informational purposes.
We copy files via the web interface to Raspberry, reboot the system or update the list of games through the settings and plunge into a sea of \u200b\u200bnostalgic feelings.
Many people know that in Windows 7, as in previous versions Windows has a MMC management console. It is a pretty useful tool for PC administration. Basic tools for this are included by default in the Administrative Tools applet in Control Panel. However, not all users may need them, or the opposite situation may arise, when a necessary and frequently used tool is not present in the Administration applet, and to get to it, you need to run whole line In this article I will tell you how to find a way out and create your own administration console windows systems 7 with a set of tools necessary for a specific user.
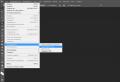
First of all, you need to create an empty MMC console, for this we type in the Win + R input line the command mmc.exe and press Enter (Fig. 1).
Picture 1.
In the "File" menu, select the item "Add or remove snap-in", in the window that opens from the list on the left, select the necessary snap-ins and click on the "Add" button to connect them to our console. For some tools it is necessary to specify the computer that will be controlled by it. In my case, as an example, I included three snap-ins in the administration console: Disk Management, Device Manager, and Security Analysis and Configuration (Figure 2).

Figure 2.
For some tools, you need to specify the computer that will be controlled by it, such as for the Disk Management snap-in.
After adding the necessary snap-ins, press the "Ok" button, go back to the "File" menu and select the "Save" item. We assign a name and choose any place convenient for us to place our own administration console, for example, it will be the Desktop.
To change the parameters of the created administration console in the "File" menu, select the "Parameters" line (Fig. 3).

Figure 3.
A tab will open in which we have the following settings: changing the console icon, console mode, and below two more parameters that are related to the selected console mode. Let's dwell on this moment in more detail.
When you select each of the modes, its description is given in the window. When you select the "Author" mode, the "Do not save changes for this console" and "Allow user to customize the console view" checkboxes will be inactive. By default, the "Author" mode is set. This mode assumes complete freedom of action with the console for its creator. At the same time, after each end of a session with it, a warning window will be displayed asking if the console settings will be saved when it is closed. To get rid of the appearance of this window in the future, select "User mode" and tick the "Do not save changes for this console" checkbox, and uncheck the "Allow user to customize the console view" checkbox. Then close the console and save the changes.
The administration console created in this way will optimize and facilitate the work with the key system components, selected based on the needs of a particular user.
Finally, I want to tell you about another interesting snap-in - "Link to a Web resource", which makes it possible to create a link to a web page, for example, to the page of this blog (Fig. 4).

Hello everyone today I want to tell you about mmc (Microsoft Management Console), since many system administrators not only do not know about it, but if they do not know how much mmc provides a wide range of functionality and time savings, for example, when I was just getting acquainted with operating systems Windows, many books have given examples that technical support or the HR department had specially prepared mmc consoles for them, in which they had all the things they needed to take the maximum load off system administrator... Let's create our own Mega console with you.
We will consider the creation of mmc or as I also call it a mega powerful console on Windows Server 2012 R2.
Pros of mmc
- don't need to have on desktop or menu quick access there are many shortcuts in the start
- the ability to control other servers remotely from one place, if not of course
- free, since the built-in windows utility
- flexible customization exactly for your needs
Types of launching mmc
There are two types of launching a snap-in:
- Authoring is a mode where you can add and modify the contents of a snap
- User mode is a mode when there is already a management snap-in and you cannot change anything in it, for example Computer Management, and a bunch of such
Running mmc
By launching the Microsoft Management Console, it will open by default in authoring mode, implying edits, but if you wish, you can then prohibit changing your console. Press Win + R and enter mmc.

As a result, you will have a window like this.

Adding snap-ins
the mmc console allows you to add the necessary snap-ins via the File-Add menu or by pressing CTRL + M

In my example, I'll add the following things:
- Active Directory - Users and computers (the most used snap-in)
- Active Directory - Domains and Trusts
- Active Directory - Sites and Services
- Hyper-V Manager
- PKI enterprise
- View events
- ADSI Editing
- Services
- Group Policy Management
Select the one you want and click the add button.

The selected console will appear on the right side

If you click the change extensions button, then you will have the opportunity to more fine tuning mmc windows console. For example, some of them include additional extensions. We see that Computer Management consists of more than 10 extensions, if necessary, you can disable unnecessary ones.
Another mmc windows console allows you to add some snap-ins that will relate to other computers, for example, an event viewer that will show logs from another computer

click the review and add the desired one.

As a result, we got such a tool.

Customizing the appearance of mmc
In order to make your mega console more convenient, I suggest expanding the center area and getting rid of the scope. To do this, click View-Customize.

and uncheck the action bar.

You can also add additional commands to turn your rig into a really cool thing. We see that there is only an Offline or Restart in Services, let's expand this functionality.

Choosing an action - a new view of the taskbar

The panel view wizard opens.

Choosing the vertical view, although you may like the other, it's all up to you.

apply to all elements

We set a name if the old one does not suit you


The task creation wizard will now open.

You have three options to choose from
- Menu command - standard command
- Operating system command - script
- Jump command

On the left side, select the services, and on the right, the desired command.

For example, I chose to connect to another computer.

Setting a shortcut for it


In order to add more commands to mmc, open Action-Edit taskbar view

Tasks tab - create

In the end, I got it like this

There is already what your imagination is great for and then add, you can make good functionality.
Let's talk about the rest in the second part of MMC or mega powerful console part 2.
To get an idea of \u200b\u200bthe flexibility of MMC, it is helpful to look at the process of creating a console file — an MMC tool (document) —from the beginning. For example, let's describe the procedure for creating new console and adding the Computer Management snap-ins and Certificates snap-ins to it.
1. From the Start menu, select Run, type mmc, and then click OK. The Consolel window opens with an empty console.
By default, the MMC console opens in authoring mode, where you can create new consoles and modify previously created administrative tools. An empty console has no functionality until rigs are added to it. The MMC menu commands in the menu bar at the top of the window apply to the entire console.
2. From the File menu, select Add / Remove Snap-in. The Add / Remove Snap-in window opens, listing the stand-alone snap-ins and extension snap-ins that will be added to (or already included in) the console. Snap-ins can be added to the root of the management console or to existing stand-alone snap-ins (other tree nodes); this is indicated in the Snap-ins added to list. In our case, we will leave the default value - Console Root (Console Root).
3. Click the Add button. The Add Standalone Snap-in window will appear on the screen (Figure 6.4) with a list of standalone snap-ins available in the system.
It is necessary to distinguish between the names of the snap-ins (that is, their names that were given by the developers and which are fixed in the supplied snap-in packages, see Fig. 6.4) and the names of menu items, MMC tools and nodes in the snap-ins tree of the MMC console.
4. Double-click Computer Management. A window will appear with the configuration options for this snap-in.
Figure: 6.4. Window with a list of snap-ins available in the system
5. Leave the switch in the Local computer position. Then click the Finish button. The first rig has been added to the console.
6. In the snap-ins window, select Certificates and click Add.
7. In the next window, select the appropriate radio button - This snap-in will always manage certificates for:
- My user account (my account user);
- Service account (service account);
- Computer account
8. Click Finish and Close.
9. In the Add / Remove Snap-in window (which displays a list of snap-ins to be plugged in), go to the Extensions tab. This tab lists the extension snap-ins that ship with the selected stand-alone snap-ins. If you are not going to include all the snap-ins of an extension, uncheck the Add all extensions box (which is the default) and uncheck the unnecessary snap-ins. When finished, click OK.
10. Close the window for adding snap-ins by clicking OK. The console window now contains two snap-ins - Computer Management and Certificates.
11. To save the created tool, choose Save from the File menu and specify the file name and folder where the console file will be saved.
An additional benefit of this approach is that if a user has a roaming profile, that user will always have access to all the tools they create.
Notice: Undefined offset: 0 in /var/www/u202064/data/www/site/module/book_file/index.php on line 10
Microsoft Management Console (MMC) is often used by system administrators to create fine-tuned administration products. With the help of MMC, you can ease the day-to-day tasks on the shoulders of system administrators. All the tools that are in the MMC are displayed as consoles. Creating tools in this console is one of the easiest tasks.
You will need
- MMC software.