Joomla 1.5 standard module materials in the archive
After installing the Joomla management system on a local or virtual server, we are faced with the question: how to install the template and where to download it? In this tutorial, we will look at how to install a template in Joomla and what methods of installing templates exist. Choosing and installing a template is an important step that should be given special attention. I will also give examples and solutions to problems that may appear during template installation.
- go to view
See the link above for the template installation guide in Joomla 3 version!
There are two ways to install a template in Joomla: using the standard Joomla installation, install / uninstall and manually, by copying the template files to the templates folder.
Method one. Install the template in Joomla using the standard installer.
First, download the template we want to install. After the archive with the template is downloaded, you need to make sure that the downloaded archive contains the template, and not the archive with the templates, or as it often happens that the archive contains several more archives. The Joomla Template archive must have a zip extension, and the archive must contain the files:
- templateDetails.xml - used to install the template in the admin interface;
- index.php - contains the entire structure (code) of the template.
- params.ini - Joomla is required to save your settings
Also make sure that the archive contains folders:
- css - contains style sheets
- images - this folder contains images used in the template
- js - JavaScript script files (jquery.js, mootools.js, scripts.js)
In the example, not all files and folders that are in the Joomla template. The number of files and folders depends on the template itself, I just listed only those that are mostly found in all joomla templates and without which the template will not work.
For example, if you downloaded a template, and there are several more archives in the archive, then you can easily determine which of the archives is the template by these criteria and install it.
It should be noted that when choosing a template, you need to pay attention to the date of its release and how much it matches the version of Joomla with which you are working.
For example, some of the templates from the earlier release no longer work in Joomla 1.5 or display incorrectly.
Note:The archive with the template for installation via the standard install / uninstall installer must have the .zip or .tar.gz extension

In the administrative panel, select "Extensions" - "install / uninstall" Next, select the archive with your template on your computer and click the " Download File & Install". If the template matches your version of Joomla, after a few seconds the template will be downloaded and installed, you will see a message that the template has been successfully installed.
After the template is installed select "Extensions" - "Template Manager". In the Template Manager, you will see all the installed templates and the template you just installed. (By default, two standard templates are already installed in Joomla: rhuk_milkyway and JA_Purity) Select the required template by checking the radio button next to the template and click the "Default" button.

The second way to install a template in Joomla
This method can be used when you need to install a large number of templates or just there are cases when the template is not installed in a standard way install / uninstall.
To install the template in this way, you need to unpack the archive with the template into the folder (folder name can be any, the main thing is in English letters)... Next, start the FTP client and open the / templates folder on the site for which we install the template and upload our template folder to it.
If your site is on local server, then you just need to copy our folder to the / templates / folder. If you want to change the name of the template, then in the template folder you need to find the templateDetails.xml file, open it with notepad or any text editor and find the line with the tag
As I already said, by default, Joomla already has two, sometimes three standard templates: rhuk_milkyway and JA_Purity, which you can safely use when creating your project.
Today, the choice of templates for the site is very large, and the developers even divide them by topic: templates for business sites, for entertainment portals, holiday, real estate, music, social networks, cinema, video, sports, tourism and many others.
It is worth noting that some of the templates are created on a commercial basis and must be paid to the developer before using them, otherwise it will be considered a copyright infringement. Therefore, before installing this or that template on the site, check the author, there are now a huge number of them, and under what conditions he provides the template for use.
If a large number of templates are loaded, and you do not remember the name of the required template, then when you hover over the link with the name of each of the list, you can view its thumbnail.

When choosing a template, you also need to pay attention to its structure, blocks and positions that it includes. Indeed, before creating a site, you probably already planned what and where will be located on it: whether there will be a header (usually a picture placed on top, it is also called a site header), a logo, a top or vertical menu, the number of blocks on the page, and etc.
In order to check the positions in a particular template, you can type in address bar browser http: // your site /? tp \u003d 1 and you will see all possible positions of the template and their names.
As I promised, starting with this article, we will get acquainted with various types of menus in Joomla... And we will start from the very first - this " List of materials in the archive".
If you do not know, then read the corresponding article about it first. Also, if you don't know, then you also need to read about it first.
Now let's get down to parsing the menu type - " List of materials in the archive":

We have already discussed various settings on the left in the article:. But the parameters on the right differ depending on the type of menu. And now we will get acquainted with the parameters for " list of materials in the archive":

As we can see, there are three blocks. Let's start with the block: " Options - Basic":
- Order... Here, from the drop-down list, you must select the option of sorting materials when they are displayed on the page.
The second block is already much larger. But, nevertheless, I give a description of all the settings:
- Show links to closed content ... There are links that are open only to registered users (I think you have seen this often). And with this option, you can show all visitors that the links exist and display them. However, if the visitor is not logged in, then he will still not be able to follow the link - he will be asked to log in first.
- Show title text... Whether or not to show article titles.
- Title as link... Display title plain text or as a link to an article.
- Show introductory text... This setting allows you to display introductory content on the page.
- Section title... Show or hide the title of the section to which the article belongs.
- Section title as link... Display the section title with a link or plain text.
- name of category... Whether or not to show the name of the category to which the article belongs.
- Category name as link... Show category name as link or plain text.
- Author's name... Whether or not to show the author of the article.
- Date and time of creation... Display the date and time of the article creation, or, conversely, do not display.
- date and time last change ... Whether or not to display the date and time when the article was last modified.
- Show navigation... Show the content of the article or not. This refers to materials that consist of several pages.
- More link... If you put " Show"and the material has the main text, then this link will appear. If at least one of the conditions is not met, then the link" More details"is not displayed.
- Votes / Article Rating... Show the rating of the article, as well as allow users to rate it.
- Icons... Show print icons, PDF and Email or not.
- PDF Icon... Show or hide the icon PDF.
- Print icon... Show or hide the icon for displaying a printable version of the article.
- Email Icon... Display an icon for the ability to send an article by Email friend, or, conversely, do not withdraw.
- Hits... Show or hide the number of views of the article.
- Show in RSS... Here you can choose to show only the introductory text, or only the main text. It's a matter of taste, but I advise you to show only the introductory one, so that the person subscribed to your Rss feed, came to your site to finish reading the article.
The third and final block is " Parameters - System":
- Page title... A very important option in which you need to put the tag value<title\u003e on the page where the menu item will lead.
- Show page title... Whether or not to show the page title not only in the tag<title\u003e, but already directly in the content of the site.
- Page class suffix... If you want to make an individual design, then to prevent confusion with others CSS classes, You need to specify a unique suffix that you will use when designing the page.
- Menu picture... Here you can select a picture that will be located next to the name of the menu item.
- SSL enabled... This option determines whether to require a secure connection when following this link. In most cases, you should leave " Ignore".
So we examined all the settings when creating a menu item like: " List of materials in the archive". In the next article I will continue to describe this process, but with other joomla menu types.
Hello! Today I found something new for myself ... we'll talk about it ...
Sometimes, when creating site articles, it becomes necessary to insert a module into the article text (content). It may not be necessary often, but sometimes all the same. On this site, your humble servant has implemented the insertion of the search module into the 404 page of this site.
I will also add that such needs may arise at any time, and I think so, you need to know how to do this. For such purposes, there are certain components and plugins, but we will not talk about them today, since we will do the entire implementation by means included in the package of the installed CMS Joomla.
1. Create a new position for the module
To create a position, we will need to add it to the file located at: Your_site / templates / Your_template / TemplateDetails.xml
Having opened the file for editing, we find the lines defining the positions and add the position similarly to the existing ones. (I named my position search_content)

2. Create a new module or a copy of an existing module
In the administration panel in the menu, select Extensions? Module manager create module.
Turn on the module and select our newly created position - search_content (as in the picture below).

In the module parameters, I personally set the module class suffix so that the new module has nothing to do with the settings of the search module, which is located in the site header. Thus, by assigning a suffix to the module class, we can apply any styles described in template.css... but something I got carried away, this is not the topic of this article \u003d)
We set the rest of the settings as we need.

3. Settingplugin configuration “Load Module»
Now we need to configure the plugin included in the Joomla installer - "Content - Load Module".
To do this, go to the Plugin Manager in the menu: Extensions? Plugin manager ... In the list we find the plugin "Content - Load Module".
Open the module, and on the right in the plugin settings window, in the block Plugin parameters, change the parameter value "Style"on "No framing", turn on plugin (if not active).
A customer turned to the web development studio "Engine" with a request to update his site. The tasks were as follows: update Joomla 1.5 to Joomla 2.5 and install a new responsive template, while preserving all site content (materials, sections, menus, etc.). In this article, we will describe how to make a site migration and save all site content.
We divide the work into three stages:
1. Saving the site. We make a full backup of the site. Checking hosting parameters for Joomla 2.5
2. Automatic update Cms Jomla 1.5 up to version 2.5 via the jUpgrade component
3. Installing responsive template via quickstart
4. Replacing tables which are responsible for the content of the site, menus, sections
So, let's begin.
Item 1. Preparatory work before migration Joomla
If you decide to migrate Joomla 1.5, before starting work, you need to conduct a preliminary analysis and preparation of the site.
First of all, check if your hosting meets the requirements to work with Joomla 2.5. To install version J 2.5, you need the following hosting assembly:
PHP version must be from 5.2.4;
MySQL version 5.0.4 and higher;
Hosting support for Apache 2.x,
To check, you do not need to go to the server, you just need to enter the site's administrative panel. Further in top menu to find Help \u003e\u003e\u003e System Information... Here you will find the information you need about your hosting software.

For the jUpgrade component to work properly, you need to check if the cURL module is enabled on the hosting. It is usually on. To check, go to the admin. hosting panel, hereinafter "PHP Information" and in the cURL line should be enable.

Site backup
Important to remember!
Do all of your extensions support version 2.5? To check, use the Joomla Extension Directory search, there you will see which extensions support version 2.5 and 3.0. Please remember that jUpgrade is not yet capable of upgrading all 3rd generation extensions on its own. Here's a list of the extensions it updates: AcyMailing, AdminPraise, Akeeba Backup, BreezingForms, CompoJoomComment, CommunityBuilder, Contact Enhanced, Hikashop, JCE, jEvents, JomSocial, Jumi, K2, Kunena, SobiPro, redFORM, redMEMBER, redSHartlery 2 ...
All other extensions will have to be updated manually, or not updated at all. In our case, the following third-party extensions are installed on the site:
joomlaComment, Community Builder, XMap, FireBoard, uddeIM
Have you made any changes to the kernel files? Be careful, all changes will be lost.
Is your template 2.5 compatible? If not, would you be comfortable upgrading to any of the standard ones?
Is there localization in the version you want to update to? Make sure of this.
If you have permission to create and edit files and folders in Joomla 1.5?
Create a backup and a copy of the copy!
Skipping this point is perhaps the most fatal mistake of all. if you have backup copy, you can roll back your changes whenever you want. If you do not follow this advice, if something goes wrong, the data recovery process will result in a waste of time.
We save the site database and all directories and site files.
Point 2. Updating Joomla with jUpgrade component
Requirements for the jUpgrade component to migrate (upgrade) Joomla 1.5 to Joomla 2.5:
PHP v5.2.4 or later
IIS / Windows: MySQL v5.1 - Linux / Apache: MySQL v5.0.4 +
Curl module of PHP enabled
Joomla 1.5.19 preferably 1.5.25
Included plugin system - Mootools plugin update
Javascript and JQuery enabled browser
Download and install latest version jUpgrade. It is very important to use the latest available version as a large number of bugs are fixed with each release.
Then we install it as usual joomla extension... Further, for this extension to work, you need mootools Upgrade Plugin
After installation, go to the plugin manager and activate it.
After installation, go to the control panel of the JUpgrade component. 
Then into the parameters of this component. 
Distribution - the version of the engine you are updating to;
SQL Driver - a driver for working with a database;
Target Directory - the folder where the new site will be saved;
Prefix for old database - table prefix (outdated version);
Prefix for new database - table prefix for the new engine;
Disable set_time_limit () - disable the time limit for performing update operations;
Disable Error Reporting - disable error messages.
Skip checks - disable checking;
Skip download - skip the download, if YES, then you need to write the Joomla source files, that is, the Joomla 2.5 distribution kit, to the folder with the new site;
Skip unpacking - if not, the distribution will be unpacked;
Skip templates copy - skip copying templates. Only standard templates are supported;
Skip 3rd party extensions - skip updating of third-party extensions.
Skip users - skip transferring users to new version;
Skip categories - skip transferring categories to the new version;
Skip content - skip transferring content to the new version;
Skip menus - skip moving the menu to the new version;
Skip modules - skip transferring modules to a new version;
Skip banners - skip the transfer of banners to the new version;
Skip contacts - skip transferring contacts to the new version;
Skip newsfeeds - skip the transfer of the news feed to the new version;
Skip weblinks - skip link transfers.
Keep original positions? - keep the original positions of the modules;
Delete previous migration - delete previous update attempts;
Enable migration debug - enable debug mode;
Enable Mootools version debug - Mootools debug mode;
Important!
In parameters specify the folder for storing the updated version of the engineif necessary (we left it by default), we also cancel the distribution download and unpacking. Since in jupgrade folder we will copy the Joomla 2.5 distribution. Therefore, we download the Joomla 2.5 distribution and unpack it into jupgrade folder.
Joomla update. Solving the JavaScript problem
After the settings, save the changes and return to the component control panel. Now you can start updating by clicking on the corresponding button. We would like to note that the "Start Update" button was not working, which means that there is a JavaScript error.
It can be fixed by editing the media / system / js / modal.js file, in which you need to find the line:
this.setOptions (this.presets);
And replace with:
this.options \u003d this.presets;
This replacement should be performed only after configuring the jUpgrade component. Next, we update:


After completing the update, the component provides us with links - to the user part of our site and to the admin panel. The updated version of the engine is now contained in the jupgrade folder. Wherein this version uses newly created tables, with a prefix that was specified when configuring JUpgrade. That is, you and I received a completely new site, with our file structure and its database.
Now it is necessary remove all original files of the old 1.5 engine and replace with new ones (from jupgrade folders). In the database, you also need to delete tables that were used by the old version of Joomla (delete all tables whose prefix jos - this is in our case).

As you can see - this is really Joomla 2.5. Now if we look at the installed components, we will see that the Community Builder remained installed, it was ported to the new version of the engine and for it correct work, you also need to reinstall it. Therefore, we download the latest version of the component and install it as a regular Joomla extension. After that, you can make sure that all the data of this component has been successfully transferred to the new version of the engine. All content from previous version Joomla: materials, categories, and also menus.
Installing a template
Thus, we have completed the upgrade from Joomla 1.5 to Joomla 2.5. It remains only to install the template that was used earlier. To do this, open the templateDetails.xml file ( this file contained in the template archive) and make a few edits to it in accordance with the requirements of Joomla 2.x. Namely, we change the install block to the extension block:
The parameter block is also replaced in accordance with the following form:
After that, you can install the template on the new Joomla engine (again, having previously created a zip archive). Of course, there are still a lot of things to fix in this template before it becomes completely identical. old version... But in any case, it is already working and displays information.
After making all the edits to the template, you need to update the positions of the modules and check the performance of the site as a whole.
This completes the update.
Point 3. Installing a responsive modern template via quickstart with content saving
Step 1.
- After we have updated the site - we enter the site database and copy individual tables of the site, namely:
Materials:
#_content - Materials
#_content_rating - Content in the rating
#_contentitem_tag_map
Section manager:
#_categories
Homepage Manager:
#_content_frontpage
Menu:
#_menu - All site menu items (back-end + front-end).
#_menu_types - Back-end menu.
We select these tables in the database and Save.
We save the entire updated site just in case. Then we download the adaptive template with the option “ quick launch". This is a tested version of the CMS, as well as your Joomla template with all the necessary functional modules and components. All you need to do is upload these files to the server that will host your site.
In the archive of such a template there is a directory: QuickStart

The number of folders and their names may differ depending on different manufacturers templates. As a rule, the folder with QuickStart weighs more than the others, except, of course, the folder with the PSD sources. In general, finding it will not be difficult.
Then you need to: unpack the archive located in. The unpacked folder should contain the following documents:

Now, in the address bar of your browser, enter the URL of your site. If you did everything correctly, the start page of the Joomla installer will open. It looks like this:

We enter all the data of our hosting and the data of our website.
After that, the site is installed! Template and modules with components - works. BUT the content on the site is DEMO. It remains to replace the content with your own.
Step 3. Replacing content in the site.
We enter phpMyAdmin and delete from the database the tables that were previously copied to our PC. Namely:
#_content
#_content_rating
#_contentitem_tag_map
#_categories
#_content_frontpage
#_menu
#_menu_types
After deleting. We add the previously copied the same tables to our database.
As a result, we get: An updated "engine" Joomla 2.5 with an installed adaptive template and all the necessary modules and components + site content as it was before (materials, sections, menus). Which was exactly what had to be done.
If you need to do this - but you do not want to do it yourself - you can contact our studio with this problem, we can do it. Just write to us: [email protected] and describe the task.
That's all, if you want to "thank" ours - you have such an opportunity: on the right there are options for donations for the development of the portal. Or share the article in your social media through the services below.
This tutorial provides a quick guide to working with archived articles in Joomla 3.x.
Archiving articles allows you to store them on your Joomla site for future reference, but makes them less visible to your site visitors as such articles no longer appear with the rest of the site's content. Once archived, these articles are only viewable from the "Archived Articles" menu section in Joomla, the "Archived Articles" module, or by searching by article name using the built-in content filter of the Joomla site.
Archive Articles
Articles can be easily archived in the Article Manager. To do this, do the following:
Displaying a list of archived articles by means of a module
You can configure the Archived Articles module to display a list of archived articles organized by month. Do the following:
Displaying a list of archived articles via the menu button
You can also create a menu button "Archived Articles" to display a list of archived articles on the site. Do the following:
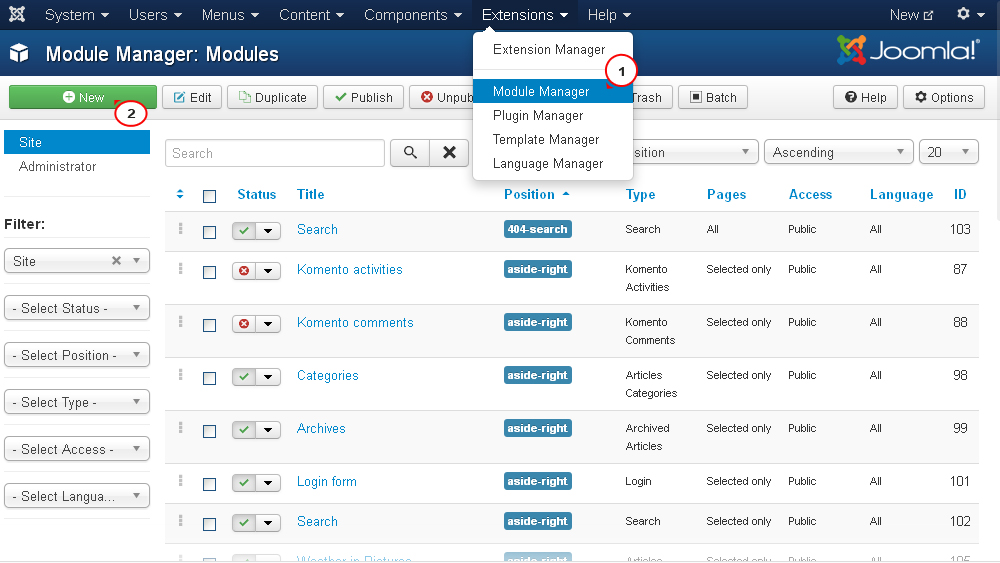
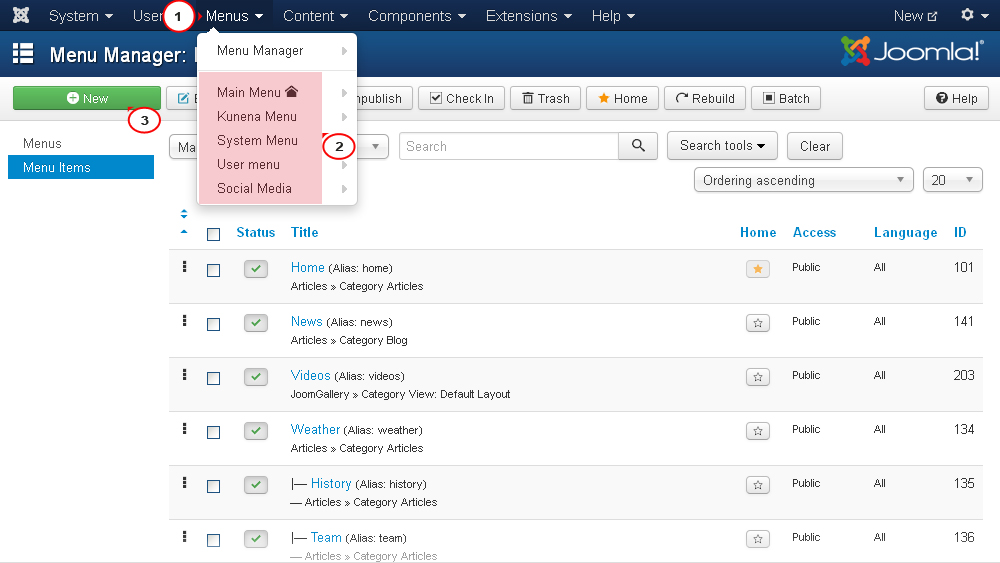
In your Joomla admin panel go to the section Menu (Menus), select the menu to which add a new item and press the button Create (New) top right in the toolbar:
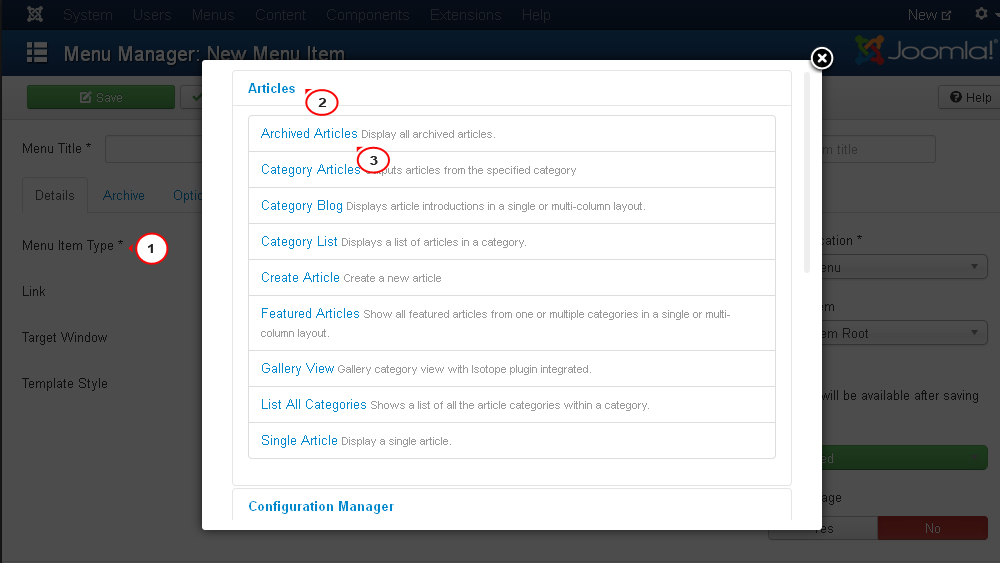
Near parameter Menu Item Type press the button Select (Select)... In the pop-up window that appears, open the tab Articles and select the type Archived Articles from the dropdown list:
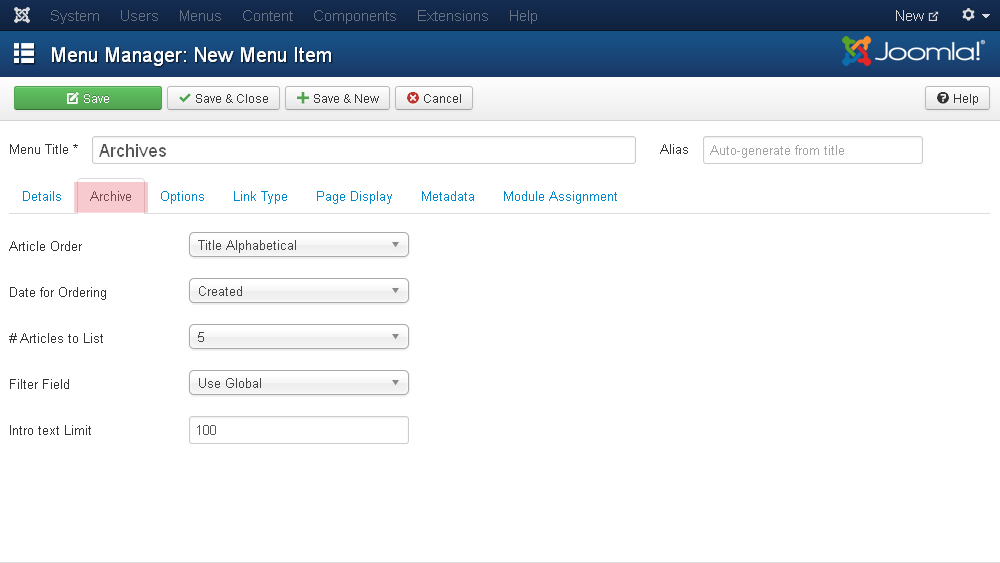
Now you can set the main settings of the menu item:
This is where the tutorial ends. Now you know how to manage archived articles in Joomla 3.x.


