The Quick Launch panel is missing, what should I do? Citylink quick launch panel disappeared quick access panel does not work
Excel for Office 365 Word for Office 365 Outlook for Office 365 PowerPoint for Office 365 Publisher for Office 365 Access for Office 365 Visio Plan 2 Visio Professional 2019 Visio Standard 2019 Visio Professional 2016 Visio Standard 2016 Visio Professional 2013 Visio 2013 Visio Premium 2010 Visio 2010 Visio Standard 2010 Excel 2019 Word 2019 Outlook 2019 PowerPoint 2019 OneNote 2016 Publisher 2019 Access 2019 OneNote 2013 OneNote 2010 Project Professional 2019 Excel 2016 Word 2016 Outlook 2016 PowerPoint 2016 Publisher 2016 Access 2016 InfoPath 2013 Project Professional 2016 Excel 2013 Word 2013 Outlook 2013 PowerPoint 2013 Publisher 2013 Access 2013 Excel 2010 Word 2010 Outlook 2010 PowerPoint 2010 Access 2010 Publisher 2010 Project 2010 InfoPath 2010 SharePoint Designer 2010 Office 2010 Project Online Desktop Client Project Professional 2013 Project Standard 2010 Project Standard 2013 Project Standard 2016 Project Standard 2019 SharePoint Workspace 2010 Less
Panel quick access is customizable and contains a set of commands that are independent of the tab currently displayed on the ribbon. You can move the Quick Access Toolbar to one of two possible locations, and add buttons to it to perform various commands.
Notes:
Intended action:
Add a command to the Quick Access Toolbar

Add a command that is not on the ribbon to the Quick Access Toolbar
Press the button and select the item from the menu Other commands.

In the list Select teams from select item Commands not on the ribbon.
Find the required command in the list and click Add to.
Advice: If you cannot find the command you need for teams, not included in the feed list, try setting teams select for all teams.
Removing a command from the Quick Access Toolbar
Right-click the command you want to remove from the Quick Access Toolbar and select in context menu paragraph Remove from Quick Access Toolbar.
Change the order of commands on the Quick Access Toolbar
Customizing the Quick Access Toolbar.
In the window Customizing the Quick Access Toolbar click the command you want to move and click the arrow Move up or Move down.
Grouping commands by inserting a separator between them
Commands can be grouped using a separator so that the Quick Access Toolbar looks like it contains sections.
Right-click the Quick Access Toolbar and select Customizing the Quick Access Toolbar.
In the list Select teams from select item Frequently used commands.
Please select <разделитель> and press the button Add to.
Use the arrows to place the separator where you want it. Move up and Move down.
Moving the Quick Access Toolbar
There are two options for placing the Quick Access Toolbar.
Top left corner in the window title. (default location)

Under the tape

If you are not satisfied with the current location of the Quick Access Toolbar, you can move it to a different location. If you think that the place next to the program icon is too far from the work area, you can move the panel closer. When the panel is positioned under the ribbon, it somewhat limits the size of the work area. So if you want to expand it, it's best to leave the Quick Access Toolbar where it is by default.
Click the button Customizing the Quick Access Toolbar (on the right side is the quick access bar).
Select the item in the list Place under the tape or Place over ribbon.
Customize the Quick Access Toolbar using the Options command
With the command Options you can add commands to the Quick Access Toolbar, delete them, and change their order.
Open the tab File.
On the menu reference select item Options.
Click the button Quick Access Toolbar.
Make the necessary changes.
Restore the default settings for the Quick Access Toolbar
Right-click the Quick Access Toolbar and select Customizing the Quick Access Toolbar.
In the window Customizing the Quick Access Toolbar press the button Restore default options and select the command Restore Quick Access Toolbar Only.
Export a customized Quick Access Toolbar
You can export your Ribbon and Quick Access Toolbar customizations to a file that other employees can import and use on their computers.
Open the tab File.
On the menu reference select item Options.
Click the button Quick Access Toolbar.
Click an item Import and export and select the command Export all settings.
Importing a customized Quick Access Toolbar
You can import a settings file to change the current appearance ribbons and quick access bars. Importing settings helps ensure the same look and feel for applications Microsoft Office for all employees or just on different computers.
Important: When you import a ribbon customization file, any previously customized ribbon and Quick Access Toolbar settings will be lost. If you may need to restore the current settings, you should export them before importing the settings file.
Open the tab File.
On the menu reference select item Options.
Click the button Quick Access Toolbar.
Click an item Import and export and select the command Import settings file.
For more information about customizing the Ribbon, see Customize the Ribbon in Office.
Reasons for the appearance of the green ball icon
A green ball icon is displayed if a custom group or command was added to the Quick Access Toolbar after customizing the Ribbon, but no icon was assigned to it.
This icon is used in the following cases:
when adding a custom group to the quick access panel;
so that you can distinguish the custom ribbon from the default ribbon.
Add an icon representing a custom group or team
Open the tab File.
In Group reference press the button Options.
Click the button Customizing the Ribbon.
In the window Customizing the Ribbon in the list Customizing the Ribbon select the added custom group or command.
Click an item Renameand then in the list Symbol click the icon.
In the dialog box Renaming press the button OK.
For more information on customizing the ribbon, see
IN microsoft program Word toolbar disappeared? What to do and how to get access to all those tools, without which work with documents is simply impossible? The main thing is, do not panic, as it disappeared and will return, especially since it is quite easy to find this loss.
As the saying goes, everything that isn't done is for the best, so thanks to the mysterious disappearance of the Quick Access Toolbar, you can learn not only how to get it back, but also how to customize the items that appear on it. So let's get started.
If you are using the version of Word 2012 and higher, you just need to press one button to return the toolbar. It is located in the upper right part of the program window and looks like an upward-directed arrow located in a rectangle.

Press this button once, the disappeared toolbar returns, press it again - it disappears again. By the way, sometimes it really needs to be hidden, for example, when you need to fully and completely concentrate on the content of the document, and so that nothing unnecessary is distracted.

This button has three display modes, you can choose the appropriate one just by clicking on it:
- Hide the ribbon automatically;
- Show only tabs;
- Show tabs and commands.

The name of each of these display modes speaks for itself. Choose the one that will be most convenient for you during your work.
If you are using MS Word 2003 - 2010, to enable the toolbar, you must perform the following manipulations.
1. Open the tab menu "View" and select item "Toolbars".
2. Check the boxes next to the items that you need to work.
3. Now they will all be displayed on the Quick Access Toolbar as separate tabs and / or tool groups.
Enabling individual toolbar items
It also happens that not the entire toolbar “disappears” (disappears, as we have already figured out), but its individual elements... Or, for example, the user simply cannot find any tool, or even a whole tab. In this case, you need to enable (configure) the display of these same tabs on the Quick Access Toolbar. This can be done in the section "Options".
1. Open the tab "File" on the quick access panel and go to the section "Options".

Note: IN early versions Word instead of button "File" there is a button "MS Office".
2. Go to the section in the window that appears "Customize Ribbon".

3. In the "Main Tabs" window, check the boxes opposite the tabs that you need.

- Advice: By clicking on the "plus" next to the name of the tab, you will see the lists of tool groups that these tabs contain. Expanding the "plus signs" of these items, you will see a list of tools presented in groups.
4. Now go to the section "Quick Access Toolbar".

5. In the section "Select teams from" select item "All teams".

6. Go through the list below when you meet there necessary tool, click on it and press the button Addlocated between the windows.

7. Repeat the same step for all other tools that you want to add to the Quick Access Toolbar.
Note:You can also delete unnecessary tools by pressing the button "Delete", and sort their order using the arrows located to the right of the second window.
- Advice: In chapter "Customize the Quick Access Toolbar"located above the second window, you can choose whether the changes you made will be applied to all documents or only to the current one.

8. To close the window "Options" and save your changes, click "OK".
Now on the quick access panel (toolbar), only the tabs you need, tool groups and, in fact, the tools themselves will be displayed. By properly configuring this panel, you can significantly optimize your working time, resulting in increased productivity.
"Panel quick launch"appeared in windows versions XP. Windows 10 also has Quick Launch, but you need to enable it first.
How to enable Quick Launch in Windows 10
Click on the "Taskbar" with the right mouse button. In the window that opens, move the mouse cursor over the "Panels" and in the drop-down list select "Create toolbar ...":
In the window that opens " New panel tools "select desired folder and click the "Select folder" button. After this action, a pinned link will appear on the "Taskbar" to access the folder you have selected:

Customizing the Quick Launch
To customize the created "Quick Launch", you need to disable docking of the "Taskbar" (you may have already disabled it earlier). To do this, right-click on an empty space on the "Taskbar" and uncheck the "Dock taskbar" item.
Now you can customize the appearance of the Quick Launch, for example, change the name or move it to another location on the Taskbar. After the settings, pin the "Taskbar" again.
Removing the Quick Launch Bar
To remove the panel, right-click on the "Taskbar", select the "Panels" section and uncheck the "Quick Launch Panel" box you created.
If you still have questions - ask them in the comments, we will be happy to help you.
Q: Where are the Quick Access Toolbar settings in the win10 registry?
Need to do backup all File Explorer and Quick Access Toolbar options.
Google gives out this folder: HKEY_CURRENT_USER / Software / Microsoft / Windows / CurrentVersion / Explorer / Ribbon
That's her?
Answer: why do you ignore
Message from dzu
Create a system image.
Do you like dancing with a tambourine? then go ahead
Question: ftp in Quick Access Toolbar windows explorer 10
Created ftp folder in Windows 10 Explorer Quick Access Toolbar.
The connection works, but I cannot change / delete it. There are no problems with other folders.
Answer: Found a solution:
Select the folder along with any other and delete.
Answer: Same!! The whole Internet was covered and NOTHING! \u003d ((
Question: When logging into Windows XP, the taskbar does not work
I go to Task Manager, delete "explorer.exe" and create a new process "explorer.exe".
How do I fix the problem?
Answer: labrob2013
Quote:
clicking on the taskbar itself should not lead to anything, you need to pull out the program shortcuts to the taskbar and click on them, or when you start applications, a button appears on the panel - a program that you can click to activate it ... So clarify what you are talking.)
Right button mouse click on Start -\u003e Properties -\u003e Taskbar
When something like this:
That is, what to click on ...)))
Question: Winstep Nexus Dock - Quick Access Pnel
- paid version of the program with advanced functionality.
Latest version - Winstep Nexus 12.2:
Winstep Nexus Dock is a panel for quick access to the most frequently used applications and opening documents (files, folders) in the style of a panel for the same purpose in Mac OS. Flexible settings allow you to position the panel anywhere on your desktop, providing many possibilities. The program uses an interactive menu with Drag-n-Drop support. To place the required application or folder on the panel, just drag the corresponding icon with the mouse.
Answer: bars22
To begin with, Xtreme is a different product ... which totally replaces the appearance of the desktop (Start menu, taskbar ...). Plus the creation of the same additional panels, since Ultimate is part of Xtreme (more details here - (in English)). Separately, Ultimate, can create only additional panels (not counting built-in widgets).
And of course Xtreme is the most full version, because in it there are many different "little things".
Question: Shortcut icons disappear in the quick launch bar of windows 10 home 64 bit
The shortcut icons in the quick launch bar are constantly disappearing. The same ones disappear. The labels themselves are working. When the program is launched using such shortcuts, the icon appears, but only until the next reboot. Not particularly critical, but annoying, however.
Maybe someone came across?
Answer:
Only they did not rewrite the half that was worth rewriting ...
Question: When entering Windows XP, the taskbar does not work (the explorer.exe process starts)
When entering Windows XP, the taskbar does not work (not clicked)
I go to Task Manager, delete "explorer.exe" and create a new process "explorer.exe".
How do I fix the problem?
Related entries:
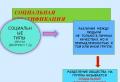 Presentation on the topic "social structure and social relations" Social stratification by Weber
 The rapid development and expansion of the fields of application of electronic devices is due to the improvement of the element base, - presentation
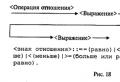 Boolean values, operations, expressions
 Von Neumann architecture presentation
 The history of the development of computer technology The beginning of the computer era


