Network settings in CentOS 7
In this material I will touch on a current topic with which almost any initial work with the server begins. Configuring basic network parameters in CentOS - ip address, dhcp, ipv6, dns, hostname, static routes, network cards and other network parameters.
We will move on the topic step by step from simple to complex, analyzing all the nuances in order and answering the most popular questions.
- Network settings on a CentOS 7 server
- How to get network settings via DHCP
- How to configure DNS in CentOS 7
- How to disable ipv6 in CentOS 7
- How to change hostname in CentOS 7
- Set the default gateway in CentOS 7
- Network Manager in CentOS 7
- System config network tui in CentOS 7
- How to add a static route in CentOS 7
- How to configure 2 IP addresses on one interface
- How to do a network restart in CentOS 7
- How to find out the IP address in CentOS 7
- What to do if CentOS does not see the network card?
- What to do if the network is not available on CentOS?
- Using network utilities traceroute, dig in CentOS
- Configuring 802.1Q VLAN in CentOS 7
Network settings on a CentOS 7 server
The first time we encounter the network settings of a CentOS server is when we perform the installation. On the initial setup screen there is a separate item regarding setting up network interfaces:
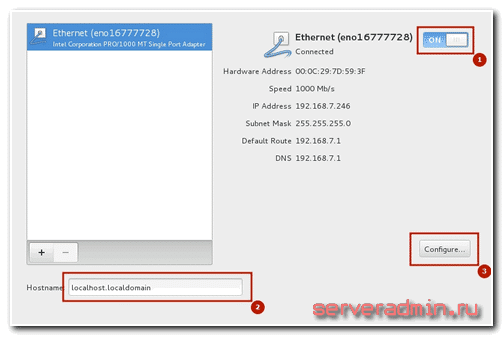
Having entered it, we see a list of connected network cards. Each of them can be turned on using the corresponding slider (point 1 in the picture). When the interface is activated, it automatically receives settings via dhcp. You can see the result of dhcp work right there. If you are not happy with these settings, you can edit them by clicking configure(point 3 in the picture). Here you can also set hostname(point 2 in the picture):
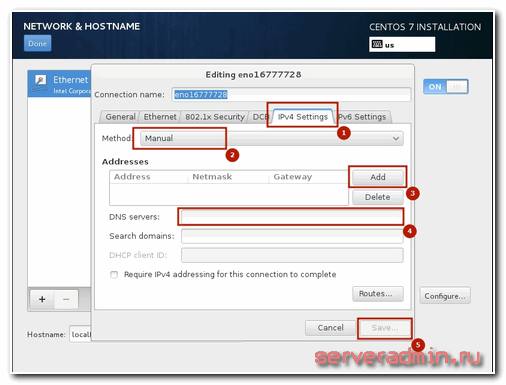
By opening the Ehernet additional settings window, you can change the name of the network interface, specify the IP settings (item 1 in the picture), select manual settings(point 2 in the picture), assign ip address(point 3 in the picture), install dns server(point 4 in the picture) and save the network settings (point 5 in the picture):
After completing the remaining settings, the installation will begin. After installation, you will have a server with the network settings you specified.
Now let's consider another situation. You did not create the server, and therefore the network configuration, but now you need to look at it or change it. The server console is at your disposal, and we will work in it. If you installed from a distribution kit minimal, then when you try to view the network settings using the command ifconfig in the console you will see the following:
Bash: ifconfig: command not found
or in Russian version:
Bash: ifconfig command not found
To work with ifconfig and other network utilities you need to install the package net-tools. Let's do it:
# yum -y install net-tools.x86_64
Now you can see the network settings:
# ifconfig
eno16777728: flags=4163
inet 192.168.159.129
RX packets 319 bytes 36709 (35.8 KiB)
TX packets 256 bytes 148817 (145.3 KiB)
lo: flags=73
inet6::1 prefixlen 128 scopeid 0x10
RX packets 6 bytes 624 (624.0 B)
RX errors 0 dropped 0 overruns 0 frame 0
TX packets 6 bytes 624 (624.0 B)
TX errors 0 dropped 0 overruns 0 carrier 0 collisions 0
If you do not want to install an additional package, you can use a simpler command ip with parameters:
# ip addr
1:lo:
inet 127.0.0.1/8 scope host lo
inet6::1/128 scope host
valid_lft forever preferred_lft forever
2: eno16777728:
inet 192.168.159.129
/24 brd 192.168.159.255 scope global dynamic eno16777728
valid_lft 1709sec preferred_lft 1709sec
inet6 fe80::20c:29ff:fe7d:593f/64 scope link
valid_lft forever preferred_lft forever
We have seen the network configuration, now let's edit it. Let's say we need to change the IP address. To do this, go to the /etc/sysconfig/network-scripts directory and open the file for editing ifcfg-eth0. This file has approximately the following content:

Using the settings from this file, we get the IP address via dhcp. To manually register a static IP, we bring the file to the following content:
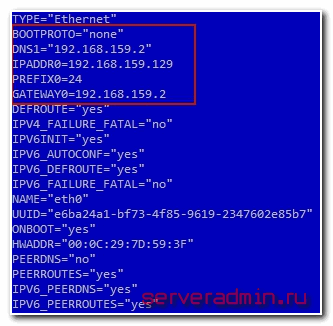
We have changed the parameters:
BOOTPROTOс dhcp on noneDNS1 specified the dns server IPADDR, configured the static IP address PREFIX, specified the GATEWAY subnet mask. configured the default gateway
For the changes to take effect, you need to re-read the network settings:
Restarting network (via systemctl): [OK]
Check if the new network configuration has been applied:
#ifconfig:
eno16777728: flags=4163
inet 192.168.159.129
netmask 255.255.255.0 broadcast 192.168.159.255
inet6 fe80::20c:29ff:fe7d:593f prefixlen 64 scopeid 0x20
ether 00:0c:29:7d:59:3f txqueuelen 1000 (Ethernet)
RX packets 672 bytes 71841 (70.1 KiB)
RX errors 0 dropped 0 overruns 0 frame 0
TX packets 572 bytes 290861 (284.0 KiB)
TX errors 0 dropped 0 overruns 0 carrier 0 collisions 0
Everything is fine, the new network interface settings are installed.
How to get network settings via DHCP
Now let's consider the opposite situation. Let's say your network card has some settings set manually. But you want your computer to receive network settings via dhcp as a client. To do this, you need to perform the opposite operation to what we did before. That is, open the file /etc/sysconfig/network-scripts/ifcfg-eth0 and delete the lines there with the parameters DNS, IPADDR, PREFIX, GATEWAY and specify the value in the BOOTPROTO parameter "dhcp". Save the file and restart the network:
# /etc/init.d/network restart
Then we check whether our client has received the settings via dhcp.
How to configure DNS in CentOS 7
The current dns server settings in CentOS can be viewed in two places:
- In the file with the settings of the network card ifcfg-eth0, which we have previously edited several times.
- In the /etc/resolv.conf file
Why they are now in two places, I don’t know, but before, the DNS server settings in some distributions, I don’t remember exactly which ones, were indicated only in resolv.conf, but at some point this changed. And all network settings began to be stored in one file along with the address, gateway, mask, and so on. If you now edit the resolv.conf file and add some server dns there, then after a reboot they will be replaced with the values from the ifcfg-eth0 file.
So in order to set the DNS server parameters, you need to edit the ifcfg-eth0 network settings file, adding as many servers as required.
For example like this:
DNS1="192.168.159.2"
DNS2="8.8.8.8"
DNS3="8.8.4.4"
To apply the settings, save the file and restart the network, everything is as usual. After rebooting the server, the dns settings will be written to the resolv.conf file
# cat /etc/resolv.conf
# Generated by NetworkManager
nameserver 192.168.159.2
nameserver 8.8.8.8
nameserver 8.8.4.4How to disable ipv6 in CentOS 7
Currently in active use of the protocol ipv6 no, and it is not needed in normal work. Although we have been scared for many years that there are practically no free IP addresses left, in reality there are still enough for everyone. So for practical reasons, ipv6 is not currently needed on the server and can be disabled.
Before disabling ipv6, just in case, you need to check which programs use it in their work. This is necessary in order to avoid errors in their operation by first disabling ipv6 in the configurations. In order to see what programs are hanging on the ipv6 interface, use the netstat command:
# netstat -tulnp
tcp 0 0 127.0.0.1:25 0.0.0.0:* LISTEN 2317/master
tcp 0 0 0.0.0.0:22 0.0.0.0:* LISTEN 1333/sshd
tcp6 0 0::1:25:::* LISTEN 2317/master
tcp6 0 0:::22:::* LISTEN 1333/sshd
udp 0 0 0.0.0.0:49252 0.0.0.0:* 694/avahi-daemon:r
udp 0 0 0.0.0.0:123 0.0.0.0:* 715/chronyd
udp 0 0 0.0.0.0:5353 0.0.0.0:* 694/avahi-daemon:r
udp 0 0 127.0.0.1:323 0.0.0.0:* 715/chronyd
udp6 0 0:::123:::* 715/chronyd
udp6 0 0::1:323:::* 715/chronyd
All lines with ::: are ipv6 protocol. In my case it is sshd, postfix and chronyd. Let's disable ipv6 for them and leave only ipv4.
Let's start with sshd. Open the settings file /etc/ssh/sshd_config and find the lines:
#AddressFamily any
#ListenAddress 0.0.0.0
Let's uncomment them and change them. It should look like this:
AddressFamily inet
ListenAddress 0.0.0.0
Now open the postfix settings file /etc/postfix/main.cf. We are looking for the line there:
#inet_protocols = all
Change to:
Inet_protocols = ipv4
Disable ipv6 in chronyd. To do this, create the file /etc/sysconfig/ chronyd and add the line:
OPTIONS=-4
Now we disable ipv6 in CentOS. Open the file /etc/ sysctl.conf and add the lines there:
Net.ipv6.conf.all.disable_ipv6 = 1
net.ipv6.conf.default.disable_ipv6 = 1
Editing the /etc/sysconfig/ file network, adding there:
NETWORKING_IPV6=no
IPV6INIT=no
Reboot and check the result:
#reboot#ifconfig
eno16777728: flags=4163
ether 00:0c:29:7d:59:3f txqueuelen 1000 (Ethernet)
RX packets 2301 bytes 243024 (237.3 KiB)
RX errors 0 dropped 0 overruns 0 frame 0
TX packets 2138 bytes 1327955 (1.2 MiB)
TX errors 0 dropped 0 overruns 0 carrier 0 collisions 0
lo: flags=73
inet 127.0.0.1 netmask 255.0.0.0
loop txqueuelen 0 (Local Loopback)
RX packets 0 bytes 0 (0.0 B)
RX errors 0 dropped 0 overruns 0 frame 0
TX packets 0 bytes 0 (0.0 B)
TX errors 0 dropped 0 overruns 0 carrier 0 collisions 0
There is no mention of inet6 and ipv6 format addresses anywhere. So everything is fine, we have disabled ipv6 in CentOS. Now let's check the list of open ports:
# netstat -tulnp
Active Internet connections (only servers)
Proto Recv-Q Send-Q Local Address Foreign Address State PID/Program name
tcp 0 0 127.0.0.1:25 0.0.0.0:* LISTEN 2291/master
tcp 0 0 0.0.0.0:22 0.0.0.0:* LISTEN 1322/sshd
udp 0 0 0.0.0.0:123 0.0.0.0:* 2453/chronyd
udp 0 0 0.0.0.0:5353 0.0.0.0:* 697/avahi-daemon: r
udp 0 0 127.0.0.1:323 0.0.0.0:* 2453/chronyd
udp 0 0 0.0.0.0:57259 0.0.0.0:* 697/avahi-daemon:r
All ports are ipv4. Everything is in order, our task is completed.
How to change hostname in CentOS 7
By default, during installation CentOS puts the hostname localhost.localdomain. If you haven't changed it, you can do it later. First, let's check what hostname you have set. This is done using the command in the console hostname, or using uname:
#hostname
localhost.localdomain# uname -n
localhost.localdomain
In order to change the hostname in CentOS, you need to edit the file /etc/hostname. Let's check its contents:
# cat /etc/hostname
localhost.localdomain
Let's edit this file to change the hostname:
# mcedit /etc/hostname
centos.localhost
Save the file and check:
#hostname
centos.localhost
Everything is ok, we changed the hostname to centos.localhost
Set the default gateway in CentOS 7
If for some reason you did not set the default gateway when setting up network parameters, you can do this manually. First, let’s check which default gateway is currently installed in the system:
# netstat -nr
Kernel IP routing table
0.0.0.0 149.154.71.254 0.0.0.0 UG 0 0 0 eth0
10.8.0.0 10.8.0.2 255.255.255.0 UG 0 0 0 tun0
10.8.0.2 0.0.0.0 255.255.255.255 UH 0 0 0 tun0
149.154.70.0 0.0.0.0 255.255.254.0 U 0 0 0 eth0
192.168.1.0 10.8.0.2 255.255.255.0 UG 0 0 0 tun0
The line with Destination 0.0.0.0 specifies the gateway address. If you don’t have it, or the wrong gateway is set in the Gateway field, you can change this. Set the default gateway:
Route add default gw 192.168.0.1Network Manager on CentOS 7
CentOS by default has a service that manages all network connections - NetworkManager. It constantly monitors network settings and, using a configuration management daemon, makes appropriate changes to active network devices. It supports standard ifcfg configuration files.
List of network utilities and applications:
NetworkManager Standard networking daemon nmtui
Simple Text Interface (TUI) for NetworkManager nmcli
Command line utility that allows users and scripts to interact with NetworkManager control-center
GNONE shell GUI utility nm-connection-editor GTK+ 3 applications required for some tasks not supported by control-center
Users do not interact with NetworkManager on CentOS directly; they use graphical and command line utilities to do so. One such utility is system config network tui.
System config network tui in CentOS 7
To manage network settings in CentOS, you can use a graphical utility nmtui.
It is very easy to check its presence in the system.
Just run it in the console:
If you don't have it installed, it's very easy to fix. Install in CentOS system config network tui:
# yum install NetworkManager-tui
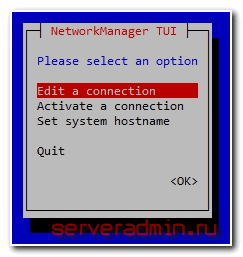
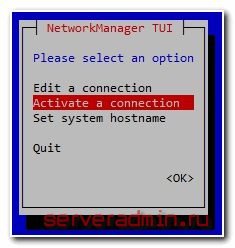
By using tui you can specify any network settings that we did before through the command line and editing configuration files. Let's do that. Call the program:
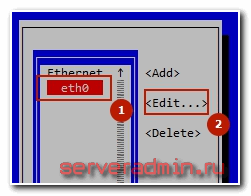 Select the first item Edit a connection, then select the network interface and click “Edit”:
Here we can change the name of the network card, mac address, specify the type of network settings - manual or dhcp, manually specify the ip address, gateway address, dns server, add routes and some other settings:
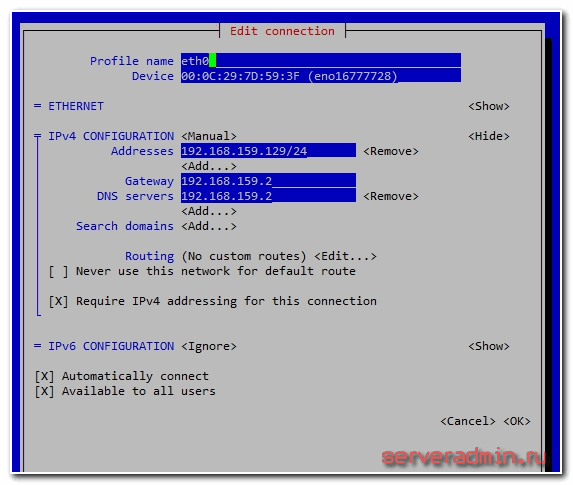
After editing is complete, save the settings by clicking OK.
If you select the item on the first screen of the utility Set System Hostname, you can quickly specify the hostname. The result will be the same as we did before in the console.
How to add a static route in CentOS 7
To control routing on CentOS, you may need to add a static route. This is quite easy to do using the console command. First, let's check the existing routes using netstat:
# netstat -nr
Kernel IP routing table
Destination Gateway Genmask Flags MSS Window irtt Iface
In this case, we have one route for the address 0.0.0.0/0.0.0.0; the gateway is 192.168.159.2, which is also the default gateway. That is, in essence, there are no static routes. Let's add one of them.
Let's say we have a subnet 192.168.8.0 mask 255.255.255.0, traffic to this subnet is routed by the gateway 192.168.159.5 Add a route:
# route add -net 192.168.8.0/24 gw 192.168.159.5
Check if the added route has appeared in routing table:
# netstat -nr
Kernel IP routing table
Destination Gateway Genmask Flags MSS Window irtt Iface
0.0.0.0 192.168.159.2 0.0.0.0 UG 0 0 0 eno16777728
192.168.159.0 0.0.0.0 255.255.255.0 U 0 0 0 eno16777728
Everything is ok, the route has been added. But after reboot this static route will be deleted. To prevent this from happening and to save the added routes, you need to write them to a special file. In the /etc/sysconfig/network-scripts folder, create a file called route-eth0 the following content:
# mcedit /etc/sysconfig/network-scripts/route-eth0
192.168.8.0/24 via 192.168.159.5
Reboot and check if the route is in place:
# reboot# netstat -nr
Kernel IP routing table
Destination Gateway Genmask Flags MSS Window irtt Iface
0.0.0.0 192.168.159.2 0.0.0.0 UG 0 0 0 eno16777728
192.168.8.0 192.168.159.5 255.255.255.0 UG 0 0 0 eno16777728
192.168.159.0 0.0.0.0 255.255.255.0 U 0 0 0 eno16777728
Everything is fine, the static route has been added.
How to configure 2 IP addresses on one interface
If you need to configure 2 IP addresses on one interface in CentOS, then doing this is quite simple. Let's use the ifconfig command. First, let's check the list of network interfaces:
# ifconfig
eno16777728: flags=4163
inet 192.168.159.129 netmask 255.255.255.0 broadcast 192.168.159.255
ether 00:0c:29:7d:59:3f txqueuelen 1000 (Ethernet)
RX errors 0 dropped 0 overruns 0 frame 0
TX errors 0 dropped 0 overruns 0 carrier 0 collisions 0
lo: flags=73
inet 127.0.0.1 netmask 255.0.0.0
loop txqueuelen 0 (Local Loopback)
RX errors 0 dropped 0 overruns 0 frame 0
TX errors 0 dropped 0 overruns 0 carrier 0 collisions 0
Let's add another IP address 192.168.159.120 to the eno16777728 interface:
# ifconfig eno16777728:1 192.168.159.120 up
Let's check what happened:
#ifconfig
eno16777728: flags=4163
inet 192.168.159.129 netmask 255.255.255.0 broadcast 192.168.159.255
ether 00:0c:29:7d:59:3f txqueuelen 1000 (Ethernet)
RX packets 254 bytes 30173 (29.4 KiB)
RX errors 0 dropped 0 overruns 0 frame 0
TX packets 204 bytes 27658 (27.0 KiB)
TX errors 0 dropped 0 overruns 0 carrier 0 collisions 0
eno16777728:1: flags=4163
inet 192.168.159.120 netmask 255.255.255.0 broadcast 192.168.159.255
ether 00:0c:29:7d:59:3f txqueuelen 1000 (Ethernet)
lo: flags=73
inet 127.0.0.1 netmask 255.0.0.0
loop txqueuelen 0 (Local Loopback)
RX packets 11 bytes 940 (940.0 B)
RX errors 0 dropped 0 overruns 0 frame 0
TX packets 11 bytes 940 (940.0 B)
TX errors 0 dropped 0 overruns 0 carrier 0 collisions 0
Everything is fine, we added a second IP address to the same interface. But after a reboot, the additional address will not be saved. To save it, you need to create an interface settings file in the /etc/sysconfig/network-scripts folder
# mcedit /etc/sysconfig/network-scripts/ ifcfg-eno16777728:1
DEVICE=eno16777728:1
BOOTPROTO=static
IPADDR=192.168.159.120
NETMASK=255.255.255.0
ONBOOT=yes
Save the file, reboot and check what happened. The second IP address must be in place.
How to do a network restart in CentOS 7
I have already touched on this issue earlier, but just in case, we will repeat it separately. Let's say you've made some changes to your network configuration. How can I apply these settings without rebooting the server? Very simple. To restart the network in CentOS, just use the command:
# /etc/init.d/network restart
The NetworkManager service will re-read all network settings and apply the changes.
How to find out the IP address in CentOS 7
In order to quickly find out the current IP address in CentOS, you need to use the following commands:
# ifconfig | grep inet
inet 192.168.159.129
netmask 255.255.255.0 broadcast 192.168.159.255
inet 127.0.0.1 netmask 255.0.0.0
Or the second option for determining the local IP address:
# ip addr | grep inetinet 127.0.0.1/8 scope host lo
inet 192.168.159.129
/24 brd 192.168.159.255 scope global eno16777728
Both commands allow you to quickly find out your IP address.
What to do if CentOS does not see the network card?
You installed the server, booted up and discovered that there is not a single network card in the system. What to do in this case? First of all, look at the output of the dmesg command and look for a memory of your card there. Perhaps it is in the system, just not activated. You can activate it using nmtui, which I told above.
There is a menu item Activate connection, you need to go into it and activate your network card. After this you can configure it.
If your network card is not in the system, then you need to search the Internet for information about this network card by model. Perhaps there will be drivers for it in the repositories. This is a fairly common situation. Most often, drivers will be found and they will need to be installed correctly.
There is still a possibility that you will not see your card when outputting the ifconfig command if a network wire is not plugged into this card. To be sure to view all interfaces, you must use the -a switch:
# ifconfig -a
There is another way to look for a network card in the system. Install the package pciutils:
# yum -y install pciutils
And look at the output of the command:
#lspci | grep Ethernet
If the network card is seen by the system, then there should be something like this:
02:00.0 Ethernet controller: Intel Corporation 82545EM Gigabit Ethernet Controller (Copper) (rev 01)
If the output is empty, then the network card is not defined.
What to do if the network is not available on CentOS?
Let's say you are trying to ping some address, for example 8.8.8.8, and you receive a response that the network is not available:
#ping 8.8.8.8
And in response you get:
Connect: Network is unavailable
This situation may arise if you do not have a default gateway installed. You can add it using the command:
# route add default gw 192.168.0.1
If the problem is not with the gateway, then you need to check the settings of the network adapters. If there is no active adapter, then you will also receive a message that the network is not working. It is necessary that at least one network adapter is correctly configured on the system. How to do this is written above.
Using network utilities traceroute, dig in CentOS
To diagnose network connections in CentOS, it is useful to use special utilities. But if you used the minimal installation, then most likely they will not be on the system. For example, the popular utility traceroute When you try to launch it, it will display the following message:
# traceroute ya.ru
bash: traceroute: command not found
It needs to be installed separately from the repository:
# yum -y install traceroute
Same thing with the popular program dig to work with DNS servers and records:
# dig ya.ru
bash: dig: command not found
For this network utility to work, you must install the package bind-utils:
# yum -y install bind-utilsConfiguring 802.1Q VLAN on CentOS 7
To raise a tagged interface on CentOS, you first need to check kernel support 8021q:
#modprobe8021q
If there are no error messages, then everything is fine. If the module is not found, you need to rebuild the kernel modules, enabling support for the required module.
Now create a configuration file for vlan in /etc/sysconfig/network-scripts:
# mcedit ifcfg-vlan4000
VLAN=yes
DEVICE=eno16777728.2000
BOOTPROTO=static
ONBOOT=yes
TYPE=Vlan
IPADDR=192.168.100.2
NETMASK=255.255.255.0
I draw your attention to what is highlighted in bold. In all the instructions on the Internet that I came across, this parameter was indicated as TYPE=Ethernet, but with this setting the interface with vlan did not rise, an error appeared:
Error: no device found for connection ‘System vlan4000’.
Only after I fixed it did everything work as it should. So save and activate the interface:
# ifup vlan4000
Connection successfully activated (D-Bus active path: /org/freedesktop/NetworkManager/ActiveConnection/7)
Checking our vlan:
# ip ls
1:lo:
link/loopback 00:00:00:00:00:00 brd 00:00:00:00:00:00
2: eno16777728:
link/ether 00:0c:29:7d:59:3f brd ff:ff:ff:ff:ff:ff
3: vlan4000@eno16777728:
link/ether 00:0c:29:7d:59:3f brd ff:ff:ff:ff:ff:ff
Everything is fine, the tagged interface is up. By analogy, you can create several more similar interfaces, not forgetting to change their names and addresses.
This concludes my voluminous material on the topic of network setup in CentOS.
I will be very glad to receive comments, remarks, and corrections. They probably will. By creating such materials, I first of all learn myself and improve my knowledge in the subject area. There may be errors and typos here somewhere, although I check everything on live systems when writing manuals, but inaccuracies and typos are still possible.
Many thanks for the article: http://serveradmin.ru
Related posts:
 How to clear the browser on Android
 How to connect an Xbox 360 or One gamepad to your computer
 How to install Tor browser on your computer?
 MTS Unlimited - weaning off greed: paid wifi distribution - bypass
 Programs for watching TV over the Internet: the best applications for desktop and mobile systems


