Test mode like. Disable test mode in Windows. Using the Universal Watermark Disabler
Initially, the "seven" is configured in such a way that it does not allow unsigned drivers to be installed. This is a special system protection. It is removed if the test mode is activated in Win 7.
Test Mode Setting
The test mode of Windows 7 can be turned on as a result of installing any software, the installer of which has a built-in script. An ordinary user will easily notice a change in the system by the inscription at the bottom of the screen. It's small, but still seriously distracting.
In this case, you will need to deactivate this function.
But there are also opposite situations, for example, when you need to install custom software. And this cannot be done without activating work with unsigned drivers.
Disconnection
Anyone who gets in the way of the inscription on the desktop will be interested in how to turn off the test mode in Windows 7. This is done from the Command Line. To start it open "Start", find the section in the full list "Standard", the desired item is located there. Right click on it, and then "Starting from ...".

In the text box with the blinking cursor, write the query bcdedit.exe -set loadoptions ENABLE_INTEGRITY_CHECKS, and then press Enter, then - bcdedit.exe -set TESTSIGNING OFF

Note: you will not be able to insert text, you need to type it in manually from the keyboard.
All that remains is to reboot the system.
Important: if you open the command line without administrator rights, then entering the command will be accompanied by the message "Access denied"... This indicates that you have missed the item. "Starting from ...".
Activation
Test mode activation is required to install unsigned drivers, such as those developed by users, that are required to synchronize a device with a computer. But there are other reasons why this function is needed.
Restart Command Prompt following the instructions from the previous section. Activate the first request again. A success notification will be displayed, then write bcdedit.exe -set TESTSIGNING ON
For some time now, users began to be bothered by a pop-up window in the tray area, signaling that the operating system has entered a "test mode". This phenomenon is observed in almost all OS versions older than the "seven".
In our short article we will look at the test mode of Windows 7, as well as how to switch from it to normal operation. Generally speaking, this way of operating the OS is not intended for the average user.
Its purpose is to provide a special environment for software developers whose programs do not have a so-called digital signature - that is, a Microsoft certificate confirming the reliability of the program, as well as an environment for debugging device drivers.
The automatic transition to this mode sometimes occurs against the will of the user when he launches this or that program. For example, this happens when running some service utilities like "OpenedFilesView" and others.
Sometimes installers put the system into this state before shutting down and rebooting.
In all such cases, it is advisable to bring everything back to normal and disable this mode in some way. Let's find out how.
Shutdown procedure
The only known way to solve our problem is to use the command line. On the other hand, this can be done both from the console (command line window) and from the window - execute the "Start" menu. Consider the console option as more versatile:

After the performed manipulations, the computer will switch from debugging to normal operation, and the panel in the tray area will disappear from view. We figured out how to disable test mode in Windows 7. Is it possible to enable debug mode in the same way? Yes, as you have already noticed, there is a word "OFF" among the parameters of the above console command.
Replacing it with "ON" will have the exact opposite effect. As you can see, everything turned out to be extremely simple.
If the problem bothers you too often, then it is better to create a text file with the .bat extension in Notepad in advance and include the required command in it.
An urgent problem in our time, such a problem as disabling the test mode for Windows worries many users. It turns out that the problem is that as soon as it starts, the user himself may suspect on the screen of his device such inscriptions as "test mode". After such an inscription, the name of the current operating system and plus the version of the assembly are usually indicated there.
In fact, the device will not work worse from such an inscription, but it will not get better either. There is just one more problem, not everyone is ready to put up with the decrease in space, as a result of the appearance of the inscription. Further, a very important question arises for the user: is it possible to put it where? and how to actually do it?
Test mode in the Windows 10 operating system
Everyone knows that a lot of applications have always been developed for an operating system like Windows, and the difference in them is not only in hardware, but also in the OS. Especially in order to learn and test any application, you can simply activate the test mode. Moreover, a couple of versions, such as 64-bit ones, can remove some restrictions on the type of security, which is quite convenient to use.
In order to pass the activation of the test mode in Windows, you just need to do certain actions:
- run command line as administrator;
- enter the command there bcdedit.exe -set TESTSIGNING ON: \\ go to ok (enter).
That's how easily the test mode was activated in Windows.
The desire to enjoy the disabled test mode is quite real. Indeed, quite often it happens that such a mode is simply turned on arbitrarily. Then it is better for the user to turn it off and do it as soon as possible. After all, not everyone knows that it is in the test mode that the system is most vulnerable and irreparable harm can be caused if precautions are not taken in such a situation in time.
Here's how to turn it off yourself:
- we call the command line with the already known methods;
- strictly run it as administrator;
- here we enter the following command:
- let's press enter now.
- restart your computer.
Usually this method helps, but there are cases when you cannot turn off the test mode when using it. For such a case, one more step has been found, which often helps. Here's what you need to do and how to remove Windows 10 test mode using another method:
- We performed 1-4 steps of the previous method.
- Then we use this command: bcdedit.exe -set loadoptions ENABLE_INTEGRITY_CHECKS
- Now we are already using this command: bcdedit.exe -set TESTSIGNING OFF
Be sure to restart your computer.

It is important to take into account such points that all the methods that were provided to you above are perfect for 7-ki, 8-ki, 10-ki systems.
How to hide the label
Not all users are ready to disable such a test mode, and many simply need it, but the inscription gets in the way. You can just hide such an annoying inscription and that's it.
You just need to download a program called Universal Watermark Disabler, run it and then click instay.
A window will pop up and there you should click "Yes". Then in the next window "ok". We turn off the device and you can turn it on and check its operation. Now the program will be connected, but the unpleasant window will simply hide and will not cause inconvenience.
A little about what the test mode is for. From Microsoft website:
That is, in test mode, you can use programs whose drivers are not digitally signed by Microsoft.
Test mode Windows 7. How to enable and how to disable.
Some programs require Windows to go into test mode during installation. I personally ran into this while trying to install a small utility called OpenedFilesView. When installing, she asked whether to switch to test mode for signing drivers, which I agreed to for the sake of interest.
How to disable test mode windows 7
Have you got the inscription: "Test mode" and the build number? This happens if you inadvertently, when installing a program, chose the permissions to go to test mode, which you entered after restarting the computer. Let's take a look at how to turn off the test mode in windows 7 and get rid of the annoying text in the lower right corner of the desktop.
Perhaps, like me, you switched to test mode after installing a small program called OpenedFilesView. When it is installed, the installer asks the question "Should I go to test mode?" and the user, considering this a useless action, agrees.
As it turned out, the problem, if you can call it that, can be easily solved. Windows 7 - test mode how to disable? Just one line!
Everyone has already remembered that we have used the Run utility many times in our articles - this case is no exception.
So, go there using Win + R and enter the following command:
Bcdedit.exe -setTESTSIGNINGOFF.
After clicking on "OK" and rebooting, the system will exit the test mode.
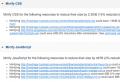
So. To disable test mode in Windows 7, open "Start" - "Run" (or press the key combination Win + R) and enter the following:
Bcdedit.exe -set TESTSIGNING OFF
But remember, if you ever need to turn it back on, you will need to perform the same actions, but use ON instead of OFF. That is, to enable test mode in Windows 7, open "Start" - "Run" and enter the following:
Bcdedit.exe -set TESTSIGNING ON
Now you are convinced that turning off the test mode of windows 7 is very easy.