What to do in Photoshop when you're bored. How to make your work in Photoshop more efficient. Let's go back for a second: how the pictures were taken
Here is a series of lessons that teach you how to use the graphic editor Photoshop - an incredibly popular and indispensable tool in web design, with the help of which not only buttons, banners and logos are created for the site, but even entire layouts. The design of almost any site you visited was originally drawn in Photoshop, so knowledge of this program will be definitely useful for a webmaster, although the skills of image processing and creating your own drawings will not harm a common PC user either. Digitizing photos, retouching old photographs, creating postcards and collages are just the beginning of a long list of useful actions that the editor allows you to do, and a series of lessons will help you get comfortable with it.
Bookmark this page so as not to lose the table of contents and consistently study article after article, comprehending more and more new techniques of working in Photoshop.
But what will you learn in these lessons?
- 1 Getting Started in Photoshop - Quick Selection and Filling
Here you will get acquainted with the program's interface, learn what the main interface elements are for, learn how to create documents and save them, master the selection of areas on the canvas. Also from the lesson you will understand how to fill areas with color, you will understand the principles of working with the program. Once you have mastered the information, you will learn to perform simple actions and will be able to independently explore other editor tools.
- 2 Layers and text
Everything photoshop images are built on layers. That is why editing in the program is so convenient. The lesson will tell you what layers are, why they are needed and how to work with them. In addition, it describes techniques for creating and processing labels, as well as moving objects on the canvas. After completing the lesson, processing multi-layered documents will not be a problem for you.
- 3 Filters
You will be introduced to a huge library of image-changing scripts. The filters of the editor can not only give the finished image one or another effect, but even create new objects and frame the photo.
- 4 Working with images
The article provides the basics of processing existing graphic files... Editing several images at once, moving objects from one drawing to another, resizing and removing unnecessary parts - this is just an incomplete list of lesson topics.
- 5 Transformation
The lesson will teach you to scale image elements, change proportions, tilt, distort and deform them
- 6 Drawing - brush and pencil
The first in a series of articles about tools for creating your own masterpieces. For a long time, computer technology has developed to the point that it allows you to simulate drawing on paper. You will learn to create with a virtual pencil and brush - sketches and watercolor paintings can now be easily drawn and distributed on electronic media, making an unlimited number of copies and not worrying about the safety of labor.
- 7 Drawing - Shapes
Freehand creation is one thing, and accuracy and speed are sometimes paramount. The lesson tells about the tools with which in just a few clicks you can create perfectly flat geometric shapes of the given dimensions. From a simple square to an ellipse, a star, and even a musical note, this article covers everything.
- 8 Drawing - paths and bitmaps
You will remember once and for all how a vector differs from a raster, what the pros and cons of both approaches, and you will also learn why shape outlines are needed in Photoshop and what pixel mode does.
- 9 Drawing - Pen tool
Continuing with the paths, explore the Pen tools. Purpose, method of application, description of parameters, and as a result you will learn how to draw atypical contours and create the most complex geometric objects.
- 10 Drawing - Magnetic pen tool
The Magnetic Pen tool has become so popular that it is called the Magnetic Pen, although there is no such separate tool in Photoshop. What this function allows you to do, why users love it so much and how it will help you personally - read the article.
- 11 Image retouching tools
To use these editor functions for the Internet, you do not need to be a layout designer, or a designer, or a webmaster - nothing at all. It is enough to be an active user social networks... How to make your face more beautiful, remove moles and freckles? How can I process an old scanned photo so that colors become brighter, and scratches, spots and dust particles are not so noticeable? How to carefully cut an object, move it or clone it? Where is the tool that will help you get rid of the red-eye effect in a photo in just a couple of minutes? Look for answers to these and other questions in the article.
- 12 Image correction tools
You already know so much that mastering new tools is not a problem. I just had to make an overview with a description of the possibilities to improve the quality of pictures - to lighten where it is too dark, darken where it is overexposed, blur and sharpen, mix and smear colors. Generally, additional Information how else to make the image better is waiting for you in the lesson.
The pinnacle of creativity for the web is rendering site templates. When most of the tools are mastered, and the skills are enough to draw and dividers with shapes, and buttons for menus, and logos, and beautiful inscriptions, nothing prevents you from creating a good, complex layout. The article tells what a standard template consists of, describes the principle of creation, and also teaches you how to cut a layout using tools that are previously unfamiliar to you.
Paying attention to each of the lessons, analyzing practical examples and experimenting on your own, as you master the course, you will go from beginner to advanced user. photoshop programs and you will be able to delve into it yourself by going to new level mastering, and will help you with this strong and reliable foundation laid by the cycle of our articles.
What can be done with Photoshop?
It's no secret that one of the most powerful and functional graphic editors in the world is Adobe Photoshop ... Its capabilities are truly impressive:
- creating a magnificent collage of several photos (for example, the simplest one can be seen in the lesson "");
- professional retouching of the face: remove acne and skin imperfections, enlarge eyes and eyelashes, correct nose and chin;
- improve the quality of images: darken or lighten the photo, add missing elements (clouds, monuments);
In general, use Photoshop as famous graphic designersand newcomers to this amazing profession, with which you can create your own new, bright and fabulous world.
Figure # 1.
How to master the Photoshop graphic editor for a novice designer?
Did you know that mastering the Photoshop graphic editor is not so difficult. And yes ... you can do that too. To do this, you just need to repeat a few lessons that will help you understand the purpose of this or that. It is the tools graphic editor - the main "weapon" of the designer. With their help, the goal is achieved.
Take for example healing Brush tool... Using it, you can easily remove acne from your face in the photo, as well as give it a matte or glossy shade. Remember those gorgeous photos on the covers of glossy magazines. This smooth skin a face that has not a single defect ... oh, my heart fluttered. Of course, to achieve this result, you will need to master more than one photoshop tool and a lot of time, but the Healing Brush will get you started. And then, you can connect your imagination and you will definitely succeed.
Our site offers several simple photoshop lessonsthat will allow you to get basic concepts about one or more tools, which later will allow you to work in Adobe Photoshop in a professional and easy way.
Usually when it comes about digital overlay, people think of exposure overlay first. This is correct, but it could be much broader. There are several situations where digital overlay can come in handy. It can not only help to create more interesting photobut will also make your shooting experience easier. In this article, I'll walk you through how I use digital blending in Photoshop to create interesting compositions.
I took a photo of the Batu Cave in Malaysia. And I decided to add a few pigeons from the series of pictures taken, combining them into a single image using digital overlay technique.
Selecting images
Here are the raw photos I'm going to use. You see the pigeons are in different places in each of the photos.

We open Photoshop

Let's go back for a second: how the pictures were taken
Note that there is a background layer at the bottom. This image was taken with different settings than the doves. I did this because usually, before taking additional photos, such as with pigeons, I first take a few photos with BEST settings cameras for this situation. In this case, they were: ISO 100, aperture f / 8, shutter speed 1/30.
However, the shutter speed of 1 / 30th of a second was too long to capture the movement of the birds. So I needed a faster shutter speed, which resulted in the following settings: ISO 800, f / 5 and 1/640 second. This allowed me to freeze the movement of the pigeons, but at the same time resulted in noise in the image (ISO 800 versus ISO 100) and a shallower depth of field (f / 5 versus f / 8), resulting in more soft background.
Thus, the ideal scenario is to combine them in one image. Using digital overlay technique, you will get a photo best quality with the least amount of noise and better focus by adding pigeons from another image to it. It looks like the pigeons have more noise, but only in very small areas, so you can do a separate noise reduction for the pigeons only if needed.
Sequence filming
Here's a sequence of the shooting process to give you the best picture:
- Think over the composition.
- Take a photo with the best (optimal) camera settings for the scene.
- Without moving your composition, change your camera settings to capture what you find interesting. For example, animals, people who can emphasize the atmosphere of a place. It could be a monk praying in a temple, or even inanimate objects like trains and boats, or anything else that grabs your attention in a scene.
Stages inPhotoshop
Step # 1 - turn off some layers
Back in Photoshop, you will see an "eye" icon next to each layer. This means that all of these layers are visible. Let's temporarily hide all the photos of the pigeons by clicking on the "eye" icon to uncheck each layer. Leave only two visible - background and Layer 1 with doves.

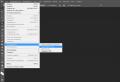
Step №2 – add mask layer
Next, select layer 1 Doves and hold alt key, click the “add layer mask” icon (circled in red in the photo below on the left). You should have a black rectangle on the right side of the layer, as shown in the photo on the right. This way we add a reverse mask to the layer, black means that the layer's content is hidden. If you do not hold down the Alt key while creating a mask, then it will be white, showing all the contents of the layer.

Step # 3 - paint on the mask to reveal the bird
We now have a black mask. To blend only the pigeons from this layer, we need to select the Brush tool and paint on the mask with white over the birds. Note: a black mask means hiding the layer, and a white one revealing it.

After you have selected the Brush, make sure it has soft edges and the Opacity is 75%. Opacity affects how strongly the drawn area is visible. Using 100% Opacity, you only need to brush once to fully reveal a specific area. However, at 75% or less, you will need to repeat the painting several times to achieve 100% effect. It is slower, but at the same time the edges will be smoother and the layer will blend better with the original image.

Note that as you paint, the layer mask will reflect your result. Congratulations, you have your first pigeon! Let's repeat the same process for the next layer.

Step # 4 - repeat on the next layer
Following the same steps on the Pigeons 2 layer, you will have a second pigeon added. But wait, something is wrong. Have you noticed that the second pigeon is surrounded by dark edges? Why?

This is due to the fact that even with the same camera settings, lighting conditions can change during the shooting. This image was taken when clouds covered the sun and the light in the cave became dim. Instead of solving this problem with some very precise masks (by making the pigeon outlines larger and neat, which can be quite tedious), let's try adding a Curves adjustment layer.
Before doing anything with this adjustment layer, right-click and select "create clipping mask". This will ensure that whatever adjustments you make will only affect the layer below it. Now add some brightness by pulling the curve up slightly as shown at the bottom right.

The area surrounding the second pigeon now looks much better. In addition to using a curve, you can apply any other adjustment layers, for example, color balance to correct the hue of a particular layer if the white balance does not match the background.

Now you can see that the bird looks much better after applying Curves.
Step # 5 - Finish Masks for All Layers
Let's continue with the rest of the layers. The results of applying the masks will look like the photo below once you finish the blending process.

Conclusion
Here is the final digital overlay result. Now you can do any other post-processing, applying contrast, changing color balance, sharpness, or other processes that you think are necessary to improve the photo.

I hope you enjoyed this article and it gives you some new ideas and inspiration.

Translation: Tatiana Saprykina
Quite often, PC users tend to learn new programs in order to be able to design images to their liking and even earn income. One of the most sophisticated and powerful graphics tools is Adobe Photoshop. How to use, where to start - all this will be described below.
Interface, tools and menus
First you should run installed program... A beginner is recommended to go through the menu (horizontal top), explore the tools on the left. To find out what the icon is and what it is responsible for, you need to move the cursor. A tooltip should appear. If you left-click on a tool, for example, "Fill", then it will be active. At the same time, the settings appear below the horizontal menu at the top of the screen. Experienced users almost always set the desired tool parameters.
Pay attention to the triangle in the lower right corner of some tools. If you click on the mouse right button, then additional options will open.
And now we should talk about the menu in Adobe Photoshop, how to use it when working with photographs and drawings. First you need to go to the "File" menu to open an existing image for editing, or create new document... This menu also contains the function of saving the work done.
The rest of the items located after the "File" and before the "Help" refer directly to the work on the image.
First steps in work
It is worth starting to study the program using an existing photograph. To do this, go to the "File" menu, click "Open" and find the desired picture. When it is added, you can start working.
A small tabbed window will appear to the right of the image. When working, you almost always need the "Layers" tab, since all actions on the image take place on it.

At this point, every beginner asks the question about:
- how to use Photoshop (Adobe Photoshop);
- why can't work with the picture;
- is it possible to correct errors if they appeared during the work.
You should immediately answer the second question: by default open image locked, that is, has To turn it into a layer (that is, unlock), you need to double-click in the window to the right on the image and the inscription "Background" in the "Layers" tab. Now you can work.
Why are layers needed?
To understand how to use Adobe Photoshop, it's worth understanding layers. The fact is that they can serve as a reserve image ("create a duplicate layer") in case of unsuccessful actions with the photograph, and as an area for applying new effects. For example, you need to make an inscription for a wedding photo and an image of translucent doves, hearts. In this case, you need to create a new layer above the main photo and activate it. Then you can either insert a new image with doves, or draw using the Brush and Pencil tools located on the left of the toolbar.

Layers can be made transparent or semi-transparent. To explain their meaning, you should imagine a real photograph lying on the table. Next, translucent or transparent printed paper is applied to it. So the main photo is Layer 1, and the transparent art paper is Layer 2.
Effects and colors
Work with color and effects should be done using horizontal menu or in the right window (the "Layers" and "Properties" tab). It should be noted that it makes no difference for a beginner how to use Adobe Photoshop CS6 or other versions. Almost any generation of "Photoshop" will be suitable for learning the program. The same goes for color modes, filter gallery, image manipulation (for example, mirroring, rotating, moving).
Is Adobe Photoshop Difficult
Often, beginners ask: is it difficult to master the program? It is impossible to answer unequivocally. You need to understand why a person needs this tool. Let's say you often need to make light adjustments, for example:
- trim,
- mirror,
- make an inscription,
- discolor.
In this case, it is enough to understand how to use Adobe Photoshop. But if there is a desire to become a professional, to learn how to make fabulous pictures from ordinary photographs, then it will take perseverance, a lot of time for training, right up to studying the theory of color.

Often there are nuances on the forums, when watching training videos, where participants ask how to use Adobe Photoshop CC, how it differs from SC6. Let no one be confused by the last two symbols, meaning the version of "Photoshop". For simple operations with pictures, both versions have everything necessary tools, they are located in the same places.