Combine phone memory and Android CD card. How to increase memory on Android. Sections of internal memory ROM Android - let's clarify the painful part about the layout of system memory How to combine internal memory and phone
Do you want to use your MicroSD card as a real storage expansion and install apps on it? To do this you need to format it like internal memory. This is quite easy to do on most phones, but unfortunately some manufacturers, such as Sony, LG or Samsung, do not have this feature by default. But if your smartphone is equipped with Android Marshmallow or newer, then you can use the command line. However, after this, avoid Android updates. We will tell you how to combine memory correctly in this article.
Go to:
Easy way
If you're lucky, your smartphone will allow you to do this without connecting it to your PC. This method will most likely be your only hope if you are using a newer version of Android (7.0 Nougat or 8.0 Oreo). Here's how to check:
- Install the SD card in Android phone and wait for it to be recognized
- Open Settings > Storage
- Tap your SD card's name.
- Tap the three vertical dots on the right top corner screen.
- Click "Settings" .
- Select Format as internal memory.
- Click "Clean and Format"
- Android will then prompt you to transfer your data
If your smartphone doesn't allow you to do this, the process becomes more difficult. We'll get to it below.
What to do if your phone doesn't allow you to format microSD as internal storage
Some smartphone makers disable the normal Android feature for formatting microSD as internal storage, hiding the ability to do so from your phone. But you can still activate this process using a PC without requiring any root privileges.
The exact steps vary depending on Android versions your phone. This method worked well on Android 6.0 Marshmallow and Android 8.0 Oreo, but we encountered difficulties on Android Nougat.
For phones using Android 6.0 Marshmallow
When the MicroSD card is formatted as internal memory, applications can be stored entirely on it. This means that if you download an application with a total size of 2 GB, then there should be 2 GB of space on the SD card. If, however, the MicroSD card is formatted only as a backup, there will not be enough memory, as it writes PLATYPUS_DIARRHEA on Reddit.
Just because a menu option is invisible doesn't mean it doesn't work. A few days after the publication on Reddit, it became known that the command line can also format a MicroSD card as internal memory in the Galaxy S7. We have successfully tested the instructions with Samsung Galaxy S7, Sony Xperia Z5 and LG G4 running under Android control 6.0 Marshmallow.
All three smartphones run Android 6.0 Marshmallow out of the box or after an update and have a MicroSD card slot. Additionally, there is no menu option to format the MicroSD card as internal memory. The function is only available in HTC One A9 and Motorola on all Moto smartphones.
Why did Samsung, LG and Sony hide this item? I connected each of the three smartphones to the computer, and each of them had one MicroSD card.
Then I entered in the commands described in my blog. Once you open a command prompt window and connect your smartphone, you can enter the first command:
- adb shell
Now the command prompt is ready to run system commands on your smartphone. In this case, we want to format the SD card or part of it as internal memory. Even if Sony, Samsung and LG deny us this option in the GUI, we can still execute this command through the console. First, however, we need the SD card ID. You can find it out with the following command:
- sm list-disks
In my case the disk is called 179.64 . Perhaps yours is different. Please note the exact ID. In the next command we will format and partition the MicroSD card. Your content will be deleted. If there is on the map important files, copy them to another disk or computer. If you want to keep a MicroSD card in your smartphone all the time, you can now partition all your memory. To do this, enter:
- sm partition disk:179.64 private
The operation takes a few seconds or minutes, depending on the capacity of the memory card. If you only want to use a certain percentage so that other devices can read it, you must exclude it from the private section. The 50:50 split command looks like this:
- sm partition disk:179.64 mixed 50
This is the end of Paul O'Brien's leadership, but not the end of the job. If you now want to use the re-allocated memory, you must also migrate your applications and data. This can be done through the “Storage” section in the menu Android settings. Select your MicroSD card, then go to the top right side of the menu and click "Move Data". You cannot select this menu item before splitting.

Now all downloaded applications will be completely written to the MicroSD card. Only system applications and updates use internal memory. This means you will never receive an error message due to out of space.
Smartphones with Android Oreo
Recent Android updates have changed the rules a bit, but you can still use this method with ADB. Just start working with ADB using the method above, but after entering shell adb you will be prompted to set certain values.
Enter the following lines to unlock the ability to format microSD cards as internal storage on your phone:
G8141:/ $ sm set-force-adoptable true
G8141:/ $ sm list-disks
- disk:179.0
G8141:/ $ sm partition disk:179.0 private
G8141:/ $ sm set-force-adoptable false
G8141:/$exit
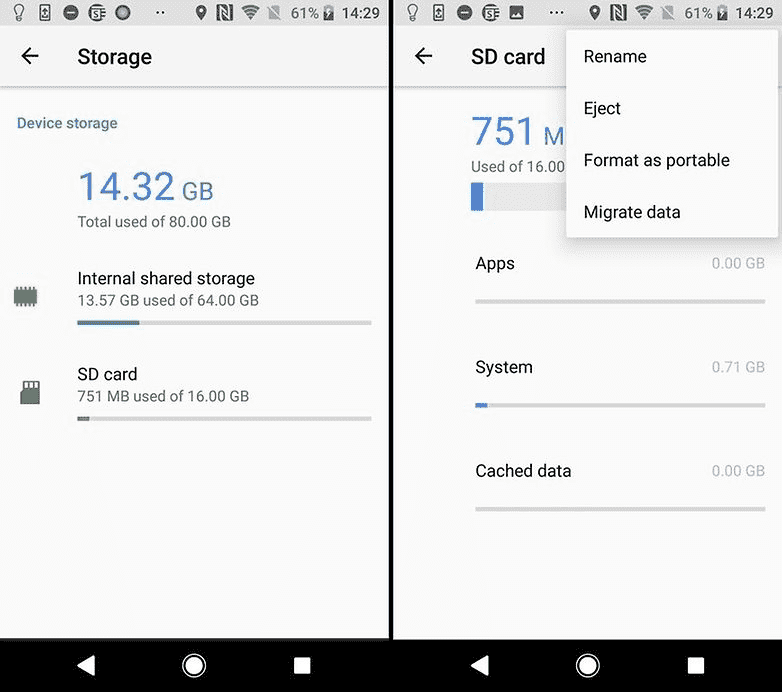
We tested this method on a Sony Xperia XZ Premium running Android 8.0 Oreo and it worked. In the screenshots below you can see a 16GB microSD card installed as internal memory:
Problems with system updates and Nougat
Some readers have reported difficulties installing system updates on Android 6.0 after using the above methods. Updating to Android 7.0 Nougat is not possible after installing MicroSD as internal storage. Our test devices running Android 7.0 Nougat don't even respond to the console commands shown above.
Due to the lack of documentation online, we can only recommend performing a number of operations before updating the system. Do backup copy photos or music to your computer or the cloud and free up as much memory on your SD card and smartphone as you can.
Remove unnecessary applications and return the data to internal memory. Then format the MicroSD card as removable storage. Only then will you be able to install the Android update safely.
What's the catch?
MicroSD cards are not as fast as the built-in memory of a smartphone. So don't waste your money on cheaper ones and instead buy yourself memory cards with reasonable read throughput. Extreme Pro and MicroSD from Sandisk turned out to be, in our opinion, the best in terms of price/quality ratio. At bandwidth 74 MB/s writes you shouldn't experience any lag. Such cards are best suited for installation as internal memory
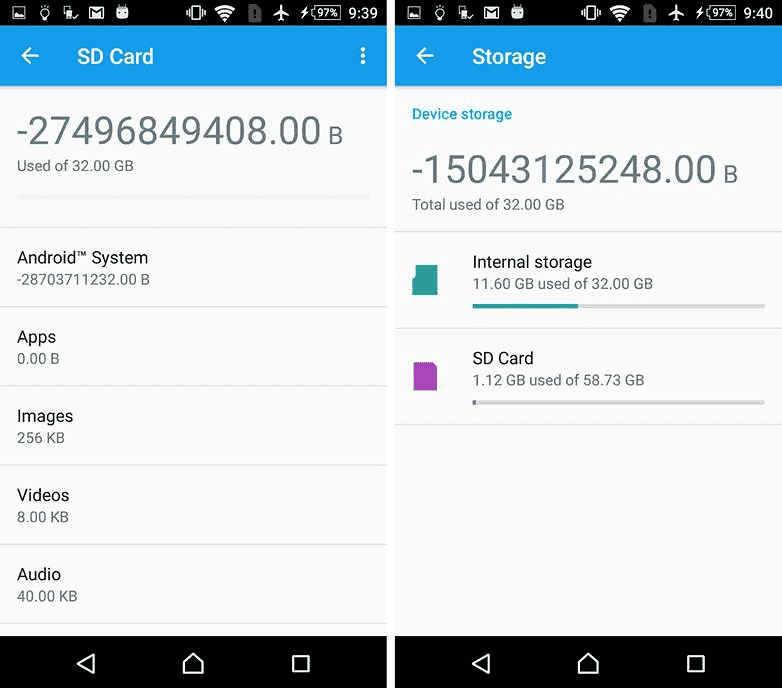
Interestingly, only the LG G4 was able to read the extended memory correctly. Samsung showed an unnaturally large amount of occupied memory, and Sony's memory was even negative. However, we didn't have any complications, and even when we were connected to the computer, we were able to access all of our data properly, although we could only see a general part of the memory and not a specific part. Difficulties arose only when the system was updated (see above).
Memory expansion: complete success
We subjected all the smartphones described above to the same endurance test. We have installed Final Fantasy IX on all devices. The game size is 1.8 GB. After installation, it is easy to see which of the two types of memory, internal or SD card, was used. In all cases, there is 1.8 GB less space on the SD card after installation. This degree of success cannot be achieved with SD cards formatted as external memory, as complete data migration is not possible.
Compare the internal memory and SD card memory values in the screenshot to confirm.

What happens if you remove the microSD card?
Of course, the question is what happens if the MicroSD card disappears from the system. In fact, this creates a serious problem for your applications. Eventually, they can no longer access their data. Since the sections with your operating system and factory reset information are still stored in the internal memory, a removed or broken SD card cannot cause much harm. When we removed the MicroSD card, the application icons simply disappeared, and when reinstallation came back.
If you lose your SD card or break it, your data will be lost. Since they are encrypted as internal memory, you may have no hope of recovering the data. Instead, use regular backups. So go ahead and enjoy cheap memory expansion for your Marshmallow smartphone.
Safely Removing Internal Broken SD Card
To safely remove the SD card from your smartphone, you must reverse the above process. Since you probably don't have enough storage space on your internal memory, you'll first need to transfer photos and other data to another storage location, such as HDD your PC.
Then go back to settings "Storage and USB Drives" and press "Move data to internal memory" on the menu. Then format the SD card like external memory. Do both steps (backup and format) so that your data cannot be lost and you can use the SD card with other devices.
Starting with version Android 6.0, it became possible to use a flash card as internal storage device data. Now the device, after certain actions, can use the memory available on the SD as freely as the internal one. The article will tell you how to connect an SD card in this quality and what restrictions are imposed on it.
How to connect a flash drive as internal memory
Before connecting the drive, you must transfer from it all important information. During the setup process, it will be completely cleared and the data will not be returned.
First of all, you need to go to Settings, and then go to the section " Storage and drive", where you should click on the SD card.
Next you need to select “ Tune" and click " Inner memory" Immediately after this, the device will warn the user that all information will be deleted and it will become impossible to read it on other devices without full formatting.
Here you need to select “ Clear and Format" and wait for the memory clearing process to complete. You may then receive a message indicating that the media is running slowly. As a rule, this means that the flash drive used is not very good quality and its use as device storage may also affect the performance of the smartphone itself. For good and fast work recommended to use UHS Speed Class 3 (U3) drives. 
After formatting is completed, the smartphone will ask you to transfer information, you should agree with this and wait until the work is completed. After the transfer, the work of turning the flash drive into internal memory will be almost complete; all that remains is to reboot the device. 
Features and limitations of using an SD card
There are a few things you should be aware of before you start using a flash drive in this way.
- After conversion, all data, except for some applications and system updates, will be placed on the SD drive.
- When connected to a computer, only this part of the memory will be available for interaction.
In fact, all actions are performed only with a flash drive, the real internal storage of the phone not available for interaction and is practically not used at all. Firstly, this means that when you remove the drive, almost all your data, photos and applications will be lost. Secondly, if the volume of the flash drive is less than the actual storage capacity of the smartphone, then the amount available memory will decrease, not increase.
Format the card using ADB for use as internal storage
The function is not available on some devices, but it is possible to connect a flash drive as storage in another way. However, it is worth noting that this method is very labor-intensive and can cause damage to the device Therefore, if you are not confident in your abilities, then it is better not to do this on your own.
To use this method, you will need to perform many steps. You need to download from the site and install Android SDK, then download and install from the official website device drivers, and also, you need to enable “ debug modeUSB» on the device.
- adb shell
- sm list-disks (after execution, an id will be issued in the form disk:ХХХ,ХХ should be written down and entered in the next line)
- sm partition disk:ХХХ,ХХ private
Then you will need turn off the phone, go to settings and click on sd, select menu and click “ Transfer data" That's it, the actions are finished.
How to set a memory card to standard mode
To return the flash drive to standard mode, you just need to go to its settings, as in the first option, and select “ Portable media" Before doing this, all important information should be transferred to another location, because the drive will be formatted during the process. 
IN new version Android 6.0 Marshmallow introduced the Adoptable storage option, which combines internal and external flash drives (MicroSD) into one logical partition. The memory is one array, and the OS itself will allocate which partition to place the installed applications in. It is worth recalling that before this, memory cards were assigned a modest role for storing multimedia files, without the ability to transfer applications or cache, as a result of which the internal memory was clogged with 1-3 massive games.
Activation of Adoptable storage
There is no need to look for the option in the settings; the system itself will offer memory consolidation as soon as it detects MicroSD. To protect the information on the drive, data encryption (protection) is used, and this requires formatting the card, which will delete the data, so be sure to make a backup copy. After agreeing to the cleaning, wait until the operation is completed and do not remove the card while formatting.

After formatting, the system will prompt you to transfer multimedia content(photos, pictures, music, videos, etc.) to the section related to MicroSD. At this point, the exact amount of memory that will be freed up after the data transfer will be displayed. Perform the move immediately or postpone it until later.
Features and consequences of Adoptable storage
1. The option will make the internal and external storage, so when connected to a PC\MAC, only one disk will be displayed. At the same time, in the device settings you can see how much memory is used by each section.

2. Games and programs will be installed in the internal memory by default; to move to the external partition, open the application options in the settings and select the SD card.
3. Use only high-speed UHS-I Class 10 cards as this will affect the performance and speed of the device. If MicroSD is not fast enough, the system will report possible failures and long-term transfer of information.

4. When combining memory, the SD card is formatted, so save important information elsewhere before starting the process. Also, due to the use of data encryption, the drive will not work in any other device, only after the next formatting, which will lead to the loss of all recorded files.
5. After resetting to factory settings, MicroSD card will stop working, which will lead to another formatting. Therefore, be sure to take care of the settings Reserve copy information.
Was the article useful to you?
Rate it and support the project!
18.03.2018
In budget or outdated Android devices today, there is a serious problem with internal memory, or rather its lack, and even though the device may have a memory card of several gigabytes, it still cannot be installed with many programs. Built in Android function allows you to transfer some applications to a memory card, but, as experience shows, it is not enough.
In the current high range we find some brands that still include this slot in their terminals. This may be because it does not affect the overall functioning of the device in any way since it is only used as external storage for media content.
Opinion: Cheaper internal storage would be a better option
Of these, only the last two have the ability to increase their storage size. As we've already said, the price difference between the various Internet options is huge, and in my opinion, it doesn't encourage the user to go for something that truly suits their needs. Being less than 3250 rubles is the price transition between both models.
I tested different applications for expanding the internal memory of Android devices: App2SD, Link2SD, FolderMount. Personal experience has shown that, after all, the best solution There is an application Link2SD. The application (like other similar programs) requires a rooted Android device, but if everything is done correctly, you can forget about the issue of lack of internal memory for a long time.
If you need more storage space, you can choose one that currently has a good price and performance. Giving you more multimedia content. Unfortunately, even brands prefer to jump 6,500 rubles at best between models. But remember that not all cards are the same.
The power of mobile devices continues to increase over time. Comparing the benefits of the first terminals with the current terminals may seem like a significant progression. In this article, we will focus on internal memory and how it can be expanded. On one hand, you can expand the internal memory, but otherwise the system performance and data access are penalized if any problem occurs. This module reduces the performance loss that occurs when accessing encrypted information.
Step by step guide
To expand the memory of your Android device using the Link2SD app, you need to follow these steps:
- Make sure that the device has a working root installed;
- Prepare a memory card;
- Install and configure the Link2SD application.
Rooting a device
Despite the many so-called "universal" apps for rooting Android devices, personal experience shows that rooting is a unique process for each device. Search the Internet for a rooting application (method) specifically for your device model. Working with one of these "universal" applications for rooting Android devices is described.
When internal memory is used, the performance drop is almost negligible. The result will be a device that is worth using and has more low productivity than it should be. Imagine if the entire page was coded this way. The content will be there, but no one other than the user with the password will be able to access it.
With encrypted information, only the device can access it. Having more internal memory tends to install more apps and create multimedia content such as photos or videos. The problem arises when we go on a trip, take a lot of photos, and when we return home we have problems accessing information. The information is there, but not accessible.
Preparing the memory card
Preparation consists of creating an additional Ext partition on the SD memory card, to which application files will then be transferred from the internal storage, thus freeing up the internal memory of the device.
There are many different ways creating partitions, but for our task I recommend using one of the following:
If this is the case and there is no copy in the cloud, the information may be lost. Firstly, the device should not create problems when accessing information. This is the theory and, unfortunately, it is not always true. If the device cannot access the content, it will inform the user that it must be formatted due to information loss.
This is indeed a very effective option if you take the serious aspects into account. The first, of course, is that the device allows you to use it as internal memory. At the same time, it does not allow the user to access information if there is a problem with the device.
Attention! Before performing the operation of partitioning a memory card, save all data on the memory card to a computer or other device, because During the partition creation process they will be deleted! After creating the partitions, return all data back to the memory card.
If for some reason you later decide to return the memory card to the initial state use or instructions.
The way to avoid this problem is to keep a backup important information in the cloud or on your computer. Something similar can be done with the rest of the device data. The second detail, information encryption, forces the user to save a copy of important information outside the device. Forgetting your phone or dropping it on the ground can result in you losing access to all the information it contains.
Resources are limited and work best only with installed applications. A phone that has 100 apps installed will not have the same resource performance as another. Battery fluidity and duration will be penalized in the second case.
Setting up Link2SD
If you have successfully completed the previous two steps, it’s time to take the last step: install and configure the Link2SD application.
When you first launch the program, it will ask for superuser rights; allow it to obtain such rights by clicking on the “Allow” button.
Common sense must be used to ensure correct operation of the device in all cases. Cover image: 8 bytes vs. 8 GB, Author: Daniel Sancho. . On the other hand, its use is quickly limiting the level of moving content. To begin, we will prepare your computer and your phone. It's a long read, but quick to do.
After that you can disable it. Go to your phone's settings, tap About Phone, and then enter your build number 4 times. Now connect your phone to your computer. Then we will run command line. This will launch a black window called Command Prompt. . Nothing very naughty or light.
- Go to your phone settings.
- Storage direction.
- Click on the word "plus" in the upper right corner of the screen.
- And do: Transfer data.
Next, a dialog will appear for selecting the file system of the 2nd partition of the SD memory card. If such a dialog does not appear or you need to open it again, click on the menu button in the application and select the "Recreate mount script" option. Select the item corresponding to the file system of the second partition of your memory card and click "OK". If you receive an error message, open the dialog again and select some other item (for me the script worked successfully on the “ext2” item, although the second partition of the memory card was formatted in “ext3”). You should receive a message indicating that the partition was mounted successfully. After that, restart your device by clicking on the "Restart device" button.
Federated storage, what is it?
Do you have a smartphone with little internal memory? Are there too many applications that cannot be installed on external memory? Or just tired of having to constantly uninstall heavy games to install others? Well, unified storage will be very useful for you!
In theory, since in practice some manufacturers do not allow this and it may be necessary to "force" this function. Please feel free to let us know about other models. So, to be able to do the manipulations that you need to have?

Go back to the program, wait until the list of applications loads, select the application you want to move, and click on the “Send” button. In the next dialog, select what application data you want to transfer (I usually transfer everything that is possible). IN free version Link2SD can transfer everything except application data, but even this will have a noticeable effect.
Step 1 - Download the required software
We are not responsible for any incompatibility with your smartphone, so be sure to check that it works with your smartphone before attempting anything. Then install it in the desired folder, storing it in memory, or because we will need it. Developer mode is a mode that will allow you, roughly speaking, to perform manipulations on your smartphone - again at your own risk - otherwise the manipulations will not be allowed by the smartphone. It is represented by a new menu available in the device settings.
IN this phone on internal flash memory approximately 830 MB of space is allocated for storing user data and installed programs and approximately 2 GB for internal USB drive(for storing user files).
The internal memory capacity may not be enough if there are a large number of installed programs, but it is easier to store user files on an external SD card and the capacity of the internal USB drive is most often excessive.
The site administration is not responsible for what you do with your phone. Before you do anything, think about why you need it and carefully study the instructions.
The proposed modifications to the internal flash memory of the phone allow redistribute storage volumes so that the internal memory for storing programs and user data becomes approximately 2.3 GB, and the volume of the internal USB drive is reduced to 500 MB (this is usually enough for user files).
Standard distribution
HDDRawCopy.
Procedure for installing changes
1.
2.
Download modify_fs.zip 2209
3.
4.
5.
6.
7.
8.
9. Enter standard/factory recovery (Volume + and On). Select item apply update from external storage , then select the file CWM_ViT.zip.
10.
11. Select item apply update from external storage, then select the file CWM_ViT.zip.
12.
13. Boot into factory recovery, where again select the item reboot system now.
14.
}
Related posts:
 High magnification monoculars - features and benefits Monocular magnification 50
 World of Tanks crashes on startup - fixing errors World of tanks crashes after every battle
 Server key 1c over the network
 How to turn on WiFi on laptops Add a new wireless network to a laptop
 How to find out iPhone serial number?


