Check mac os disk speed. DiskTools Pro - Monitor your Mac hard drive health
Hard drives are the main device for storage of information currently. Maintaining hard disk in good condition is essential, no matter what you use - SSD or HDD... After all, the loss of information is a huge problem for its owner.
There are a number of quality applications for OS X that allow you to monitor the health of your hard drive, fix errors, and test the read / write speed. For example, the basic functionality is already available with the system - Disk utility.
AT this review we will look at an advanced tool for monitoring the status of hard drives, application -.
The main application window prompts the user to select the desired action.
 The following fields are located at the top of the window:

Let's move on to the main menu of the application, I would like to note that each of the items can be called using a key combination, which is very convenient.
 Let's take a look at each of the available menu items:
- Scan and Repair Bad Sectors - the most important function, it scans the entire hard disk and fixes bad sectors.

- Defragment Files - file defragmentation. This function there is, however, it makes little sense to use it for disks with the HFS + file system. However, it can be used for disks with the FAT32 or NTFS file system.

- Test Data Transfer Integrity - test of the speed of writing and reading the hard disk. You can set the testing duration, as well as the size of the files used.

- Verify and Repair Volume - checking and correcting hard disk software errors.

- S.M.A.R.T Diagnostics - checking a large number of S.M.A.R.T. parameters

- Analyze Capacity Usage - analysis of the contents of the hard disk. The types of data consuming disk space are displayed. It is possible to search for large files to free up disk space.

- Backup / Restore Volume - creating a disk image and restoring from a backup.

- Volume Options and Settings - the ability to hide the drive in Finder, as well as enable a notification when a certain critical amount of free disk space is reached.

- Preference File Inspector - checking settings files for errors.

- Find and Repair Broken Aliases - search for problematic links to files (aliases).

- Device / Volume Information - basic information about the hard drive.

- Repair and Maintenance Log - this section stores logs of previously performed operations on the hard disk.

Application settings include sound settings, information display, settings related to application operation and schedule.

Of personal experience I want to say that the application is working fast and effectively, provides a huge number of possibilities. Although the cost of the application is impressive, it is completely justifies the investment... And watch out for the app bundles, just recently DiskTools Pro was included in the MacHeist nano Bundle 3, which cost only $ 10.
Advantages:
- workmanship
- wide functionality
- work on schedule
Disadvantages:
- high price
Information on :
Platform: OS X
Cost: $79.99
Check SSD disk using utilities is a universal method that performs several tasks at once.
- The first - checking the drive for errors.
- The second - control of the operational life of the device.
The presence and periodic use of such programs for the owner is not only desirable, but also necessary.
After all, the resources of these components of modern PCs and laptops are limited in comparison with HDD, and the risk of data loss is higher.
Although these disadvantages are fully offset by a significant number of advantages from using SSDdue to the difference in their design from standard hard drives.
Features of using SSD drives
SSD disks are solid-state non-volatile drives, the principle of which resembles the operation of flash memory - SD and microSD cards, USB flash drives and other storage media.
These devices have no moving parts and use a DDR DRAM chip to transfer data.
Parallel recording of information simultaneously on several memory elements and the absence of the need to move the information-reading heads (typical for HDDs) allow to increase the process speed several times.
And if the average read speed of a modern hard drive is about 60 MB / s, even an average SSD is capable of delivering values \u200b\u200b4-5 times higher.
When writing data, the excess may be less, but the process is still much faster.
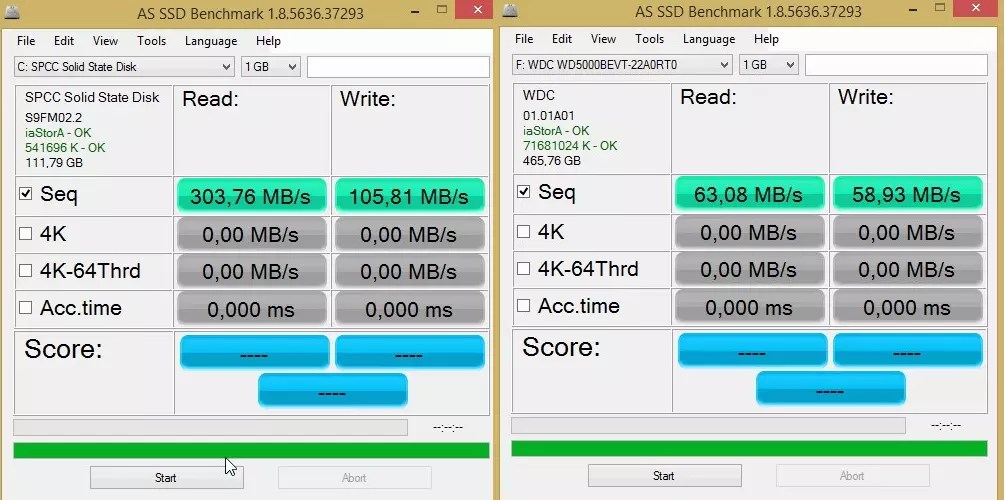
Figure: 1. Comparison of read and write speed indicators of SSD and HDD.
The download speed is of particular importance for those computers on which several resource-intensive applications are installed.
In this case, only download windows systems occurs within 15–20 seconds for a solid state drive and between 30 and 60 seconds for a hard drive.
The same speed improvement occurs in the process of launching programs and writing data.
Other benefits of using SSD drives (read more) include:
- resistance to shocks and falls. An important parameter for laptops, in which hard drives often fail precisely because of mechanical damage;
- compactness - many discs are not much larger than the battery mobile phone, others have the dimensions of a memory strip;
- extended temperature range of the disk;
- minimal power consumption and no noise during operation.

Figure: 2. Comparison of the sizes of HDD, standard SSD and mSATA drive.
At the same time, the operation of an SSD is associated with certain disadvantages. These include the relatively high cost of the drive, although with an increase in capacity, the price-to-volume ratio becomes lower.
The second important disadvantage is the limited resource of SSD drives, which is why it is recommended to periodically check them.
Configuring SSD for Windows 10: Complete step-by-step instructions
Drive diagnostics
The main task of inspections sSD drives consists in diagnosing its condition and issuing information about the presence of errors, resource and estimated operational period.
This allows the user to know in advance about future problems with the drive, leading to unpredictable loss of information.
In addition, based on the results of the check, you can plan financial expenses for the purchase, the cost of which may not allow you to quickly find such an amount if the problem occurs unexpectedly.
Plus, checking the drive doesn't take long, and doesn't even require the purchase of expensive software.
The utilities can be downloaded online for free or purchased for no more than the cost of a standard anti-virus program.
Whereas the recovery of lost information from SSD, unlike hard drives, is impossible.
The best utilities to check SSD drives
To check the health of the hard drive, drive manufacturers and third-party developers have released dozens of applications.
Most of them are free or shareware, that is, they require payment only some time after the start of use.
Their effectiveness is almost the same, but the differences lie in usability and functionality.
SSD Life
SSD Ready
When checking the status of the SSD, you can use SSDReady, which only works with solid state drives... The result of the check is an estimate of the expected duration of the device's operation based on the collected statistics on data writing and reading. The program runs in the background and requires almost no resources.

Figure: 6. SSDReady application.
Hard Disk Sentinel
A feature of the Hard Disk Sentinel application, designed to monitor hard drives, is to track performance degradation or acceptable level temperature and a message about it to the user. The application constantly checks the baud rate, temperature and other parameters. Among its features:
- work with SSD disks, with IDE and SATA drives, and even USB-drives;
- displaying information about the current and minimum temperature;
- indication of the number of errors and the number of hours of the disk;
- an indication of not only the current, but also the maximum possible information transfer mode for the disc.

Figure: 7. Working with the Hard Disk Sentinel program.
HDDScan
The freely available HDDScan program allows you to diagnose hard drives of any type, check them for errors and monitor the health of drives. The utility works in real time and, if necessary, displays a detailed report on the state of the disk on the screen, which can be saved for future use.
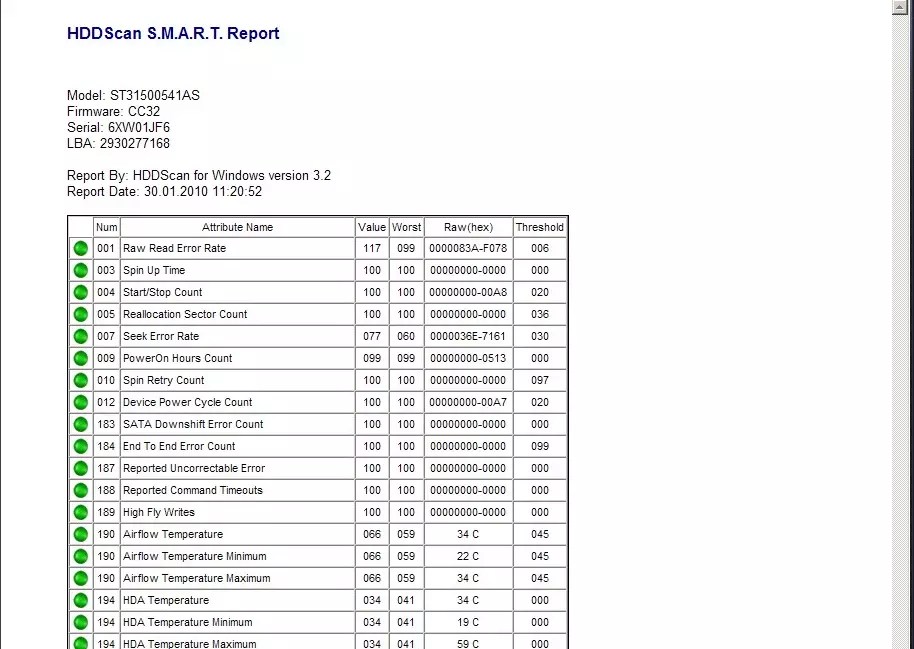
Figure: 8. Report of the HDDScan program.
SSD Tweaker
The free SSD Tweaker application is simple to use and allows the user to not only monitor the status of solid state drives, but also disable unnecessary operations in the operating system that reduce the life of the drive. For example, such as the Windows Indexing and Defragmentation Service. Parameters can be configured manually or automatically.

Figure: 9. Working window sSD programs Tweaker.
HD Tune
HD Tune app comes in several flavors - free version and paid HD Tune Pro. The first provides testing of the health of hard drives (including SSDs) and memory cards. The shareware utility, for which you will have to pay $ 38, has advanced functionality, allowing you to control almost all disk parameters and conduct a number of additional tests.

SSD Disk Checker: The Best Utilities to Diagnose and Improve Performance
Your Mac won't turn on? Don't panic! Do not rush to leave everything and carry your favorite computer to the nearest service. It is quite possible that the built-in macOS tools will be enough for "resuscitation", which anyone can use.
Boot in Safe Mode on Mac
When Safe Mode is activated, macOS will scan hDD and fix any errors it finds.
"Safe" boot starts only essential components (ie, only what is needed to start the computer). As a result, third-party extensions, login elements (logins-passwords) will not be launched, and the cache in certain sections will also be cleared.
To start your Mac in Safe Mode, turn it off, then turn it on, and hold down the ⇧Shift key on your keyboard at the same time as the startup sound. If your Mac freezes when it turns on, turn it off first (to do this, hold down the physical power button on the case or keyboard for 10 seconds).

If your Mac boots up, restart it and turn it on as usual. If the computer freezes again, put it in Verbose Mode - for this you need to turn off the Mac, turn it on and after the start signal simultaneously press and hold ⌘Cmd + V. This way you can find out which system component is causing the problem. When the source is identified, you can reboot into Safe Mode (hold down the ⇧Shift key) and remove the problematic extension, and then try a regular reboot.
2. Recovery Mode and First Aid on Mac
If safe mode did not solve your problem, move on to the next option called Recovery Mode ( Recovery Mode). It "lives" in a separate part of the boot disk and allows you to restore the system, access the Terminal and the ability to reinstall the operating system of your Mac - macOS.
To enter Recovery Mode:
1. Turn off your computer;
2. Turn it on;
3. Immediately after the start signal, press and hold the key combination ⌘Cmd + R.

If you cannot go to Recovery Mode (this happens in case of problems with the disk), you can start the recovery mode via the Internet. The keyboard shortcut will be somewhat different - ⌘Cmd + ⌥Option (Alt) + R. This method requires an Internet connection and will take much longer, since macOS will download several gigabytes of system image from the web.
If booting into Recovery Mode was successful, you will see several options for action. Launch Disk Utility and find boot diskwhich is the source of the problem - most likely it is called Macintosh HD. Select it in the window on the left and then click First Aid → Run.

Fsck check
File system consistency check (fsck, "consistency check file system") Is a good old Unix tool for checking and solving disk problems.
Depending on the size of the hard drive, its type, and the severity of the problem, the fsck check can take quite a long time. Just be patient.
To run fsck, you need to go into Single User Mode. It allows you to make changes to user shared resources on your computer. Single User Mode won't start macOS; it just gives access to the Unix command line.
To switch to Single User Mode:
1. Shut down your Mac;
2. Turn it on;
3. Immediately after the start signal, press and hold the key combination ⌘Cmd + S.

You will see the command prompt shortly. Type in it fsck -fy to run the fsck routine.
Note: if your drive is encrypted, select the appropriate user account and enter the decryption password. If you have a Mac firmware password set, you will not be able to launch Single User Mode.
It is important to wait until the fsck check is complete - if the process is interrupted, data loss is possible. After the check is complete, you will see one of the following messages:
** The volume Macintosh HD could not be repaired.
The system reports that the hard drive could not be recovered. It's okay - just run fsck again. The command is the same: fsck -fy
** The volume Macintosh HD was repaired successfully.
***** The volume was modified *****
Much better ... but it's too early to relax. Again, run the test again.
** The volume Macintosh HD appears to be OK.
But this is what we need. fsck checked the entire disk and found nothing that needed fixing.

You can now exit Single User Mode. Command to exit: exit.
Apple Diagnostics
If the above methods did not work for you, then the problem is almost certainly very serious. Which means it's time to use Apple Diagnostics!
This is a special test for Mac computers from the manufacturer. As a result, you will receive an error code and be able to understand what exactly is wrong with your Mac.
For start apple test Diagnostics:
1. Turn off your Mac;
2. Disconnect all connected devices from it, except for the keyboard, mouse, monitor, Ethernet cable (if any), and power cable. In other words, unplug flash drives, external hard drives, printers, scanners, etc.
3. Turn on your Mac;
4. Immediately after the start signal, press and hold on the keyboard D.
5. Choose your language
As mentioned above, after passing the test, you will receive an error code at your disposal. Decoding codes:
- ADP001: No errors found.
- NDD001: Problem with USB devices. Make sure all unnecessary USB devices are turned off;
- NNN001: Not Found serial number... Are you using Hackintosh? They have already left for you! (joke);
- PFR001: Software problem;
- PPM001-015: Computer memory problem;
- PPR001: Processor problem;
- PPT001: No battery found;
- VFD006: Video card problem;
- VFF001: Problem with sound card.
As you can see, problems are divided into two categories - those that can be easily eliminated by both an ordinary user (for example, errors related to USB), and those with which you need to immediately go to the service (for example, problems with video and audio cards, processor, memory, etc.).
Recovering files from a damaged disk
Damage to the hard drive also means the possible loss of data (or part of it). In order to avoid this, try creating an image of the "broken" disk. This will require external hard disk of at least the same size.
1. Connect it to Mac, restart your computer,
2. Enter Recovery Mode (⌘Cmd + R),
3. Run Disk Utility,
4. From the menu bar at the top, select File → New Image → Macintosh HD Image and start the process. It will take some time to create the image, but in the end you will receive a copy of the old disk in DMG format and you can mount it on the new system.

If the creation of the image fails for some reason, the files can be copied manually. To do this, return to recovery mode (⌘Cmd + R) and launch the Terminal application. Use the cp -r command to start copying your files to external media. Example:
cp -r / Volumes / Macintosh HD / Users // Documents / Volumes / Backup /
Don't forget to change to your username on the system.
Let's break down the command: cp - this is the command to copy, - r means that this command is executed recursively, i.e. first, the directories inside the directory you specified are copied, and then the directories that are part of them, and so on.
The first path is an indication of the location of the files that you want to copy. The second path indicates the location of the external drive, it will always be in / Volumes / whatever name you give it.
The only difficulty with this method is that you have to remember exactly where your files were located and write the path accordingly. Also, you can only hope that the files are not located on the damaged part of the disk.
When the data copying is complete, you can have your Mac repaired or reinstall macOS with a clear conscience.
... It is at such moments that people begin to understand the importance of reserve copy data. And indeed - with configured copying Time machine data loss problems are not terrible. Set up data copying right now - and save yourself a lot of time, nerves and money in the future!
Based on materials from yablyk
Hi Geektimes! It makes no sense to describe the advantages of an SSD or solid-state drive over HDD - who appreciates quick start operating system, no noise and low power consumption, probably already managed to acquire such a disc. But the adventures with SSD do not end there: like a car or even a smartphone, this drive requires careful handling and maintenance. Therefore, you need to monitor it periodically.
If you install Vector or another OCZ solid-state drive instead of (or in conjunction with) the HDD on a Mac, this can be done quite simply - the manufacturer offers its own utility SSD Guru, which allows you to keep the disks in good condition (we already wrote about it in detail in the blog). However, third-party developers do not sleep either - many have long ago released their own solutions on the market that deserve close attention. We will talk about them.
If you've installed an SSD instead of an HDD in a MacBook (with Optibay or not), this is especially true for you.
DriveDx
This utility provides comprehensive information about your SSD. In the disc name tab, you can find basic information, problems encountered, drive health indicators and other useful information.Here we see that the disk is absolutely healthy - the indicator of "general health" is 100%, however, our SSD has a little less "to live". The storage capacity is 480 GB and the total runtime is 982 hours. The number of cycles has exceeded 3,000, which is quite normal for a young disk.  The absence of problems and the good health indicators indicate that the drive is being monitored and maintained at maximum performance.
  A complete list of indicators is available in the corresponding tab.
In the tab with statistics you can find the following interesting Facts, such as the number of logical sectors read and written, the presence of interface errors and data on forced reboots. 
When errors occur, all of them are recorded in the log, so you will always find out what is the cause of a particular problem, and you can quickly eliminate it. To check the SSD for such errors, you can run a special test that identifies them. There are two options to choose from - a quick test and a long test. They are automatically carried out when the program starts.
The only disadvantage of the application is that it is paid. The personal license costs $ 24.99, and the family license costs $ 49.99. The developers periodically arrange sales, so that with a good coincidence, the program can be snatched with a 20 percent discount. 
Chameleon SSD Optimizer
Excellent free alternative DriveDx with one important feature - the ability to activate TRIM for SSD. Whether or not to activate it depends on the drive itself: some disks demonstrate such low speed and performance that it is a necessity for them.The utility disables electronic signature Kernel extensions (.kext), which Apple introduced in OS X Yosemite to combat programs like Trim Enabler, but on OS X El Capitan Chameleon SSD Optimizer does just fine. To do this, you must not forget to give it administrator rights. 

The program has four main information tabs - the main information, which, in general, can be limited to, is available in the More Disk Info section. The app also scans the SSD down to model, serial number, speed and temperature. Miniature and minimalistic, but everything is clear.
In the Settings tab, you can turn off the Sudden Motion Sensor due to the lack of moving heads in the SSD. But the NOATIME function, on the contrary, should be activated: it prevents the recording of the time of the last access to the file, thus, its resources become more accessible.

Sleep modes deserve special attention - Set Sleep Mode. There are three modes: A - in which the content random access memory does not write to disk if the laptop lid is closed; B - in which the system stores a copy of the contents of RAM in sleep mode; C - when the system is restored from a disk image. In the latter case, the "falling asleep" of the laptop is slower, but the performance improves autonomous work... The first two modes are installed on the computer by default.
The best combination is to put the sleep mode in position A and turn on the prohibition of creating a dump of the main memory in the sleep mode.
For disk capacity, protocol and over provisioning data, see the next tab. In our case, 17% comes from the user and 0% from the manufacturer. Good result.
As we have already noted, the open-source program is distributed absolutely free of charge and "lives" through voluntary donations. Considering that it is not much inferior to the first application, this is good news.

Disk Sensei

Remember the famous Trim Enabler? The application developers completely rethought the design and capabilities of their product and issued it in a new form, with a new name. Now it is not just a utility for activating Trim, but a complete program for monitoring the state and "health" of SSD.
The Dashboard tab displays all the necessary information about the solid-state drive: manufacturer, serial number, amount of data written and read, capacity (including occupied space), temperature, and even the overall health indicator of the drive. The data is presented in an easy-to-read form, without unnecessary indicators and other garbage.
Information about the life of the SSD is presented in the Health tab - here both the number of cycles and data on errors, as well as interesting information such as the time the disk has been working at the moment. A total of 16 indicators are available, each of which a "healthy" SSD should pass without problems. As we can see, in our case it is 16/16, which means the drive is absolutely healthy. However, this became known from the past utilities.
And now, perhaps, about one of the main advantages of Disk Sensei. We switch to the Visual section, which provides visual information about the content hosted on the SSD. The data is cleverly sorted by sector (hello Daisy Disk) so you can see at a glance which files are taking up the most space on your drive.

In our case, for example, photographs take up a lot of space. In the application, you can follow the path to a specific file, which is very convenient. Not every program in this segment can boast of such an opportunity.


But the pleasant bonuses do not end there. In Tools, you can clear caches, activate Trim, and also optimize the processes that we saw in Chameleon SSD Optimizer: motion sensor, local time machine, writing RAM data to disk.

And if you really get bored, you can run a benchmark or view running processes. Eh, only this Disk Sensei doesn't make coffee.
For all this pleasure, of course, you will have to pay - $ 19.99 for the licensed version, a weekly subscription is provided so that you can try everything yourself.

OCZ SSD Guru
Cool utility for managing and monitoring solid state drives from OCZ (from us, yes :)). There is no OS X version yet, but this problem is being solved quick creation bootable flash drive with the corresponding application.This can be done very simply. You will need a regular USB flash drive and the program's distribution kit in dmg format, which can be downloaded from the OCZ website for free by selecting the desired product. First, we format the flash drive in FAT format and specify SSDSUPPORT as the name. For this task, even a standard disk utility.

Once the formatting is complete, mount the downloaded image and copy all the files on it to the USB flash drive.

After that, you need to remove the USB flash drive, turn off the Mac, insert it back, and then turn on the computer with the started option key (Alt). Select the USB stick as the boot volume.

After that, you will have access to the SSD Guru utility and will be able to fully use it.
What can OCZ's free solution do? First, the program provides general information about the drive, including capacity, health, used space, interfaces, model and serial number of the drive.

In the Tuner tab, you can enable Trim without using third-party software and view over provisioning data. OCZ provides its own convenient solution for this purpose.

Here you can also download the necessary updates and start Safe Disk Formatting.

All in all, a real must-have for OCZ SSD owners. It is distributed absolutely free.
Instead of output
As you can see, each of the utilities is good in its own way, and they all have their own advantages and disadvantages. In the case of disks from OCZ, it is quite possible to get by with the standard free solution. But those who like to keep everything under control, of course, will not stop the price of $ 20. The choice is yours!If you want to measure the performance connected to mac computer, you can use special utilities from third party developers to calculate its read and write speed. Today we will talk about the two most popular and demanded ones - Disk Speed \u200b\u200bTest, which you have probably already heard about, and its equally worthy alternative to Xbench. Both of them work with both regular USB drives and firewire.
With Disk Speed \u200b\u200bTest, you can measure performance beyond external hard disk, but also built-in, including SSD. To do this, you need to download a free utility from the Mac App Store, connect your hard drive and launch the application.
But it's too early to press the coveted Start button. Press the settings button, and then "Select Target Drive", where we select external drive... Otherwise, the program will automatically start testing your built-in hard drive.

Now you're done! Click on Start, after that the application will measure all the necessary parameters. You will see the results of its work in the "How fast" block. It is worth noting that the process may take several minutes.

Externally, Xbench looks much simpler, but in terms of measurement accuracy, it is in no way inferior to its predecessor. Program - Mac doesn't have it yet. Before using Xbench, make sure your external hard drive has been formatted to work with OS X.

When Xbench finishes its work, you can view its results.


