Resolved: Network and Sharing Center does not open. Solved: Network and Sharing Center does not open Network and Sharing Management
I once went to the Control Panel in the Network Sharing Center and shared access and saw this picture - the page could not be loaded:
I decided that some system files were damaged, I opened command line as administrator and ran the scan with the command sfc /scannow but the scan suddenly ended at 18% with a notification that the scan was completed and found damaged files which could not be restored. For Windows 7, if the necessary updates are installed, there is another way to restore system files using the command DISM /Online /Cleanup-Image /ScanHealth- it immediately scans and restores system files(in Windows 8 and 10, to restore system files, the last key should look like this - /RestoreHealth). The picture below shows the three commands that I executed and, accordingly, the results of their execution:
In general, DISM rustled, restored something, after which the Sfc check still reached 100% and completed, but the damaged files were still there and the Network and Sharing Center still did not open, complaining that the page could not be loaded. There are several more options for restoring system files and the system in particular:
- rollback to one of the previous restore points,
- recovery from image,
- attempting to restore from the recovery console,
- reinstalling Windows in update mode.
For some reason, there were no recovery points or pre-created images on this computer, so the first two options were not available to me; in order to restore system files from the console, I would need bootable flash drive, boot from it and after selecting the language you need to select at the bottom left of the window:
And then this window will appear:
In it you can try the options marked with numbers 1 and 2, and in the first case - all files will remain in place, in the second - you will receive a system with the state as of the specified date, so everything necessary files on the system disk you need to copy it somewhere in advance. My third option is to launch the command line and write in it: sfc /scannow /offbootdir=D:\ /offwindir=D:\windows- where D is a letter system disk, the easiest way to find out is by typing Notepad on the command line - notepad will launch, in it you need to go to the file menu -> open and determine the drive letter with installed Windows, and substitute her into the team above. But in my case, this command also failed, then the last option remains after it is completed, I run it again Sfc /scannow this time everything is fine, the system files are restored.
Microsoft continues to actively improve Windows 10, introduce new features and change the interface. One of the directions of these changes is the abandonment of the classic “Control Panel”, which was previously used for Windows settings, and move to the more modern Options menu.
For example, previously, in order to open the “Network and Sharing Center” you had to click right click mouse over the network connection icon on the taskbar. Until recently, this method also worked in Windows 10, but for latest versions it is no longer relevant. In this regard, many users have a question about how to open the “Network and Sharing Center” in new Windows versions 10.
In fact, the “Network and Sharing Center” opens almost the same as before, but now you just need to make one extra click. To do this, right-click on the network connection icon on the taskbar and select “Open Network and Internet Settings” from the menu that opens.
As a result, the “Settings” menu will appear in front of you with the “Network and Internet - Status” section open. Here you need to scroll to the very end of the page. Almost at the very bottom there will be a link “Network and Sharing Center”. By clicking on this link you will have access to the “” section you need.

In addition, the “Network and Sharing Center” can be opened using the command “control /name Microsoft.NetworkAndSharingCenter”. To do this, press the combination Windows-R keys and in the window that opens, execute the specified command.

If you wish, you can even make a shortcut that will execute the command “control /name Microsoft.NetworkAndSharingCenter” and thereby open the network control center. To do this, right-click on the desktop, select “Create – Shortcut”, enter the command and save.
Today, there is an Internet connection in almost every home. Some people limit themselves to one computer. Others buy routers and create a home local network for several devices (including smartphones). In any case, to do everything correctly, you need to know how it is done correct setting local network in Windows 7. This is the topic that is discussed in this article.
Network and Sharing Center
This menu is the heart of all network connection settings in Windows. Set up a local network, change the IP address, find out the MAC address of your network card, create a new PPPoE connection - all this can be done here. Of course, all actions can be performed through the command line Windows string, but for most users this method will be very inconvenient.
To bring up Control Center in Windows 7, you can go in several ways:

Connecting to new network equipment
Let's assume you connected to a provider and purchased new router. The router setup itself is not covered in this article - there is too much variety. When the device is fully configured and ready to use, you need to connect your personal computer to it.
You connect the router and PC using a patch cord, and the network connection icon in the Windows tray changes its appearance. This means that everything is fine with the network card and cable. If your router is in DHCP mode, i.e. independently assigns IP addresses to new devices - most likely none additional settings you won't need it.
The operating system will ask you to select a connection type: “Public”, “Home” or “Work” network. For the private Windows user this step doesn't matter. Select, for example, home and click “Ok”. Try going online - if everything works, you don’t need to do anything else. 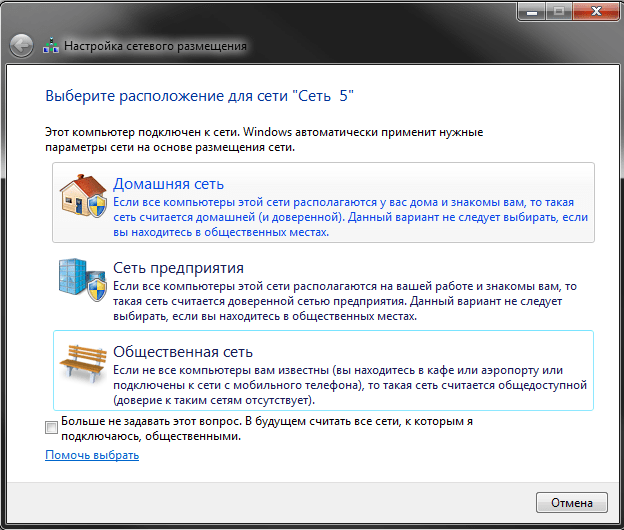
If not, you need to configure the adapter, which is discussed below.
Pay attention! If you don't have a router and you connect a cable from your ISP to your computer, it probably won't work. Modern providers rarely use DHCP technology, preferring PPPoE or Static IP. In this case, follow the further instructions.
Configuring adapter settings
This section of the manual is intended for those users who need to configure the properties of the adapter (network card). If, according to the agreement with the provider, you need to assign a specific IP or mask, or specify a specific gateway, proceed according to the instructions. If the contract specifies a login and password for connection, skip this step and go to the section dedicated to PPPoE.

New home connection
If you connect directly to your provider by cable, bypassing the router, most likely you will need to do the following.
Attention! Sometimes the appearance of menu items, as well as their names, may differ slightly, depending on the version of your OS and installed updates, add-ons and themes.
Windows XP :
1) In the "Start" menu, select " Control Panel" (in some systems it is a sub-item of the "Settings" item, i.e. You need to select "Settings", and then " Control Panel")2) B " Control panels" select, depending on the type/theme of the control panel
- Either " Network connections"
Either " Network and Internet connections"and there" Network connections"
3) B " Network connections"right-click on the icon""
(your name may be slightly different, but NOT "1394" and NOT "") and click "Properties" 
4) In the window that appears, click on the line " Internet Protocol (TCP/IP)", so that it stands out, and then, to the right and below, click the "Properties" button 
5) In the window that opens, place dots in the radio buttons in the positions "" and " 
6) After you return to the previous window, at the bottom you need to click “Close” or “OK” (Depending on what item you have).
7) After some time, the computer should receive settings (May take up to 2-5 minutes). If this does not happen, double-check the sequence of actions and disable-enable network connection(Or restart your computer). If for any reason you will not be able to work and you are sure that the current month has been paid for (or included test period) - call technical support
Windows Vista and Windows 7
:
(!) * If the system asks permission to continue, click "Continue" 1) Click Start, select there Control Panel
2) In the control panel, depending on the type, click "" or "Network and Internet", and then " Network and Sharing Center".png)

3) Select from the list on the left
- IN Windows Vista "Managing network connections"
- In Windows 7" Changing adapter settings"

4) Right-click on the " icon Local network connection" (You may have a slightly different name, for example "Local Area Connection" or have some number. Please note that this should NOT be connection "1394" or " Wireless network connection") and click "Properties" 
5) In the window that appears, find the item " Internet Protocol Version 4 (TCP/IPv4)", click on the line itself so that it is highlighted, and then, to the right below, click "Properties" 
6) In the window that opens, place marks on " Obtain an IP address automatically" And " Obtain DNS server address automatically", and then click the "OK" button 
7) When you return to the previous window, click “Close” or “OK” at the bottom, depending on the button you have. 
8) After some time, the computer should receive the settings (This may take up to several minutes). If this does not happen within 10 minutes, recheck the sequence of actions and disable and enable the network connection (Or restart the computer). If for any reason you will not be able to work and you are sure that the current month has been paid for (or a test period is included) - call technical support at 600-00-66
[updated 11/11/2012]
Windows 8:
1) Click on the “Desktop” tile 
2) Right-click (bottom right, in the tray) on the connection icon (Maybe with exclamation mark, with or without a cross) and select “Network and Sharing Center” 
3) Click “Change adapter settings” on the left side of the window that opens .png)
4) Right-click on the local network connection icon (in this case, “Ethernet”), make sure that the connection is enabled and there is no “Enable” item at the top of the menu (enable if necessary), then select “Properties” 
Related posts:
 High magnification monoculars - features and benefits Monocular magnification 50
 World of Tanks crashes on startup - fixing errors World of tanks crashes after every battle
 Server key 1c over the network
 How to turn on WiFi on laptops Add a new wireless network to a laptop
 How to find out iPhone serial number?


