Connect a second sata hard drive. We connect two or more hard drives to one system unit. Motherboard support
How to connect a hard drive to a computer?
Co desktop computer the situation is much easier than with a laptop, so let's start with it. So, you already know what characteristics to rely on when purchasing, so we’ll leave this topic outside the scope of today’s article.
- First of all, even before purchasing, you should have figured out what free connectors for connecting drives are available on your motherboard - the old IDE or one of the varieties of SATA (I, II or III).
- And secondly, what free power connectors are available on the .
Modern hard drives, motherboards and power supplies work with SATA connectors. However, if they are all already occupied on the power supply, then also take care of purchasing a Molex-SATA adapter to connect your second drive to Molex-type power.
If you want to use a second old hard drive connected to motherboard type “IDE”, and the last one you have is new and no longer has such an input, then we buy an adapter from IDE to SATA.
Another option is to connect HDD To a computer that does not have a corresponding connector for it, use a special IDE-SATA PCI controller. The advantage of it is that with it you can connect an old IDE drive to new board, and a new SATA drive to the old motherboard. It looks like an expansion card that is inserted into a PCI slot on the motherboard and adds support for working with IDE devices. Let me remind you that you can connect two disks or drives to a standard cable at once.

Let's say you have already figured out all your nuances, purchased a second hard drive and, if necessary, adapters, and now you need to install it in the case and connect it to the motherboard and power supply. First, we fix the hard drive in a special basket in the case, or insert it along the guides and secure it with special fasteners or ordinary screws, depending on the type.

After that, connect the “small” SATA to the corresponding connectors on the back of the drive and on the motherboard, and into the SATA socket bigger size(for power supply) we insert either an adapter connected to the cable from the power supply, or directly the power supply cable with a SATA plug. We do this carefully so as not to break the socket on the hard drive, since there is no limiter at the bottom and you can easily break off a piece of the board with the contacts of this connector.
In the screenshot below, green arrows indicate wide SATA arrows that connect the second hard drive to the power supply, and red arrows indicate narrow ones that go to the motherboard.

Yes, do not forget that all connections must be made with the power supply disconnected from the outlet, or with the power switch turned off, if there is one on it. As you can see, there is nothing complicated.
How to install a second hard drive in a laptop?
Is this really possible? Yes, today you can also increase the amount of space not only on a desktop PC, but also on a laptop. And for this it is not at all necessary to replace the standard hard drive that is already in the laptop, and therefore you will not have to face all the associated problems, such as transferring files and reinstalling Windows and all programs on the new hard drive.
The second hard drive in the laptop (let me remind you, 2.5 inches in size) is connected using a special adapter, which is installed instead of a laptop DVD drive - you must admit, almost no one uses this device now. And if you need to view discs, you can always use an external one connected via USB.
This is what this adapter, invented (or copied?) by the Chinese, looks like:

In online stores it can be found under the name “2nd SSD HDD HD Hard Disk Driver Caddy SATA for 12.7mm CD / DVD-ROM Optical Bay”. Inside and outside this adapter there is a connector for connecting a disk and for connecting the adapter itself to the laptop board.
So, we insert the hard drive into the adapter. You may also have to screw the mount yourself to the back of the adapter, through which it will be screwed to the laptop body.


And in its place we insert the adapter and secure it with the same screw. After this, a new hard drive will appear in the “Computer” menu, which after formatting can be fully used.
How to install a small hard drive in a computer?
Speaking about connecting a hard drive, one cannot help but touch upon the problem that users sometimes encounter when they need to install a hard drive or 2.5″ SSD into a computer whose case only has mounts for standard 3.5″ drives. For this case, there are also special adapters in which such a hard drive can be secured and inserted into a regular place under disks of larger diameter.

BIOS does not recognize the second hard drive
Another common problem that you may encounter when installing 2 hard drives- the computer simply does not see one of them. First of all, if you are using an adapter, then this may be the problem. Use known-good adapters.
If you haven’t used it or your adapter is working, then the whole point is in the BIOS settings, namely the controller’s operating mode is set incorrectly hard drives.
We reboot the computer, go into the BIOS and look for the “SATA Controller” item (or SATA ATA/IDE/Raid Config, Mass Storage Controll or something else like that to set the HDD operating mode). If you connected a drive with a SATA cable to the motherboard and a modern operating system is installed on the computer ( Windows Vista, 7, 8 and above), then the AHCI, IDE, Native or Enchansed position can be activated in this item. Wherein
only in AHCI mode will be achieved maximum speed transferring data from disk.
If more old Windows, or if the hard drive was connected, then only IDE, Native or Enchansed.
The disk controllers themselves must also be enabled. I'll give you a couple of screenshots from different BIOS with these settings:

If your computer has 2 hard drives (or a disk + DVD drive) and both of them are connected via IDE cables, then the problem may be that they are not configured correctly. If you have just such a connection and in the BIOS you see the following picture:
then this is your case. In this configuration (when both are connected via IDE), one disk should be Master, that is, the main one, the one on which Windows is located, and the other Slave, that is, secondary.
This priority is configured using a special jumper installed on the contacts on the back of the case.
All possible positions of this jumper and their modes are usually described on a sticker on the disk body. They may differ from one manufacturer to another.

From our table we see that if Windows is installed on the disk and it will be the main one (Master), or if it is used alone, then we put a jumper on the first 2 vertical contacts. If it is secondary (Slave), then remove the jumper altogether.
We do this with our hard drives and go into the BIOS again. Now they will be automatically detected by the motherboard and the following picture should be drawn:

Thank you! Did not help
Often, unstable computer operation is associated with a lack of free space on the hard drive. To solve this problem, you can remove unnecessary files, but if there are none, you need to install an additional HDD on your PC. This article provides instructions for connecting a second drive and describes some pitfalls that a user can expect when performing this operation.
Motherboard support
So, how do you connect a second hard drive to your computer? "Are SATA or IDE ports soldered to the motherboard?" - the first question that should be answered before installing the HDD. You need to find out what model of motherboard is installed in the system unit. This can be done by installing the AIDA64 program on your computer. This utility shows complete information about your computer. On the left side of the main application window, just click on the text “Motherboard” to find out the model. After this, you need to find the documentation for the motherboard and find out which connection ports for drives are installed on it: SATA or IDE.
If you cannot find the documentation, you will need to study the hardware of the computer yourself. To do this, you need to remove the left cover of the system unit, having first unscrewed the mounting bolts on its back side. Hard disks located in the front of the PC case in special pockets. Pay attention to the train that comes from motherboard to HDD. If it is wide, it means the drive connection interface is IDE; if it is narrow, it means SATA.
After visual inspection Still have doubts about what type of connection is used on the motherboard? In this case, disconnect the cables from the drive and pay attention to their cut. If there is a slot in the shape of the letter "G" in the connector. If the IDE connector will look like a rectangle with two rows of holes.
Pay attention to the area of the motherboard where the cable from the drive goes. Are all ports busy? If there are no free ports, connecting a hard drive in the classic way will not work. Also take a look at the cable itself if the HDD connection interface is IDE. Usually it has two connectors for drives, and one of them may be free.

Before connecting a second hard drive to your computer, see if there are free pockets in the equipment case for installing drives. If they are not there, the hard drive can be placed on the bottom of the system unit, but this is unsafe for the equipment. When moving computer hard the disk will dangle, and there is a possibility that it will damage the PC components or fail itself.
Selecting a hard drive
Before you can connect a second hard drive to your computer, you must first purchase it. After determining the connection interface, you can begin selecting a drive. Remember that 3.5-inch hard drives are best for your computer. Smaller samples are designed for installation in laptops. Although, if you find a 2.5-inch form factor HDD that matches the parameters, you can install it in a special adapter case and use it in a desktop PC.
Also determine which one you will need. If only documents will be stored on it, it is enough to purchase a HDD with a capacity of 320 GB. If you plan to store high-definition films and computer games, it is better to choose a hard drive with a capacity of at least 1 TB.

It makes sense to pay attention to the characteristics of the speed of reading and writing data. There is only one rule: more is better. Although, if the computer is used only for working in office applications, it makes no sense to overpay for this feature.
Correct jumper position
Users whose motherboard only has IDE ports must make jumper adjustments. How to connect a second hard drive to a computer, where to put the jumper? So, if only one HDD is connected to the cable, the jumper must be set to the Master position, and the drive itself must be connected to the outermost connector of the cable. If two drives are connected to one wire, then the jumper on the additional hard drive should be in the slave position, and it should be connected to the connector that is located at a distance from the edge of the cable. There is no need to install jumpers on a SATA drive, since a separate cable is used for each drive.

How to connect a second hard drive to a computer?
Order HDD installations for drives with any interface is the same. Regardless of the type of hard drive, follow these steps to install it:
- Disconnect power from the system unit.
- Unscrew the bolts holding the left housing cover and remove it. This usually involves pulling it back.
- Place the drive in the pocket of the system unit. At correct installation the slots for screws at the place where the hard drive is mounted and the holes on the HDD will coincide.
- Tighten the mounting screws.
- Before connecting the second hard drive to the computer, pay attention to connecting the cables to the first one. Connect the wires to the additional drive in the same way as to the main one.
- Replace the case cover and turn on the computer.
BIOS setup
After a second hard drive is connected to the computer, several changes should be made to the BIOS, since sometimes the newly installed HDD is assigned as the first boot device. This results in the OS being unable to boot. To configure "BIOS":
- Turn on the computer by pressing the power button.
- As soon as the screen lights up, immediately start pressing the DEL or F8 key. Different motherboards use different buttons to enter the utility BIOS settings. To figure out which key to press, watch the messages on the screen or read the instructions that came with your motherboard.
- After entering the BIOS, go to the Boot tab.
- Use the arrows to select and press "ENTER".
- In the menu that opens, move the cursor to the First Drive item, press ENTER and select the hard drive on which the system is installed. If you are not sure which HDD should be selected, set the switch to a random position.
- Return to the previous menu by pressing ESC.
- Here move to the First line Boot Device and press "ENTER". Sometimes, to see it, you need to move to the Boot Devices Priority submenu.
- Select Hard Drive from the drop-down menu. Sometimes the full name of the hard drive will be displayed instead of this message.
- Press F10 to save your changes, then press ESC to exit the setup utility and restart your computer.
If after these manipulations the PC does not boot, return to step 5 and select another drive.
External hard drive
How can I connect a second hard drive to my computer if the SATA and IDE ports on the motherboard are busy? In this case the best option will be used external storage. Typically, such devices are connected to a USB port. Less often - to FireWire. In the first case, the drive can be installed on any PC, in the second - only on one equipped with a special port. The main advantage of an external HDD is portability. It can be easily connected and disconnected without turning off or disassembling the computer. However, such devices usually work slower than those installed in a PC case.
Operating system settings
What system settings should be made after the second hard drive is connected to the computer on WIndows 7? SATA or IDE - drives that are often not detected by the system in file manager after installation.

To display the new HDD in Explorer, follow these steps:
- In the Start menu search bar, type "Manage."
- Click on the item with the text “Computer Management”.
- On the left side of the snap-in window, select Disk Management.
- Click right click on the drive that is not displayed in Explorer. You can find out which HDD you should work with by comparing the indicated volume with the real one and examining the partition labels.
- In the expanded list of actions, click on “Create a simple volume”, then specify file system and cluster size, then click OK.
- After completing the operation, right-click on the HDD again, and select “Change drive letter” from the menu.
- In the window that opens, click on the “Add” button and specify the desired letter.
Good day.
For many users, one disk is often not enough for everyday work on a laptop. There are, of course, different options for solving the issue: buy an external hard drive, flash drive, etc. media (we will not consider this option in the article).
Or you can install a second hard drive (or SSD (solid state)) instead of a drive for optical disks. For example, I use it very rarely (I’ve used it a couple of times over the last year, and if I didn’t have it, I probably wouldn’t remember about it).
In this article I want to look at the main questions that may arise when connecting a second drive to a laptop. So…
1. Selecting the required “adapter” (which is installed instead of the drive)
This is the first question and the most important! The fact is that many people do not suspect that thickness The disk drives in different laptops may be different! The most common thicknesses are 12.7 mm and 9.5 mm.
To find out the thickness of your drive, there are 2 ways:
1. Open some utility, such as AIDA (free utilities: ), then find out the exact model of the drive in it, and then find its characteristics on the manufacturer’s website and look at the dimensions there.
2. Measure the thickness of the drive by removing it from the laptop (this is a 100% option, I recommend it so as not to make a mistake). This option is discussed further down in the article.
By the way, please note that this “adapter” is correctly called a little differently: “Caddy for Laptop Notebook” (see Fig. 1).

Rice. 1. Adapter for a laptop for installing a second disk. 12.7mm SATA to SATA 2nd Aluminum Hard Disk Drive HDD Caddy for Laptop Notebook)
2. How to remove the drive from a laptop
This is done quite simply. Important! If your laptop is under warranty, such an operation may cause a refusal warranty service. Whatever you do next, do it at your own peril and risk.
1) Turn off the laptop, disconnect all wires from it (power, mice, headphones, etc.).
2) Turn it over and remove the battery. Usually its fastening is a simple latch (sometimes there can be 2 of them).
3) To remove the drive, as a rule, it is enough to unscrew 1 screw that holds it. In a typical laptop design, this screw is located approximately in the center. When you unscrew it, it will be enough to lightly pull the drive housing (see Fig. 2) and it should easily “move out” of the laptop.
I emphasize that proceed carefully; as a rule, the drive comes out of the case very easily (without any effort).

Rice. 2. Laptop: drive mount.
4) It is advisable to measure the thickness using a caliper rod. If it is not there, you can use a ruler (as in Fig. 3). In principle, to distinguish 9.5 mm from 12.7, a ruler is more than enough.

Rice. 3. Measuring the thickness of the drive: it is clearly visible that the drive is about 9 mm thick.
Connecting a second drive to a laptop (step by step)
To begin with, I want to draw your attention to 2 nuances:
Many users complain that the laptop is somewhat lost appearance after installing such an adapter. But in most cases, the old drive socket can be carefully removed (sometimes small screws can hold it in place) and installed on the adapter (red arrow in Fig. 4);
Before installing the disk, remove the stop (green arrow in Fig. 4). Some people push the disk “from above” at an angle without removing the stop. This often leads to damage to the contacts of the disk or adapter.

As a rule, the disk fits into the adapter slot quite easily and there are no problems with installing the disk into the adapter itself (see Fig. 5).

Rice. 5. Installed SSD drive into the adapter
Problems often arise when users try to put the adapter in place optical drive into a laptop. Most often the problems are as follows:
The adapter was chosen incorrectly; for example, it turned out to be thicker than needed. Forcing the adapter into the laptop can cause damage! In general, the adapter itself should “ride” into the laptop as if on rails, without the slightest effort;
On such adapters you can often find compensator screws. In my opinion, there is no benefit from them, I recommend removing them immediately. By the way, it often happens that it is they that rest against the laptop body, preventing the adapter from being installed into the laptop (see Fig. 6).

If everything is done carefully, the laptop will have its original appearance after installing the second disk. Everyone will “think” that the laptop has an optical drive, but in fact there is another HDD or SSD (see Fig. 7) ...

Rice. 7. The adapter along with the disk is installed in the laptop
I recommend that after installing the second disk, go to Laptop BIOS and check if the disk is detected there. In most cases (if installed disk It works and there were no problems with the drive before) BIOS correctly detects the drive.
How to enter BIOS (keys to to different manufacturers devices):

To summarize, I want to say that the installation itself is a simple matter, anyone can do it. The main thing is to take your time and act carefully. Often problems arise due to haste: first they didn’t measure the drive, then they bought the wrong adapter, then they started installing it “by force” - as a result, they took the laptop for repair...
That's all for me, I tried to sort out all the pitfalls that may exist when installing a second disk.
Articles in the same category
I’ll share with you how I solved a problem related to my hardware. I worked and worked... and there wasn’t enough space. Have you thought about how to install a hard drive on your Acer AX3910 computer? There are not enough connectors for it.
I’ve been using this computer for several years now and I’ll tell you honestly, it’s never let me down, it works super reliably, quickly, and the most important thing I like about it is its noiselessness. Works like a laptop. It's on the table and you can't even hear it.
Engineers looking for a cost-effective alternative to serial connections began using parallel connections. Over the years the standard has changed significantly. This is not a controller: it is properly called a "host adapter". Social media continues to grow rapidly. Every year we learn new things about what works and what doesn't.
Your computer has two basic type memory: hard disk memory and RAM, and they perform separate functions. Technicians call non-volatile hard drive storage because data remains when the computer is turned off. Traditional hard drives constantly write data in tiny magnetic fields on spinning metal platters; Newer SSD technology has no moving parts and instead uses flash memory to store files.
Installing a second hard drive on an Acer AX3910 computer.
Before this model, I used the same desktop computers, of the same brand, only less powerful and with a smaller hard drive. As they were used, the need for a faster processor and a larger hard drive arose. I have been using this model for more than two years and have no plans to change yet. Except that there wasn't enough space on the hard drive.
Random access memory is a high-speed temporary storage area where your computer stores running programs, open documents, and intermediate results of calculations and file processing. This is useful if your programs require a large amount of memory. He also contributed to the book Nanotechnology: Molecular Reflections on Global Abundance. It also allows you to create redundancy to protect against data loss if your primary hard drive fails. Hard drives come in two versions: external and internal.
Computer settings:
For additional storage space, I have been using an external hard drive “WD Elements” for a year now. The brand is not known to me, it is made in Thailand.
This HDD has a USB3 connector, the data transfer speed is very high that I didn’t even need to increase the built-in hard drive.
And I wouldn’t worry if at one point he didn’t start working slowly. The time it takes to load files into my programs from this external drive has increased dramatically. And the programs are energy-intensive - Adobe Premier Pro, Adobe Muse. The brake became concrete.
And there was concern. When checking the disk, Windows declares a system error on the disk, but cannot fix it. And “my whole life” is on it! Archival photos, work over many, many months. It became creepy to even think, if suddenly... I don’t even want to say this word! I handle it very carefully, blowing off the dust.
First, determine if the computer system has room for an additional hard drive. Following the instructions in your computer's manual, open the computer case and locate the hard drive. If there is space above or below this hard drive for another device of the same size, you likely have room for a second hard drive.
Next, look at the cables connected to the existing drive. One will be the power connector and the other will be the data connector. The power connector goes to the computer's power supply, and the data connector goes to the motherboard. Also check if there is free place to connect a second drive on one ribbon cable. If not, you will need to install a second ribbon cable in the second controller socket on the motherboard, assuming it is accessible.
How to install a second hard drive
What to do? I decide to urgently install an additional 1 TB hard drive, leaving the original drive of the same manufacturer under the system, without reinstalling the system or changing anything. Bought for 3820 rubles. And knowing that this compact case does not have one for it, I decide to install it instead of a CD/ROM, and use an external CD/ROM, connected via a USB connector. It's not needed that often these days. And on the motherboard there are only two SATA connectors for disks.
Installing software on an external drive
- Make sure your original drive and your new drive are connected at the same time.
- The automatic installation will now begin.
- Run all available software updates.
How to determine the thickness of the device
I know of two types optical drives used on laptops that differ in thickness. "Thick" has a height of 12.7 mm, and "thin" - 9.5 mm. You can determine the thickness of the device you have installed without disassembling the laptop. To do this, first look at the device manager and look at the product model.
All you do is look for the location option during the installation process. At this point, it's too late to install them on another hard drive unless you want to go through and uninstall and reinstall the programs individually. However, you can't simply drag and drop program folders onto another drive. What you should do is create what is called a symbolic link. These are a bit like the shortcuts to programs, folders, and websites that litter your desktop, but they're more powerful.
There is no need to resort to complex commands, although there is a simple and free utility that does everything for you. Select "Custom Setting" and release all advanced features. When you install any software, it always asks where you want to save it. It has two halves and divides them in the middle - a column of icons.

I have this Optiarc AD-7580S. Now let’s visit any popular Internet resource that sells similar products or Yandex.market and look at the characteristics of the device.

As you can see, the thickness of the device, according to the description, is 13 mm (taking into account rounding, in reality 12.7 mm).
We need to select the source folders and destination. Make sure they are all checked. Now programs run from the hard drive. At some point, hard drive space becomes scarce and it is time to transfer data to an external hard drive. Or maybe you need an external hard drive for backups?
Connecting an external hard drive
Before purchasing a drive, please contact your computer to connect external media. When purchasing, pay attention to what connections the plate has. Depending on the application, you need a wafer with a higher or lower transfer speed.
Unpack and prepare the plate
When the drive arrives at your home, unpack it and check what's on the drive. In most cases, external drives come with a desktop or plug-in power supply and a connection cable for the computer.If in doubt, you can measure it yourself using an ordinary ruler. You can tell the difference between 12.7 and 9.5 drives with the naked eye.
Where to buy an adapter for HDD to ODD bay

It is a plastic box with small fee with connectors and microcircuit, also includes a USB cord for connection and a decorative strip on the front side. For some reason, the package included a mini-CD with drivers, but Windows 7 saw the device without installing additional software. Moreover, the device is detected from the BIOS, so it can be used as a bootable CD-ROM.
Connect the power supply and plug it in. Then connect the hard drive to your computer. If you want to be safe, turn off your computer beforehand. If the drive is connected, turn it on and, if necessary, turn on the computer. Now
Modern technologies are developing more and more every year. The time has long come when one hard drive in a computer is not enough. A huge number of people connect a second HDD to a personal computer. The connection procedure is nothing fancy and even a beginner can figure it out. Let's look at everything more carefully and in detail.
Connecting a second HDD to a laptop or Personal Computer
There are two options for adding an additional hard drive:
- TO system unit PC. This method Great for standard desktop computers;
- Addition in the form of an external drive. This is very easy way, which is suitable for all devices.
Method 1: Adding to the system unit
The process of adding additional media to the system unit can be divided into several small stages. Let's look at each of them in more detail.
Type Definition
At the very first stage, you need to decide on the type of interface with which the hard drive interacts. It is worth noting the important fact that the majority of computers have a SATA interface, therefore, it is advisable that the second hard drive be of a similar type. The motherboard may not have an IDE bus because it is considered very old, which may cause some problems when installing older hard drives.
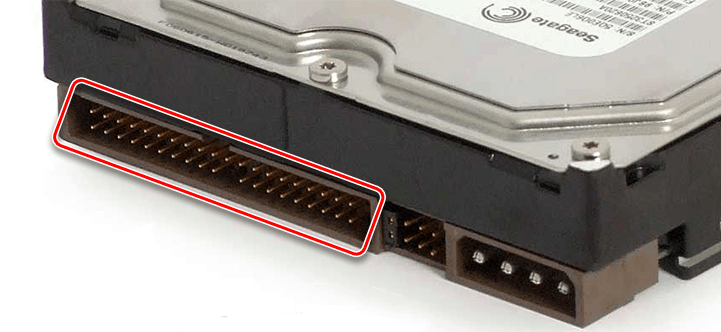
The best way to determine the standard is to carefully consider the contacts.
Example of a SATA connector

Example of an IDE connector
Adding a second SATA drive to the system unit
Adding an additional drive – simplest process which goes like this:

Boot priority for SATA drives
By default, there are four holes on the motherboard for adding SATA drives. It is worth understanding that their numbering starts from zero. Namely, the priority of the hard drive directly depends on the connector number. To set the priority yourself, you must use the BIOS. Each specific type of BIOS has its own special controls, as well as a special interface.
In the most early version you need to go to the “Advanced BIOS Features” menu and start working with items such as “First/Second Boot Device”. In modern versions, the path looks like this: “Boot/Boot Sequence – 1st/2nd Boot Priority”.
Adding an additional IDE drive
There are also cases when you need to connect an old IDE drive. Step-by-step instruction The process looks like this:

Connecting the second IDE to the first SATA
If necessary this procedure, then you will need an appropriate IDE-SATA adapter. An example of an adapter can be seen below:

Step-by-step instruction:
- First you need to put the jumper in the Master position.
- The IDE plug is connected to the hard drive.
- Take a red SATA cable and connect one side to the motherboard and the other to the adapter.
- The power cable is connected to the power supply and adapter.
About possible display problems
Sometimes it happens that after an additional hard drive has been connected, the system cannot recognize it. Don't panic, because most likely you did everything right. It’s just that for the second hard drive to work correctly, it needs to be initialized.
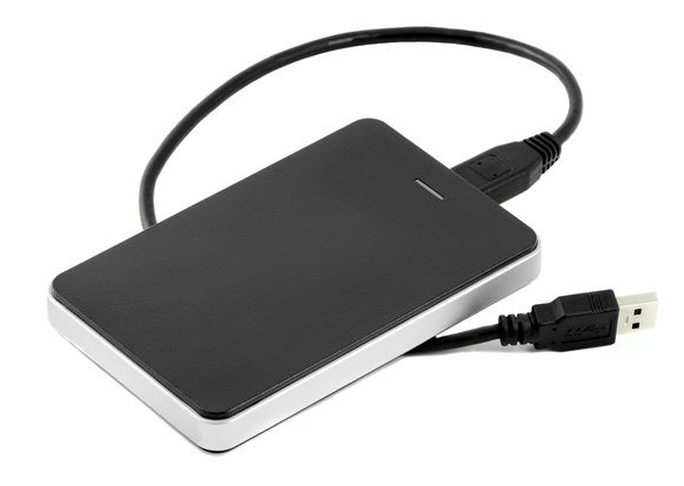
Method 2: Connecting an external hard drive
Connecting an external HDD is convenient if the stored files are needed not only at home, but also outside of it. In addition, this method is the only correct one for laptop owners, since they simply do not have a special additional connector for a new hard drive.
In fact, everything is easy here, because the external hard drive is connected via USB, just like any other devices (mouse, keyboard, flash drive, webcam and much, much more).
Hard drives that are installed in the system unit can also be connected via a USB connector. Here you will need outer casing for a hard drive or a special adapter. The bottom line is this: the required voltage is supplied to the HDD through the adapter, and communication with Personal Computer happens via USB. Different hard drives have their own wires, so you should always pay special attention to the standard that specifies the dimensions.
Related posts:
 High magnification monoculars - features and benefits Monocular magnification 50
 World of Tanks crashes on startup - fixing errors World of tanks crashes after every battle
 Server key 1c over the network
 How to turn on WiFi on laptops Add a new wireless network to a laptop
 How to find out iPhone serial number?


