What is the winsxs folder for. WinSxS what is this Windows folder, how to clean it? Removing components on demand
Many users are perceived almost as a standard of "fluidity" and a tendency to gradually litter with unnecessary files. Unfortunately, there is some truth in such beliefs.
That is why the popularity of various kinds of optimization programs, which allow keeping the livestock of this garbage under relative control, does not decrease in any way. But some users have little of their functionality, and therefore they decide to take matters into their own hands. The results can be disastrous.
For example, they often delete the WinSxS directory. What kind of folder is this, why deleting it can affect the performance of your system in a far from the best way? Let's find the answer to this question in our article.
What it is?
To understand why it is so important, it would be a good idea to first figure out its purpose. First you need to go back a little, telling about the history of Windows OS. The fact is that the release of the notorious Windows XP became a truly significant event: the line of 9x-systems was completely closed, after which NT-varieties became the main ones.
But the problem is that many of the functions that were in demand in older versions are needed for one reason or another in new systems. As a rule, this is due to compatibility issues, for which old bugs from older versions were carefully transferred to the same Internet Explorer.

So, the WinSxS directory has become a repository of such ancient elements. What is this folder? Is it just a systemic "dump"? No, it's not that simple.
Modifying Description Files
When Windows Vista came out, there were profound changes in the core of the system that did not appear in any way outwardly. So, earlier all the components were described by INF files, whereas in Vista the practice “binary file + XML” was first introduced. This bundle contains almost everything from registry keys to system settings.
All these bundles are stored in WinSxS. What kind of folder is this, in simpler terms? It can be called an important system store, which contains all the information about the system. In fact, this directory is an OS in miniature. Now it is clear what the consequences will be caused by its removal?
Most often, after such a barbaric step, the system will not work at all. And if by some miracle some part of its functions is preserved, then it will still be impossible to fully work on it.
Can it be cleaned?
Oddly enough, but such an operation is quite acceptable. Over time, the size of this folder begins to grow rapidly. This is due to the fact that new connections arise between system components, and some of them are already outdated.
Do not forget that the system is constantly changing and improving: for example, when you install updates, not only new, but also old versions of system files appear in the folder. This is done to enable rollback to the old system view.

Simply put, as a result of maintenance and customization, the volume of this directory will continually grow until one day it exceeds all reasonable limits. But before cleaning WinSxS, there are a few simple rules to remember.
Firstly, only system utilities from Microsoft itself should be used for its "sanitation". Secondly, manual change of its components is unacceptable, since the consequences of such "creativity" will be unpredictable. Thirdly, if you do not understand the meaning of this cleaning, and the size allows, it is better to completely abandon such an idea. You will definitely not increase the performance, but you can earn problems in abundance.
How is cleaning done?
We have already said that before cleaning WinSxS, you need to use the services of a special utility. It is hidden in the depths of the system, and therefore ordinary users are not even aware of its existence. It is called DISM, and currently its eighth version is included in Windows.
For the utility to start, you need to have administrator rights. To start it in this mode, perform the following operations: click on the "Start" button, and in the menu that opens, find the search string. Enter the word "CMD" into it, press the "Enter" button.

A list of found elements will appear in the right part of the window, among which there will be a file of the same name. Right-click on it, and in the drop-down context menu select the "Run as Administrator" item.
First, we find out if the cleaning operation is really necessary at a particular moment. To do this, you must use the following command: "Dism.exe / Online / Cleanup-Image / AnalyzeComponentStore".
After that, several incomprehensible lines will appear, the meaning of which we will now explain. So, after the line “Component Store
The second line shows the real size of all components, which should be guided by. Finally, the most recent value is the number of those system files that have been replaced with new ones, and therefore they can be removed painlessly.

The first way
It is the most simple and effective. So, to make the WinSxS folder of Windows 7 smaller, run a command prompt in administrative mode. Enter the following command into it: "Dism.exe / Online / Cleanup-Image / StartComponentCleanup". A little time will pass, after which the system will inform you about the operation.
Attention! If you performed the operation using the first method, then all other actions can be omitted, since they will no longer make sense.
Second way
Start the command line emulator again in Administrator mode. Enter the command "cleanmgr" into it, then press the "Enter" key. The utility will start. In the latest versions of Windows, it can even determine the volume of old system update files that can be painlessly removed from the OS.
Third way
This method is intended to remove all old versions of components that are no longer needed. It is extremely useful for computer owners who have been running the same version of Windows for several years.
Important! If you follow our advice, you won't be able to rollback the update. The warning is all the more important because recently Windows 7 users suffered a series of system failures associated with the unsuccessful KB2859537 patch. However, if everything is fine with your OS, then the WinSxS folder (we will tell you how to reduce it) may be revised.
This operation is performed by the command "Dism.exe / Online / Cleanup-Image / StartComponentCleanup / ResetBase". The gain in the amount of freed up disk space will directly depend on the total number of updates that you have installed since the installation of the system itself. It happens that the size of the freed space is measured in gigabytes.

Should I clean it
So, after all of the above, you may well be in some difficulty. And this is understandable: on the one hand, the gain in the amount of freed up space attracts, but on the other ... What will you do if some update file turns out to be problematic?
If there is a corresponding WinSxS file, then there is nothing to worry about. But when it is not there, in some cases only reinstalling the system can help. So before this operation, we strongly advise you to decide whether you really need this bit of free space. Moreover, as you know, in Windows 8 WinSxS is partially optimized by system tools, so you shouldn't worry too much about it.
The WinSxS folder is located on the C drive in the Windows directory and is used to reserve storage of previously installed versions of system components. Its volume can be huge, often several gigabytes... Some users may be annoyed by this fact, and some (on computers with a small hard drive) simply need to somehow save space, including by reducing the volume of this folder. Fortunately, now, due to the significant volume of modern disks (several terabytes), this problem is almost no longer relevant and many may not even think about how to reduce this folder.
Why is it so large and constantly increasing?
We immediately warn you that it is extremely not recommendedmanually delete something from this folder using the standard method. Some even ask if it is possible to completely delete this folder? The unequivocal answer is no, by no means. This will almost certainly lead not only to system errors, but can also cause irreparable damage to the system up to to the impossibility of launching it further.
However, it is quite possible to reduce its volume in reasonable ways without harming the OS. Tips on cleaning methods will be described below for various operating systems: Windows 7, 8, 10. But you should not expect special miracles, the volume of this folder usually cannot be reduced much, most often such cleaning will be limited to several hundred megabytes, but in some cases you can and save a couple of gigabytes.
During Windows update, outdated versions of files and information about changes saved in this folder... This is necessary if you decide to rollback in case of problems - therefore, the contents of WinSxS improve reliability and resilience to system failures. The size of the folder depends on which periodicity the components are updated as often. That is, if you installed your operating system relatively long ago, then the directory will probably weigh significantly.
How to empty a folder in Windows 10
A dozen, in addition to the previously described, uses this directory to ensure Windows reset in case of unforeseen circumstances to the original state.
Applying the steps described below when updating the OS, you will be able to get rid of unnecessary files.
First load the console cmd on behalf of the admin. The line to be entered for our purposes will be next:
Dism.exe / online / cleanup-image / AnalyzeComponentStore 
The WinSxS directory will be analyzed and see if it needs to be cleared.
If it is written Yes, then enter the command as in the next window. 
The cleaning of our storage from obsolete files will automatically start, after which we will observe a message about the successful completion of the operation.
Cleaning should not be done very often, it only makes sense if the folder exceeds 7 GB in volume, less is normal.
We clean the folder in Windows 7
You need to tinker with this version of the system, as you need install additional update KB2852386, and then the required field will be added to the utility for cleaning disks.
First let's run Update centre by entering the word "center" in the search, or using Control Panel.


In the Download and install updates field, click Install... We look for the required, install it, then reboot.
Loading Disk cleanupby typing the word "cleaning" in your search. 
In the utility, we are interested in cleaning system files, namely the field “ Cleaning Windows updates»Or backup files. 
Clearing the folder in Windows 8
In the eight (8.1 also) in the disk cleaning utility, the ability to clean system files is available by default, which pleases - no need to make unnecessary gestures to install optional additional updates.
We start in the same way by entering the name of our utility in the search. 
Similar to the seven we clean system files, or clean updates in the downloaded files. 
In the eight with one, you can, as in the ten, clear this directory in console cmd(on behalf of the admin, of course). The team we are interested in: 
DISM (Image Serving System) is utilityto help you install, configure, and update files and components in Windows.
Auto cleanup of backups
It is best to configure the automatic cleaning of these backup components, so as not to think about whether or not to start optimizing the WinSxS content or to prevent erroneous deletion of the necessary files.
You can configure this function in Planner... To open it in search let's hammer in the word “ scheduler».


In the console, follow the path Library \\ Microsoft \\ Windows \\ Servicing 
Find the task StartComponentCleanup in the menu click Execute... The task of cleaning and compressing the components will start. You can also configure the optimal frequency of this task.
When you see the WinSxS directory - what is this folder in general, and why does it weigh so much? You cannot erase all content. At least in the usual way. If you delete important system files, the OS will malfunction. But the size of the directory grows over time. And it will be useful to figure out how to clean it and whether it is possible, in general, to do it.
WinSxS is located in the root directory of the OS (usually C: \\ Windows) in all modern Win, starting from version 7. The files and directories that are there are needed for the operating system to work. If they are removed, changed, moved or renamed, serious problems can arise. At best, errors will appear. At worst, Windows will no longer start. And you have to restore it. Therefore, before you clean up any system directory, make sure that it does not damage the OS and does not cause critical failures. And in order to understand if WinSxS can be removed, you need to figure out what it is for.
It stores the files that are needed to restore Windows. After each update, a backup is created - a certain image of the system. With it, you will be able to return Win to the state it was before the update. This is a useful and necessary feature - after all, new versions of programs and services do not always work stably.
If you installed the OS recently, then WinSxS will be "small" - only a few gigabytes. But over time, the directory grows or takes up more and more disk space. Its sizes sometimes reach 10-30 GB. Moreover, some of the content may no longer be needed. Why would you go back to the security update you downloaded a year ago?

But you can't just clear the entire folder. Or delete some "old" files by looking at their creation date. If you act carelessly or thoughtlessly, the system will stop functioning. It is possible to reduce the size of this directory using some built-in OS tools. Or just reinstall Win.
The memory that is specified in the WinSxS properties is slightly different from the "real" folder weight. In fact, it is slightly smaller, since some of the content is hard links (symbolic). The conductor "does not notice" them.
If several days have passed after the update and the OS is working normally, then the backup is no longer needed. However, it is recommended to erase only "old" files. After all, they definitely won't be needed. Full cleaning of the WinSxS folder in Windows 7 is not possible. Only some files are allowed to be deleted. This requires SP1 to be installed.
The freed up space can be distributed more profitably: download applications, download videos, save personal data, and so on. Or leave some memory for the needs of the system.
How do I know if SP1 is installed?
It was in Windows 7 SP1 that access to Win SxS appeared. In previous versions of Win, clearing this folder was not possible. To see if this package is on the OS:
- Go to the "Control Panel" (for example, through the "Start" menu).
- Open the System option under the System and Security category.
- The "Edition" field should contain information: OS version, Microsoft copyright, year of creation. If there is a line "Service Pack 1" there, then everything is in order and the catalog can be edited.

Before cleaning
Before cleaning WinSxS, you need to download one update (if not already installed).
- Go to Start - Programs - Update Center.

- Click on "Optional Updates". If there is no such item there, then all services are already loaded.
- Find the update with the number "KB2852386" in the list.
- Check the box and confirm the installation.
Without this update, WinSxS cleanup will not be available. It can also be downloaded from the official Microsoft website.
- Go to com.
- In the search bar at the top right, enter "KB2852386".
- Choose the update that suits your system: 32-bit or 64-bit.
- To, right-click on the "My Computer" icon, then on the "Properties" item. The "Type" line will indicate the bitness of Windows.
Cleaning
If you are wondering how to remove WinSxS, give up this idea. You cannot completely erase this folder. It is also not recommended to manually remove files from there. There will be unpleasant consequences. But clearing some of the content and making the directory a little smaller is a very realistic task.
Disk cleanup function
- Right click on the system drive. A context menu will open.
- Select the "Properties" line.
- General tab.
- Disk Cleanup.

Click on Disk Cleanup
- Check Windows Updates. If it is not there, click on the "System Files" button. The required line should appear.
- Confirm the action by clicking on "OK" and then on "Delete".
- Wait for the process to finish. Next, a PC restart may be required.
- The service only gets rid of unnecessary updates. You cannot erase the entire folder.
Command Prompt in Windows 10
WinSxS in Windows 10 can be cleared by using the console.
- Right click on the Start Menu. It looks like the Win logo.
- Select "Command Prompt" and run it as administrator.
- Enter the command "Dism.exe / online / cleanup-image / AnalyzeComponentStore".
- The system will analyze and issue recommendations.
- If it prompts you to remove unnecessary files, use the command "Dism.exe / online / cleanup-image / StartComponentCleanup". Cleaning starts.
- If the directory weighs less than 5 GB, it is better not to touch it. Otherwise, the opposite effect will turn out - an increase in volume instead of optimization.
If the WinSxS folder takes up too much space, you can clean it up. This is done through special OS services or the command line. Do not modify the contents of the directory directly. If you delete all files using the "Delete - Enter" method, serious problems will arise.
During the operation of the OS, users notice the rapid growth of the Windows folder. The increase in size is due to the fact that the internal winsxs folder begins to weigh a lot. Let's see what this winsxs folder is in Windows 7, 10, 8 and whether it can be deleted or cleaned.
Winsxs - what is this folder and should it be deleted
This folder is located along the path C: \\ Windows \\ winsxs and stores files of OS components, as well as backup copies and updates to these files. Even if these components are not installed in the operating system, they are stored in the winsxs folder, taking up HDD space.
Note: Under these circumstances, the letter of the local drive is C. Your letter may differ, be careful.
In fact, the OS components are in other places, and the contents of the winsxs folder are links to those components. When Windows updates are installed, they and their old copies are deposited in the winsxs folder. Over time, updates become more and more and, accordingly, the winsxs folder takes up a lot of space in Windows.
The winsxs folder can be up to several gigabytes in size. Although this free space does not mean anything for modern hard drives, it will not be superfluous. To find out how much winsxs weighs, just right-click on it, then select "properties", on the "general" tab, see the number of megabytes. This method will not give information about the actual size of the folder, but will help to judge the amount of free space. Remember this number, it will be needed in the future for comparison. 
Important! It should be noted right away that it makes no sense to manually delete the winsxs folder in Windows in the traditional way, since you can remove the components that are vital for the operation of the system.
Cleaning programs will not work, there are standard OS tools that will help you clean the winsxs folder in Windows. Let's take a closer look at the methods.
Removing old updates through the Disk Cleanup utility
This method works in Windows 7 and older, which will reduce the size of the winsxs folder. Run Disk Cleanup in one of the following ways:

In the new window, click the clear system files button (shown in the screenshot). If prompted by UAC, click yes. 
To clean the winsxs folder in Windows, make sure that the checkbox next to the "Clean up Windows updates" sub-item is checked, since this section is responsible for deleting files in the winsxs folder. Check other items as you wish. In this window, you can also estimate the approximate amount of free disk space. Finally, click OK and wait for the end of the process, you may need to restart your PC. 
Note: the function of clearing updates is built into windows 8, 10. For the seven, Microsoft released an update for this option to appear. If you do not find the update cleanup point, then download and install the KB2852386 update package. The methods below do not work on Windows 7.
Cleaning with Task Scheduler
With the release of Windows 8, there was a function that allows you to clean the winsxs folder automatically. The OS has created an automatic StartComponentCleanup task that runs in the background to remove old versions of files after 30 days. This period is given to exclude incompatibility of new updates. You can manually start this task by following the steps below.
To start the task scheduler, in the "run" window (called by the Win + R buttons), write the taskschd.msc command, then click OK. 
On the left side of the window, expand the Task Scheduler Library section, then the Microsoft and Windows subsections, find the Servicing section and click it. Select StartComponentCleanup, on the right side of the window, click "Run" to start cleaning the winsxs folder. You need to wait about an hour. 
Note: you can accomplish this task through the command line. You must then use the command:
schtasks.exe / Run / TN "\\ Microsoft \\ Windows \\ Servicing \\ StartComponentCleanup"
Cleaning up via the command line
Dism.exe is a cmd application that allows you to perform various manipulations with Windows components, which will help you clean up the winsxs folder. Windows 10, 8.1 introduced a new AnalyzeComponentStore parameter to help determine how much space the winsxs pack actually takes up. Bring up the command line with administrator rights, enter the following command and press Enter:
Dism.exe / Online / Cleanup-Image / AnalyzeComponentStore
As a result of the calculations, you will know if cleaning is recommended. To see the amount of memory that can be freed, take a look at the items marked in the screenshot. The sum of these two elements shows the amount of used hard disk space. 
After the analysis, you can start cleaning the winsxs folder. The StartComponentCleanup parameter in cmd produces similar results as in Task Scheduler. However, the components are removed immediately, without waiting. In cmd with admin rights, enter this construction, then click Enter:
Dism.exe / online / Cleanup-Image / StartComponentCleanup
Using the ResetBase parameter you remove all obsolete versions of each component. The command looks like this:
Dism.exe / online / Cleanup-Image / StartComponentCleanup / ResetBase
The SPSuperseded parameter helps reduce the space that the service pack takes up. Use a command like this:
Dism.exe / online / Cleanup-Image / SPSuperseded
Wait for the completion of these commands. Next, estimate the amount of memory freed through the AnalyzeComponentStore parameter. 
Removing Windows Components
Windows 8, 10 allow you to enable, disable Windows components. These functions are located in the "Programs" section. 
All Windows components are stored in the winsxs folder, whether they are enabled or not, and take up space. There is a way to help remove these components from winsxs entirely, thereby freeing up space. In the future, you can download remote components as needed.
Run cmd with admin privileges. Enter the command below, then press Enter:
DISM.exe / Online / English / Get-Features / Format: Table

The command line will build a table of component names, as well as their states. Remember the name of the component to be removed and use the following command:
DISM.exe / Online / Disable-Feature / featurename: NAME / Remove
In this command, you need to replace NAME with the name of your component. In the example, we will remove DirectPlay. 
This will change the status to Disabled with Payload Removed. In these ways you can clear the winsxs folder in Windows.
That's all, now you know winsxs - what is this Windows 7, 8, 10 folder and how to clean it. It is recommended to use the first three methods first, although you do not need to resort to the method with the task scheduler, since it is duplicated, but everything is at your discretion. Removing the components is not recommended because it will not free up much space, and the removed components may be needed in the future. You can also, to free up additional space on the HDD.
Many are faced with the problem of lack of free hard disk space. Especially often the disk on which the operating system is installed becomes clogged. This is due to the fact that there are a lot of folders on it, which the system itself fills with the information it needs. This problem is also relevant for Windows 7. You can clean up system folders from unnecessary garbage either manually or using special programs.
Windows 7 system folders: the need to clean up and possible consequences
Each of the system folders has its own purpose and stores information of a certain kind. Before cleaning the disk, carefully read what function this or that folder is responsible for, otherwise you may lose important data or severely harm the operating system, which will lead to its breakdown:
Video: what files can be deleted on the system drive
What not to do when cleaning up system folders
Please read the specifics of the above folders carefully. Before clearing one of them, consider if its contents will be useful to you in the future. Some folders, such as Windows or System32, shouldn't be touched at all. And don't try to clean up folders by simply deleting their contents. This will lead to the fact that the remnants of them will remain in the computer's memory, which in the future will begin to litter and overload the system. There are only a few folders that you can manually clean up:
In no case do not delete the folders themselves, this will lead to critical errors in the operation of the system, you only need to erase their contents. Also, before clearing system folders, make sure you can free up memory by other methods, for example, by uninstalling third-party applications and games.
Methods to clean up Windows 7 system folders
If you nevertheless decide to clear your hard drive from accumulated third-party files, then the easiest way is to use the built-in Windows functions. There are two initial options - standard and advanced cleaning.
Standard cleaning
Using the standard cleanup method, you will get rid of the following files and folders:
To perform a standard hard disk cleanup, follow these steps:
 Opening the properties of the system disk
 Go to the "General" section
 Select the files you want to delete
 Click the "Clean" button in the "System Restore and Shadow Copy" section
Extended cleaning
With the advanced cleaning option, you will delete the following folders and files:
To perform advanced disk cleanup, follow these steps:
 Run "Command Line" as administrator
 We register the cleanmgr command
 Select the drive on which to perform cleaning
 Selecting the files to be deleted
Video: Windows Disk Cleanup
Disk cleaning with third-party programs
Before proceeding with the manual cleaning of each folder separately, you should use special third-party programs created to automatically search for and clean the disk from unnecessary files:
 Download the CCleaner app
 Go to the "Cleaning" section
 Selecting the sections to clear
 Press the button "Analysis"
 Before deleting files, you can view their details
Video: Delete System Files Using CCleaner
Features of cleaning individual system folders
If the previous cleaning methods did not solve your problem or you need to clean one of the folders selectively, then find it in the sections listed below and follow the instructions.
But many folders are hidden by default so that the user does not accidentally damage them. To display hidden folders in the general list, do the following:
 Opening the explorer
 Expand the "Service" menu
 Go to the section "Folder options"
 Go to the "View" section
 Changing the parameters of hidden folders
Winsxs
Cleaning the Winsxs folder on Windows 7 is done through a standard disk cleanup. This method has already been described above. Before starting the cleanup, you are presented with a list of files that can be deleted. Check the section "Files of the backup copy of the update package" in it.
 We mark "Files of the backup copy of the update package"
Video: how to empty the Winsxs folder in Windows 7
System Volume Information
To clear the System Volume Information folder, you must first access it:
 Open the properties of the System Volume Information folder
 Go to the "Security" tab
 Press the button "Change"
 Click the "Add" button
 We register the username
 We give full access to the folder
 Go to computer properties
 Go to the "System Protection" section
 Press the button "Configure"
We successively press the buttons "Apply", OK.
DriversStore
To remove outdated drivers from the DriversStore, follow these steps:
 Opening the command line
 We register the command pnputil.exe –e
 We register and execute the command
Installer
The Installer folder may contain files necessary for the system or programs, but there is a special third-party application PatchCleaner that automatically detects what can be removed from the content:
 PatchCleaner searches for obsolete update files and allows you to move them to another media or completely remove them
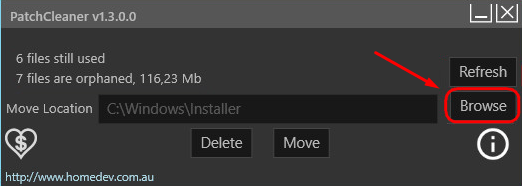 Click the Browse button
 Specify the path to the Installer folder
 Press the Delete button
 We confirm the action by clicking on the Yes button
Pagefile.sys
If you are sure that the computer will cope with the required tasks without the Pagefile.sys paging file, you can remove it by following these steps:
 Go to the section "Additional system parameters"
 Press the button "Options"
 Click the "Change" button in the "Advanced" tab
 Setting the required parameters
 Restart your computer
Folders with history, cache and browser cookies
Browser files can take up a lot of disk space. The easiest and safest way to remove them is through the settings of the browser itself:  We mark the files. which need to be removed from the browser history
 We set the parameter "For all time" and clear the history
Disk cleaning problems
If, after you have deleted any files from the system folder, errors appear or the computer starts to slow down, there is only one thing to do - perform a system restore. This could happen if the disk was not cleaned correctly or necessary files were deleted. System recovery is possible only if the computer has restore points:
 We start the computer in safe mode
 Open the "System Restore" application
 Click the "Next" button
 Choosing a restore point
Video: Windows 7 Recovery
What to do if there is no "Clean up system files" button
If, when trying to free up disk space through the standard cleaning method, you are faced with the absence of the "Clean up system files" button, this means that you have disabled UAC (User Account Control), and the program starts immediately with the ability to clean up system files. That is, pressing the "Clear system files" button gives you administrator rights and with them the ability to edit and clear system folders. But if UAC is disabled, then you have access to changing system files right away and you do not need to press any additional buttons.
 If the button "Clean up system files" is missing, account control is disabled
If you want to clean up disk space or are sure that a part of the virus has survived in the system files, then the operating system itself has a standard and extended disk cleanup function for this case. You can also use third-party programs or clear each folder separately. But do not delete everything, otherwise it will lead to a breakdown of the computer, and the only way out is to roll back the system to the last restore point.
Related entries:
 Presentation on the topic "social structure and social relations" Social stratification by Weber
 The rapid development and expansion of the fields of application of electronic devices is due to the improvement of the element base, - presentation
 Boolean values, operations, expressions
 Von Neumann architecture presentation
 The history of the development of computer technology The beginning of the computer era


