Windows 7 welcome backgrounds. Windows Welcome: specifics of disabling or changing the background of the PC boot screen. How to make a voice greeting
Hello, dear readers! Probably after prolonged use of the operating room windows systems 7 you get bored standard image, which expresses the greeting when logging into the OS? The same screensaver constantly catches the eye, which can cause not the most pleasant emotions in many people.
If so why don't you change start screen a drawing or photograph that is more interesting to you? This is not as difficult as it might seem at first glance - the replacement operation will take you a few minutes at most. So, it's time to figure out how to change the background. windows greetings 7 so that the background when loading can always delight you!
Using software to achieve a goal
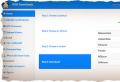
This method is intended not only for users who do not want to perform many actions, but also for those who are afraid to carry out operations with system registry... To change the screensaver when entering the OS, you must first download and install software, which is called " Logon background changer". Its weight is barely more than 700 kilobytes, so there will be no problems with downloading and then installing. Background replacement instructions:
- Run the above software and prepare the picture that you want to install on the login window.
- In the running application, select "Choose a folder" and select the one you need in the lower list of images.
- After you have made your choice, click "Apply" and confirm the changes to the OS settings.
After confirmation, the image will be saved and installed on the loading screen. Now you can go to it (CTRL + ALT + DEL) and view the results of your work. All actions will take a maximum of 3-5 minutes.
How do you achieve what you want using the registry?
Advanced users can disable or change the picture by contacting the Windows 7 registry. If you also want to try doing everything yourself, use the following detailed instructions:
In the search menu, type regedit and press Enter. After completing the steps, the editor window will open.

In the left list of folders, find the path HKEY_LOCAL_MACHINE \\ SOFTWARE \\ Microsoft \\ Windows \\ CurrentVersion, then go to the Authentication folder, followed by LogonUI and open the Background location.

Here in the right window you will find the OEMBackground. If it is not there, then create it. right click mouse: create / parameter DWORD 32 and name the file OEMBackground. After clicking on this file 2 times, a window pops up and specify the value 1 in it.

When you're done with the registry, create in system folder System32 \\ oobe storage folder and name Info, and in it, change the backgrounds folder. This is where you need to upload the desired background image. Look at the picture, what is circled in red, you should get the same path.

When you place a picture on the specified path on the disk, it must be in JGP format and no more than 256 KB in size, it will be automatically installed on the boot screen. To save the changes, you need to restart your PC.
Share this article with your friends so that they too can make their OS more fashionable, attractive and beautiful. Do not forget to subscribe to new articles and instructions in order to be among the first to know about the most useful and demanded information on competent and effective work with a computer. Until next time!
Every ordinary user can easily install a greeting on windows 7 in order to hear a voice in audio mode or comment on any actions.
Installing a greeting on windows 7 does not require any software, just open the Notepad utility. The added text is perceived by the utility when it is written in English. For example, you want to hear a voice prompt when you turn on your computer.
Open Notepad and drive the following English words into it:
Dim speaks, speech
Speaks \u003d "in these quotes you type the words you want to hear, always in English, for example: Goodafternoon, Alexander! I wish you luck. "
Set speech \u003d CreateObject ("sapi.spvoice")
speech. Speak speaks
This file can be saved with whatever extension and name you want. If you did everything correctly, when you open the file, you will hear the text written in it. Open through the button and move the file there. Execute. After this operation, you should hear your text.
Debugging voice parameters
If desired, you can adjust the desired volume, speed, and tone voice message... You can do this in two ways: through Narrator and using special commands.
Configuring with Narrator
Open the window Execute (Windows R) and type in the narrator command. In the Narrator pop-up window, find voice settings... Read the settings carefully and make whatever you see fit. Then confirm the action.
Debugging Using Commands
Customizations can be made using VBS commands
For example:
Set .voice \u003d .getvoices.item (0)
The meanings of several other commands:
.Volume \u003d Volume
.Rate \u003d playback speed
Windows XP is a Microsoft masterpiece (in my opinion, I'm a big fan of this OS). But for so many years, it has already been working on many computers that it has become boring with its interface. In one of the articles I have already told. Now, let's walk through the process of creating and modifying the Windows XP Welcome screen.
When I wrote about the boot screen on XP or about, I was limited mainly standard means OS without resorting to any help third-party programs... But to change the Windows XP Welcome screen, you need to install one little Resource Hacker. It takes up little space, and you can download it for free and via a direct link.
Changing the Windows XP Welcome Text
In order to change the Windows XP welcome screen, you need to edit the logonui.exe system file. We will edit it using the downloaded and installed program.
Before making changes to the logonui.exe file, I recommend making a backup, since the changes may not be reversible and entail unpleasant consequences. To make a copy of it, just copy the file to some other folder.
So, launch Resource Hacker and open the logonui.exe file through the File and Open menus. This file for modifying the Windows XP Welcome screen is located in C / WINDOWS / System32. When the file is displayed in the program, open in the left menu "String Table", then "1", and then "1049".
In the right window of this program, you will see the standard OS labels that appear in the welcome window. All of them can be edited. But since we need to change the Windows XP welcome picture, we go to line 7 (sometimes there may be a different line number), and change that inscription to the desired one. You can change other phrases if you wish.
For example, I had "Welcome", I changed it to "Hello \u003d)". When editing, do not remove the quotes, they should open and close the greeting caption.
After changing the text, click "Complete Script" and save the changes through the menu "File" and "Save".
Now, if you did everything correctly, after restarting you will see your inscription in the Windows XP welcome window.
Changing the Windows XP welcome picture
Changing the Windows XP Welcome screen is similar to changing the text of the caption. To do this, also open the same via Resource Hacker system file logonui.exe.
Now we need to select the "Bitmap" folder in the left menu, then "100", and then "1049". On "1049" you need to right-click and select "Replace Resource". A window will open in which you need to click on "Open file with new bitmap". After that, you need to select a picture that will replace the Windows XP welcome screen. When the picture is selected, it will be displayed in the thumbnail window. Click on "Replase", leaving the rest of the default settings.
After that we save the changes through “File” and “Save”. Reboot and admire.
To change the Windows XP welcome window, you must select a picture with the * .bmp extension. Make any picture in, which is in each OS or through other image editors. It is better to make the picture resolution the same as your monitor. To edit pixel resolutions and crop images you can, I told you how you can do it. There are no other restrictions.
That's all. Now we know how easy it is to change the text and picture of the greeting on Windows XP.
Windows7 is one of the most popular versions of the system. We are all used to seeing the welcome blue screen with the words "Welcome". Of course, he can get bored, despite his attractiveness, and there is an opportunity to change him. Not everyone knows how to do this, but with the help of our advice, you will certainly succeed. To call this splash screen, just click Ctrl / Alt / Del.
This article describes three ways to change the windows 7 welcome screen:
1
... Using the LogonBackgroundChanger program.
2.
With the help of the TweaksLogon program.
3.
Change windows 7 welcome screen without programs.
Method 1.
1.
Download the LogonBackgroundChanger app from the internet.
2.
Unzip the directory.
3
... Double-click the Win7LBC.exe file.
4.
Follow all instructions.
5. At the bottom of the screen there will be an inscription "Preset Startup Screensavers" Choose any you like. If you want to choose yours, click "ChooseAFolder", select the desired directory.
6. When you decide on the picture, click "Apply", then "YES" and wait.

7. In the option of choosing a large picture, the application will cut it down to 256Kb.
8. To see what happened, use the Ctrl / Alt / Del combination.
Method 2.
1
... Download the TweaksLogon app from the Internet.
2.
Unzip the folder.
3.
Find the TweaksLogon.exe file and run it.
4.
Follow all instructions.
5.
There are no picture templates in this application, as in the previous one. Therefore, choose your own, indicating the path to it. ("Select Backgroud" button).

When large size pictures you will see a window:

Accept size reduction.
6. The background will be changed. To check press TEST.
7. Click RevertToDefaultLogonScreen to return.

Method 3. Change the windows 7 welcome screen without programs.
1. This method allows you to change the screen background without installing programs.

2. Go to START and write regedit.

3. In the window that opens, find OEMBackground, right-click. Change the value to 1.
When the computer starts, it usually plays sound greeting Windows. You can change this greeting music or turn it off altogether.
How to remove Windows welcome
Open the Control Panel and go to the Hardware and Sound category.
Control Panel open category Hardware and Sound  Standard music for voice greeting is disabled
In this window you need to go to the "Sounds" tab. To disable the standard Windows welcome sounds, uncheck the "" Play melody on this tab windows startup"And click on the" OK "button.
How to change the Windows 7 greeting
You can change the greeting sound in Windows 7 to some non-standard greeting, such as a verse greeting or a voice greeting in English or Russian, and you can also make a musical greeting from your favorite music track. To do this, in the "Sound" window on the "Sounds" tab, find the program event "Windows Logon" and click on it.
 A window called Sound
 After that, the "Browse" button is activated. Click on it and a window will open in which you need to find the file you need.
 This folder contains the standard Windows 7 welcome ringtone
 This file must have the extension .WAV. You can make a file with the .WAV extension sound. After you find desired file you need to click on it and click the "Open" button, and in the "Sound" window you need to click the "OK" button. Your greeting will now play when Windows starts.
How to change the greeting in Windows 8
You can change the Windows 8 greeting in the same way as changing the Windows 7 greeting. The only difference is that by default in Windows 8 in the Sound window on the Sounds tab there are no program events "Enter Windows", "Exit Windows "And" Completion windows work". Therefore, you must first enable the Windows Logon program event for it to appear. You can enable it in the Registry Editor. We launch the Run command by simultaneously pressing the WIN + R keys on the keyboard. The Run window will open.
 Run the regedit command
 In this window you need to enter the "regedit" command without quotation marks and press the "OK" button. The Registry Editor will open.
 Find the WindowsLogon branch in the Registry Editor
 In this registry editor, you need to go along the path HKEY_CURRENT_USER - AppEvents - EventLabels - WindowsLogon.
 Find the ExcludeFromCPL parameter and change it
 By clicking on WindowsLogon in the right window, you need to right-click on the ExcludeFromCPL item and select "Change" from the menu that appears. A small window will open in which you need to set the value to 0 and click the "OK" button.
 Change the value to 0 of the ExcludeFromCPL parameter
 After that, you can close the registry editor and in the "Sound" window on the "Sounds" tab, the program event "Windows Login" will appear. Now you can safely change your greeting.