How to bypass Google phone confirmation. How to verify a new channel account on YouTube and why do it? Conditions and requirements for getting a checkmark
After resetting your smartphone using Hard reset, the next time you turn on the phone, you must enter your Google account credentials. This is how the user described the situation to me, who brought me a phone with a request to confirm the account, which was previously synchronized with the smartphone.
In general, it is something similar to the Apply ID, which has long been used in devices manufactured by Apple. Since many people complained that the data in Android is not protected at all, and you can hack any password on the phone with a regular hard reset, Google decided to refine several aspects of this protection.
As a result, starting from the series android firmware 5.1.1, the hard linking to the Google account has begun. That is, even after resetting the settings, you will not be able to fully use your smartphone until you enter the credentials of the account that was tied to it when the device was first turned on.
Of course, the user who turned to me about such protection did not even suspect and without second thoughts calmly reset the settings. Of course the data account someone does not remember, since it was created in haste only in order to have access to the Play Market.
So, after the next such smartphone, I decided to share my experience and show how I managed to bypass the protection with Google account verification after resetting the settings (Hard Reset).
Resetting the smartphone to the factory state through the phone settings
Very often, a normal reset directly from standard menu settings. This is due to the fact that the type of factory reset occurs directly from the phone and the protection system recognizes this as if the user did it himself, respectively, and does not ask for confirmation of the Google account (FRP).
Of course, the most difficult thing that we have to do is get into the same settings menu, but we will still try to do it. This method was tested by me on android 6.0 and 6.0.1.

Bypass Google Account Verification (FRP) After Reset with QuickShortcutMaker
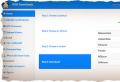
If you did not become the happy owner of the device, who was helped by the first method, then most likely you will have to turn to third-party applicationsthat will help us unlink Google account.
One of these applications will be QuickShortcutMaker. By the way, I would say that this method helps 80% of cases that are associated with FRP. So I recommend using it first of all.

You can see the visual performance from 10 to 17 points in this video, starting at 5:30 minutes:
Important information for those who have Google Accounts"There will be no item with a login and password. In order for it to appear, you will have to additionally, in addition to QuickShortcutMaker, install the Google Account Manager patch. After that, the desired item should be displayed without any problems in the list of Google accounts.
Third option for bypassing FRP from Google using Test DPC
The third option also consists in installing and using additional programs, this time it is “ Test DPC". If the previous method did not help you, then you should definitely try this option as well.

An illustrative example of the implementation of this method, we look at the video:
It was with such images that I personally managed to bypass the protection with google confirmation account after factory reset on Android. If none of the described methods works for you, don't be discouraged, and it happens.
There are many different ways to bypass this protection, you just need to find it on our website or on some forum. Where users could share the option that is right for you.
There is also a theory that turning off the phone and putting it on the shelf for about 72 hours, the binding disappeared by itself and the smartphone, the next time it turned on as if it had just been taken out of the box.
How to bypass Google account verification (FRP) after resetting smartphone settings (Hard Reset)
In this article, we'll look at one of the ways to bypass Google Account verification after a factory reset or hard reset.
If you remember, earlier we told that. Google introduced this feature on devices that run Android 5.1 Lollipop and above. But what if you don't need hard reset protection? How to bypass confirmation google account? The system has one loophole that we will exploit.
How to Bypass Google Account Verification?
So, you've done a hard reset or factory reset on your Android device... After restarting your smartphone, you are prompted to configure it, for example, connect to Wi-Fi, select a language, country, etc. When you are done, you will need to verify your Google account. What if you don't remember your account?

That's all! Please note that this method works on devices that support Google Now. If you haven't been able to bypass Google Account verification, chances are you don't have Google Now Assistant installed on your smartphone.
On the w3bsit3-dns.com forum, there are many other ways to bypass Google account verification after a hard reset for any smartphone model, but they are more complicated than those described in this article.
An ordinary user of a phone with Android versions 5.1 and higher often does not know what to do if he has forgotten the data from his account, and after full reset settings, the smartphone with the new protective function Device Protection begins to require you to confirm your Google account and does not allow you to log in. We will describe several ways to solve this problem, which is relevant for modern Google devices.
There is no password for the account in the device with Android
If the owner of the device has forgotten the Google password associated with the gadget, recovery can be done in the same way as for regular Gmail email. To do this, the easiest way is to contact google service Account Recovery, which will help you recover information step by step:

The user, of course, did not forget that the device is inoperative. Therefore, you can use two options:
- remove the SIM card and install it on another device to receive a confirmation code from Google;
- refuse this by indicating that you cannot use the device.
In the latter case, if you specified a backup mailbox during registration, an email will be sent to it with a link to the password reset page. There you can set a new account and log into your account on your android phone.
If you did not provide any data for recovery
Sometimes, when registering, users do not indicate either a backup mailing address or a telephone. Then resetting the password that the owner of the device has forgotten will be more difficult to do - have to answer a lot of leading questions:
- first you will need to specify the mail for communication;
- the last password from your Google account that you can remember at least approximately;
- approximate dates of creation and last visit;
- frequently used mailbox addresses;
- other Google applications that you use - calendar, mail, etc., and the dates you started using them.
Next, it remains to send your answers to the service that restores Google access, after which you will either see a record of the successful confirmation of your account ownership and a proposal to change the password for Android, or you will be sent to the specified mail for communication additional instructions to provide access.
You do not remember your login
If it was you who filled out your profile when buying a new phone, then for sure for your own mailbox you are using the same name. You can also remember it in Google Account Recovery. For this:

After filling in the captcha, you can send a message. If the data is entered correctly, the recovery should complete without problems.
How to bypass account verification
But usually the owner of the device, if the device was configured in a store, does not remember not only email Gmail, but also does not have any information to restore this data, as a result of which devices with Android 5.1 and higher remain locked. Fortunately, the creators of the OS have not managed to fix all the "holes" yet.
These devices, after performing a factory reset and even after flashing, are inoperable until the owner confirms the account.
What to do if it is impossible to perform the data verification procedure, we will describe below. In general, you can "cure" a gadget using the settings menu, although sometimes you don't get there right away. Let's describe a couple of ways to bypass blocking.
Method one
After performing a Hard Reset and the account verification window appears, do the following:

After going to the menu for changing parameters, you will need to reset the settings using the standard method:
- go to the recovery and reset parameters;
- in the "Reset settings" folder, activate the appropriate command for your device.
Your current Google account will be deleted, and then start making new settings for your gadget.
Second way
If a confirmation window appears:


Verifying your YouTube account unlocks new features. The service offers to go through this procedure during registration, and it is also available to channel owners at any time. A verified account allows you to:
- upload videos longer than 15 minutes;
- add arbitrary pictures as a preview to videos (without confirmation, you can select only frames from the video for the screensaver);
- enable channel monetization;
- add external links to end screens, tooltips;
- use a video editor and edit videos after they are uploaded to YouTube.
All information will appear after confirmation in the "Status and functions" tab.
We'll show you how to verify your YouTube account and what you need to do to get a checkmark. And we will also clearly demonstrate this process from start to finish.
To confirm go to the Creative Studio and click on the "Channel" tab. Here you will see the status of the channel.

If the channel is not yet confirmed, you will see a blue button. Click on it.

A window will open in front of you. Select your country of residence and convenient way confirmation: voice or SMS message. Enter the phone number to which the message will be received and press the blue "Send" button.

Enter the 6-digit code received on your phone in the form of a message and click "Send". If the code does not come, check if the phone number is correct. If it is entered incorrectly, then go back to the previous step and correct it. If there is still no code after that, try the second method.

The channel will be confirmed after these actions.

Click on the "Continue" button. A page will open showing information that the channel is confirmed.

If you have several YouTube channels, then you should know that no more than 2 accounts are connected to one number in 12 months.
Getting a checkmark is not easy. You need to meet certain requirements. Go to the channel and to home page you will see if there is a check mark or not - if available, it will be located next to the name. It will also be displayed to the right of the channel name under each video.

You can often see check marks on the accounts of large companies, organizations and channel owners with a large audience. This badge increases the authority of the channel and inspires confidence in viewers - it does not provide other privileges. Another check mark is needed in order to prove to the viewers the authenticity of your channel, because you can find dozens of re-uploads of videos on YouTube.
Conditions and requirements for getting a checkmark
The main condition for getting a check mark is 100,000 subscribers. But a few years earlier, this number was different, which is why you can see that even accounts with a smaller audience have ticks. Other requirements for getting the badge:
- at least 900,000 views in the last 3 months;
- the account is linked to the Google+ page;
- the channel has no copyright infringement and adheres to the YouTube community guidelines.
If your channel does not have 100,000 subscribers, but it is developing rapidly or belongs to a large brand, moderators often revise the conditions for getting a check mark in your favor.
YouTube may refuse to receive a checkmark for a user without giving a reason. But practice shows that the badge is received by all users whose channel is without violations and has gained a certain number of views and subscribers.