Setting up tools in Photoshop cs6. Setting up and managing panels in Photoshop CS6. Creating a new panel group
In this tutorial, we'll learn how to manage and organize the various panels that make up a fairly large part of the Photoshop CS6 interface.
We use panels a lot when working in Photoshop. For example, when we add, remove, select and arrange layers in our document, we are working with the Layers panel. Also when working with this panel, we add layer masks and various effects. When we create adjustment layers and subsequently work with them, we use the Adjustments and Properties panels.
We can choose colors using the Color and Swatches panels, work with individual color channels using the Channels panel, go back to a previous step in our work using the History panel, and much more. Having so many panels can be confusing when working with Photoshop, especially if you are new to the field, which is why it is so important to know how to manage panels and how to arrange them on the screen.
Before we start exploring panels, let's make sure that our screens display the same panels in the same places. To do this, we must be sure that we have a standard working environment for the program. In other lessons, we discussed what a program's working environment is. Essentially it is a program's way of remembering which panels should be placed on the screen and where they should be located.
The program works with several built-in working environments, from which we can choose the ones we need and even create our own at our discretion. At the moment, if you look in the upper right corner of the program interface, you will see a window for selecting the "Working environment" parameter. The actual phrase "Workspace" is not specified anywhere, but by default it should be set to "Essentials". If another parameter is set, click on the box and from the list that appears, select the top one - "Main working environment":
In the options window, "Main working environment" must be selected
Next, let's reset all settings and reload the Main Workspace setting to get all the panels back to their original positions. Most likely, they are already located in their original places, if you have not worked with the interface yet, but to be completely sure of this, click on the word "Main workspace" in the options window and select "Reset Main workspace" ( Reset Essentials) at the bottom of the list:

We reset all settings and reboot the "Main working environment" parameter
Now that we have made sure we see the same panels, let's explore how to manage them and how to organize them. Photoshop's panels are arranged in columns on the right side of the screen. By default, there are two columns with panels - the main column on the right and the secondary, narrower - on the left (in the figure below, both columns are highlighted):

The panels are located in two columns along the right edge of the program interface
Let's take a closer look at the main column with panels. By default, Photoshop has three panels in it - the Color panel (at the top of the column), the Adjustments panel (in the middle), and the Layers panel (at the bottom of the column) ... How do we know that we are working with the Color, Adjustment and Layers panels? We'll figure this out based on the title tab each panel has at the top:

Three panels - "Color", "Adjustments" and "Layers" - are open in the main column of panels
You may have noticed that although only three panels are open, there are actually more panels in the main column. We can clearly see other tabs with titles of different panels. For example, the top Color panel has a Swatches heading on the right, the Adjustments panel has a Styles heading, and the Layers panel has two other headings called Channels. ) and "Paths". What's the matter? Since Photoshop is constantly dealing with multiple panels, Adobe had to find a way to avoid cluttering up the screen too much. A solution was proposed - to combine, “mount” two or more panels into separate groups of panels. Thus, several panels can occupy the space of one panel!
How it works? Let's take a look again at one of the panels currently open - the Color panel. We know this is a Color panel because it says Color at the top of the panel title. There is another tab next to it with the heading "Samples". This is an additional title for a panel that is merged with the Color panel into one group, but is currently hidden behind the Color panel. Only one panel can be active at a time in a group, and we can always determine which panel it is, since the titles of other, inactive, panels are dimmed and grayed out. To switch between panels in a group, you just need to click on their tabs with titles. In my case, the "Color" panel is active, but if I click on the tab with the heading "Swatches" - the "Swatches" panel will become active, coming to the fore. The "Color" panel will hide behind the "Swatches" panel, but I can easily make it active again at any time by clicking on the appropriate title:

To switch from the "Color" panel to the "Swatches" panel, click on the title
I'll do the same with the Adjustments panel, which is currently active in a separate group. I can see that the Styles panel is in the same group behind the Adjustments panel. To switch to the Styles panel, I'll click on its title. This action will cause the Styles panel to become active, and the Adjustments panel to hide behind it. When I need to make the Adjustments panel active again, I simply click on its title:

Switch between the "Adjustments" and "Styles" panels by clicking on their titles
Notice that the Adjustments panel is in the first group, and the Styles panel is in the second. There is no definite reason why the Adjustments panel comes first, and in reality, changing the order of the panels is easy. All we need is to click on the tab with the title of the desired panel and, while holding the mouse button down, move the tab to the left or right. In my case, I selected the Adjustments panel by clicking on it, and without releasing the mouse button, moved the panel to the right on the other side of the Styles panel:

Click on the tab with the title of the panel "Adjustments" and move it
After moving the tab with the title bar to the desired location, I release the mouse button, and the panel rises to a new position. Now the Styles heading comes first in the panel group and the Adjustments heading second:

Headers reorder easily changed
What if, instead of just rearranging the order of the titles within one group, I want to move the panel to another group? Let's say, for example, that I want to move the Styles panel into the same group as the Color and Swatches panels. In order to do this, I just need to click on the tab with the heading "Styles" and, again holding down the mouse button, start moving the tab up to the new panel group until around new group the blue highlight box will not appear:

A blue highlighting box appears around the group of panels to which I want to add a new panel
The blue frame signals that I can release the mouse button, after which the program will merge the Styles panel with the group containing the Color and Swatches panels. Note that the Adjustments panel is now located alone in a separate group, which is nevertheless a group, despite the fact that there is only one panel in it (after all, we can add to this group at any time other panels):

In a programmePhotoshop is very easy to move panels from group to group
As we have already noted, the "Adjustments" panel is now in a separate group. In fact, we can create a new group from any panel. Suppose I want to place the Color panel, which is currently a group with the Swatches and Styles panels, into a separate group, and I also want to position this new group just above the Adjustments panel. To do this, I'll click on the tab titled "Color" and, while holding down the mouse button, begin to move the tab towards the Adjustments panel until a blue highlighting rectangle appears between the two existing panels. It's important to note that this time we're waiting for the highlighting rectangle to appear, not the border box:

A blue highlighting rectangle appears between the two panel groups
After the highlight rectangle appears, I'll release the mouse button and Photoshop will place the Color panel in a separate group between the other two groups:

A new group has been created for the Color panel
We can temporarily collapse panel groups to make more room for panel content in other groups. To temporarily collapse a group, double-click any tab with a title in that group. While the group is collapsed, all you see in it is a list of tabs with panel titles. In my case, I double-clicked on the Swatches tab to collapse the group it belongs to:

Double click on any tab with a title to collapse the panel group
To reflect all the contents of the group again, click on the tab with the panel title once, which I did in my example with the Swatches tab. Double-clicking the mouse button collapses the contents of the group, single-clicking reflects the entire contents of the group:

Click on any tab with a title once to expand the panel group
If you no longer need a separate panel in a group and want to close it, click on the tab with the title of that panel to make it active, and then click on the menu icon located on the right upper corner panels. In my case, I click on the Color panel menu icon:

Each panel has its own menu, which can be called by clicking on the corresponding menu icon
From the menu that appears, select the "Close" command:

From the list of commands of the menu panel "Color" select "Close"
This action will close one specific panel while the other panels in the group remain open. In my case, the Swatches panel remained open and the Color panel closed:

The Color panel is closed, but the Swatches panel remains open
If you want to close the entire panel group, click on the same menu icon in the upper right corner:

Click on the menu icon again
This time, to close the entire group of panels in its entirety, from the list of menu commands that appears, select the command "Close Tab Group":

We select the command "Close tab group"
And now a whole group of panels has disappeared (the Color and Swatches panel):

Column of panels after closing the group containing the Color and Swatches panels
To reopen the panel after it has been closed, or to open any other program panels, go to the Window section in the menu bar at the top of the screen:
In the menu bar, select the "Window" section
This action will lead to the opening of the menu section, where, among other items, you can see the complete list of panels available for us in Photoshop. A check mark next to the panel name means that this panel is open and located on the screen:

To view the complete list of panels go to the "Window" section
To open a panel that is not yet displayed on the screen (there is no checkmark next to it), just click on its name in the list of panels. I'll reopen the Color panel by clicking on it:

Select the "Color" panel in the "Window»
And now the Color panel has reappeared in the main column of panels. Note that the Swatches panel has also appeared on the screen. This is because the Color panel was grouped with the Swatches panel before closing, and Photoshop remembers this moment. The program also remembered that the Color and Swatches panel group was positioned directly above the Adjustments and Styles panel group. By remembering the location of the panels, the program greatly facilitates our work:

The Color panel (and the Swatches panel) are redisplayed
Before we continue, I'll add a small but important note - when we look at the full list of panels in the Window menu section, a check mark next to the name of an individual panel means not only that it is open, but also that it is in the current moment active in her group. Other panels can also be opened in a group, but if they are not active (their contents are hidden behind the active panel), they will not have a check mark next to their name. For example, if we look at the Layers panel, we will see that it is grouped with two other panels, Channels and Paths. But the "Layers" panel is currently active in the group:

The Layers panel and the Channels and Paths panels behind it
If we look at the list of panels in the "Window" section of the menu, we will see that the "Layers" panel, of course, has a check mark next to its name. However, despite the fact that the Channels and Paths panels are also open on the screen, there are no checkmarks next to their names, since they are not currently active panels:

Only the "Layers" panel has a check mark next to its name (unlike the "Channels" and "Paths" panels)
I'll click on the panel tab titled Channels to make it active in the group, which will cause the Layers panel to recede into the background along with the Paths panel:

Switch to the "Channels" panel
And now, if we look again at the list of panels in the "Window" section, we will see that a check mark has appeared next to the "Channels" panel. The "Layers" panel is still open (if I closed it as we went through earlier, it would disappear completely from the screen), but since it is no longer the active panel in the group, there is no check mark next to its name. And of course, there is no check mark next to the name "Contours" either. Sometimes this checkbox can confuse us. The presence of a check mark means that the panel is open and active, the absence of a check mark means that the panel can be closed (it is not displayed anywhere on the screen) or simply inactive and hidden behind the active panel in its group:

Now the checkbox is next to the name of the "Channels" panel, and next to the name "Layers" it no longer exists
Until now, we have only considered the main column with panels, but to the left of the main column there is also a secondary column. At first glance, this column seems a little strange, since, by default, the panels in this column are represented as icons:

The second column with panels is located to the left of the main column
Initially, this second column contains two panels - the History panel at the top and the Properties panel below it. Perhaps you will think with irritation: "So how can we figure out what these panels are, looking at incomprehensible icons?" First, if you have the Show Tool Tips checkbox checked in the Preferences section (by default, it is checked), as soon as you hover over each icon, the panel names will appear on the screen.
Second, and this is much more convenient, you can hover the mouse cursor over the left edge of the column and it will turn into a double-headed arrow. When the arrow appears, click on the edge of the column and, while holding down the mouse button, drag the edge to the left to resize the panel. As you move the edge around the icons, panel names will appear, which will be much more useful to us. Once you've added enough space for the panel titles to enter, release the mouse button:

Change the width of the second column with panels to display panel names next to icons
The secondary column is especially suitable for placing panels on it, which we need to be open not all the time, but periodically. The way of displaying panels in the form of icons is good because in this form the panels do not take up much space on the screen, and we can get fast access to them. If we click on the panel icon (or on its name), Photoshop will temporarily expand the panel to its full size so we can work with it. In my case, I'll expand the History panel by clicking on its icon / name:

Click on the icon / name of the "History" panel to expand it to full size
To collapse the panel back to the icon view, we can either click on its icon / name again, or click on the small double arrow icon:

Click on the small double arrow icon to collapse the panel
We can expand all panels in the second column at the same time by clicking on the smaller double arrow icon in the upper right corner of the column:
In order to collapse all panels even more - to the view of only icons, move the mouse cursor over the line separating the primary and secondary columns. When your cursor turns into a double-headed arrow, click on the dividing line and drag it to the right until only the panel icons are visible. When working with columns, where all panels are presented only in the form of icons, a lot of free space is freed up on the screen, however, in order to work efficiently, it is necessary to remember the names of all icons well. I would not recommend you this way of displaying panels, but this is just my opinion:

Now all panels in both columns are represented as icons
To quickly expand the main column with panels to full size, click the double arrow icon in the upper right corner again:

Click on the double arrow to expand the main column with panels to full size
And now the main column is presented in its original expanded form, as I usually leave it:

The main column is now shown in its original expanded view
Moving panels between columns
We can move panels from one column to another with the same ease as between groups. In my case, I opened a few more panels (Histogram, Info and Navigator) by selecting them from the Window menu section. The program has placed the panels in a secondary column, along with the History and Properties panels that were originally in the column:

Three new panels have been added to the second column
Suppose I want to group the Properties panel, which is in the secondary column, with the Adjustments panel in the primary column. To do this, you just need to click on the title of the "Properties" panel and, while holding down the mouse button, begin to move the panel to the main column to the "Adjustments" panel until the familiar blue highlighting frame appears:

Move the "Properties" panel to the group with the "Adjustments" panel
I'll release the mouse button and the program will place the Properties panel in a new group in a new column. We can do the same in the opposite direction by clicking on the panel and moving it from the primary to the secondary column:

Properties panel is now grouped with Adjustments and Styles panels
Finally, I suggest you look at some useful keyboard shortcuts for temporarily hiding all panels on the screen. Pressing the Tab key once will temporarily disappear all the panels on the right side of the screen, the toolbar on the left, and the settings panel at the top of the screen. In other words, all panels will disappear except for the menu bar. Pressing the Tab key again will cause all panels to appear in their places.
To hide the panels located only to the right, press the Shift + Tab key combination once. Pressing the Shift + Tab key combination a second time will cause the panels to go back:

The panels on the right will be temporarily hidden after pressing the key combinationShift +Tab
When the panels are hidden, move the mouse cursor all the way to the right side of the screen, and the panels are temporarily displayed on the screen. If you move the mouse cursor away from the right side of the screen, the panels disappear again:

Moving the mouse cursor to the right side of the screen will temporarily display the panels
I will add a small note at the end ... If during our lesson you worked with the panels yourself, making some changes on the screen, and now you want to switch back initial settings panels, just reload the "Main Workspace" setting, following the steps that we covered at the very beginning of our lesson.
And now we're done! We examined in detail different ways work with panels that make up a significant part of the Photoshop CS6 interface! To learn more about the program, visit our Photoshop Basics section for a variety of tutorials on layers, selections, interface and other program elements, or consider other topics that interest you!
Transfer: Ksenia Rudenko
The reason for writing this material was the repeated questions on the forums and in personal messages by e-mail. The fact is that with suboptimal settings, the program may slow down, as well as various other problems, for example, the inability to work with individual filters or tools.
So let's get started.
First, we will configure the basic parameters of the program itself, and then move on to the color management settings.
In order to open the settings dialog, you either need to go to the menu Editing - Settings - General (Edit -Preferences -General) CTRL +K.
The following settings window will appear (by clicking on the picture, you can view a larger image).
Here I usually put the default interpolation algorithm Bicubic (best for smooth gradients)... This algorithm is the most versatile and is suitable for both reducing and enlarging images. However, after reduction, you will have to sharpen it. If you mainly reduce images, then you can put the algorithm Bilinear... Then, in most cases, you will not have to sharpen after reduction, or you will have to do it much less often.
Also I uncheck the option Tool change by keySHIFT... This speeds up the work, as it allows you to quickly switch between tools of the same subgroup (for example, between normal and mix brushes) by pressing just one key, and not two.
Now let's go to the next tab Interface

The settings here are mainly about visual effects (circled in red). I turn them off, as it interferes with work. The color of the interface is a matter of taste, but I'm used to working in the old fashioned way in a light interface.

I do not use the next tab, as the settings synchronization function is not yet fully developed. I am not making any changes to it.

Go to the tab File handling

This is where I change the setting Maximize file compatibilityPSD andPSB... I put the value Is alwaysso that every time you save, the window with this request does not appear.
The next tab is Performance.

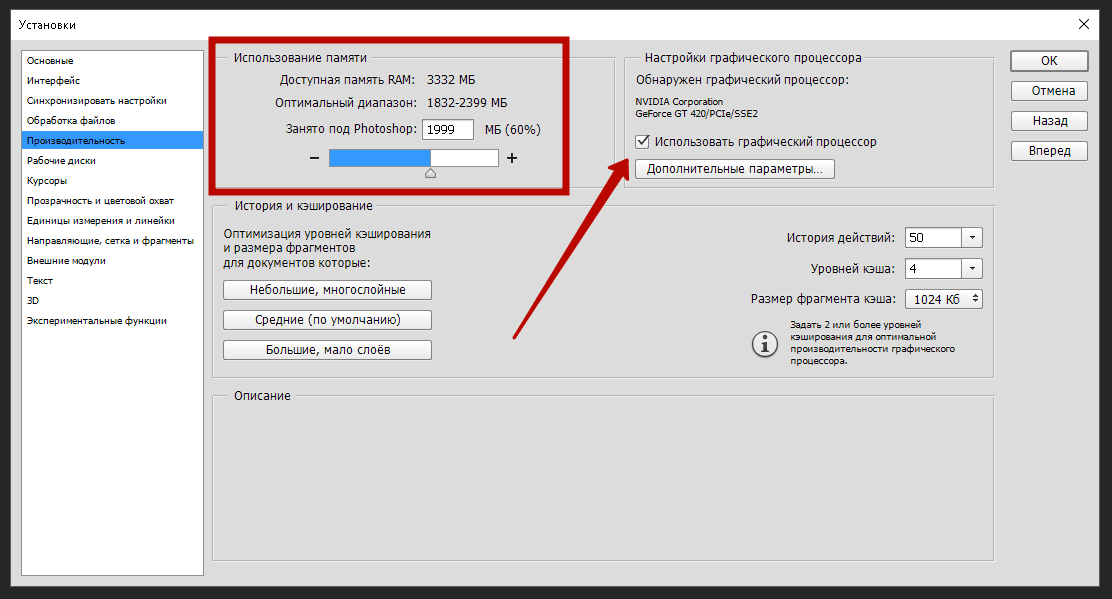
Here you need to set the volume random access memory, which will be used by the program, the number of steps of the file change history available in the palette History, scratch disks, and configure the settings for using the GPU (video card). Let's go through the order.
It is better to set RAM within the range recommended by the program so as not to slow down the operation of the operating system and others in parallel running programs and processes.
The working disk must be selected different from the system one (the one on which operating system). The scratch disk is used for temporary files that Photoshop creates in the process. Very good if it will sSD disk, in this case, many operations will be performed faster.
I leave the number of steps in history at 20 by default, since I hardly use the history of changes. Why? Yes, because after a couple of minutes of retouching, even 500 steps of the history will already be used, and large resources are required to store history, which can slow down the program.
Therefore, instead of referring to history, you just need to properly organize your work: perform operations on copies of layers, use the principles of non-destructive editing.
In the GPU settings block, you need to check that the checkbox is enabled Use graphics processor ... For more detailed setting need to press the button Extra options

Check that the parameters are set in the same way as in the figure. Pay particular attention to the two check boxes - Use GPU to speed up computations and UseOpenCL... Disabling these features makes many operations and filters unusable.
Of the following tabs, the tab is practical. External modules... It must include the block flags Filters and Extension Panels... Then all filters will be shown in the menu, and the various extension panels will work.

Now let's configure the settings for the color management system. To do this, either go to the menu Editing - Color Settings (Edit -ColorSettings) or press the key combination SHIFT +CTRL +K... The settings window will open

In line Settings from the dropdown list select Universal settings for Europe... Thus, sRGB IEC61966-2.1 will become the main workspace for RGB. This completes the color adjustment.
You can use the pre-installed environment as a working environment The photo... You can select it in the upper right corner of the program window. You can then customize the program palettes as you wish.

Now you need to restart the program and you can start working.
Before working with the program Adobe Photoshop on your computer, you first need to optimally configure this graphics editor for yourself. This is necessary so that further work in the program does not cause you any difficulties or problems. Work in such an editor should be convenient, pleasant and fast. In this article we will go through the main settings and adjust some of them for ourselves. Now let's get down to business!
The main
So, go to the menu " Editing» —> « Installations» —> « The main". After that, the settings window opens. Now we will analyze the basic settings. (the picture can be enlarged):
- Color palette - leave on " Adobe«;
- HUD color palette - let's leave on Color tone wheel«;
- Image interpolation - select the mode " Bicubic, sharper (best for smaller)". Very often we have to reduce our image for posting on the Internet or in preparation for printing. And since we often reduce our image, that's why we choose this mode.
Let's now see the following parameters in the “ The main". We will not change anything especially here, with the exception of the item “ Shift tool change". Usually, to change the tool in one tab, we press the Shift key and at the same time, which belongs to this tool. This is not very convenient for us. Therefore, you can uncheck this item. This way you can change the instrument with one hotkey... It is very convenient! But if you want, you can leave the check mark on this item.

Also in these parameters there is an item " Scale with mouse wheel". If desired, you can check this item and save the settings. Now, when scrolling with the wheel, the photo will scale. Pretty convenient function... If you need it, check the box next to this function. If you do not check the box, then to change the image scale, you will need to clamp aLT key and simultaneously scroll with the mouse wheel.
Interface
So, when we have set the main parameters, go to the tab " Interface“To view the settings for. We don't change anything in the main color settings. But in the settings " Border" all items are left " Do not show«.
What will it give us? By default, a shadow appears on the borders of the photo. I think this is an unnecessary beauty of the program, but it interferes with work. It can be confusing if this shadow is valid or if it was added using a separate effect. Therefore, in order not to get confused in the future, it is better to turn off the shadow display.
Below in the settings " Panels and documents"Put a tick on" Auto Show hidden panels ". We don't touch any other settings here. Also make sure that the interface language is Russian and the small font size is set in the menu.

File handling
Go to the tab " File handling". We do not change the file saving parameters.
In the file compatibility in the "" point, we put " Is always". Then the program will not ask us when saving whether to maximize compatibility or not. The program will do this by default. We leave the rest unchanged.

Performance
Go to the performance settings of the Photoshop program. In the memory usage scale, you can adjust the use of RAM according to the needs of the program. Usually the maximum 100% value is set here so that the program does not slow down in the future.

In settings " History and cache»Make small changes. In step " Action history»I put it on 80. In the process, it will be better if we have a big story. We can make some mistakes in working with the program and we should have a good opportunity so that we can always return to the previous action. If the story is small, it won't be enough. I recommend making the story large at least 60 points. Usually history is set to 100. However, I will say that this parameter loads the system a little. If your computer is not very powerful, then set 60. This way Photoshop will not freeze often.


And here is the tab “ Scratch disks" very important. Under no circumstances should you install with a scratch disk system disk C. You can select other drives where you have the most free space... But we never touch the system disk.

Also in GPU settings (if it supports), you need to enable OpenGL rendering. Here you can also configure “ Extra options", But I left the mode in these parameters" Usual". It may happen that this feature may not be present in the GPU settings. This means that this parameter is not supported by your video card.

Cursors
After you have adjusted the performance of the program, go to the tab " Cursors". Here you can customize the appearance of the cursor. Here I personally did not change anything and left everything in the standard form. If you wish, you can play here and customize your cursor display.

Transparency and color gamut
You can configure the warning when going out of gamut, as well as the display of the transparent areas themselves. I didn't change anything here either and left everything as default. If you want, you can play around with the settings.

Here you can configure the units of measure for rulers, columns for text, and the default resolution for new documents. I haven't changed much here. But in " Rulers"I chose to display in" mm«. « Text"I put in" pix". So I will roughly know what size my letters are, depending on the size of the image in pixels.

Guides, grid and slices
As a rule, in the tab “ Guides, grid and slices»You can customize the grid to suit your needs. However, I personally did not change anything here, and left all the settings by default.
External modules
Here you can select a folder for plug-ins. When you add various plugins there, then Photoshop will refer to this folder in the future. In step " Expansion panels"All settings must be checked.

Fonts
I haven't changed anything here either. Left everything as it was.

3D
In the tab “ 3D»You can adjust the settings for working with 3D images. Here you can set the% of video card memory usage. I left it at 100%. There are also rendering settings, quality settings and other settings for working with 3D objects. I did not touch all these settings and left everything by default.
The described installation instructions make it possible to use the official version of the cs6 Photoshop editor. But there are more a new version editor, this is Photoshop CC, you can download it with installation instructions for free by clicking on the link in the menu on the right, at the moment this is the latest photoshop editor from adobe.
Despite the fact that support for the cs6 version has been stopped, it is possible to download it at the office. If you dig deep into the site, below are instructions on how to download and install downloaded in 2015, then re-uploaded, since the speed of the site is terrible, and there is no instruction as such. And so let's get started ...
P.s When installing Photoshop cs6 below the points given below, the Internet must be turned on!
2. Open the archive (if downloaded from the site) with any 7z or winrar archiver go to the folder Adobe CS6launch Set-up.exe(if by reference 1, then everything will be automatically unpacked there)
3. After the installation programs are initialized, in the window that appears, select "trial version".
4. You will be required to sign in. Click to enter.
 5. Click create Adobe ID, you can register to a fictitious e-mail (mail) as well as other parameters.

6. Select the components for Cs6, language, location, well, and click on the button " Install«

Summing up, we can say that installing this method you will receive latest version Photoshop cs6. It remains only to follow the upstream link which will lead you to instructions for activation and free use.
Articles in the same category
No matter how you got adobe program Photoshop CC, whether registered on the official website and rented or downloaded from Torrent, in any case, you need a Photoshop setup.
Someone in English, someone in Russian. It doesn't matter either. We can customize it anyway. I will show on my Russified version.
The interface, depending on the version of the program, may differ slightly. Don't worry if some setting is missing in one section or another, it will still be reflected in another.
Photoshop setup is as follows
Go to the menu Editing - Settings - General
It is better to leave everything by default in the basic settings.

Working window interface
In the Interface menu, customize the color theme of your Photoshop. It can be completely black, it can be very light. It all depends on the taste and mood of the person.

Here you can also adjust the language and font size. The most convenient Small, but everyone can choose from the list for their monitor and their level of vision. We leave the rest as is.
"Synchronize settings" skip and configure file processing
This section of the settings menu does not require editing at this stage. The developers have tried to set the optimal settings by default. Later, when you learn what the RAW format is used for, you may need this setting. Now we leave everything as it is

Check the Use GPU box. This is to help your computer's processor.
The fact is that image processing is a process that requires a lot of resources from your computer, so it uses all its capabilities. And if you have a good video card, which also has the same GPU, and it also needs to be connected to the image processing work. This is where we connect it.
Memory usage. This is the setting we define for using Adobe Photoshop CC in its workflow.
The available memory determines how much your computer can give to run Photoshop at the moment. And at the same time, to give other programs the opportunity to
work. We define this with the slider, setting the memory occupied by the program for the program.
60% is enough for stable operation. By setting 100%, we condemn parallel programs to braking.
Leave the rest of the parameters in this section as they are.
Scratch disks for storing archives
If you install the C drive, that is, the root drive, then you boot the system, which is not desirable.

This parameter is purely creative, over time it will be needed, but for now we will leave it as it is.

We leave "Transparency and color gamut" in the same form
Measurement units and rulers
Measurement units are in pixels, Columns in points

We do not pay attention to "Guides and fragments" for now and leave it in the same form.

"External modules", "3D", "Experimental functions" leave the default settings.
Make the settings for this parameter as follows

We have successfully completed the Photoshop setup, in the next article we will consider Importing photos into the program.


