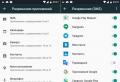
How to increase hard drive space on pc. Increasing the size of the C drive at the expense of the free space of the D drive
Sometimes it becomes necessary to increase the capacity of the C drive by using another partition. Most likely you need this, because there is almost no space on it, but you need to expand. In this article I will analyze two programs that will help you do this and a small instruction.
We will talk specifically about increasing the C drive at the expense of another partition, for example, the D drive, while they must be on the same hard drive or SSD. If you have Windows 7, 8 or 10, then this guide will work for you.
How to expand the C drive with Aomei Partition Assistant
A wonderful program that will allow you to expand the C section: hard disk or solid state driveis called Aomei Partition Assistant. This program does not install with it various garbage, which some programs are famous for. Also, the program is in Russian with a completely understandable interface. Works on all operating systems starting from Windows 7.
The most important thing to pay attention to is that incorrect work with partitions can lead to data loss. If they are important to you, I recommend storing them in a safe place.
Download and install the program, I think there will be no problems with this. After launching, you will see a nice interface, though, for someone like. All your disks and partitions are displayed there.
In our case, as I said, we are going to grow section C at the expense of section D. Now let's do that.
Click on the D drive right click mouse and select "Resize Partition".
A window will open where we can change the size of the slider, or enter it manually. You need to make sure that the unallocated space of the partition after choosing the size is in front of it, as shown in the screenshot. Then click OK.

Now, in the same way, we change the section C, only now we increase the size on the right. It will grow at the expense of the free space that we took from drive D. Click OK again.

After the work done, at the top of the program, on the left, there is a button "Apply", press it.

Now the computer should be rebooted, usually there are two of them. As a result, the size of the C drive will be increased.
This is not the only function of the program. With it we can. Also, you can create a bootable USB flash drive in the program and resize partitions there.
How to Increase C Drive with MiniTool Partition Wizard Free
So, there is another not bad program called MiniTool Partition Wizard Free. It is free, does not install third-party software, but its disadvantage is that it is not in Russian, it may be difficult for some, but thanks to this article you will understand everything.
The program interface is somewhat similar to the previous one. In principle, there are almost no differences from the first option. We will increase the system disk in the same way.

First press on the D dial, then press Move / Resize Partition up. Now we take the required size of the D disk, select it on the left and click OK.


That's all, after the performed operation in the explorer, you can already see the increased size of the system partition. Now you know how to do it.
You can download the program from here.
How to increase the volume of the system disk as standard
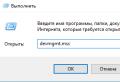
Standard means with standard windows tools... You can do so, good, like Windows 7, Windows 8 and Windows 10 have such a function. But have this method disadvantage: the data on the D drive will be erased, therefore, you will need to first transfer them somewhere. Perhaps you decided to use this method, then, first, press the combination Win + R, a window will open in which you need to enter the command:
| diskmgmt.msc |
This will open the tool "Disk Management"... There you will see all the connected drives and partitions. If there are additional sections, they are also called hidden, then I do not recommend touching them.
So right click on section D and select "Delete volume"... Subsequently, the data on the disk will be deleted, and to the right of the C drive, free, unshared space is formed.

To increase the volume system disk right-click on it and select "Expand Volume"... Next, the Volume Expansion Wizard will open, where we need to indicate the volume by which we will expand the disk. Don't choose a lot if you still need section D.

We increased the system disk, now we need to use the unused space that we have left. To do this, click on what is not distributed with the right mouse button and click Create Simple Volume... The drive will be assigned the letter of your choice, and it will also be formatted. That's all.

Now you can get all your important data back to drive D.
Each time the C drive has less and less free space. Memory exhaustion is a problem for all computers, even those with HDD or SSD with a lot of free space. At the same time, Windows cannot work normally when there is a lack of memory, so it is imperative to provide sufficient space for the system. There are two ways to achieve this goal: remove existing files or increase the size of the disk. At the moment, the second direction is more interested - increasing disk space.
The problem appears due to one feature of Windows - a gradual increase in the size of the system and the constant addition of temporary files. Over time, system files, as well as temporary files, tend to take up more space. This "sin" all windows versions, with no exceptions.
Initially, the lack of space can be corrected by deleting useless programs, temporary files, downloads, etc. Anyway, a situation is inevitable when only important applications are left on the disk, and, alas, there is not enough space. Some users give up, but this is not worth doing, since the system begins to process requests very slowly, programs often criticize, and errors become the norm.
To continue using local applications normally, you need to provide enough free space on the C drive. So how do you increase the size of the C drive? We will tell you in our article.
How do I clean up junk from my disk?
The easiest way to free up space is to remove all the trash. If the problem of lack of space has appeared recently, it is still possible to do only by deleting useless data. For a while, this will be enough for the normal operation of the system. You need to clean up the garbage in several stages.
Algorithm of actions is given below.
- We clean temporary files (they inevitably accumulate when all applications are running). CCleaner copes with the task efficiently and quickly. It is enough to download the utility from the link, on the first tab, click on the "Analysis" button, and then - "Cleanup".
- Removing useless files. By default, Windows browsers download all files to the Downloads section located on drive C. There may be a lot of unnecessary things here: software distributions for installation, obsolete files, torrents, etc. It is worth checking the sections where files are downloaded and deleting everything is useless.
- Uninstalling programs. Many users go through 2, 5 or 10 applications in search of suitable ones. Having found a good utility, the search stops, but earlier installed programs remain in the system. They should be removed by going to the "Programs and Features" section, the menu - "Control Panel".
- Transfer media files to another drive. Photos, movies, music, games, and so on are best stored on drive D. Such files should be cut from drive C and moved to D.
How to increase the size of the C drive at the expense of the D drive?
Add free space to the logical drive C with really standard Windows tools or through applications. The main disadvantage of the first method is the forced formatting of the partition. Programs can cope with the same task, but without deleting files, so this option is a priority.
Using Aomei Partition Assistant
A free utility with a good reputation successfully copes with transferring space and saving data.
Its advantages include:
- simple setup;
- the ability to run several actions at once;
- reliable work;
- russian interface.
The whole procedure is absolutely safe for your computer and hard drive.
The main functions of the program:
- creating and removing logical drives;
- transfer of free space between disks;
- formatting;
- merging, splitting, copying sections.
The greatest interest for us is the transfer of free space.
To complete it, you should use the instructions:
- download the application from the office. site;
- install and run the program;
- right-click on the disk where there is free space intended for transfer, and click on "Resize Partition";
- reduce space on drive D to create unallocated space.
Important! The slider should be moved from left to right, the freed space should appear before the rest of the disk data.
- repeat step 3, but for the C drive, and expand its place at the expense of the space on the right;
- in the main window, click on the "Apply" button.
Helpful! The program supports deferred action, which means that no changes are made until you click "Apply". Until the start of the procedure, all changes can be corrected.
With MiniTool Partition Wizard Free
This is another similar program that is not inferior to the previous one. Has the ability to move space without formatting disks. The only drawback is the English-language interface, but it's intuitive, so it's rather difficult to get confused.
The way to add free space on the C drive is the same as in the previous program. The instructions from the previous section are also applicable to the MiniTool Partition Wizard. With the help of checkpoints, you initially need to shrink one disk, and then increase the other. If you need to allocate the exact space, you can specify the desired amount in numbers (indicated in megabytes).
All of the above methods create free space on the C drive, so the reader can independently choose the method he likes. Usually, after the procedure, the system starts working much faster and there are fewer failures.
Good afternoon. Most people buy computers in a ready-made assembly, that is, the system is installed on it, all the components and assemblies of the computer, the BIOS is configured, and so on. This is, of course, good. But, sellers often sell PCs, hDD which has only one section.
Whether to partition the hard drive
In other words, there is a system on one section, and people download movies, install programs, games, and so on on the same section. Then, wanting to learn how to better understand computers and their programs, people consider the installed programs, files, and so on.
Some of them are deleted, some are edited, etc. But, since Windows is installed on the same partition, it is quite difficult for a person to distinguish where the program that he installed himself is, and where is the system software.
But, if the user unintentionally deletes one of the system files, then it is very possible that the computer simply will not start. Hence, it is very bad and inconvenient when the hard drive is not divided into partitions. Therefore, when you buy a computer, ask the seller to split the hard drive into a couple (or three) partitions. At least two. Although, in my opinion, three are more convenient. One has the system installed, the other has working software, the third has various videos and games.
In my opinion, this is the most convenient option. But, if you've already bought a computer with a single partition, it doesn't matter! Winchester can be split into three parts (or more if you like). This can of course be done during OS installation.
But, this is not very convenient, especially if your OS functions perfectly. Yes, and there is no desire to bother with reinstalling the system. In this case, it remains to divide the hard drive into partitions with a working system.
This is quite possible, as it may seem strange to many users. There are a number of programs that can partition a disk. But the most convenient of them, in my opinion, is Acronis.
Acronis Disk Director 12 description
This program is specially designed to work with a hard drive. She can quite professionally divide your hard drive into parts, and, moreover, select a certain size for each section. Also, you can link multiple sections together if you have many. Among other things, Acronis gives us the opportunity to move or copy the system to any partition on the disk, and even to another hard disk.
It is very comfortable. For example, you bought new computer and want to copy the system from the old system unit on new. To do this, you simply remove the hard drive from the new system unit of the new computer, insert it into the old one, and copy the system. You can choose the Move command. But, there is a threat that something will go wrong and you will lose the system. If you copy the system, then if a problem comes out, you just start copying the system again.
How to increase the size of the Windows system disk
In addition, it often happens that your system partition small volume. For example, only 40 GB. It would seem a decent size, but by modern standards, it is not much! I would even say - not enough (especially during the last windows updates 10, which took up a lot of space).
Because modern programs have a decent weight, over time, from their number, and from constant updates, the volume of the C drive increases greatly.
What should be done in this case? The most reasonable thing is to increase its size. And, better, in excess. I advise you to set the size of the system disk to at least 100 GB, and preferably 120 GB, as I will do. For this, we need Acronis Disk. This program is paid. In general, its cost, considering all its functions (and there are a lot of them), is not high. In addition, it has a Demo version with limited features.
Free Download Acronis Disk Director 12 from the official site (demo version). Installing the program. I recommend installing Acronis on the C drive. we will work with disk D (we will take a little volume from it). After installing the program, the Acronis window opens.
Cutting off some volume from the D disk
From this window, we see how many partitions we have, and how much they take up from the hard disk. So, our task is to increase the system partition. He has a volume of 88.48 GB. The D drive has 360.3 GB. To increase the system disk, we first have to cut off a small part from another disk, in particular from D, and add it to the system disk.
Therefore, before the operation of separating part of the D disk, I recommend the most important information copy from this disk to another disk (just in case). Then, the disk needs to be defragmented. The best option is if the D drive is completely free.
To do this, we select drive D, and with the right mouse button select from context menu "Resize Volume".
In the new window, we see how much occupied space is on it, and how much free. In the disk space, brown color indicates the place occupied by information. Free space is shown in yellow. Then, with the mouse, we take the disk strip by the left side, and drag it to the right, up to about 30 GB. Please note that while the volume of the disk is 360.3 GB.

After dragging and dropping, the volume became 330 GB. At the same time, in the column "Unallocated space in front of the volume", we have the number of 30.29 GB. Also, to resize the volume, you can simply write 30 GB in the "Unallocated space before the volume" column. Please note that in the bottom menu, which shows our disks, a new disk is formed, called "Unallocated space". Click Ok.
![]()
And, we have nothing going on because we haven't clicked "Apply Pending Operations" at the top of the menu. Let's click on this command.

We have a window "Pending operations". Where we also know that a reboot will be performed. Click "Continue".

Reboot must be confirmed. We agree.

After rebooting, enable Acronis Disk Director 12.
How to Attach Unallocated Space to the C Drive
So, turning on Disk Director 12, we pay attention that now the D disk is 330 GB, and next to it there is an unallocated space of 30.29 GB. Right-click on the C drive, and select "Resize Volume".

We have a window where we see that while our C drive occupies 88.48 GB. This is followed by an unallocated space of 30.29 GB. So, we take by the right edge of the strip, and with the mouse pulls out the space of the C disk for the entire interval of unallocated space. Or, in the column "Unallocated space after volume", you can simply write 0 GB (it will even be better). Further, MANDATORY put a tick above the command "Add unallocated space to volume".

Click Ok. After that, click "Apply Pending Operations". The OS tells us that a reboot is required. We agree. Click Ok.

In the next window, click "Continue".

We are fixing operations

After rebooting, open Acronis and examine the program window. We see that the system drive now takes 118 GB, and the D drive is 330 GB. What we needed to do. Now the system disk has a decent size, and you can install small programs directly on it (I still recommend installing large programs on another partition of the hard drive).

How to partition hard drive in Windows 10 if there is only one partition
You may have a different situation. For example, you have a system installed, you started working with it, install programs, download music, movies, games, and so on. Then, you realized that your friends' railway has several sizes, and you have only one large section installed in the store. What can be done in this case? How do I split a disk into parts?
You can partition the disk into parts during system reinstallation, but then you will completely lose all information from the disk. The first step is to defragment the disk. Transfer especially valuable information to removable media.
Next, launch Disk Director 12. Select "Resize the volume" (I will show it on my C drive). Then, grab the right edge of our disk and drag it closer to the center. Let me remind you that the dark green bar is the disk space occupied by information. Light green, free disk space. We put Ok.
If you don't like the volume letter, you can change it. Also, it is desirable to format the new disk in NTFS format. We choose the cluster size 4096 bytes.

Other program features
Besides, acronis program can move volumes, merge volumes, split volumes, resize clusters, format, defragment desired section... Also, it has an interesting "Check" function.
That is, if you select this command, and in a new window put a check mark over the commands "Fix found errors" and "Restore damaged sectors”, The program will start checking and treating system files.

This function of the program works better than the built-in one, which deals with fixing system errors.
Conclusion: Acronis Disk Director 12 is one of best programsto increase the volume local disk C. merging these partitions, adding space to the system disk. It has a convenient design, Russian language, easy to operate and has many other additional functions. Even a beginner can handle it. Good luck!
PS For three after the article, I rolled back the system I'm using. The backup was made before the disk was expanded. So, upon rollback, the system returned to its previous state. Including disk C. That is, its volume sent again 88.6 GB. A disk with unallocated space formed next to it. I used the Acronis program again.
The disk recovered to its previous size quickly and efficiently. Why am I saying this? In addition, if you restore the system from backupthe disk will most likely shrink again. But, Disk Director 12 will return to its previous size without much effort!
Probably, every user has come across such a paradox that no matter how huge the volume of the C drive is, the day comes when space on it starts to be sorely lacking.
And then the question arises, is it possible painlessly for the system and for all stored data to increase the size of the C drive and how to do it correctly?
How to increase the size of the C drive is a pressing problem for many users
This article is intended to answer this question. But first, let's look at why the space on the C drive starts to run out.
Why C drive space is running low
The fact is that operating system Windows has such an unpleasant feature as an increase in the size of its logical volume after a certain time.
At the same time, all files, both temporary and system ones, are subject to growth. And this happens with all versions of the OP - Windows 7, 8 and 10.
Of course, at first we try to free up space by deleting unnecessary files or cleaning the disk, but still there comes a time when there is nothing to delete, and the volume continues to be sorely lacking.
Disk C is full - an unpleasant but correctable situation
This situation has a very negative effect on our computer.
There is little disk space left - urgent action is needed
- it often starts to crash and glitch, bringing us a lot of inconveniences, such as slowing down PC performance and slowing down its performance.
The fullness of the disk also affects the security of the system, the risk increases that at the most inopportune moment during intense work at the computer, the program we need will crash.
3 ways to expand your C drive
Method 1. Free up space on the C drive using the system utility
Windows 7, 8 or 10 operating systems have standard utility "Disk Management", which allows you to view and modify the hard disk partitions at our discretion.
Finding it is easy enough by following the instructions below:
- Right-click on the "Computer" icon and select the "Control" item in the dialog box that opens.
On the "Computer" icon, right-click and select "Management"
In the menu that appears, find the "Disk Management" utility and click on it with the mouse button.
Find and run the Disk Management utility
This program provides us with the ability, at our discretion, to manage all devices designed to save data - logical drives, flash memory, CD.
Using this utility, we can easily transfer the amount of free space from the local drive D to drive C, that is, increase the size of the system disk on which we have an operating windows system 7 (8 or 10).
Before transferring free space, let's determine how much free space we have on drive D, how much we need for our local drive C and how much we can transfer.
Now, in order to transfer this vacated space to the system volume, right-click on it and select the "Expand volume" function in the menu that opens.
To transfer the freed space to our disk, select the item "Expand volume"
Now we press the "Shrink" command, after which the system provides us with information about the freed space, which we redirect to the C drive.
We have information about the freed up space, which we can now transfer to the system drive C
In the field that opens, indicate the size in MB of the space that we intend to transfer. After this action, the system will poll the volume and provide you with the result in the following form:
Determine the size of the space required for compression and indicate this value in the appropriate field
In order to free up the volume of our disk, right-click on it and stop at the "Shrink volume" option.
Right-click on drive D and select "Shrink Volume"
Thus, we run special program Volume Expansion Wizard. Click "Next" and in the proposed window determine the amount of space that we are going to add.
We launch the "Volume Expansion Wizard" and determine the size that we are going to add
After all the performed manipulations, we restart our computer.
Method 2. Increase the volume of the system disk using the Aomei Partition Assistant
One of the most versatile and well-proven programs for reliable and easy management of our disk partitions is free program Aomei Partition Assistant.
Aomei Partition Assistant - universal program for working with hard disk partitions
This application allows the user to do the following:
Aomei Partition Assistant is versatile and useful program for each user
- Create and delete hard disk partitions.
- Change the amount of free space.
- Format hard disk partitions.
- Combine, split and move or copy partitions, including to another hard drive or SSD drive.
Step 2. Installing Aomei Partition Assistant
After launch installation file, select the language (Russian) and follow the prompts of the installation wizard.
We install the Aomei Partition Assistant program, following the wizard's prompts
It should be noted that the program is distributed free of charge for private and commercial use.
Step 3. Launch Aomei Partition Assistant
After the installation is complete, a very convenient interface in Russian opens in front of us, where all the disks of our computer with all partitions are displayed.
Simple and user-friendly interface of Aomei Partition Assistant allows you to effectively work with all disks on your computer
Step 4. Increase the size of the C drive at the expense of the D drive
Let's take a closer look at how you can increase the space on volume C with volume D without losing data.
So, we perform actions according to the instructions:
Right-click on the D drive and select the "Resize Partition" function;
Right-click on section D and click the "Resize Partition" option
In the opened console, we can easily change the volume of the disk with just the mouse, hovering over the control points, as shown in the photo;
Partition size can be easily resized using breakpoints
Click "OK" and open the system volume C in the same way and increase its volume due to free space;
By analogy with D, we work with the C disk, changing its volume at our discretion
Upon completion of all manipulations with disks in the top panel of the main menu, click the "Apply" option;
After all the actions taken, click on the "Apply" function in the upper toolbar
- Next, you may need to perform, as a rule, two reboots, after which we get the desired result - an increased size of the system C-disk by reducing the D disk without losing any data.
Method 3. Change the size of the disk with the MiniTool Partition Wizard Free program
Partition program Wizard is a convenient and easy-to-use application
The program, like the previous application, is shareware and does not require any additional knowledge other than the skills of an ordinary PC user.
However, it has one small drawback - the lack of a Russian-language interface. Which, however, is offset by its simplicity and affordability. Also work in MiniTool Partition Wizard Free
is very similar to working with the Aomei Partition Assistant discussed above.
After installing Partition Wizard, we see the same simple interface, which makes using the program easy, even without Russian-language settings.
Simple interface makes it easy to work in the program, even with the missing Russian interface
Changing the size of disks also occurs by analogy with the above program. In the same way, using checkpoints, we can easily resize the volume, at the expense of the available free space.
The regulation of the added disk space is the same in a simple way
After we complete all the operations to increase the size of the system drive C at the expense of volume D, the result will be immediately available to us in Explorer.
I hope these simple methods will help you quickly and easily solve the problem of increasing the size of one disk at the expense of another without losing data.
Related Videos
The first, the most natural "devourer" of free space on the hard disk is the Windows operating system. During the operation of the PC, the so-called paging file is used, into which the OS unloads files if there is not enough random access memory... It is not recommended to disable the use of the paging file, however, a competent specialist can change its size, if necessary.
Another "fruit" windows work - creating system restore points. The files required to restore the operating system after a failure can take up a very decent amount of the total disk space and are not always needed by the user. If you are saving important data to an external hard drive or USB flash drive, and the installers of the programs you need to work are at your fingertips, then you can disable System Restore altogether. If you need restore points, use them periodically when system failures, then in the settings you can reduce their number, as well as the amount of space for them.
For Windows Vista or Windows 10, the path you need to follow to access the above settings looks like this: "Start" -\u003e "Settings" -\u003e "Control Panel" -\u003e "System" -\u003e "System Protection".
How to remove garbage after running various programs
Of course, the files that create various programs in the course of their work cannot be called junk in the full sense of the word, but after obtaining the desired result, they can be cleaned quite painlessly. For example, in the browser, you should clear the cache more often. After removing the programs, it is worth checking the place where it was installed, and manually deleting folders and files that were created and not deleted automatically.