Do-it-yourself Foxconn computer cooler repair. The computer fan is not working. In modern PC models, most coolers cannot be disassembled yourself, and not every technician will undertake such work
From this article you will learn:
- What are the main causes of water cooler failure?
- What types of water cooler repairs can you do yourself?
- In what cases does a cooler break down require the help of a specialist?
- How to protect your water cooler from damage
Water dispensers are available in almost every office; they are also widely used in apartments. These devices often fail, and the cause of breakdowns in most cases is their improper operation. Only very rarely does this happen through the fault of the manufacturer. In this article, we will look at all cases of breakdowns and figure out when and how to repair a water cooler with your own hands.
The main causes of water cooler failure and methods of elimination
You have discovered that your dispenser is faulty. At the same time, you want to save money on a water cooler repairman. Where should you start? First of all, it is necessary to determine the cause of the breakdown and carry out independent diagnostics. Background information on this issue is collected in the table below.


In what cases can you repair a water cooler yourself?
Today, a cooler is an integral attribute of office premises; dispensers also provide fresh drinking water to many apartments and residential buildings. Modern comfort depends on their proper operation, so proper operation, timely prevention and repair are necessary.

Within self-diagnosis First of all, you need to pay attention to the contamination of the device elements and begin cleaning them.

Cooler cleaning
The device must be periodically freed from deposits on the internal surfaces. Specific recommendations for repairing and cleaning water coolers depend on the model of the device, but the general plan of action for disassembling the device will be approximately the same.
- The hot water tank with temperature sensors installed on it is usually located on top. To access it, you need to remove the back wall by unscrewing the corresponding screws.
- The cold water drain device (drain plug) also needs to be cleaned - it is located in the cooling system on the left side. On the right is a rigidly fixed hot water drain plug.
- Next, using a wrench No. 15, remove the rubber seal and unscrew the 4 screws with a curved screwdriver.
- Then the water heating tank is removed from the device. To do this, you need to cut off the fastening clamps from the pipe and then remove all the connecting tubes.
- After this, you should free the device from all wires, including grounding, and temperature sensors by unscrewing 6 screws.
- If it is discovered that there is no thermal conductive paste at the tank connection points, it must be applied.
- Once cleaning and maintenance have been completed, the cooler is reassembled in the reverse order.
After assembling the device and filling it with water, you need to check it. Make sure that water flows correctly in idle mode, and then connect the device to the network. Light indicators should indicate that the device is working properly and does not need cleaning.
But the complete serviceability of the cooler should not exempt you from regular cleaning of all its main components. By getting rid of deposits on internal surfaces, you prevent many possible problems, capable of disabling the device and necessitating additional repairs. Regular cleaning of the cooler is also important for the health of consumers - it prevents pathogens from entering the water.
If the cooler stops heating water
Here are the most common reasons for lack of water heating:
- the device is de-energized;
- the device is turned off;
- the fuse has tripped;
- The heating element has failed.

The last two reasons are a serious reason to contact the service center that services your cooler model for repairs. You can replace failed elements yourself; if this is not difficult for you, then this option will be much cheaper.

Cooler disassembly sequence:

- The back wall is detached.
- The fuse is checked and, if necessary, replaced.
- The functionality of the heating element is checked. If it fails, the heating element is replaced with a new one. Many manufacturers, however, recommend contacting authorized service centers in this regard. This makes particular sense during the warranty period, when it is better to entrust all the work to professionals.
What to do if your water cooler is leaking
Water dispensers regularly break down for some users and work fine for years for others. Why is this happening? The problem obviously lies in improper operation of the device. In most cases this is true, but not always. Sometimes a leak in the dispenser occurs on its own, even if the device is used carefully. The leak makes itself known as a puddle that accumulates at the base of the cooler and can ruin your mood for the whole day. Users, as a rule, immediately try to find the reason and decide whether to contact service center for repairs or try to fix the problem yourself. It is about fixing this problem yourself that we will talk about.
We carry out diagnostics, starting with the most obvious and common causes, gradually moving to more rare ones.

Reason 1. Poor quality packaging supplied
The probable cause may not be in the dispenser at all, but in a defective bottle - water may well be leaking through a barely noticeable crack. If visual inspection container does not give any results, to repair, try using the following action plan.
1. First of all, you need to turn off the water heating and cooling systems. The corresponding toggle switches are usually located on the back wall of the dispenser.
3. Carefully remove the empty bottle from the bottle receptacle.
4. Then you need to drain all the water from both taps, for which, depending on the location of the device, you need to:
- open the cover of the drain valve located on the rear wall - in the case of a floor cooler;
- remove the silicone plugs located at the bottom of the device - in the case of a desktop cooler.
5. After all the water has been drained, you need to tighten all the taps, including the drain taps, and install the drain tap cover or plugs in their places.
6. Finally, a new bottle of water is installed on the device and the functionality of the device is checked.
If after the repair the leak has not disappeared, you will have to identify other probable sources.
Reason 2. The problem is in the cooler itself
What to do if everything is fine with the container? In this case, the problem will already be in the cooler. But there is no need to immediately disturb the service center in desperation. There are several causes of leakage that you can eliminate on your own. The most popular of them are shown below.
- The drain plug does not fit tightly and, as a result, leaks. You just need to tighten it tighter.
- Residue got inside the faucet protective film from the bottle. You should remove debris from the faucet by first removing its top cover. Don't forget to screw the cap back on, tightening it tightly.
- You may be opening the tap incorrectly. Check the operating instructions again.
Fighting bacteria
Neglecting regular cleaning of the device can lead to the fact that instead of high-quality bottled water, the output will be a liquid contaminated with microorganisms that is unsuitable for drinking. There is a risk of bacteria getting into the water when changing the bottle with dirty hands. Although these bacteria usually multiply on the surface of a special rubber gasket, remaining within the biofilm, there is still a possibility of them getting into the water.
The appearance of a colony of bacteria on the biofilm affects the water: its taste deteriorates, sediment remains in the dishes, the liquid itself becomes cloudy, and scale often appears when it is boiled.
To prevent this from happening, maintain hygiene of all parts of the dispenser that come into contact with water. Be sure to get rid of biofilm, as if it is present on surfaces, any sanitization will not be effective enough.
When can you not repair a cooler yourself?

Not in all cases you can cope with the problem yourself. An ordinary leak in a cooler often indicates a more serious breakdown that requires repair with the participation of service specialists:
- a hot water tank burst under low temperature conditions (for example, inside an unheated room);
- during the process of transferring the dispenser, the connecting tubes broke because the water from the device was not drained in advance;
- The faucet was severely damaged and must eventually be replaced.
How to protect your cooler from damage: care rules

There is nothing difficult about buying a new cooler and installing it. It is much more difficult to provide it with proper care throughout the entire period of use. As we found out, it is imperative to take care of the dispenser (especially clean it regularly) - this will protect the device from frequent breakdowns, save you from unnecessary expenses on repairs and allow you to always use high-quality water.
- Turn on the heating only after you are sure there is sufficient water pressure from the appropriate tap.
- Do not use excessive force when handling taps.
- Use only drinking bottled water.
- Protect the device from shocks and falls, which can cause not only external chips and cracks, but also damage to internal mechanisms.
- Avoid getting foreign objects into the dispenser, especially around the bottle receptacle. Try to protect the device from insects and mice.
Where to buy a drinking water cooler

The Ecocenter company supplies coolers, pumps and related equipment to Russia for dispensing water from bottles of various sizes. All equipment is supplied under the “ECOCENTER” brand.
We provide the best price-quality ratio of equipment, and also offer our partners excellent service and flexible terms of cooperation.
You can see the attractiveness collaboration, comparing our prices with the cost of similar equipment from other suppliers.
All our equipment meets the standards established in Russia and has quality certificates. We deliver dispensers to our customers, as well as all the necessary spare parts and components in the shortest possible time.
Power supply fans periodically fail or start running slower than before, affecting the overall performance of the PC. Repairing a fan costs money, and going to specialists takes time. There is a way out of this situation. You can repair the fan yourself without using a screwdriver.
Materials
To repair a PC fan you will need:
- tube with oil for sewing machines;
- stationery knife.
Step 1. Understand the essence of the breakdown
In the photo of the fan you can see a standard fan bearing bushing. When rotating, its shaft slides thanks to a very thin layer of lubricant. It, in turn, is held in place by a rubber bushing, which is located under the sticker. A number of fans do not have such a bushing at all, and the sticker is simply glued on top of a layer of grease. Problems with fan operation begin when the lubricant layer dries out partially or completely.

The traditional repair method involves disassembling the power supply and removing the fan itself. After this, remove the sticker, sleeve, and apply new layer lubricant and then everything is put in negative sequence in place.
The difficulty lies in the fact that all the insides of the power supply are connected to each other by wires and the work, despite the simplicity of the description, will be time-consuming.

Step 2. Check if the life hack will work
There is an easier way to apply fan lubricant, but it will not work for all power supplies.
Check out back panel yours and if you have four holes in the very center of the fan mounting area, as shown in the photo, then you will succeed. If not, you will have to go the hard way.

Step 3: Apply Lubricant
To apply the lubricant, you will need to take a tube and sewing machine oil. No need to use motor oil. Its layer will be too thick for the power supply fan.

To apply the oil you will need a tube with a needle or a thin pastry syringe. You will have to cut the tip of the tube at a large angle so that it resembles the tip of a regular needle.

Insert the needle into the center hole of the fan mounting area, piercing the sticker and rubber grommet. If the latter is missing, then quickly pull the needle back, as the oil will quickly spread over the surface. If there is, then squeeze out some oil and also remove the needle. Immediately after this, turn on the power so that the fan evenly distributes the lubricant over the surface and starts working again as before.
Have you noticed that your computer makes an annoying squeal or buzz when you turn it on? Most likely your fans are humming. There are several of them on the computer. The cooler on the processor, the cooler on the power supply, or the fan on the video card may be humming. You may have a case fan installed. Each of them can buzz. In this article we will look at cleaning and lubricating the power supply cooler. Fortunately, almost all other computer fans have the same design and are disassembled in the same way. How to remove a processor cooler can be read in the article
Let's begin.
Turn off your computer from the network.
Disconnect all cables going to the computer. Please be aware that simply unplugging the power cord may not completely cut off power to the computer case or components. Power can also come through the power cord, through a cable going to the monitor.
Safety is paramount. Attention! The power supply housing contains powerful capacitors that remain energized even when the power is turned off. If you do not have experience, it is better not to open the power supply.
Well, let's start.
Remove the 4 screws holding the power supply to the case.
Having disconnected all the wires going to motherboard, hard drives, everything else - pull the power supply out of the case.
Unscrew 4 more bolts from the top and remove the power supply cover.

On the left in the photo you see 2 relatively large barrels. These are powerful capacitors. It is not recommended to touch the area with your hands. In general, it is highly undesirable to touch the board and the elements on it with your hands. We unscrew the screws that secure the cooler to the wall.

The wires that power the fan are usually soldered tightly, but sometimes you can disconnect them from the board. In the photo you can see the fuse in the middle just above the fan. Sometimes, to repair a “burnt out!” The power supply can be managed simply by replacing the fuse.
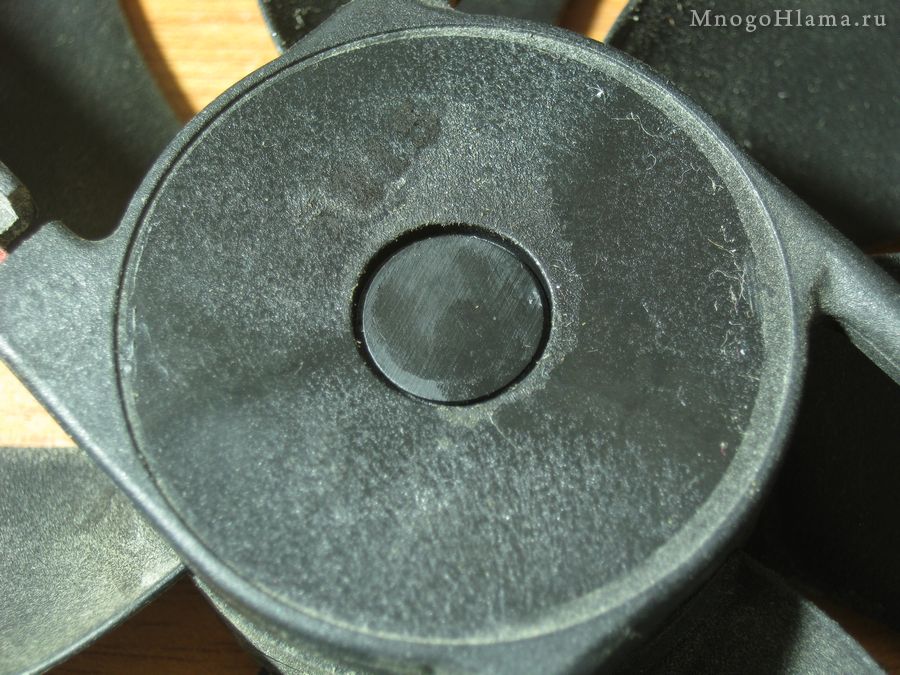
The fan was removed. Access to the fan axis is usually closed with a funny round sticker. We take a knife.

Sometimes there is also a round rubber stopper under the sticker.

If you are tired and your strength is running out, you can drop a drop of engine oil directly into the opened hole with the axle and put everything back together. Oh. No machine oil? Badly. As a very last resort, you can use refined olive oil. After a short time, sunflower turns into glue. Olive will last a week or two until you buy a bottle of machine oil.
The effect of a drop of oil into the recess will be unambiguous, but the disassembly procedure will most likely have to be repeated in two months. Machine oil is liquid and with intensive rotation it is easily displaced, flows out and the fan begins to hum again.
If you are determined to continue, check that you have Litol-type lubricant in your house. Due to its viscosity, it adheres more reliably to the fan axis and will last longer. Automotive motor oil holds well on the bearing.
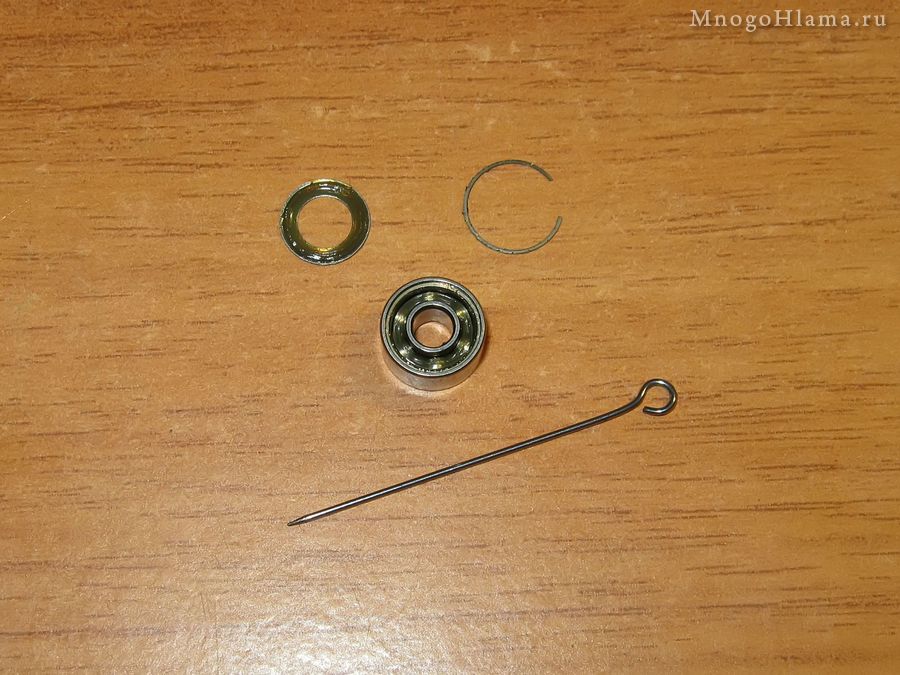
Visible in the recess on the impeller axis white retaining ring. We need to remove it. We pry it with a needle and tweezers and try to pull it off. There is a cut in this ring. We take tweezers by the part of the ring near this cut and try to remove it. Attention! Very often, when you try to remove it, this vile ring flies whistlingly to the far end of the room. There is practically nothing to replace this ring with. You are guaranteed to have trouble if you lose this ring. Be careful please.
If you still manage to lose this ring, try cutting out round pieces the size of the lost puck from a plastic bottle. Poke (melt) a hole in the middle of the round piece. Try wearing your homemade ring. I did it.

A rubber washer may be placed under the retaining ring. We remove it carefully and put everything aside.

Carefully wipe the impeller axle of old grease, use a match, a toothpick, or anything to clean the hole for the axle. We take this opportunity to wash the impeller from dust. Apply Litol lubricant (or drip engine oil) and assemble everything in reverse order.
Instead of the round sticker that we tore off, you can stick a piece of tape. It will block air access and prevent oil leakage.
We assemble it, screw it on, and don’t forget to plug in all the connectors from the power supply to the motherboard. Turn it on. Let's enjoy it.
I found a couple of old fans in my hardware and decided to take them apart to see how they work. In addition, it has never been possible to completely disassemble such fans before. All the time I limited myself to the usual peeling off the sticker, removing the plug and adding a couple of drops of oil to the bearing. Both of these fans are from two different power supplies, one 120 mm, the second 80 mm. But they also attach exactly the same ones to the case of the system unit, to pump cold air into it or to pump out hot air. So, using these examples, you can carry out preventive maintenance on your fans.


I thought about making a review of both fans, since the small fan is about 15 years old, but later it turned out that their design is almost the same. The only noticeable differences are in the size and shape of the housing, impeller and motor board. Therefore, I will describe the disassembly process on a large fan (120mm).
First, peel off the sticker under which the rubber stopper is hidden.


Use a screwdriver or something sharp to pry and remove the plug.

Under the plug you can see the metal axis of the impeller, on which there is a split, white, plastic lock washer. If it is hard to see due to old grease, then wipe it with a cotton swab.

We insert a narrow screwdriver into the cut of the locking ring and turn it 90 degrees so that the ring moves apart. Then pry up the ring with a screwdriver and remove it from the impeller axis. During this process, the puck can easily shoot and roll away somewhere, usually in the most hard to reach place, under a table, sofa, baseboard, etc.


After removing the retaining ring, remove the rubber ring from the axle.


Now, without much effort, you can separate the impeller from the frame, while it will be lightly held by magnets that are built into the impeller body.


Remove another rubber ring from the base of the impeller axis.


At this point we can say the disassembly is complete. We clean everything from dust and old grease.


Actually, the frame itself with the engine.


We also thoroughly clean the brass engine liner from dirt and old grease. If you wish, you can remove the board with the motor windings, although this is not necessary for cleaning and lubrication. In my case, it was easily removed from both fans, but I found traces of glue under the board. So you may not be able to remove it so easily.


We assemble everything in reverse order. Rubber rings on the bottom and top.


It is convenient to press the retaining ring with tweezers from both sides at once.

If your fan is very worn (noises, knocks, rattles during operation), then it is better to immediately replace such a fan with a new one. Otherwise, lubricate the impeller axle with thick lubricant (grease, etc.) before installing it on the engine. I have this fan that is relatively new, so I assembled it, and only then lubricated it with motor oil because it is liquid and will always fill all the cracks.

We apply oil with a needle to the rings and the impeller axis; a syringe is indispensable in this regard. In this case, the impeller can be rotated periodically by hand, then it will be easier for the oil to penetrate inside. You shouldn’t pour a lot of oil (3-5 drops are enough) since anything extra will always find a hole and will subsequently collect dust and become overgrown with moss or fly off the blades all over the place. system unit. Here, of course, everything depends on the size of the fan; a large one needs more lubrication, while a small one needs less.

Let's plug the plug. If this sticker area is accidentally filled with oil, you need to wipe it with solvent or white spirit, since this sticker will no longer stick to oil. The sticker itself can be replaced with tape if the old one has become unusable.


In principle, everything is about prevention. We connect, check, then, depending on the test results, install it in the computer case or power supply. Or we throw it away and go to the store for a new fan, if during disassembly we completely destroyed our old fan. Fan designs are different, both on plain bearings, as in my case, and on rolling bearings (ball bearing), but general principle I think their showdowns are similar.
Afterword
I recently came across this Gembird fan with a diameter of 120mm. It attracted my attention with the inscription BALL on the protective sticker, which roughly translates as ball, ball, ball. After disassembly, it turned out that this fan was assembled on a ball bearing. But disassembling it is practically no different from disassembling a cheap fan, which I discussed a little higher in this topic.


Even the bearing itself in this fan can be easily disassembled with a pin. You just need to carefully remove the retaining ring using a needle, then you can remove the side protective wall of the bearing (boot). After which you can safely carry out preventive maintenance of the separator and the bearing as a whole, clean, wash, change the lubricant. In this case, the bearing is almost perfect, there is a lot of lubricant and it is light. If your bearing is dry and dirty, and there is also wear (the races are hanging out as if the balls have become smaller), then it is better to replace such a bearing with a new one. Although it is easier and maybe cheaper to buy a new fan.


from 120 rub. RUB
Each of us may encounter such a problem as the absence of a familiar buzzing sound when turning on the PC. At the same time, the system will boot well (at least without failures), everything seems to be fine, but there is no such sound as we are used to.
If such troubles have not passed you by, then your computer fan is not working and you definitely need to do something about it!
Operating the device without a cooler is prohibited, since without cooling you may face serious troubles.
Most electronics are sensitive to overheating, and if your PC's rear fan isn't working, subsequent repairs can be more expensive. What to do in such a situation? We'll talk about this today.
Why doesn't the cooler work?
There are not many reasons why a fan on a computer may not work. This PC element is one of the simplest, but at the same time the most important in the entire system, because it is responsible for cooling sensitive electronic parts. Here are a few of the most common problems, which are most often the answer to the question: why does the cooler not work?

So, we have found out the main reasons why a fan may fail. Next, let's talk about how such malfunctions are eliminated.
The computer fan does not work: how to deal with the problem?
If your fan has failed, you should never use your computer. But what to do? At all do-it-yourself repair It is not recommended, since the device can still be broken, which can lead to a variety of consequences.
Experts from Expert will help you solve any problems with the cooler, regardless of your PC model.

There are usually two solutions to the problem:
- Option one: no replacement. The fan may be in good working order, but it may also develop lubricant, which can significantly deteriorate the quality of its operation, even to the point of failure. In such cases, the fan is dismantled, completely disassembled, new lubricant is applied, and the connection is re-installed and tested.
- Option two: replacing the part. Repairing fans is usually impossible. Yes, and inappropriate. The cost of components is cheap, but there can be a lot of work. As part of this work, we completely dismantle the old cooler, install a new one (you can buy it yourself, or the technician will bring it with you), connect and check the functionality of the replaced part.
Related posts:
 High magnification monoculars - features and benefits Monocular magnification 50
 World of Tanks crashes on startup - fixing errors World of tanks crashes after every battle
 Server key 1c over the network
 How to turn on WiFi on laptops Add a new wireless network to a laptop
 How to find out iPhone serial number?


