Resetting the pampers of the epson l120 printer. Epson pampers reset. What is a diaper in a printer
Each Epson device, whether it is a printer or an MFP, has a special container with an absorbent filler (drive), which is popularly called a "diaper". The pampers absorb the excess ink that is generated when the image is printed on the edge (without a frame), and it also collects waste ink used for cleaning the print head. Each diaper has its own resource, or rather, the amount of ink that it can absorb. If the printer fills more, excess ink will start to flow from the printer. To prevent this from happening, sensors are installed in the machines that block the operation of the printer and give an error: the service life of the ink-absorbing printer lining is coming to an end. In this article we will tell you how to reset the diaper on Epson, and thereby get rid of this error. We will restore the operation of our device, as well as tell you how to prevent the physical overflow of the container with the absorbent filler.
When and in which Epson machines does the pad overflow error occur?
Let's start with the fact that pads are installed in all Epson printers. However, depending on the class of the device and its performance, they differ. So in large-format devices (print format A2 and higher), the diaper is made in the form of a removable container. It is easily changed by the user independently within a few minutes. The official names for this consumable may vary: Waste Ink Tank, Waste Ink Tank, Absorber Tank, or Maintenance Tank. The cost of capacity, depending on the model of the plotter, does not exceed 4000 - 6000 rubles. The resource of the diaper, depending on the model, ranges from 10,000 to 35,000 pages, depending on the model of the device. When a diaper overflow error appears, you simply pull out the old one, insert a new one and keep typing. But in household devices, everything is a little different.
Selecting a waste ink container (pampers) for Epson plotters.
Usually, in printers and MFPs (up to A3 format inclusive), the diaper is built into the device itself. That is, it turns out that it is not consumable, and a spare part. The user cannot change it on his own. It is necessary to take the device to service centerwhere an engineer will disassemble it and replace the absorbent core. Then, using special software, it will reset the digital counter error in order for the printer to start printing.
The resource of the diaper, depending on the device, is from 3000 pages to 5000 pages. Although there are lucky people who overflowed the diaper by 10000 - 12000 prints. The thing is that the less we do ink pumping in order to clean the print head, the higher the diaper resource. And thus we can print more pages. In addition, if we print images with borders, we will also increase the life of the diaper. However, if you rarely print, and you have a printer for a long time without printing, you need to clean the print head, otherwise you risk getting more expensive repairs. In any case, replacing the pads physically is cheaper than replacing the printhead. Typically, the cost of a printhead is estimated at half the cost of the machine. Therefore, in any case, I recommend doing the cleaning of the print head when the picture is a comparison of the diaper of a plotter and a conventional printer.

Physical overflow of the diaper.
As we already found out, the pad overflow counter usually gives an error after printing 3000-5000 pages. Then it stops the printer until the error is eliminated and the diaper is physically replaced. The manufacturer, in this case Epson, always insures itself and makes a container with an absorbent filler with a large margin. In some cases, the device can be reset several times. Usually, this is 2-3 times. Then the diaper will need to be replaced. If this is not done in time, then ink will begin to flow out of the body. There are several ways out of the situation:
1) take the device to an Epson service center for specialists to replace it!
2) replace it on your own or arrange to drain the waste ink into a special container.
Within the framework of this article, we will not talk about how the waste ink is drained into a special container, but just say that for different Epson devices this process is performed differently. But at the same time, the meaning is the same: we attach a container for draining to the ink output tube using a silicone loop. In order to get to the waste ink discharge tube, depending on the model of the device, you need to either remove the cap from the back of your device, or unscrew one or more bolts, after which you can pull out the diaper and get to the output tube. In some cases, you will have to get confused and disassemble the case.
Epson pampers reset software.
In most cases, we need two programs that will reset the diaper overflow error - these are the Adjustment Program and PrintHelp. The first is free and in English, and the second is in Russian and most of the functionality is paid. Personally, I like the Adjustment Program, because in my case, this program coped without any problems with resetting the absorbent filler overflow error on the L1800 printer (A3 format printer with a proprietary continuous ink supply system). And most importantly, I managed to do it for free. But in the PrintHelp program this is already a paid procedure and costs almost 600 rubles for one reset. However, printhelp has its merits. Let's see which program is better to use?
As you probably already guessed, the choice of program depends on your Epson model. We use the Adjustment Program if you have the next model of a printer or mfp.
PrintHelp can be used with almost any Epson model for a fee, using a reset code, and free for some models.
Choice of software:
| Software | Supported Epson printers and MFPs. |
|---|---|
| CX9300, L111, L210, L301, L351, L551, L1300, L1800, L130, L220, L310, L360, L455, L565, L605, L655, L801, L805, L810, L850, ME620F, R270, R330, R390, SP14 WF7018, WF7521. | |
| to reset the counters for free on the following models: | L110, L210, L300, L350, L355. |
| Download PrintHelp to reset counters for free for the following models: | Photo 1410, Photo 2100, Photo 2200, L100, L200, R1800, R1900, P50, T50, T59, T60, T1100, T21, T26, T27, T30, T33, T40W, R270, R290, R295, R300, R310, R320 , R360, R380, R390, R800, RX610, RX615, RX620, RX690, RX700, SX125. |
Attention! Resetting the counters on your device is done at your own risk! The author of the article is not responsible for damaged equipment as a result of such a reset! Any manipulation with the printer may void the manufacturer's warranty. Therefore, if the device is under warranty, it is better to contact the service center. If there is no guarantee or you are not afraid of losing it, then you can proceed to reset the Epson diaper according to the instructions below. In fact, in almost 100% of cases, you should not be afraid. However, there may be difficulties with some models. I will show using the example of the Epson L1800. Besides, there were no problems when resetting the counters on the T50 printer.
How to reset the diaper on Epson using the Adjustment Program for the L1800 model as an example?
Downloading the archive for a suitable Epson model. Unzip and run the program. On the initial screen, click Accept. We turn on our printer or mfp epson and connect it to the computer if it is not connected.

Select the model of the device from the table and press Start. I will use the example of the L1800 printer. In the window that opens, select Select. Here we need to select the connection port. To begin with, you can put Auto selection in the port item. Or select the port manually, in my case it is usb003 and click OK.


In the window that opens, first, let's check the readings of the counters. To do this, put a tick in the small boxes next to the numbers 0 and 80, and click Check. If your printer is already locked, then it will show 100% filling in two windows (depending on the model, there may be one or several windows, epson l1800 has two).

Since I have already reset the counters, it shows at the moment:
- the first counter is 9% full out of 100%, while gaining 1111 points out of 12476.
- the second counter is not filled at all and shows 0%, gaining 0 points out of 6788.
As you can see, epson l1800 has two counters. The first (up to 12476 points) is the main counter of the printer (diaper). The value of this counter increases during printing, as well as when cleaning and pumping ink. So keep this in mind. The second (up to 6788 points) is additional counter, which is an absorbent pad under the printhead. The counter increases with borderless printing and some special printing modes.
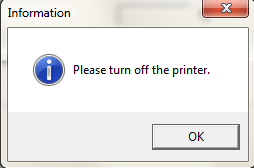
Now let's reset the counters on the Epson in order to unlock the printer and print on it again. To do this, put a checkmark next to the first and second counter and click Initialize. Further, a warning pops up that after pressing OK the counter will be reset. Click OK. After the reset, a warning pops up that it is necessary to turn off the printer: Please turn off the printer. Turn off the printer with the button on the printer case and press the OK button. Next, we receive a warning that you need to reboot or turn on the printer: Please reboot the printer. Turn on our printer and click OK.

Do not close the program on the computer yet. We managed to reset the waste ink tank counters on Epson absolutely free. Now let's check the counters. Check the boxes and click Check. I forgot to say that when checking it is not necessary to put a tick in front of the counters. However, when we reset, they must be set. When checked, the counters are 0 points or 0%. That is, the reset of the diaper counters was successful. The printer is unlocked and now we can continue printing without any restrictions until the next time the counter is triggered.
How to reset the diaper on Epson using Printhelp using the example of the L1800 model?
First you need to download the Printhelp program, and then install it. We open the program and turn on our epson device, it can be both a printer and an MFP. In my example, I show using the example of an A3 printer in the EpsonL1800 format. Of course, the printer must be connected to the computer. In Printhelp, click the Refresh Printer List button. In the left upper corner our device should be displayed.

Now we press the button Read working out counters. And we see the results. In my case, the counters are not yet full. Only 3.32% filled. You can print for a long time without fear of overflow. It's just that I just zeroed it with the Adjustment program, and after that I did a few head cleanings. In your case, the counters will show 100% filling. In this case, the device is locked and does not print. Now our task is to reset the counters so that the device starts printing. Remember, Printhelp is not completely free. There are models for which you can make a free reset, but they are few. Basically, you need to pay an average of 600 rubles per discharge. However, the program allows you to reset the counters once with a trial code for free. In this case, you can reduce the counters from 100% to 90%. If you need to reset completely, you will have to buy a code.
In order to reset the counters, you need to select our device in the upper left corner and click on the Reset working counters button. If your printer is on the free reset list, you don't have to pay. But if the printer is not in this list, then a window will pop up asking you to enter the code. If you do not have a code, you must buy it by clicking on the Buy reset code button. If you don't want to buy a code, you can use a free trial code that will reset the counter from 100% to 90%. When you click buy code, you will be taken to the printhelp program site where you will need to buy the code. Buy and then enter. I will not buy, but I will use the free code: trial. We enter this word instead of the code and click OK. After this procedure, the counters will be reset to 90%. In my case, this does not happen, since the level of the counters is only 3.32%. After that you will be able to print a little for a while, but after that you will have to buy a code.

That's all, in this article, using the L1800 printer as an example, we showed how to reset the Epson diaper counter. We hope you found this article very helpful. Which program to reset counters is up to you. I like the Adjustment Program better as it is free and not very complicated.
Epson L120 required maintenance... Contact the service center. Adjustment program Epson L120
If your Epson L120 printer displays a “Service Required. Contact the service center. " it is necessary to reset this error using one of the service programs.
A distinctive feature of this program is an unlimited number of counter resets, unlike other programs.
Resetting the error of the pampers (absorber, working off) in Epson L120
- The program was downloaded and activated.
- Open the folder with the program and run the file Adjprog double click (fig. 2)

- In the window that appears, press the button Particular adjustment mode (fig. 3)

- Double-click the item "Waste ink pad counter" (fig. 4)

- If near Main pad counter check the box and press the button Check, then we can check the current value of the counter occupancy (Fig. 5).

After reading the values, the program shows that the counter is overflowed 100% (fig. 6), so the printer is in error and does not print

- To reset the absorber counter (diaper, working off), you must again check the box next to the "Main pad counter", and press the button "Initialization" (fig. 7)

- Push "OK" to confirm error reset (fig. 8)

- Turn off the printer button On / Off. and press "OK" in the program (fig. 9)

- Turn on the printer and we continue to work, error reset.
This error occurs if you print a lot or do a lot of head cleaning from the printer menu. There is nothing wrong with this error, this is the normal behavior of the printer, which is necessary so that you service the printer in time and the ink that collects inside the printer does not flow out onto your desk. Therefore, the error was reset, but think about how to service the printer.
Video on working with Adjustment program Epson L120, error reset “Requires maintenance. Contact the service center. "
When using printers Epson L100, L110, L200, L120, L210, L300, L350, L355, L366, L550, L555, L1300 with non-original ink, it becomes necessary to reset the ink level counter, because There is no reset code included with the ink.
- Do not enter the reset code when prompted by the printer, but this may display a void printer warranty message and will not display the ink level on the computer monitor.
- Download free program PrintHelp. The peculiarity of this program is that it resets all colors in one click of the mouse, i.e. reset like a classic CISS. Read more here
- Introduce new (other) ones indicated on our website.
You no longer need to spend money on buying original epson ink... Now you can use our FREE CODES to refill printers with the ink you like.
Please If you have ink codes ( Reset ID) from the original cans for refueling CISS you can send to us, and we will publish it on the website.
This will help make it easier for other users to zero out the cartridges. Help other customers use FREE reset!
| Black ink ID T6641 | Cyan ink ID T6642 | Magenta ink ID T6643 | Yellow ink ID T6644 |
|---|---|---|---|
| EKA-3TF-A24-GETR J3K-958-9J4-5DLN GDU-T62-G5N-3GMJ 7UR-BVW-47F-MBLZ GPC-XJQ-VT9-799R 6T2-YBZ-9WX-J42A 3BV-YV9-459-S2RC 2YB-CXS-T8D-KXDG 445-645-6UD-E7VQ X52-4HD-UVR-ZYRC YVJ-FAW-J92-QUES VYM-8WZ-5F2-RMQ3 B3M-QUH-5ZB-YE8Z TW7-6UE-BN4-L8MB 63C-8CD-DDQ-55DA A6X-4HV-DQ9-X3BZ 38J-7W3-7WF-AL2B H7R-HJK-FFU-P6EM VB5-3TW-TVE-9PAP JW6-W7J-D3S-JFGE Y56-DUY-NVN-9425 RC9-NKD-RVP-29Q3 CK8-JPG-HCX-MKRY HZ5-6EX-KJ3-H7FY ECG-94A-GJS-S9DE YKP-Z77-5FP-44A3 UJL-WXG-D4B-AXLG CB2-NN4-DHM-K2KA |
XXX-996-B96-BBUC DV9-E8U-JW4-K47Z WQ3-8ZR-M6Z-Z96F MAY-M8D-8LZ-VUXC VKP-V8T-87L-PGWB LHL-K58-D3H-GV25 vbm-L3q-4wp-v2te Y2A-VBR-QBZ-XD3Q H2X-4UX-7X9-4KCP B84-RUA-MM7-UY85 JSL-5PU-5HL-QQBF CL4-CQB-HUG-Y53P A92-Y6J-YTM-55VZ DY5-744-DTS-CR4A J44-5LP-2QL-WCWP B94-MK2-UXJ-2BGE 4ND-YSC-M3G-VGNC NCW-9EA-GCM-7XMN UQG-BCE-7VQ-YGZY JGX-LY8-9PU-E5TG RS9-L68-L4V-ZYZ5 G35-JSU-Q37-Y9BQ HMX-CLG-ZLE-RK8Z 4KE-RXB-QXL-U7PE TZT-C5M-GSH-222R XLJ-GZY-VR7-67KN |
LV5-BJ8-W26-GSJS SYH-LYR-7RR-L8EF MWA-MUJ-W6K-YJDY HXB-ES6-5TD-UKRP BJ2-HB4-8QP-GKPQ 4XP-YJ7-N7Z-6X63 VKT-3N8-K3S-EDQR LDR-2EA-6KL-4KCP K5X-AW3-VDU-X8GN FEA-8Q8-UZM-B7U5 FXL-LFM-XAY-LUR3 9A2-E8J-BH9-8D6Z F7B-339-ED2-J4UA X4H-PNM-2V5-DGNZ 22L-AML-DVU-9RK9 72W-J3K-4BE-L7KG EG2-JSH-6HY-KBX5 CEA-393-CPQ-2URE Y9M-T7N-W4B-H9UM ZUL-YLQ-JCZ-79T5 HJ4-MHN-CR2-X4GP HHF-HQP-MAH-HJ93 9GL-YLF-Y3G-Y8RF HL5-ULQ-Z2Q-4G3P FNW-M74-S2Q-N6B5 |
RXU-7VR-XK7-P7JZ FX2-6XP-PGL-LTFP K33-RG2-YRN-XACJ QGM-5Z8-6UC-UWBQ B5W-AZ8-F82-QADY G4A-9VQ-A8Q-2EFZ DN4-5BE-S26-NMY5 ALQ-W9G-92W-YDMN PPZ-FTN-6TL-D8EZ QDB-L3C-5NU-TP5G VPT-36F-A3E-KW7E QGD-P7Q-PLX-CNUZ 7XG-B4Q-QFZ-XCJG HM9-JVZ-LQ3-H4BA 5G3-VR3-HPU-6XDZ 77X-5CP-527-H4JZ ADE-BRE-Z8S-JR6J 34R-6Y3-PBK-E8BG 62L-9E4-L76-RHYG JZ3-UA2-6JC-S34M N59-DBX-7F7-78H3 A22-SVX-CVZ-42HM GZR-3F4-UQB-E9LQ YLS-7GF-JCB-237G DY2-XW9-6BZ-5UVB |
To add this page to "Favorites" click
Other articles in this section:
"With active use inkjet printer there comes a moment when the printer refuses to work and issues an error message with a request to contact the service center. Depending on the printer model, notification of this error occurs in different ways, but the most standard way an error message is displayed alternately blinking of two red LEDs under the printer buttons, and an error window pops up on the computer monitor.
Moreover, a warning about the imminent end of the service life of the absorbent lining (diaper) also pops up as a system message on the computer monitor.

After the warning message appears, you have the opportunity to print another 15-20 images (photos) of A4 format, after which the printer will refuse to print, until the waste ink counter is reset.
In all inkjet printers, a special container is used to collect waste ink (Waste Ink), which is often called a "pampers". This "diaper" is a container in which there is an absorbent material that absorbs waste ink well.
Where does waste ink come from in an inkjet printer? Each time it is turned on, the print head is automatically cleaned - a small amount of ink is pumped from the cartridges into the print head, which at this moment is in the extreme right (left) position of the printer, and the ink is “dumped” into the “diaper”. Also, when starting regular cleanings through the printer driver, ink is pumped from the cartridges through the print head into the absorber.
Since the volume of the container for collecting ink, with the absorber located in it, has a certain limitation, then sooner or later, there comes a time when the containers overflow, and ink begins to flow out, which causes pollution of the printer itself and everything that surrounds it ...
To avoid such an extremely unpleasant situation, absolutely all inkjet printers are equipped with a waste ink control system. In reality, this system is nothing more than a program counter that counts the number of times the printer is turned on and all the head cleaning procedures are performed. Since the volume of ink pumped out of the head during cleaning procedures is approximately known, and the capacity of the sump is also known, it is not difficult to calculate when it will fill.
When the counter of the amount of waste ink supposedly discharged into the sump reaches the value preset in management program printer, the printer first displays a warning about the imminent end of the service life of the absorbent pad, and soon completely blocks the ability to send a print job.
If the inkjet inkjet pads are full, the service technician should take the following actions:
- replace absorbers - "diapers"
- reset (zero) the Waste Ink Counter. "
You can reset the "pampers" waste ink counter using a special PrintHelp utility from the SuperPrint development team (Resetters). PrintHelp- a universal service program for printers Epson, Canon.


The program can perform the following functions for Epson printers (not for all models):
- checking the current value of the waste ink counter
- reset of the waste ink counter (some models require a RESET CODE)
- cleaning the print head
- enhanced cleaning of the print head during the initial refueling
- reading and writing serial number printer
- reading and writing USB ID
- reading and writing HEAD ID
- creating a dump EEPROM backup
- paper feed test
- check and test of nozzles
- printout of color fills
- initialize (disable) PF deterioration offset
- getting a status about the status of the printer
- reading ink level
- reset Ink Level and reset Pampers in printers L100, L200, L800 free
List of supported Epson printers:
Models are highlighted in green for which the diaper is reset WITHOUT a Reset Code. Diaper reset WITHOUT Reset Codes is possible only for countries: Ukraine, Russia, Kazakhstan, Belarus, Moldova, Georgia
Artisan: Artisan 50, Artisan 1430, Artisan 700, Artisan 710, Artisan 725, Artisan 730, Artisan 800, Artisan 810, Artisan 835, Artisan 837
B: B40W, B42WD, B1100, B1110
BX: BX300F, BX305, BX310FN, BX320FW, BX525WD, BX600FW, BX610FW, BX620FWD, BX625FWD, BX925, BX935
C: C58, C59, C62, C63, C64, C65, C67, C68, C76, C77, C78, C79, C82, C83, C84, C85, C86, C87, C88, C90, C91, C92, C93, C94, C95, C97, C98, C99, C110, C120
CX: CX2800, CX2900, CX3100, CX3200, CX3300, CX3400, CX3500, CX3600, CX3650, CX3700, CX3800, CX3900, CX4000, CX4080, CX4100, CX4500, CX4600, CX4700, CX00, CX500, CX00, CX4700, CX00, CX5000, CX5000 CX6500, CX6600, CX7300, CX7700, CX7800, CX8300, CX8400, CX9300F, CX9400Fax, CX9500F
D: D68, D78, D88, D92, D120
DX: DX3800, DX4000, DX4200, DX4800, DX5000, DX5050, DX6000, DX7400, DX7450, DX8400, DX9400F
EP: E-600, EP-302, E-600, EP-702A, EP-703A, EP-705A, EP-706A, EP-775A, EP-801A, EP-802A, EP-804A, EP-804F, EP- 901F, EP-902A, EP-903
K: K100, K101, K200, K201, K300, K301
L: L100, L110, L120, L200, L210, L300, L350, L351, L355, L550, L555, L800, L1300, L1800
M: M100, M105, M200, M205
ME: ME2, ME-10, ME-20, ME-30, ME-32, ME-70, ME-80, ME-82WD, ME-100, ME-101, ME-200, ME-300, ME-301, ME-303, ME-320, ME-330, ME-340, ME-360, ME-401, ME-403, ME-510, ME-520, ME-530, ME-535, ME-560, ME- 570, ME-600F, ME-620F, ME-650, ME-900WD, ME-940FW, ME-960FWD, ME-1100
NX: NX110, NX125, NX127, NX130, NX200, NX210, NX215, NX220, NX230, NX300, NX305, NX330, NX400, NX410, NX415, NX420W, NX430, NX510, NX5156, NX20530
P: P50, P60
PX: PX610FW, PX650, PX659, PX660, PX700W, PX710W, PX720WD, PX730FWD, PX800FW, PX810FW, PX820WD, PX830FWD, PX-203A, PX-V600, PX-V630
Photo: Photo 820, 830U, 890, 900, 950, 960, 1280, 1290, 1390, 1400, 1410, Photo 1430, Photo 1500, 2100, 2200
PictureMate: PM100, PM210, PM215, PM225 PM235, PM240, PM250, PM260, PM270, PM280, PM290, PM310. diaper reset is NOT available. Reading is available.
PM: PM-3500C, PM-4000px, PM-G800, PM-G4500, PM-G5000, PM-A820, PM-A890
R: R200, R210, R220, R230, R240, R245, R250, R260, R265, R270, R280, R285, R290, R295, R300, R310, R320, R330, R340, R350, R360, R380, R390, R800, R1800, R1900, R2000, R2400, R2880, R3000
RX: RX420, RX425, RX430, RX500, RX510, RX520, RX530, RX560, RX580, RX585, RX590, RX595, RX600, RX610, RX615, RX620, RX630, RX640, RX650, RX680, RX685, RX690, RX700
S: S20, S21, S22
SX: SX100, SX105, SX110, SX115, SX117, SX125, SX130, SX200, SX205, SX210, SX215, SX218, SX230, SX235, SX400, SX405, SX410, SX415, SX420W, SX425, SX415, SX420W, SX425, SX425 SX600FW, SX610FW, SX620
T: T10, T11, T13, T20, T21, T22, T23, T24, T25, T26, T27, T30, T33, T40W, T42WD, T50, T59, T60, T1100, T1110
TX: TX100, TX101, TX102, TX103, TX105, TX106, TX109, TX110, TX111, TX115, TX116, TX117, TX119, TX120, TX121, TX125, TX130
TX200, TX209, TX210, TX219, TX220, TX230, TX300F, TX320F
TX400, TX405, TX408, TX409, TX410, TX419, TX420W
TX510FN, TX515FN, TX525, TX550W, TX560WD, TX600FW, TX610FW, TX620FWD, TX650, TX659
TX700W, TX710W, TX720WD, TX800FW, TX810FW, TX820FWD, TX830FWD
WorkForce: WorkForce 30, 40, 42, 310, 315, 320, 323, 325, 500, 520, 600, 610, 615, 630, 635, 840, 1100
WorkForce WF-7010, WF-7011, WF-7012, WF-7015, WF-7018, WF-7510, WF-7511, WF-7515, WF-7520, WF-7521, WF-7525
WorkForce WF-2010, WF-2510, WF-2520, WF-2528, WF-2530, WF-2538, WF-2540, WF-2548
WorkForce WP-4011, WPM-4011, WP-4015DN, WP-4020, WP-4022, WP-4025DW, WP-4092, WP-4095DN,
WP-4511, WP-4515, WP-4520, WP-4521, WPM-4521, WP-4525, WP-4530, WP-4531, WP-4532, WP-4533, WP-4535, WP-4540, WP- 4545, WP-4590, WP-4592, WP-4595 - diaper reset is NOT available. Reading is available.
XP: XP-20, XP-30, XP-33,
XP-100, XP102, XP-103, XP-111,
XP-200, XP-201, XP-202, XP-203, XP-204, XP-205, XP-206, XP-207, XP-208, XP-211, XP-212, XP-214, XP- 215, XP-216, XP-217
XP-300, XP-302, XP-303, XP-305, XP-306, XP-311, XP-312, XP-313, XP-315,
XP-400, XP-402, XP-403, XP-405, XP-406, XP-411, XP-412, XP-413, XP-415, XP-510,
XP-600, XP-610, XP-605, XP-615, XP-700, XP-710, XP-750, XP-800, XP-810, XP-850, XP-950
For those printers in which the diaper is made in the form of a separate cartridge with a separate chip, it can be reset only with the chip programmers.
Using the program free... All functions are supported incl. and a diaper reset function. For some models, this function works after entering
Hi everyone! Today I will show you how to reset the pampers on the Epson XP-302 printer, but in this example you can reset them on other models. At relatives, the printer began to print in black and yellow. They gave it to be repaired, they were told that it cannot be done, they need some codes ... Well, I decided to figure it out ...
At first I thought, I'll do some calibrations and everything will be solved ... But the printer started to display this message: The service life of the ink-absorbing pad has expired.
I started to google what it is in general) On the Internet there is a program for resetting epson counters, called PrintHelp, but it asks for codes that need to be bought! Well, this is not the case) But on some printers it turns out to drop the Epson diaper for free.
If PrintHelp didn't reset the counter for you for free, then on the Internet there is epson software Adjustment Program (Epson banned it from uploading).
If the program does not help, then you can try SSC Service Utility or. Run the program to reset the epson diaper. It is called the Epson Adjustment program. So if suddenly it doesn't fit your printer, then look for another version.
And so, after starting, select the model and port:
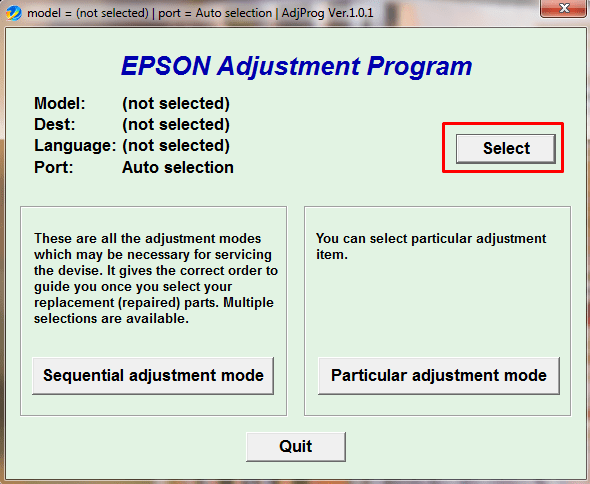
If you don't have your model, that's okay, just choose like mine.
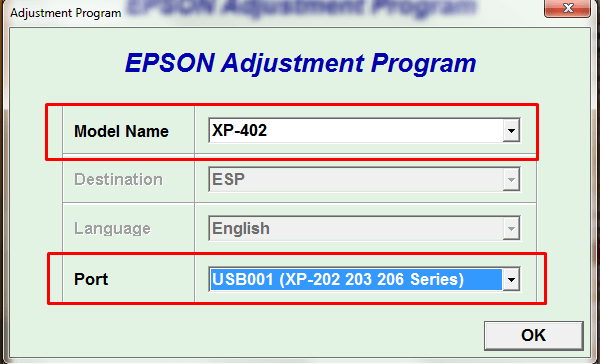
The main thing is that the drivers are installed. Otherwise, the program will not see the printer port. Click ok and then select Paricular adjutment mode.

Select the waste ink pad counter. This is an ink and diaper counter.

We put all the checkboxes and click Check, thereby we will check the counters.

I have already reset the counter and managed to print a number of pages. But if your printer swears at the diaper, then in the bottom field you will have a value of 100%. Select the top counter and click Initialization, i.e. reset the Epson counter.

The program will ask you to turn off the printer.

Click ok, after it turns on and we can check. Select the top checkbox and click check again.

As you can see, the reset of the Epson diaper was successful! But remember, it's no coincidence that Epson throws this error. In addition to resetting, I also recommend cleaning the gasket under the cartridges.


