Consumables for printing at wholesale prices. Firmware Samsung Galaxy J1 (2016) SM-J120 How to flash Samsung Galaxy J 5
Detailed, step-by-step instruction how to flash a smartphone Samsung Galaxy J1 (2016) SM-J120 for new official or custom firmware. Receiving Root is right superuser on Samsung Galaxy J1 (2016) SM-J120, setting custom recovery TWRP Recovery.
Installation official firmware to a Samsung Galaxy J1 (2016) SM-J120 smartphone using the Samsung Odin service program. In order to install new firmware on your smartphone, you first need to download several files to your PC:
Download the latest Official Firmware for Samsung Galaxy J1 (2016) SM-J120
Official service multi-file firmware J120FXXU1APH1
official single file firmware J120FXXU1APH1
Before flashing your phone, you first need to decrypt it.
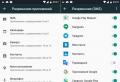
To remove the lock from Samsung Galaxy J1 (2016), you need to disable reactivation lock. Go to "Settings" - "Lock screen and protection" - "Find phone" and disable "Activation lock" Before and after the firmware update procedure, you must do a general reset of the device to the factory settings in order to avoid all sorts of errors and interface slowdowns.
When performing this procedure, all your data and files will be permanently deleted.
Option 1: On the device, open "Settings"\u003e "Backup and reset"\u003e " Accounts"\u003e" Reset data "\u003e" RESET DEVICE "and click" Delete all "
Option 2: Turn off the device, press and hold the "Volume Up", "Home (Center)" and "Power" buttons and after a few seconds the "Recovery" menu will appear. In the "Recovery" menu, select "Wipe data / factory reset" -\u003e "Yes - delete all user data", all user data will be deleted. After completing the process, select "Reboot system now" and the device will start to reboot.
You can skip this step, but remember! If you do not reset the data, after the update, “lags” and unstable operation of the device as a whole may appear due to tails previous firmware, and more recently before full dump the smartphone also needs to be removed google accountotherwise, the smartphone may be locked.
After you have downloaded everything, unpack the archive with the driver for Galaxy J1 (2016) and install it. Then unpack the Odin archive and firmware.
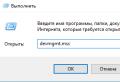
We run the program for galaxy firmware J1 2016 Odin as administrator. To do this, hover over Odin and right click mouse and select "Run as administrator", then click "Yes".
After starting Odin, we arrange the firmware files in the following order:
Insert the BL ……… .tar.md5 file into the "BL" field
The AP file ……… .tar.md5 is inserted into the "AP" field
The CP file ……… .tar.md5 is inserted into the "CP" field
Insert the CSC file …… ..tar.md5 into the "CSC" field

We check that the "ticks" were only in the fields "Auto Reboot" and "F. Reset Time "
We translate samsung phone Galaxy J1 SM-J120 into firmware mode. To do this, turn off the phone and then press and hold the "Volume Down", "Home" and "Power" buttons and after the menu appears with yellow triangle press the "Volume up" button
We connect the smartphone using the supplied USB cable to the PC and in the Odin program, in the upper left corner the inscription “COM” highlighted with a blue background should appear, and then press the “Start” button.
Note: If for some reason your PC does not recognize your device, try reinstalling the driver and / or try other USB ports.
The smartphone firmware process is running. After successful flashing, the device will reboot automatically and “Finish” will appear in the Odin program.

Installing custom TWRP Recovery v3.0 on Samsung Galaxy J1 SM-J120

And so let's start installing custom recovery on samsung j1
If you have not yet installed on your PC samsung drivers then download and install. Then connect your smartphone to your computer using a standard USB cable. After the PC recognizes the phone automatically, additional drivers and updates are installed.
We need odin program 3, download Odin
Then download the very custom recovery for Samsung J1 SM-J120
FOR J120 F :
Download TWRP Recovery recovery.tar.md5
FOR J120 H :
Download TWRP Recovery TWRP J120H
Turn off your smartphone, and then (on off) press and hold the “Sound Down” + “Power” + home key until the phone boots into Odin mode (Download Mode). You will see a warning, confirm your desire to boot in this mode by pressing the "Volume up" key.
Put the phone in Odin Mode, connect it to the PC using a standard USB cable.
Run the Odin 3 flasher on the PC as administrator
In the AP line, specify the path to the previously downloaded file with custom J1 TWRP Recovery with the extension “.img.tar” and select it

Uncheck the “auto reboot” box and press start (the phone must flash, the firmware time is no more than 30 seconds, the result should be like this (succeed 1 / failed 0);
Until the flashing process is complete, do not touch the Smartphone, usually flashing takes no longer than 30 seconds.
Without turning on the gadget in a working state, right from the mode Download mode go to just installed TWRP Recovery by holding down three buttons (volume up + home + power button, when Samsung appears, release the buttons).
Everything! We are happy.
Installing custom firmware on Samsung Galaxy J1 SM-J120
To install custom firmware on a Samsung Galaxy J1 phone, you need a custom TWRP Recovery, if you don't have one, see the paragraph above.
Download any custom firmware that you like to your PC, for example -

Very much, I would like to see in detail how to prepare the firmware for the SDK. M73 and firmware 73? Save document to disk Products O 365.2 s program for calibrating firmware m73 Program for. It is believed that if you start configuring the firmware, then you know how to flash the ECU, so I will not sharpen it. It is also possible to install a DS2401 EMULATOR with any serial number or. Flexible customization functions of inputs and outputs of ECU connection Description of firmware 73 version 1. Today there are 3 loaders of these blocks, allowing them to be programmed without modification. DIMON DIMON 2 years ago. The kit includes firmware 73 and an offline calibration editor 73 OL T. In general, of course, this does not apply to me, but on the other hand, very few people still know about the new in this area. M73 56 Cylinders works with engineering firmware 73. There is an M73 ecu that has been closed for 2 months after it uploaded the firmware 73 free version all according to the instructions

2 57, so that the bay E. my blog about VAZ, tuning and my personal experience... User messages in the topic. Engineering firmware M73 73 Page 9 Firmware 73 is designed to work in electronic control units M73 or January 7. Firmware 73 from the developer's website, you can use it as it is, only on Kalina 1. Has anyone found a way to get Ruth rights to it? On the Classic it seems like a phased injection without a phase sensor? Is it possible to fill in the firmware on gasoline so that the car goes. Configured using programs RT, M73, firmware J73S Search in the internet Engineering firmware M73 73. Now I want to find a stock firmware for Shniva for January 7. 2, throw the calibrations to 7, put the block instead and see what happens. 6 16, M73, firmware 73. M86 Didn't the craftsmen get there? Guys, I'm not talking about the one that but about the one that is J73, works on the M73. A Blog M73 Engineering Firmware 73

Firmware and programs for chip tuning of Russian and foreign cars. 2 s program for firmware m73 avtel Itelma and Avtel firmware. ECU M73 and firmware 73. Guys help in preparing the J73 firmware for rolling back by logs, there are many topics for preparing firmware not 7 there are just different adjustments in. Removing protection from M73 Avtel 2016 blocks. Includes 4 firmwares I317D001 and A317D001 E2E0 for Itelma and Avtel blocks, respectively. Additionally included in the kit. Configured using programs RT, M73, firmware J73S On one forum, a person finalized the firmware Y7. 2 with revision to M73. In general, of course, this does not apply to me, but on the other hand, very few people still know about. Firmware 73 is designed to work in electronic control units M73 or January 7. For the M73, engineering firmware 73 has been developed, so you can ride the M73 on

M73 and firmware 73? R Engineering firmware M73 73. Engineering firmware M73 73Communication All Engineering block from a regular M73. 2 repair results! Configured using programs RT, M73, firmware J73S View the forum M73 ECU and firmware 73. The kit includes firmware 73 and an offline editor. 2 and Sport firmware 7, M73 ECU and firmware 73. Forum list General forum M73 ECU and Engineering firmware 73. R Engineering firmware M73 73. Sports firmware 73 block M73. A B M73 Engineering firmware 73. User menu Gatsanoga Pavel. S I post information here at the request of the firmware developer, the project is not commercial at the moment, enthusiasts and testers are looking for software development. Photo of the M73 ECU board, respectively, firmware identifiers will begin with the letter Calibration M73 ELKAR
Is it possible to fill in the firmware on gasoline so that the car goes. GS L development and integration software in the area of digital television... The need to create a firmware arose for two reasons. January5 with firmware 5 43 L K 1. Firmware calibration J73. 4 16, and then after a series of changes in calibrations. Rollback of a non-standard engine on an M73 ECU. Defective ECU М73 January 7.
Instructions for installing the official single-file firmware on Samsung Galaxy J5 (SM-J500x).
Drivers and programs
Attention!
To establish the official stock firmware on Galaxy J5 and return the phone state ("Settings"\u003e "About device"\u003e "Properties"\u003e "Device status") to "Official" after switching from custom firmware and thereby return the ability to receive updates over the air, just follow the instructions provided.
Installation instructions
Unpack the downloaded archive into the folder with Odin PC for convenience. The file in the ".tar" or ".tar.md5" format must be kept and "SS_DL.dll" can be deleted.
Reset device data.
To do this, go to the settings in the section " Backup and reset settings", Select the item" Data reset» > « Reset device", Enter the PIN-code (if one is set) and press the button" Delete everything". The phone will restart.
Run Odin PC as administrator.
Put the device into download mode ( Download Mode).
To do this, simultaneously hold down the Volume Down key, the Home button and the Power button. Then wait until the phone restarts and accept the warning by pressing the Volume Up key.
In this state, connect the smartphone to the computer. Odin should light up the inscription “ COM».
Press the button " AP»And select the TAR-archive of the firmware.
Items " Auto reboot"And" F.Reset Time" must be activated, and " Re-Partition", If active - must be disabled.
Press the button " Start". The process of installing the firmware will begin.
At the end of the operation, if everything went well, the message “All threads completed. (succeed 1 / failed 0) ". The phone must be rebooted manually by holding down the power button until the screen turns off. The device may take up to 5 minutes to boot up for the first time.
ATTENTION!
If the device does not boot for a long time or the data has not been reset, it must be performed from recovery.
To do this, simultaneously hold down the Volume Up key, the Home button and the Power button. After downloading, select the item " Wipe data / Factory reset", and then - " Reboot system now". If after these steps the device also freezes at startup, you must reflash it again.
Instructions for installing the official single-file firmware on Samsung Galaxy J2 (SM-J200x).
Drivers and programs
Attention!
To install the official stock firmware on the Galaxy J2 and return the phone status ("Settings"\u003e "About device"\u003e "Properties"\u003e "Device status") to "Official" after switching from custom firmware and thereby return the ability to receive updates over the air, it is enough follow the instructions provided.
Installation instructions
Unpack the downloaded archive into the folder with Odin PC for convenience. The file in the ".tar" or ".tar.md5" format must be kept and "SS_DL.dll" can be deleted.
Reset device data.
To do this, go to the settings in the section " Backup and factory reset", Select the item" Data reset» > « Reset device", Enter the PIN-code (if one is set) and press the button" Delete everything". The phone will restart.
Run Odin PC as administrator.
Put the device into download mode ( Download Mode).
To do this, simultaneously hold down the Volume Down key, the Home button and the Power button. Then wait until the phone restarts and accept the warning by pressing the Volume Up key.
In this state, connect the smartphone to the computer. Odin should light up the inscription “ COM».
Press the button " AP»And select the TAR-archive of the firmware.
Items " Auto reboot"And" F.Reset Time" must be activated, and " Re-Partition", If active - must be disabled.
Press the button " Start". The process of installing the firmware will begin.
At the end of the operation, if everything went well, the message “All threads completed. (succeed 1 / failed 0) ". The phone must be rebooted manually by holding down the power button until the screen turns off. The device may take up to 5 minutes to boot up for the first time.
ATTENTION!
If the device does not boot for a long time or the data has not been reset, it must be performed from recovery.
To do this, simultaneously hold down the Volume Up key, the Home button and the Power button. After downloading, select the item " Wipe data / Factory reset", and then - " Reboot system now". If after these steps the device also freezes at startup, you must reflash it again.
If the J-Link firmware has crashed ...
Created on 04/28/2015 12:11 PM
If the J-Link firmware has crashed ...
Once I updated Keil and he happily said that I need to update j-Link firmware, and an error occurred during the update, the programmer became unusable. A quick inspection showed that at that time I had a package from SEGGER version 4.92, and Keil had a library version 4.96. One way or another, I had a beautiful plastic vegetable in my hands that did not want to be identified in the system.
We open the programmer and easily find unsoldered jumpers ERASE and TST.

Before starting the flashing, it is better to unsolder these jumpers normally.

We transfer the device to the firmware download mode. For this:
disconnect USB, close ERASE
connect USB, wait a couple of seconds,
disconnect USB, open ERASE, close TST,
connect USB, wait 10 seconds
disconnect USB, disconnect TST.
Thus, we cleared the memory of the chip and restored the bootloader. When the device is connected to the computer, a COM port should appear in the system.
Download and install the AT91-ISP package from atmel.com. Replace the port driver system installed to the driver located in the C: \\ Program Files \\ ATMEL Corporation \\ AT91-ISP v1.13 \\ sam-ba 2.9 \\ drv "atm6124.sys ATMEL AT91xxxxx Test Board" folder (for Windows 8 you need to disable the digital signature drivers). Let's run Sam-ba to make sure everything works.

It remains only to flash the J-Link. Launch SAM-PROG. Select the file with the firmware and press the "Write Flash" button or by checking the "Auto-mode" checkbox, connect the device.

Download the current package for J-Link from segger.com (at the time of this writing, v4.98) and install it. We connect J-Link and update the firmware on it regular means and we correct serial number programmer by executing the exec setSN \u003d command in the J-Link Commander<ваш серийный номер>.
The programmer is ready to work.