Windows device manager functions. VIA Platform Device Manager what is this program and is it needed? How to open device manager
In OS windows family control over the properties of the computer hardware is carried out using such system utilityas a device manager. In other words, directly between the user and the hardware. With its help, the following options are available:
- View the hardware installed on the computer.
- Timely detection of malfunctioning equipment and elimination of device conflicts.
- Editing configuration parameters of a single device.
- View information about installed device drivers and the ability to download directly from the Internet or computer.
- Roll back device software to a previous version.
- Enabling, disabling, and removing devices through appropriate interactions with their drivers.
Opportunities that open up this program, can be used by both a beginner (find out the model of a particular device, update drivers) and an advanced user (advanced troubleshooting and hardware conflicts).
- Go to the Start menu.
- Open the "Control Panel".
- Item "System".
- In the "Hardware" tab, you will see the "Device Manager" button.
Windows 7 Device Manager has the following location:
- Press "Start" again.
- If there is an item "Computer" in the menu, right-click on it and find what you were looking for in the menu that appears.
- Otherwise, go to the "Control Panel".
- In the right upper corner in the View menu, check the box next to Large (small) icons.
- In the formed list you can find the dispatcher.

Also, in any of the Windows OS, the device manager can also be opened using command line... To do this, go to "Start" and find "Run" there.

It will appear with a line in which enter the line "devmgmt.msc" and press the enter key. That's all.
It is worth paying attention to the fact that your account you must have administrator rights to make any changes to device settings. However, any user can enter the device manager.
And now a few words about Initially, you will see a list of devices on your computer. By clicking on the plus sign to the left of the device name or device class, or by double-clicking directly on the words, you can see the list installed drivers... To update the configuration, select the appropriate action from the menu by right-clicking. If in the list you see an icon in the form of a yellow question mark in XP, or a small white circle with inside on the main icon next to the name in Windows 7, then this means that the driver is not installed for the device, that is, the computer cannot use it in its work. You can fix this by updating the configuration, or by manually searching the Internet for the required software if you know the model of the device.
Hardware Manager allows you to check and update the drivers for connected devices detected by the system. This system tool is often useful for troubleshooting problems, so information on how to open Device Manager will be helpful to all users.
Windows interface
Most quick way enable device manager - click right click mouse on the "Computer" icon and select the "Control" item in the context menu. In the "Computer Management" window that appears, select "Device Manager" from the left menu.
You can go a little longer and start the dispatcher through the "Control Panel":

If this method does not work, try calling Hardware Manager directly from the "system32" folder. It doesn't matter what system you have installed: XP, Windows 7 or "ten". The path to the executable file of the tool for working with the equipment remains unchanged.

The hardware manager will appear on the screen, with which you can work further, making changes to software connected devices.
Run menu
Another way that works for everyone without exception windows versions (from XP to Windows 10) is to use the "Run" window, which can be opened through Start or launched using the Win + R combination.

Through Run, any programs, system tools and folders are included - you just need to correctly specify the launch command.
Using the command line
Let's try to launch Device Manager from the command line. First you need to open the command interpreter window itself. On Windows XP, for example, this is done through the Start menu, where among standard programs there is a command line. 
On other versions of Windows, you can use the built-in search box or the above Run menu by specifying cmd. Also, the command line is system application, whose executive file is stored in the "system32" folder in the "Windows" directory. Go here and double-click on the cmd.exe file to go to work with the interpreter windows commands.
To open the hardware manager through the command line, you need to enter the same command as in the "Run" window - "devmgmt.msc". After pressing the Enter key, a list of all connected devices with which you can work will appear.
Win + X menu
Windows 8 has a new convenient navigation menu for system tools, which is invoked by the Win + X keyboard shortcut. IN previous versions this menu does not work, but it is preserved in the "top ten", where it can also be called up by right-clicking on "Start". 
In the context menu Win + X, among other things, there is a link to the device manager - click on it to see a list of connected equipment on the screen.
Making changes to the registry
The first method describes how to start the hardware manager through the "Control" section of the "Computer" context menu. But if you make small changes to system registry, then you do not have to open the "Control" window - the "Device Manager" item will be immediately displayed in the context menu:

After completing these steps, a link to the Hardware Manager will appear in the Computer context menu next to the Management tool, which you can use if necessary.
Device Manager is a component of the Windows operating system that is designed to manage devices connected to your computer. Device Manager first appeared in Windows 95 and was later added in Windows 2000. In NT versions of the Windows operating system, it appeared as a snap-in for the Microsoft Management Console.
All connected devices are displayed in the Device Manager. Here you can determine if the connected device is working properly, change its operating parameters, and install or remove drivers. In order to determine how the device works, you just need to pay attention to its icon. If the device is not working properly, then in the Device Manager it will be indicated by an icon with a black exclamation mark inside yellow triangle... If the device is not recognized by the operating system, it will be indicated with a yellow question mark. A disabled device is indicated by a red cross or a gray down arrow. Knowing these designations, you can quickly determine which device has problems and what needs to be done to solve them.
In many of the instructions for setting up the Windows operating system that are published on the Internet, you can find recommendations for using Device Manager. But, far from always, the user is explained in sufficient detail how to open the Device Manager, what it is and how to work with it.
In this article, we will try to close this gap by describing all the main ways to open Device Manager in all major versions of the Windows operating system.
How to open Device Manager in Windows 10 or Windows 8
If you are using Windows 10 or Windows 8, you can open Device Manager using a new menu that opens using the Windows-X key combination or by right-clicking on the "START" menu.
This menu appeared in Windows 8 and has been available in all versions of Windows ever since. In addition to the Device Manager, you can use it to open other standard utilities operating system Windows. For example, using this menu you can open Power Management, View Events, Network connections, Disk Management, Computer Management, etc.
How to open Device Manager in Windows 7
You can open Device Manager in Windows 7 in different ways. The following algorithm is most often used: open and open the section “ system and safety».

In chapter " system and safety"Open the" System "section.

This will open a window with the main characteristics of this computer. Here you need to click on the link " device Manager"Located on the left side of the window.

After that, you will see the Windows 7 Device Manager window.
How to open Device Manager in Windows XP
In Windows XP, Device Manager opens in a similar way. First, open the Start menu and go to the Control Panel. In the Control Panel, open the "System" section.

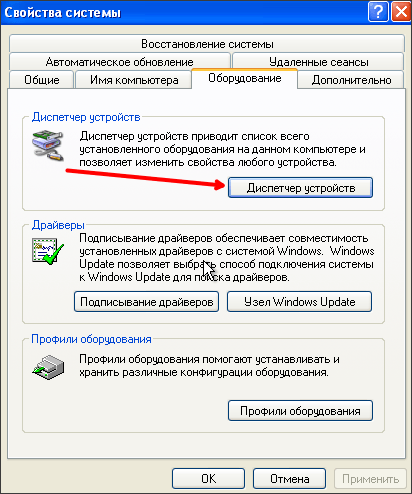
After that, the window “ System properties". Here you need to go to the "Equipment" tab.

On the equipment tab, click on the " device Manager».
After that, the Device Manager window will open in front of you.
How to open Device Manager using the command
There are also universal ways opening Device Manager, which work in any version of Windows. For example, this can be done by running the command "mmc devmgmt.msc". To do this, open the "Run" menu (the combination windows-R keys ) or command line and enter "mmc devmgmt.msc". This command works on Windows 10, Windows 7 and Windows XP.

IN operating system Windows 7 and newer versions of Windows can use the search bar to open Device Manager. To do this, you just need to open the Start menu and enter the phrase "Device Manager" in the search, and then open the program suggested by the system.

If you have Windows 8, which does not have a Start menu, then you can enter the phrase "Device Manager" in the search form on the Start screen.
VIA HD Audio Deck is the official driver that controls audio output on computers with motherboard with built-in VIA sound chip.
The program provides fine tuning parameters for output and input sound. The sound driver is installed with the utilities for the computer. The program is distributed for free and does not require registration.
In the utility interface, you can set the configuration for devices that record and play sound. In the driver settings there is a section for configuring "sound" ports. The graphical shell and utility tabs are easy to read. Even a beginner will understand the options.
Installation and capabilities
The program is installed with the default sound drivers. On the menu installation disk with drivers there is a selection of necessary components and sound utilities. After installing the sound drivers, restart the Windows OS to activate the drivers. The shell and utility tabs do not contain unnecessary settings.In the main window of the program there is multifunctional menu... You go to options and set the volume "levers", adjust the equalizer and speaker settings. If necessary, you can specify surround sound and see technical data about the sound card.
There is a setting in the side panel that controls the analog audio output. If necessary, you turn off the driver power for the selected ports and turn off the devices connected to them. The ports icon is displayed in a convenient "place" and corresponds to the location on the computer motherboard. IN additional options there is a choice of front and back panels for mute.
Additional tools
Additional tools of the utility are a mixer with stereo setup and an “amplifier” that amplifies the microphone's dB. In sound drivers, you adjust the parameters in the main window and through context menu icons in the notification area on the taskbar.Key features
- setting up and managing sound drivers on motherboards with built-in sound card VIA;
- support for balance control and stereo mixer;
- activation and deactivation of audio outputs in analog format;
- fast audio gain configuration for devices that play and record sound;
- installation in a package with drivers from the creator of VIA;
- the sound driver works on OS Windows 7 and higher.