Disable the prompt for a Microsoft account. Disable password entry in account settings
Want to load Windows 10 desktop quickly by skipping the login prompt? Want to skip entering your account password every time you boot operating system (OS) when turning on the laptop or system unit? It can be arranged! You can disable the password prompt upon login and configure windows work 10 to load in automatic mode desktop or start screen without entering a code.
What is the advantage of this? When entering the software environment without a password, the account does not require entering it. Also, now you do not need to remember the code and type it on the keyboard, spending a few seconds when loading. Thus, Windows 10 will load the desktop faster, albeit only for a couple of seconds. What is the disadvantage of this approach? It will now be easier to access information on your computer without asking for a password.
The process of setting up a Windows 10 login automatically looks like the same steps in previous versions - Windows 7 and 8. Since both of the approaches below are applicable to both local user and account user microsoft records, you can use the same instructions.
We have already written about the disadvantage of disabling the password, and therefore we advise you to do this only if you are the only user of the computer. If your relatives use the PC, then you should not remove the password.
So, to enable automatic login to Windows 10 without a password, use one of the methods below. So, here's how to remove the password prompt when logging into Windows 10.
Method number 1 for automatic login without password
it the simplest way remove the prompt in Windows 10 from the login screen.
On the Start icon, right-click and select Run. The same window can be called by simultaneously pressing the key with the icon windows start and the R key. In the dialog box that appears, enter Netplwiz. Then press the key to enter the "Enter" command.

(picture 1)
Now a window with "Accounts" will appear on the screen. Uncheck the checkbox next to the "Require username and password" entry. To fix the action, click the "Apply" button. Then the "Automatic login" window will open.

(picture 2)
In this dialog, you need to enter the current password and below it again and click on the "OK" button.

(picture 3)
Make sure that the bird in the window is gone. To see the changes in action click on the "Start" icon right click mouse (pkm) and select with the left mouse button (lkm) "Shutdown or Exit" - "Exit" or "Restart".

(picture 4)
Method number 2 to windows registry 10 disable login password
Windows registry from version to version does not undergo much changes, unlike the external graphical shell. So that this method allows you to achieve the same result.
To use it, open the registry editor. To do this, you need to get to the "Run" window, as described above. Press "Win" + "R" and enter Regedit, press the "OK" key.

(picture 5)
In the editor that opens, proceed to the next subsection:
HKEY_LOCAL_MACHINE \\ SOFTWARE \\ Microsoft \\ Windows NT \\ CurrentVersion \\ Winlogon

(picture 6)
On the right in the editor, in alphabetical order, there is the DefaultUserName parameter. To the right of it is the name of your account. Double-clicking (LMB) on it, you can see it in the "Value" field.

(picture 7)
Click "cancel" and returning to the main window of the registry editor, on the right side of the window, find the DefaultPassword parameter. This entry may not exist. If so, then create it by clicking (pcm) in the empty space. Next, click the Create button by selecting String Value. Rename it to DefaultPassword. Double-clicking (lkm) on the created entry, enter the password in the "Value" field. Click on the OK button.

(picture 8)
Now you need to change the login to automatic value. To do this, change the AutoAdminLogon entry. In the "Value" field, enter "1" instead of "0".

(picture 9)
That's all! Restart your PC and make sure your Windows 10 now opens the desktop without asking for a password. In order not to disable anything unnecessary in windows 10, it is better to use the first method.
Alexander, www.site
Video "Login to windows 10 without password automatically"
But the process is slightly different. And, in my opinion, in Windows 8.1, system protection without a text password is better thought out. The reasons - in the afterword.
Disable Windows 8 login password
Press the key combination Win (Key with the Windows icon) + R. In the window that opens, write "netplwiz", press OK (or Enter)An alternative is to call the sidebar by moving the cursor on the desktop to the lower right corner. Select "Search" in the side panel and enter "netplwiz" in the opened search line.

User accounts window. Uncheck the box on the requirement to enter a password, click "Apply"

A window will appear in which the fields "Password" and "Confirmation" are left blank. Click OK.

We return to the desktop. Again we turn to the side panel (see point 2), now click on "Settings".
In the side panel of the settings, click on the item "Change computer settings"

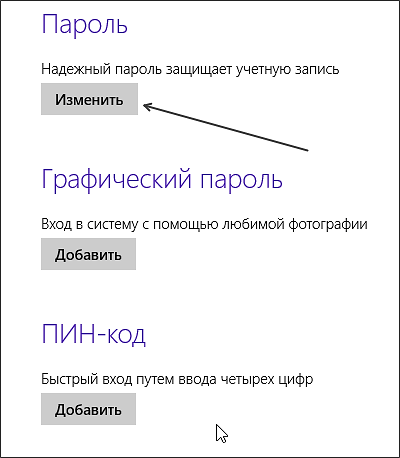
Open the "Users" tab, "Change password"

We indicate our current password, after which we do not write anything as a new one. We apply the changes, the system says that the next time they start, they will take effect.

The following inscription will serve as confirmation of the changes:

Disable Windows 8.1 login password
Differences from the previous instructions start only from point 7, so the first 6 points are performed according to the instructions for Windows 8.From the desktop, we call sidebar and select the "Settings" option. It contains the item "Changing computer settings".
Click on "Accounts" -\u003e "Login Options". If the password is set, then you will see the following text:

After clicking the "Change" button, you will need to specify your current password, and do not write anything as a new one. Further - "OK".
If everything is done correctly, we again receive a notification that our account has no password.

We reboot. You will be logged in automatically.
Reset forgotten password in Windows 8 / 8.1
Training
First, we need a few things:- Another computer with a USB port.
- A clean flash drive of 1 GB or higher.
- Hiren’s Boot CD (hereinafter - HBCD) disk image (Download, 570 MB)
- Universal USB Installer (hereinafter - UUI) (Download, 1 MB)
Video instruction
Text version
Step 1. Prepare a bootable disk / flash drive.
Open the downloaded archive with HBCD, find the image of the Hiren disk "s.BootCD.15.2.iso", transfer it somewhere to your computer.We insert the USB flash drive. Launch UUI, configure it as in the screenshot (select ISO and the drive letter with the flash drive).

Click "Create", in the window that appears, select "Yes".

When the "Close" button becomes active, the flash drive is ready.
 Close
Close
Step 2. Password reset.
We insert the drive into a computer on which we do not remember the password.In the BIOS, we set the boot priority not from hard disk, and from a flash drive (this step is individual, becauseThe BIOS is different for everyone. But mostly boot priority is in sections like “Boot "and"Bootdevicepriority ").
When the bootloader appears, select the item "Mini Windows XP", press Enter.

After loading the desktop, open the HBCD Menu program, in it click "Browse Folder"

In the window that opens, find the disk on which Windows is installed. If it was called " Local Disk", Then look for" Local Disk ". If it was called differently (say, "Windows", then look for this name). The goal is to find this disk and remember its letter (C; D; E :, etc.).

Having found the desired letter, close the explorer window.
Return to HBCD Menu again: press Programs -\u003e Passwords / Keys -\u003e Windows Login -\u003e NTPWEdit.

In this program, you need to change the drive letter of the line "Path to SAM file" to the drive letter from installed Windows... If everything is done correctly, the (Re) open button will become active. If not, then substitute another letter.

Click (Re) open and get a list of users. Select the one we need and press the "Change Password" button.

In the new window, we can either set a different password or disable it altogether - in this case, leave the password fields blank.

Click "Save changes". Then, in the lower left corner of the screen "Start" -\u003e "Shut Down" -\u003e "Restart".
The computer will reboot, and the USB flash drive can be removed. (Do not forget to re-expose toBIOS priority to boot from the hard drive, although this is not critical).
Upon entering windows system will not ask for a password. Everything is ready. You can leave it as it is, or you can come up with a new password.
Afterword
Despite the large number of points, password reset is a quick matter, as long as there is a free computer at hand. And as you can see from this example, whoever needs it will pass such a protection. A password is a good protection from the eyes of colleagues or guests in the house, but I would not recommend hoping that it will save you from all troubles.
All more users buy laptops with installed. Along with the increasing popularity of this system, the number of questions related to the use of the new windows interface... In this article, we will answer one of such questions, namely, how to disable the password in Windows 8.
How to turn off Windows 8 password prompt
There are several ways to disable password in Windows 8. The first option we will consider is disabling the password prompt on system boot.
Open the starter windows screen 8 and enter command netplwiz.
After that, the operating system finishes searching - run the netplwiz program.

In the window that opens, you need to uncheck the box next to the "Require username and password" function. When closing the window, the system will ask you to enter to the current account.

After these steps, we restart the computer. After a reboot, the operating system will no longer require a password. Your account will be logged in automatically.
This method does not delete the password, but only disables its request when the computer starts. In other situations, for example when changing user, you will have to enter a password.
How to disable password in Windows 8 completely
In order to completely disable the password in Windows 8, you need to delete it. To do this, open start screen Windows 8 and start interface windows settingsby clicking on the link "Changing computer settings"
In the window that opens, open the "Accounts" section, and then "Login Options".
In the window that opens, click on the "Change" button in the "Password" section.

After that, you need to enter your current password and click on the "Next" button. The last step is the "Change Password" window.

Here you need to leave all fields empty, for this just click on the "Next" button. That's it, after that the password will be completely removed, and you can use the account without entering a password.
Hello, friends! Today we are disabling the Windows 8 login password prompt.
During the transition to the new operating system Windows 8, imposing a constant password on the user when logging in, not everyone liked it. How to disable password prompt in Windows 8 and 8.1?
Running new version Windows 8 operating system is almost twice the speed windows boot 7. True, all the joy of such a fast boot spoils the obsessive requirement of the system to enter the password over and over again. Of course, safety is above all, but why not give the user the right to make an independent choice in resolving this issue.
Speaking of passwords, not so long ago there was published my book dedicated to the basic rules for choosing a password, it is called ““. You can get the book absolutely free.
Consider the first method, by searching or command line... Using the key combination Win + r or Start - right mouse button, point - Find or Run and enter the command (without quotes).
A window with user accounts will open in front of us.
We select all usernames and uncheck the box "Require username and password". The system will ask you to enter the existing password for your account twice. Click Ok.
If for some reason the first method did not bring the desired result and the password request for entering Windows 8.1 did not turn off, then there is another method.
Method two.
1. Go to main screen Windows 8.1, from the desktop, just click "Start"
2. In the upper right corner, click on your account.
3. In the drop-down menu, select "Change Avatar"
4. At the top, click the item - disable.
Thus, we unlink our account from the Microsoft account, they turn their account into a local one.
5. In the window for entering the Name and passwords, leave or enter a new account name, the most important thing - DO NOT ENTER PASSWORD. Next ... Everything is ready).
By default, in Windows 10, every time you start, you need to drive in the password from your local account or your Microsoft account to log in to the system. Such a request increases the security of the computer by protecting user data from unauthorized persons. However, if the computer does not have access outsiders, then it would be logical disable password when logging into Windows 10... In this tutorial, we'll look at how to do this.
A password prompt appears after starting the system, as well as when the PC exits sleep mode. Today we will look at how to disable the password in Windows 10 in both cases. Friends, I repeat once again, if several more people have access to the computer, then I highly do not recommend removing the password, since your data may fall into the wrong hands. So let's get started!
How to remove password when logging into Windows 10
To disable the password when windows startup 10, you need to make some changes in the parameters of user accounts. To do this, open the Run window by pressing the Win + R key combination, type in the netplwiz command and press the OK button.
The "User accounts" window will open in front of us. We are interested in the "Users" tab. If there are several users, select the required one and remove the checkbox from the item "Require username and password", then click "OK".

After such manipulations, a window will be displayed where we will be asked to confirm the automatic login by typing in data from a Microsoft account or a local account.

Congratulations, the login password prompt has been disabled.
Disable password in Windows 10 when exiting sleep mode
If Windows 10 is idle for a long time, then it is quite possible that the system will go to sleep. After restarting the computer, you will be able to see again the request for a password to enter the system. Let's disable this request. To do this, go to the "Start" menu - "Options", select "Accounts" and enter the "Login Options".
Next, select the section "Login Options", where we will find the item "Login Required". Here, just below, we choose the option - never. That is, when you log in again, you will not be prompted for a password.

After all the performed manipulations, the system will no longer ask for a password for your account. You can reboot the system and verify this. The computer will boot without any external action from the user. As you can see remove password when Windows 10 starts can be easily and simply.
That's all, friends! All the best!


