Instructions on how to tune a radio on a radio tape recorder from various manufacturers. How to tune the radio
With the help of the radio, you can while away the travel time. Usually, drivers prefer to listen to unobtrusive music so that it plays in the background and does not interfere with the steering. For this, autoradio is most suitable, which must first be set up. But many do not know how to properly tune the radio on the radio in the car.
Basically, radio tuning consists of a few simple steps. The broadcast range is selected and the search for radio channels is carried out, which are stored in the tuner's memory. The search for radio stations occurs either automatically or in manual mode... In the first case, radio channels are stored in descending order of broadcast quality.
Let's consider in more detail how to tune the radio on common car radios.
Pioneer
If you are wondering how to tune the radio to radio Pioneer, don't worry, setup is very easy. In automatic Pioneer tuning, press FUNC followed by BSM. To start the search for radio channels, press the right or up button, after the end, the music of the first found radio station will turn on.
For manual setting in BAND mode, press and hold \u003e\u003e |. Any first station in that radius will be searched for. After that the machine will stop scanning and start playing the found station. Then you will need to save it, for this, hold the key with the desired number... If you do not need the found station, you need to press the right key and hold it. Scanning will continue until a new station is found.

With this function, you can store up to 6 stations in the first bank in memory. After this manipulation, we press the BAND button and get into the second bank, it is shown on the display by the inscription F2. In the second bank, you can similarly store up to 6 stations in memory, and there is also a third bank. Most often there are three banks, but there are more of them. As a result, if you have three banks, you will have 18 stations active and saved. Now you know how to tune the radio on the Pioneer radio tape recorder.
Sony
Tuning the radio in the Sony radio is also not a problem. The search for stations is usually carried out in two common ways: manually or automatically. Automatic storage of radio stations:
- Turn on the radio. Pressing the Source button for a long time, wait for the TUNER sign to appear on the display.
- The range is changed by pressing the Mode button. Pressing the joystick will display the options menu.
- Turn the joystick until the inscription of the TMV option appears. Radio channels are usually assigned to the keys with a number.

For manual scanning and saving you need:
- Switch on the radio and start searching for stations.
- After the desired radio station is found, you need to press the number key from 1 to 6, after which the name "Mem" will appear. Note: when you save a radio station to a digit that already has a radio station, the previous one is automatically erased.
Thus, you can tune the radio in the Sony radio tape recorder in 5-10 minutes.
Supra
After pressing the MODE button, select the Radio function, then the screen will display RADIO and the saved band with the broadcasting frequency. Pressing BND selects the desired broadcast band.
Press and hold the \u003e\u003e || button.

Then press the \u003e\u003e || to choose desired station... If these keys are not pressed for up to ten seconds, everything will return to the original operating mode.
Setting in automatic mode and scanning the selected radio stations
Searching for existing radio stations:
By shortly pressing the AS / PS key, start the search for the saved radio channels. Any station can be listened to for about a couple of seconds. Hold the AS / PS key to store radio channels automatically. The receiver will tune six optimal stations, which are the most powerful in this broadcast range. This option can be applied in any wavelength range. After the automatic storage of stations is completed, the receiver will stop scanning them.
To tune a specific radio station, press the \u003e\u003e || button, this will scan and select radio channels with the best reception signal. By pressing the \u003e\u003e || button, you can manually select the station you want. Hold down the key with numbers from 1 to 6 for about a couple of seconds to memorize the channel under the desired key.
JVS
When tuning in stations, it is possible to leave 30 FM radio channels and 15 AM channels in the tuner.
Setting stations manually:
- Select the broadcasting band by pressing the TUNER BAND key.
- Click on button 4 to set up the station.
- Hold down the key with any selected number on the panel to store the station in the radio's memory. The selected number will start blinking, after which you will see the station stored under the selected number. For example: To tune to the station number 14, press the +10 key and then press the 4 key for about three seconds or more.
- To store other radio stations in the device's memory, repeat steps one through three. And to change the setting of the entire station, you need to repeat the whole process from the beginning.
Tuning stations in automatic mode:
Stations will be given numbers by increasing the frequency of the range.
- Select the range by pressing the TUNER BAND key.
- Press and hold the AUTO PRESET button on the panel.
- To set a different radius of action, you need to go through stages from the first to the second again.
To replace the selected stations in automatic mode, you must use the manual setting.
Kenwood
Kenwood radios offer three types of autoradio tuning: automatic (AUTO), local (LO.S.) and manual.
- Press SRC until “TUnE” appears.
- Press FM or AM to select the band.

For automatic configuration, press \u003e\u003e | or |.
In the case of manual tuning, after all the above steps, ST lights up, indicating the station found.
WinAmp. It is very convenient for listening to mp3 music files. But she still has one interesting feature Is listening to radio stations. Of course, you won't surprise anyone with such functions; sometimes it is enough to go to the site of a popular radio station and listen to the Internet broadcast. But WinAmp offers users almost 9000 radio stations. And not only offers, but sorts by style, direction, language and country.
How to tune the radio in WinAmp
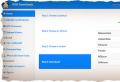
To tune the radio correctly, you need to winAmp player additionally install the WinAmp Library component. It is available for download from the Internet from the manufacturer's website. After downloading and installing the additional component, launch WinAmp. Let's start tuning the radio. Go to "Settings" and in the Online Media tab set the number of radio stations to listen to. By default, there are only 600 stations installed, and there are thousands of them on the Internet. We set the value with a margin of 20 thousand. We leave the player and start looking for radio stations.
Choose Internet Radio from the menu. Then, in the window on the right, activate the Refresh button. The download of the list of available radio stations will start. From now on, you can listen to radio stations.
To tune the radio correctly, you need to filter the list by styles and directions. To do this, in the Genre menu, you can specify several types - classical, rock, pop, jazz, etc., and you can also select countries. If the list of priorities includes not only news, but also news, you can filter by topics - politics, sports, regional news. In addition, there is a function to search for radio stations by name. Having chosen the radio station of interest, we activate playback either using the Play button, or by double-clicking the mouse. The radio stations you like can be added to your “Favorites” list.
With the WinAmp player, you can find many unexpected radio stations on the Internet. Foreign radio amateurs often broadcast "intercepted" police or air traffic control radio communications on the Internet. In short, the survey of the radio broadcast is as entertaining as a simple "wandering" on the Internet. Studying radio stations will take several months of time and a solid gigabyte.
It should be borne in mind that WinAmp in radio mode consumes about 62 megabytes of Internet traffic per hour of listening. Radio stations transmit at 128 kbps, so owners of limited packages should take this fact into account.
The high-frequency unit contains a conversion stage, input and heterodyne circuits. In receivers of the first and highest classes, as well as in the VHF range, there is an amplifier in front of the converter high frequency... Checking and adjusting the high-frequency unit can be divided into three stages: 1) checking the generation of the local oscillator; 2) determining the boundaries of the range, often called range stacking; 3) conjugation of input and heterodyne circuits.
Stacking ranges. The tuning of the receiver to the received station is determined by the tuning of the local oscillator loops. Input loops and UHF loops only increase the sensitivity and selectivity of the receiver. When tuning it to different stations, the local oscillator frequency must always differ from the received frequency by an amount equal to the intermediate one. To ensure constant sensitivity and range selectivity, it is desirable that this condition be met at all frequencies in the range. However, this frequency ratio over the entire range
is perfect. With one-handed tuning, it is difficult to obtain such a pairing. The local oscillator circuits used in broadcasting receivers provide accurate matching of the input and local oscillator settings in each band at only three points. In this case, the deviation from ideal conjugation at the remaining points of the range is quite acceptable (Fig. 82).
For good sensitivity on the KB range, two points of exact coupling are sufficient. The necessary ratios between the frequencies of the input and heterodyne circuits are achieved by complicating the circuit of the latter. In the heterodyne circuit, in addition to the usual tuning capacitor C 1 and the trimmer capacitor C2, there is an additional capacitor C3, called a coupling capacitor (Fig. 83). This capacitor (usually of constant capacity with a tolerance of ± 5%) is connected in series with a variable capacitor. The inductance of the local oscillator coil is less than the inductance of the input circuit coil.
To correctly determine the range limits, remember the following. The frequency of the local oscillator at the beginning of each range is mainly influenced by the change in the capacitance of the tuning capacitor C 2, and at the end of the range - by the change in the position of the core of the inductor L and the capacitance of the coupling capacitor C3. The beginning of the range can be considered the maximum frequency to which the receiver can be tuned in this range.
Before tuning the local oscillator circuits, you should find out the sequence of tuning by ranges. In some receiver designs, the CB loop coils are part of the LW loop coils. In this case, the tuning should be started with a medium wavelength, and then tuning with a long wavelength.

Most receivers use a band switching scheme that allows each band to be independently tuned. Therefore, the tuning sequence can be any.
The range is laid using the two-point method, the essence of which is to set the upper frequency limit (the beginning of the range) using a tuning capacitor, and then the lower frequency (end of the range) by the loop coil core (Fig. 84). But when setting the border of the end of the range, the setting of the beginning of the range is somewhat lost. Therefore, the beginning of the range must be checked and adjusted again. This operation is carried out until at both points of the range is reached compliance with the scale.
Conjugation of input and heterodyne circuits. The adjustment is made at two points and checked at the third. The frequencies of the exact mating in receivers with an intermediate frequency of 465 kHz for the middle of the range (f cf) and ends (f 1 and f 2) can be determined by the formulas:

The conjugation of the contours is carried out at the calculated points, which for standard broadcasting bands have the following values

In some models of radio receivers, the pairing frequencies may differ slightly. The lower frequency of exact coupling is usually selected 5 ... 10% above the minimum frequency of the range, and the upper one is 2 ... 5% lower than the maximum. Capacitors of variable capacity allow you to tune the circuits to the exact mating frequency when turning at angles of 20 ... 30, 65 ... 70 and 135 ... 140 °, measured from the position of the minimum capacity.

To tune tube radios and achieve pairing, the output of the generator signal is connected to the input of the radio receiver (Antenna, Ground) through the all-wave antenna equivalent (Fig. 85). Transistor radios with an internal magnetic antenna are tuned !: using a standard field generator, which is a loop antenna connected to the generator through a non-inductive 80 ohm resistor.

The decadal divider at the end of the generator cable is not connected. The antenna frame is made square with a side of 380 mm from a copper wire with a diameter of 4 ... 5 mm. The radio receiver is located at a distance of 1 m from the antenna, and the axis of the ferrite rod should be perpendicular to the plane of the frame (Fig. 86). The field strength in μV / m at a distance of 1 m from the frame is equal to the product of the readings of the smooth and step attenuators of the generator.
There is no internal magnetic antenna in the KB range, so the signal from the generator output is fed to the socket external antenna through a capacitor with a capacity of 20 ... 30 pF or to a whip antenna through a blocking capacitor with a capacity of 6.8 ... 10 pF.
The receiver is scaled to the highest frequency of the exact coupling, and the signal generator is adjusted to the maximum voltage at the output of the receiver. By adjusting the trimmer capacitor (trimmer) of the input circuit and gradually decreasing the generator voltage value, the maximum increase in the output voltage of the receiver is achieved. Thus, the pairing is carried out at this point in the range.
Then the receiver and generator are tuned to the lowest frequency of the fine conjugation. By rotating the core, the coils of the input circuit achieve the maximum voltage at the output of the receiver. For greater accuracy, this operation is repeated until the maximum voltage at the output of the receiver is reached. After adjusting the contours at the edges of the range, check the accuracy of the pairing at the center frequency of the range (third point). To reduce the number of oscillator and receiver readjustments, range stacking and loop mating operations are often performed simultaneously.
LW-band setting. The standard signal generator remains connected to the receiver circuitry through the dummy antenna. The lower frequency of the 160 kHz range and the output voltage of 200 ... 500 μV at a modulation depth of 30 ... 50% are set on the generator. The lower coupling frequency is set on the receiver scale (the rotation angle of the KPE rotor is approximately 160 ... 170 °).
The gain control is moved to the maximum gain position, and the band control to the narrow band position. Then, by rotating the core of the coils of the heterodyne circuit, the voltage at the output of the receiver is maximized. Without changing the frequencies of the generator and receiver, the coils of the UHF circuits (if any) and the input circuits are tuned in the same way until the maximum voltage at the output of the receiver is obtained. At the same time, the value of the generator output voltage is gradually reduced.
Having adjusted the end of the DV range, set the variable capacitor to the position corresponding to the conjugation point at the highest frequency of the range (rotation angle of the KPE 20 ... 30 °), the generator frequency is set equal to 400 kHz, and the output voltage is 200 ... 600 μV. By rotating the tuning capacitors of the circuits, first the local oscillator, and then the UHF and the input circuits, the maximum output voltage of the receiver is achieved.
Tuning the loops at the highest frequency of the range changes the tuning at the lowest frequency. To improve the tuning accuracy, the described process must be repeated in the same sequence 2 ... 3 times. When re-adjusting the rotor, the KPE should be put in the previous position, i.e. in the one at which the first adjustment was carried out. Then you need to check the matching accuracy in the middle of the range. The frequency of the exact matching in the middle of the LW range is 280 kHz. Having set this frequency on the generator and the receiver scale, respectively, the accuracy of the calibration and the receiver sensitivity are checked. If there is a dip in the receiver sensitivity in the middle of the range, then it is necessary to change the capacitance of the coupling capacitor, and repeat the tuning process.
The final step is to check if the settings are correct. To do this, first one, then the other end, a test stick is introduced into the tuned circuit, which is an insulating rod (or tube), at one end of which a ferrite rod is fixed, and at the other, of copper. If the tuning is done correctly, then when approaching the coil field of the loop of either end of the test stick, the signal at the output of the receiver should decrease. Otherwise, one of the ends of the stick will decrease the signal, and the other will increase. Once the LH band is tuned, you can adjust the MH and HF bands in the same way. However, as already noted, in the HF band, pairing is sufficient at two points: at the lower and upper frequencies of the range. In most radios, the KB range is divided into several sub-bands. In this case, the exact pairing frequencies have the following meanings!

Features of setting the HF band. When tuning the HF band, the signal from the generator can be heard in two places on the tuning scale. One signal is the main one, and the second is the so-called mirror signal. This is explained by the fact that in the HF band the mirror signal is suppressed much worse, and therefore it can be confused with the Main signal. Let us explain this with an example. A voltage with a frequency of 12 100 kHz is applied to the input of the receiver, that is, the beginning of the HF band. In order to obtain a frequency equal to the intermediate frequency at the output of the frequency converter, that is, 465 kHz, it is necessary to tune the local oscillator to a frequency equal to 12 565 kHz. When the local oscillator is tuned to a frequency of 465 kHz below the received signal, ie 11 635 kHz, an intermediate frequency voltage is also provided at the output of the converter. Thus, the intermediate frequency in the receiver will be obtained at two frequencies, the local oscillator, of which one is higher than the signal frequency by the value of the intermediate frequency (correct), and the other is lower (incorrect). As a percentage, the difference between correct and incorrect LO frequencies is very small.
Therefore, when adjusting the HF range, one should choose from two local oscillator settings the one that is obtained with a smaller capacitor capacitor of the circuit or with a more inverted coil core. The correctness of the local oscillator setting is checked at a constant frequency, the generator signal. When the capacitance (or inductance) of the local oscillator circuit is increased, the signal should be heard in one more place on the receiver scale. You can also check the correctness of the local oscillator setting while keeping the receiver setting unchanged. When the frequency changes, the generator signal to a frequency equal to two intermediate ones, i.e., to 930 kHz, the signal must also be heard. A higher frequency in this case is called a mirror image, and a lower frequency signal is the main one.
Tuning the antenna filter. Tuning the high frequency unit begins with tuning the antenna filter. For this, the output signal of the generator is connected to the input of the receiver through the antenna equivalent. On the frequency scale of the generator, the frequency is set to 465 kHz and the modulation depth is 30 ... 50 %.The output voltage of the generator should be such that the output meter connected to monitor the output voltage of the receiver shows a voltage of about 0.5 ... 1 V. set to the DV position, and the adjustment arrow - to a frequency of 408 kHz. Rotating the core of the antenna filter loop, achieve a minimum voltage at the output of the receiver, while the output voltage of the generator is increased as the signal attenuates.
After finishing the tuning, all tuned cores of the loop coils, the positions of the magnetic antenna coils must be fixed.
Radio receiver - setup, operation
Unlike a device with a stationary antenna, there are features of the reception of a radio signal by a car radio, which are determined by the close location of the antenna to the ground, a constant change in the distance to the transmitter, multiple reception of reflected signals and the overlap of signals from various radio stations. Due to these features, interference and noise, sound distortion and even complete interruption of radio reception can occur.
In addition, the quality of radio signal reception depends on the power of the transmitting station and the distance from the signal source, on the presence of shielding structures and structures (houses, bridges, etc.), as well as on the influence of local conditions (mountains, lowlands, etc.) ).
Comment: Using cell phone radio interference may occur in or near a vehicle.
Radio activation
When activated, the infotainment system is activated in the radio play mode if installed before the system was turned off. To activate the radio from the CD playback mode, press the "FM / AM" button (7). Subsequent presses of the button switch the frequency bands of the receiver in the following order: FM (VHF) "AM (medium and short waves)
When activating the radio or switching between frequency ranges the frequency of the radio station tuned in when the radio was last used is selected.
Tuning the radio
Tuning the radio can be done in the following ways:
Automatic search for radio stations;
Manual search for radio stations;
Searches for radio stations by program type (RDS).
Automatic tuning
Automatic frequency tuning is performed by pressing with a short delay on the 4-position switch (14) - this activates the automatic search for the nearest frequency with the received signal and the display shows the inscription "Seek" before the operating frequency of the received station. Depending on pressing the right or left sector of the switch, the search is performed in the direction of increasing or decreasing frequencies.
Comment: The RDS and TP functions must be disabled when searching automatically (see below).
The playback sound is muted while the search is in progress. At the end automatic tuning the radio starts playing the signal of the newly tuned station. If the radio does not find any radio stations, it automatically switches to the search mode with a higher sensitivity. In the case of an unsuccessful search and after this attempt, the signal of the radio station selected before starting the search will be played.
Manual setting
If necessary, the frequency of the desired radio station can be manually tuned in.
Attention: Frequency tuning should not be done while the vehicle is in motion!
By briefly pressing the button of the 4-position switch (14), the frequency change will occur step by step by pressing the right sector towards an increase, by pressing the left sector - towards a decrease. This function is used to fine tuning frequency. If you know the frequency of the desired radio station, keep the corresponding sector of the switch (14) pressed until this frequency is reached - the inscription “MAN” appears on the display before the current frequency of the radio station. During the search, the playback sound is muted and reactivated when the button is released.
Radio Data System RDS (FM)
Radio Data System (RDS) is a broadcasting service that allows FM stations to broadcast additional digital information along with the regular radio program signal. Radio receivers equipped with decoders of radio data systems and gateways (RDS / EON), when tuned to the broadcasting frequencies of a number of FM radio stations, are able to read special service information, which allows using some additional functions, such as determining the name of the radio station, automatic switching to alternative broadcast frequencies of the selected radio station, identification and transmission of traffic information messages, search for programs of a given topic, etc.
To activate the RDS function, shortly press the button (1) - the corresponding indicator should light up in the display field. If the currently tuned in station does not support RDS, the radio automatically searches for the closest signal of the corresponding station. In the display field, instead of the current frequency, the name of the broadcasting station will be displayed.
Comment: When you turn on the automatic storage of radio stations (see below), the RDS function is automatically activated.
To deactivate the RDS function, press the button (1) again; the corresponding indicator on the display should go out, and the current tuning frequency will be displayed instead of the name of the radio station.
Selecting RDS radio stations
The infotainment system backs up all receivable FM radio stations. The list of these radio stations is automatically initiated when you activate the search for TP stations or the automatic storage function (see below). In this case, RDS radio stations are sorted in the channel list by radio station names (for example, HR1, HR2, etc.).
This list is initiated manually by holding it down until the “RDS” button (1) beeps - the display will show “Memory FM”, then “MEM” and the operating frequency of the received radio station. To select RDS radio stations from the list, briefly press the left / right sector of the 4-position switch (14) - the radio tunes to the next RDS radio station recorded in the list.
To search for RDS radio stations without using the list, when the RDS function is activated (the corresponding indicator is displayed on the display), hold down the left / right sector of the 4-position switch until the message “Seek” appears on the display - the nearest radio station transmitting RDS signals is searched during the playback sound is muted while searching
Comment: If the traffic announcement (TP) function has previously been activated (see below), the radio will only search for stations that support this format.
Selecting programs by broadcast type (PTY)
Many RDS stations broadcast a PTY code indicating the type transmitted program (for example, NEWS - news). With the RTU code, you can search for radio stations by the type of program being broadcast.
This function is activated when the corresponding parameter (PTY) is selected in the setup menu (see above).
Each time you press the upper / lower sector of the 4-way switch (14), the next / previous name of the program type will appear in the display field (see explanatory table). After selecting the desired type of programs, press the right sector of the 4-position switch and hold it down until the message "RTU" appears on the display - the playback sound is muted and the search for a radio station transmitting the program of the specified type is activated. If the radio does not find a suitable radio station, you will hear the last tuned radio station. PTY Program Type Classification
| Program types | Message |
| display | |
| news | NEWS |
| Business news | AFFAIRS |
| Information | INFO |
| Sport | SPORT |
| Education | EDUCATE |
| Radio plays | DRAMA |
| Culture | CULTURE |
| The science | SCIENCE |
| miscellanea | VARIED |
| Pop music | POP M |
| Rock music | ROCK M |
| Road music | M. O. R. M. |
| Light classical music | LIGHT M |
| Classical music | CLASSICS |
| Other music | OTHER |
| Weather | WEATHER |
| Finance | FINANCE |
| Programs for children | CHILDREN |
| Social events | SOCIAL A |
| Religion | RELIGION |
| Live | PHONE IN |
| Travels | TRAVEL |
| Leisure | HOBBIES |
| Jazz music | JAZZ |
| Country | COUNTRY |
| National music | NATION M |
| Old hits | OLDER |
| folk music | FOLK M |
| Documentary programs | DOCUMENT |
Regional program search function (REG)
The REG function is activated / deactivated by pressing the button (5) on the infotainment system control panel. When this function is activated, the corresponding indicator will light up in the display field, - when searching for and selecting RDS radio stations, the regional broadcasting code will be checked additionally.
Traffic messages (TP)
Reception of traffic announcements is possible in the FM range, as well as when playing cassettes or CDs, regardless of the activation of the PDS function.
The volume level for traffic announcements can be adjusted in advance by selecting the TA VOLUME parameter in the setup menu (see above). The traffic announcement function is activated by pressing the "TP" button (4), if the currently tuned-in radio station does not broadcast traffic announcements, the search for the radio station with the strongest signal transmitting traffic announcements is automatically turned on. When the function is activated, the indicator TP appears in the display field - if there is a broadcast of messages, or "" - if none of the received radio stations is currently transmitting traffic information. When receiving information message, the audio system automatically stops playing the current mode and switches to the traffic announcement channel frequency. The corresponding indication appears on the display. The transmitted information is broadcast at the preset volume level for traffic announcements. At the end of the broadcast, the audio system will return to the previous the set settings... The playback of an informational message can be interrupted before the end of its broadcast by pressing the "TP" button - the audio system will return to the previously set settings, and the TP function will go into standby mode for the next message. The function is deactivated by pressing the button (4) again. The search for radio stations broadcasting traffic messages can be performed by pressing the right / left sector of the 4-way switch as when selecting RDS radio stations (see above), but with the TP function activated.
This audio system provides the ability to listen to traffic announcements without playing other broadcast sources or CD recordings. To do this, you must turn off the sound by blocking (see above) - the display will show the inscription "Mute", or by turning the volume control knob (8) to the extreme left position. In this case, the audio system will only play the received traffic announcement signals at the preset volume level for this function (see above). If an external audio source is connected to the audio system (for example, mobile phone), then during the operation of this device, playback of other sources of audio signal (including broadcasting of traffic announcements) is not available - the display will show the inscription "Extern In". However, if necessary, you can interrupt the audio playback from the external source and switch to the traffic announcement. When the TP function is activated when receiving a message on the screen instead of the inscription "Extern In." the name of the station broadcasting the traffic announcement appears. To switch to the message playback mode and back, press the "TP" button (4).
Memory Entry presets
The radio can store up to 12 settings FM radio stations (6 each in FM and FMAS level) and up to 12 settings AM radio stations (6 in AM and AM-AS level).
To activate the FM-AS or AMAS level, press the “AS” button (2) on the system control panel after preselecting the FM or AM band - the corresponding indicator should light up on the display. To go to the first level of the corresponding range, press the same button again - the indicator in the display field should go out.
Entering frequencies into the system memory is performed in the following sequence:
a) Run manual setting desired radio station (see above).
b) Press one of the 6 radio station selection buttons (12) and hold it for about 3 seconds before the sound signal is triggered - during this time, the display screen shows the frequency previously entered into this memory cell. After the confirmation signal, the radio receiver starts broadcasting the newly tuned radio station, and the name or operating frequency of this radio station appears on the display - the setting is memorized.
Comment: The moment the button is pressed, the sound will be temporarily stopped and will resume when the button is released.
c) Repeat the above operations with the other buttons to tune to the most listened to radio stations.
Comment: The frequency is memorized along with the RDS settings that were activated at the time of recording.
Manual tuning and recording of frequencies can also be performed by activating the AS level. The settings stored in the memory cells are activated by briefly pressing the number buttons 1-6 (12) after pre-selecting the desired level using the “AS” button (2). In addition, if you hold down the "AS" button (2) until a beep sounds, the radio will switch to the AS level, and an automatic search for stations will be performed, and the settings of 6 of them (with the strongest signal) are stored in the receiver's memory cells (numbered buttons (12)).
Comment: When this operation is performed, the playback sound is muted. Recording is made only for the AS level.
When turned on automatic recording preset radio stations, the RDS function is automatically activated - first, all radio stations that support the RDS format are stored. If, before activating the automatic memorization of radio stations or during memorization, activate the function of receiving traffic announcements TP (see above), the radio receiver after automatic search calls a radio station broadcasting traffic messages.
Comment: If the TP function is turned on during automatic recording, the automatic channel search operation remains active until at least 1 traffic information radio station is found.
If during the trip the car leaves the range of the transmitting radio stations, the frequencies of which are stored in the system's memory, it is necessary to reconfigure the memory cells to new radio stations.
Each radio has settings for a certain frequency, most of them even have fixed ones, which is very convenient. If the receiver is digital, that is, it has electronic setting, then fixing this or that radio station on a specific channel will not be difficult. This process will be a little more difficult on receivers with a conventional tuning scale. But, in any case, the user manual describes in detail how to tune the radio receiver and how many stations you can store in its memory. However, all this can be done only after purchasing this very radio. Many people face the problem of choice these days, because there are a lot of all kinds of models in stores.
For those who want to listen to all radio stations, an all-wave receiver will be the best option. And if he has the opportunity to receive VHF waves, then it will be just happiness, because such receivers can catch and talk over the radio. Therefore, it is worth thinking about how to choose a radio receiver, for what purposes it will be used and what should it be? If it is a "cabinet" receiver, then the standard FM and AM bands will be enough for it. For "portable" and "travel" receivers, it is better to be able to "listen" to all frequencies, since treks can also be in unfamiliar areas, where radio can broadcast on any frequency. "Portable" ones can just play around and eavesdrop on other people's conversations if they use walkie-talkies.
If you cannot buy such a receiver, then you should think about how to assemble a radio receiver so that it can “hear” in the required range. To do this, you need to be a radio amateur, or have one of them in very close friends. You can, of course, rummage on the Internet and search step by step instructions on the assembly of the radio. But there are also pitfalls, because not all the necessary parts can be bought, some you have to do yourself. Therefore, if you have a friend who is a radio amateur, then you can ask him how the radio receiver works, what parts can you buy, and which and how to do it yourself, and most importantly from what? After the answers to the questions are received, you can start looking for the necessary parts, both for the receiver and parts for parts for your radio.
You will have to run a lot of shopping, look for old equipment in the pantry and dig deeper into it in search of the necessary parts. After that, you will have to spend a lot of time with a soldering iron in your hands and use up a few grams of tin and wires. And now, when all the details are ready, you will need to contact a friend with the question of how to make a radio receiver so that it works reliably and for a long time. What the radio will be like does not matter much. Both a home-made and a commercial receiver receive radio waves. If he brings pleasure to his master, then he will fulfill his destiny.