How to connect a second SATA or IDE hard drive to your computer. How to connect a second hard drive to your computer How to start up two hard drives
The time has come when one hard drive in a computer is no longer enough. All more users decides to connect a second HDD to his PC, but not everyone knows how to do it correctly himself in order to avoid mistakes. In fact, the procedure for adding a second disc is simple and does not require special skills. It is not even necessary to mount a hard drive - it can be connected as external deviceif there is a free USB port.
Connecting a second HDD to a PC or laptop
The options for connecting a second hard drive are as simple as possible:
- Connecting the HDD to the computer system unit.
Suitable for owners of ordinary stationary PCs who do not want to have external connected devices.
- Connecting the hard drive as an external drive.
The easiest way hDD connection, and the only one possible for a laptop owner.
Option 1. Installation in the system unit
Determining the type of HDD
Before connecting, you need to determine the type of interface with which the hard drive works - SATA or IDE. Almost all modern computers are equipped with a SATA interface, respectively, it is best if hDD will be of the same type. The IDE bus is considered obsolete, and may simply be missing on motherboard... Therefore, there may be some difficulties with connecting such a disk.
The easiest way to recognize a standard is by its contacts. This is how they look on SATA drives:
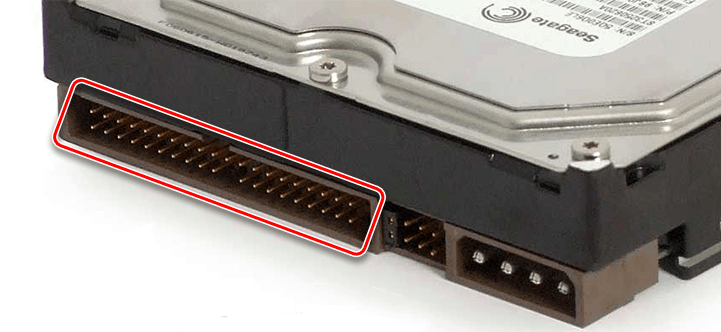
And like this for the IDE:
Connecting a second SATA drive in the system unit
The process of connecting a disk itself is very easy and takes place in several stages:
SATA drive boot priority
The motherboard usually has 4 connectors for connecting SATA drives. They are designated as SATA0 - the first, SATA1 - the second, etc. The priority of the hard drive is directly related to the numbering of the connector. If you need to manually set the priority, you will need to enter the BIOS. Depending on the type of BIOS, the interface and control will be different.
In older versions go to the section Advanced BIOS Features and work with parameters First Boot Device and Second Boot Device... In new bIOS versions look for section Boot or Boot Sequence and parameter 1st / 2nd Boot Priority.
Connecting a second IDE drive
In rare cases, there is a need to install a disc with an outdated IDE interface. In this case, the connection process will be slightly different.
Connecting a second IDE drive to the first SATA drive
When you need to connect an IDE drive to an already working SATA HDD, use a special IDE-SATA adapter.
The connection diagram is as follows:
- The jumper on the adapter is set to Master mode.
- The IDE plug connects to the hard drive itself.
- The red SATA cable connects one side to the adapter and the other to the motherboard.
- The power cable connects one side to the adapter, and the other to the power supply.
You may need to purchase a 4-pin (4 pin) power to SATA adapter.
Disk initialization in OS
In both cases, after connecting, the system may not see the connected drive. This does not mean that you did something wrong, on the contrary, it is normal when the new HDD is not visible in the system. To use it, the hard disk must be initialized. Read about how this is done in our other article.
Option 2. Connecting an external hard drive
Often, users choose to connect an external HDD. It is much easier and more convenient if some of the files stored on the disk are sometimes needed outside the home. And in the situation with laptops, this method will be especially relevant, since there is no separate slot for the second HDD there.
An external hard drive is connected via USB in exactly the same way as another device with the same interface (flash drive, mouse, keyboard).
Hard drive designed for installation in system unitcan also be connected via USB. To do this, you need to use either an adapter / adapter, or a special outer case for the hard drive. The essence of the operation of such devices is similar - the required voltage is supplied to the HDD through the adapter, and the connection to the PC is carried out via USB. Hard drives of different form factors have their own cables, so when buying, you should always pay attention to the standard that sets dimensions your HDD.
If you decide to connect the disk using the second method, then follow literally 2 rules: do not neglect the safe removal of the device and do not disconnect the disk while working with a PC to avoid errors.
We talked about ways to connect a second hard drive to a computer or laptop. As you can see, there is nothing complicated in this procedure and it is absolutely not necessary to use the services of computer masters.


Modern technologies are developing more and more every year. The time has long come when one hard drive in a computer cannot do. A huge number of people connect the second HDD to personal computer... The connection procedure is not fancy and even a beginner can figure it out. We will understand everything more carefully and in detail.
Connecting a second HDD to a laptop or personal computer
There are two options for adding an additional hard drive:
- To the PC system unit. This method great for standard desktop computers;
- Adding, in the form external storage... This is very easy waywhich is suitable for all devices.
Method 1: Adding to the system unit
The process of adding additional media to the system unit can be roughly divided into several small stages. Let's consider each of them in more detail.
Type definition
At the very first stage, you need to decide on the type of interface with which the hard drive interacts. It is worth noting the important fact that the majority of computers have a SATA interface, therefore, it is desirable that the second hard disk is of the same type. The motherboard may not have an IDE bus, as it is considered very old, which may cause some problems with installing outdated hard drives.
The best way to define a standard is to carefully consider contacts.
SATA connector example

An example of an IDE connector
Adding a second SATA drive to the system unit
Adding additional disk – simplest processwhich goes like this:

SATA drive boot priority
There are four holes on the motherboard as standard for adding SATA drives. It should be understood that their numbering starts from zero. Namely, the priority of the hard drive directly depends on the number of the connector. To set the priority yourself, you must use the BIOS. Each specific type of BIOS has its own special controls, as well as a special interface.
In the most early version you need to go to the "Advanced BIOS Features" menu and start working with items such as "First / Second Boot Device". In modern versions, the path looks like this: "Boot / Boot Sequence - 1st / 2nd Boot Priority".
Adding an additional IDE drive
There are also cases when you need to connect an old IDE disk. Step-by-step instruction process looks like this:

Connecting the second IDE to the first SATA
If necessary, conduct this procedurethen you will need an appropriate IDE-SATA adapter. An example of an adapter can be seen below:
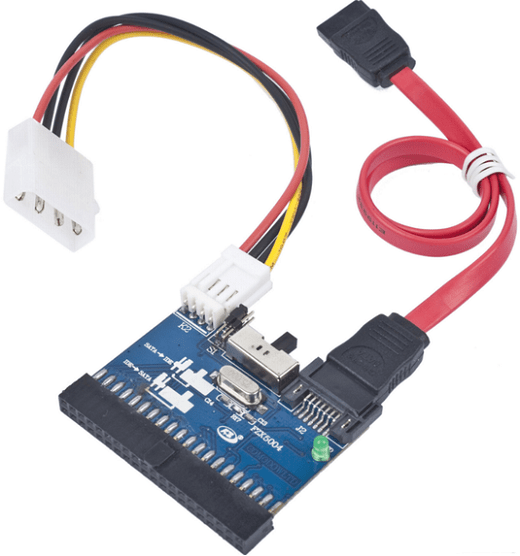
Step-by-step instruction:
- First you need to put the jumper in the Master position.
- The IDE plug is connected to the hard drive.
- Take a red SATA cable and attach one side to the motherboard, and the other to the adapter.
- The power cable connects to the PSU and adapter.
Possible display problems
Sometimes it happens that after the additional hard drive has been connected, the system cannot recognize it. Do not panic, as most likely you did everything right. It's just that for the second hard drive to work properly, it needs to be initialized.
Method 2: Connecting an external hard drive
Connecting an external HDD is convenient if the stored files are needed not only at home, but also outside. In addition, this method is the only correct one for laptop owners, since they simply do not have a special additional connector for a new hard drive.
In fact, everything is easy here, because an external hard drive is connected via USB, just like any other device (mouse, keyboard, flash drive, webcam and much, much more).

Winchesters that are installed in the system unit can also be connected via a USB connector. Here you will need an external case for a hard drive or a special adapter. The essence is as follows: the required voltage is supplied to the HDD through the adapter, and the connection with the Personal Computer is via USB. Different hard drives have their own wires, so you should always pay special attention to the standard setting the dimensions.
The quality of the content is growing inexorably, which means that the file size also increases. This may require additional space on your computer to securely store your vast library of audio and video files, heavy programs and more. In order not to change the current hard disk, it is enough to connect an additional one to it, which will act as an auxiliary source of space.
So, you have a system unit and a clear solution to install a second hard drive. This procedure is not so complicated as to apply to service center, and, in principle, even a novice user will be able to cope on their own.
Connecting a second hard drive to a computer
Connecting an additional hard drive will differ depending on which interface connector you have on your computer: SATA or IDE. SATA is a modern interface, so in almost 100% of cases it is found in more or less fresh computers... IDE, on the contrary, is outdated, it can be found in old computers, but, fortunately, hard drives with IDE interface can still be found on the market.
If you do not know what interface your computer is equipped with, before buying you will need to look under the case of the system unit to get the necessary information.
Opening the case of the system unit
1. The structure of the case of the system unit can be different. For example, in one case, it is enough to unscrew (snap off) and remove the side cover, in some you will need to unscrew 4 screws from the back of the case and pull off the case.

2. Hard drives installed in specially designated cells, which in different variations of computers can be located in different ways: they can be located in the lower part, central or side. The picture below shows how they look approximately.

3. Distinguishing between SATA and IDE connectors is easy: since IDE is an old interface, it has wide ports and rather large cables. It looks like this:

SATA, on the other hand, is a modern solution, which means it has a narrow port and a small cable.

Knowing which interface you have, you can purchase a hard drive and then connect it.
Connecting a hard drive to SATA
Let's start with a breakdown of the connection of a more modern interface, since it appears in most cases.
Before proceeding, be sure to turn off your computer and unplug it from the power outlet.
1. Insert the hard drive into a free slot and secure it with screws.
2. Now you need to connect the SATA cable that comes with the hard drive. To do this, connect one end of it to the hard drive either side, and connect the other to the motherboard.

3. It remains to connect the hard drive to the power supply. For this, a coupler, as a rule, departs from the power supply, which must be connected to the hard drive. If the power supply does not have free cables, you will need to buy a splitter that makes two connectors from one connector.

4. Assemble your computer and then connect it to the network. This completes the connection of the second hard drive.
Connecting a hard drive to IDE
Connecting a hard drive to a legacy interface is not very different, but the procedure is still somewhat different.
1. First of all, you will need to set a jumper on the contacts of the hard disk to be connected to one of the positions: Master or Slave. As a rule, Master mode is the main one when work hard disk and, most often, it is used for hard drives from which the operating system... Slave is an additional mode used for secondary hard drives that will store, for example, media files. Most often the second hard drive is connected for this very purpose, so set the jumper to Slave mode.

2. An IDE cable, unlike SATA, has not two, but three plugs for connection at once. A blue plug located at one end indicates that it needs to be plugged into the motherboard. At the other end, as a rule, there is a black plug, which belongs to the Master mode, and the white one, located approximately in the middle of the loop, is responsible for the Slave mode.

3. Insert the hard drive into the bay and then secure it with the screws.
4. You will need to connect the free plug from the power supply to the hard drive, thereby providing it with power.
5. Insert the required ribbon cable connector into the hard disk, depending on the hard disk mode that you have selected. The blue end of the hard drive connects to the motherboard.
This completes the connection of the hard drive to the IDE interface.
Actually, in self-connection hard drive is no big deal. And after completing this procedure, after turning on your computer will detect the hard drive, and you can fill it with the necessary information.
To increase the amount of permanent memory of the computer, it is recommended to connect an additional hard drive. The choice of hard disk depends on the specifications of the PC motherboard.
You will need
- - IDE-SATA controller;
- - USB-SATA connector.
Instructions
You will need
- SATA disk set, computer.
Instructions
The SATA cable has the same connectors. One connector leads to the motherboard, the other directly to the hard drive. Incorrect connection of SATA drives - impossible operation;
SATA drives have no jumpers - the connection is very simple.
Find the corresponding connector on the motherboard;
Connect the connecting cable;
Connect with hard drive;
Connect the power cable to the hard drive (you need the special cable supplied with the hard drive). Sometimes an adapter is included.
When the first computers appeared, all programs, games and other files practically did not take up disk space. Now things are quite different, and it is often necessary to install an additional storage medium. Therefore, every user should know how to connect a second hard drive to a computer. In fact, it is not difficult to do this, you just need to follow simple instructions.
The device must first be purchased from a store. Please note that the hard disk has several connection interfaces. After purchasing the purchase, you can proceed with the installation of the device.
Preparing for installation
- How many hard drives are already connected to the motherboard? Most often, the computer has only one hard drive, so installing a second drive is not difficult. In most cases, the HDD is located directly under the DVD-ROM, so it won't be difficult to find it;
- Is there extra space for installing a second hard drive? In the event that it is not possible to install a second or third disk, then you will have to purchase a USB drive;
- What type of cable is used to connect the hard drive to the computer? If the purchased device does not have the same interface as on a PC, it will be difficult to install.
Please note that you need a 3.5-inch hard drive. You don't need to buy small drives designed for laptops.
Physical disk connection
If the system unit has not yet been disassembled, disassemble it. It is now recommended to get rid of static electricity. This is done by any means known to you. If you wish, you can purchase a special grounding strap in the store.

After small manipulations, the hard drive will be fixed in the case, now all that remains is to connect the hard drive. Before plugging in the power cable and ribbon cable, please note that the procedure is slightly different for IDE and SATA interfaces.
IDE interface
When connecting a disk with an IDE interface, it is recommended to pay attention to such a nuance as setting the operating mode:
- Master (main).
- Slave (slave).
If an additional hard disk is installed, then you must enable the Slave mode. To do this, you need to use a jumper (jumper), which is installed in the second place. The first row turns on the Master mode. It is important to note that on modern computers, the jumper can be removed completely. The system will automatically detect which hard master.

At the next step, you need to connect the second or third hard disk to the "mother". For this, the IDE interface is connected to a ribbon cable (wide, thin wire). The other end of the cable is connected to the IDE 1 Secondary socket (the main drive is connected to the zero connector).

The final stage of connection is power supply. To do this, a white chip with four wires is connected to the corresponding connector. The wires go directly from the power supply (box with wires and fan).
SATA interface
Unlike IDE, a SATA drive has two L-shaped connectors. One is for power connection and the other is for data cable. It should be noted that such a hard drive lacks a jumper.

The data cable plugs into a narrow connector. The other end is connected to a special connector. Most often there are 4 such ports on the motherboard, but there are only 2 ports with an exception. One of the slots can be occupied by a DVD drive.
There are times when a disk with a SATA interface was purchased, but no such connectors were found on the motherboard. In this case, it is recommended to additionally purchase a SATA controller, which is installed in the PCI slot.
The next step is to connect the power. The L-shaped wide cable is connected to the corresponding connector. If the drive has an additional power connector (IDE interface), just use one of the connectors. This completes the physical connection of the hard drive.
BIOS setup
When all the manipulations with the hard drive are completed, turn on the computer, and then enter the BIOS. It is important to note that the launch of BIOS on each computer is carried out in its own way. To do this, use the key:
- Delete;

After entering the BIOS, you need to go to the configuration setting. It is important to assign boot from the disk on which the operating system is installed. If the priority is set incorrectly, the system simply will not boot.
In the event that one of the disks is not displayed in the BIOS, it means that the hard drive was connected incorrectly or the ribbon cable was damaged. It is recommended that you inspect all wires and reconnect (remember to turn off your computer).
As soon as the BIOS setup is completed, you can boot with the operating system. After that, all that remains is to assign a letter to the drive.
The final stage
Since connecting a hard drive to a computer is not enough, you need to make the final configuration directly from under Windows. On some computers, a similar procedure is carried out in automatic mode... To check this, you should open "My Computer" and then see if a new disk appears.
If nothing happened, you need to start the control panel. Then select "Administration". Once a new window opens, you will need to select "Computer Management". In the left column, you need to find the "Disk Management" tab (on some computers "Disk Manager").

- Select disk 1 at the bottom of the window (if more than 2 hard drives are connected, select the disk with the highest number). This will be the new hard drive;
- You must assign a letter to the logical volume. To do this, click on the disk right click mouse, and then select "Assign letter";
- As soon as a new drive letter is assigned, it needs to be formatted. The procedure can take a long time, it all depends on the size of the hard drive. When formatting, it is important to choose file system NTFS.
When the formatting process is complete, a new disk will appear in the root directory "My Computer". If for some reason it is not possible to connect the HDD using the built-in manager, it is recommended to use third-party programs.
Partition Manager is an excellent tool for working with hard drives. In addition, such a utility allows you to partition a disk into several logical volumes.
Conclusion
Attaching a hard drive takes less than 15 minutes. If you follow the instructions, difficulties should not arise. Modern computers do not need additional customization BIOS, of course, if the disks are not installed in absolutely new computer... Also, do not forget that the operating system depends on how large the plug-in hard drive can be.
Video review: connecting a hard drive


