Why does bios not see the bootable USB flash drive. How to set boot from a USB flash drive in different BIOS versions. The flash drive itself does not work
Typically, these types of problems are detected when trying to boot from a specific Flash drive. If your computing device does not see the USB flash drive in the BIOS, then most likely you have not made the necessary changes to the basic computer system, or your removable storage device is simply not bootable. However, let's take a closer look at such a confusing situation "the flash drive is inserted into the PC, but does not work properly."
Is your USB Flash Drive defective?
Of course, you can suffer for a long time and spend failed experiments in the BIOS system itself, which ultimately will be a waste of your valuable time. Because the flash drive may be simply inoperative. To be convinced of the opposite, try to enlist the help of a verification device - insert the "capricious" USB flash drive into another PC.

And in general, check to see if (seemingly faulty when the PC boots) the storage device in windows environment... That is, is the USB memory determined in the operating system itself. If not, the Flash Drive needs to be repaired. Perhaps everything will be resolved after applying a special software tool, for example, a proprietary USB flash drive recovery utility from its manufacturer.
Priority BIOS settings or what, where and how ...
- Insert the USB stick into the USB port of your PC.
- Restart your computer.
- Enter BIOS using the corresponding button on the keyboard (for those who do not know how to do it -).
- Depending on the version of the basic microsystem, the name of the section in which the connected flash drive is displayed may be different from the "BOOT" tab discussed below. And still, be guided by the abbreviated values \u200b\u200b"USB" while searching for the necessary section in the BIOS.

- We expose the boot from the flash drive.
- Also check if the USB hardware controller is disabled.

- We save and restart the computer.

It's great if the USB Flash Drive is detected and the PC goes into boot mode from a USB flash drive. Otherwise, proceed to the next section of this article.
USB flash drive boot properties
Let's say you want to install an operating system whose distribution is written to a removable storage device. However, in order for a USB flash drive to be defined as a bootable drive, you must make it so. In other words, while recording installation Windows files you need to use a special utility, for example, "Rufus" (to download, click here ). Only in this case will the USB flash drive really become bootable.
Hardware incompatibility of storage device
In some situations, the system BIOS does not see the USB flash drive due to the outdated interface of the memory device itself. Make sure your USB stick is not a receiver of the "ancient" 1.1 standard. However, new flash drives with technological characteristics 3.0 may also not be perceived by outdated computer systems.

So, detailed specifications your storage device can be found on the official website technical support - enter the model of the flash drive and read the information you are interested in. By the way, this action can help in solving problem situations related to any malfunction of your USB device (meaning the presence of a specific recovery utility on the site).
Updating the BIOS of the system - as a solution to the "invisible" USB problem
Sometimes it is advisable to carry out the process of software update of the BIOS of the microsystem. How to do this is described in detail here. However, in modern computers, this operation is performed by a fairly simple method.
- Visit the support site for your motherboard.
- Download new version BIOS (a).

- Using a special flasher - flash the BIOS of your computer.
However, before proceeding with the implementation, albeit not difficult, but still very important operation "upgrading the version of the basic PC microsystem", carefully and in detail study background information about a properly implemented update process (this may be an invaluable help for you - go ).
Bootable USB incompatibility of legacy computer systems - there is a solution!
Let's call such computers “exotic”. However, if you need to give your old computer the properties of "boot from USB stick”, Then follow the instructions below.
- Use this link - https://www.plop.at/en/bootmanager/download.html.
- After you have downloaded "Plop Boot Manager" - burn it to a CD disk.
- Prioritize the boot from the optical drive in BIOS.

- Further, after the workspace "Plop" of the utility is displayed on the screen - insert the USB drive into the appropriate connector (preferably the main one, which is located at the back system unit PC).

- Select in the bootloader window - USB.
Now your "old man" can use the USB flash drive as a bootable drive.
Summing up
So, the author of this article is sure that after you have read the material of the presented article, you will certainly succeed. And yet, I would like to note one not unimportant fact: most of the users make mistakes only because they misunderstand the problem and resort to the sometimes meaningless advice of "kind Internet GURU". At the same time, exposing his car to critical danger “complete failure”. Be wise when choosing one or another solution to your computer problems and your experience will always be fruitful!
- Hello!
- Hello...
- Can't tell, I've been fiddling with the Windows installation for an hour now and I just can't get the BIOS to boot from the USB flash drive - he just doesn't see it !!!
- Well ... try to take off her invisibility hat😊...
I recently had such a dialogue with one of my acquaintances, we, of course, eliminated the problem of invisibility, but the conversation was long.
In general, most often this problem is encountered when per windows installation, and solving it, sometimes, is far from easy. The reasons for invisibility, in fact, are many, but I will highlight the most basic in this article. By going through them, I think you can easily configure and install a new Windows ...
The main reasons why the BIOS does not see the bootable USB flash drive
1) Incorrectly recorded bootable USB flash drive with Windows
This is perhaps the most common reason. Many users create bootable USB drives according to one scenario: they simply copy files from a Windows CD / DVD to a USB flash drive. At the same time, some users say that everything works ...
Perhaps this is true, but it is not entirely correct. To create bootable USB drives, it is best to use special utilities (especially since there are quite a few of them!).
Example: how to write correctly bootable USB drive in Rufus
1) First step: insert the USB flash drive into the USB port of the computer. We copy all important data from it to hDD (If there are any). Then it can be formatted (optional).
2) Second step: the Rufus program needs to be started as administrator (for this it will be enough to press right click mouse on the executable file "rufus.exe", in the appeared context menu choose it);
3) Now go to the Rufus settings (screen below + explanations to it for each item):
- count "Device": choose our flash drive for recording;
- Under number 2 the screenshot shows the button that sets iSO image file with Windows OS, intended for recording to a USB flash drive (just specify it);
- count "Partition scheme": "GPT for computers with UEFI" (if you have a new PC / laptop, more details about it here: ) ;
- count "File system" : select FAT 32 (usually it is installed by default);
- The last button ("Start") is to start the recording process.

Before rufus recording, by the way, you will be warned that all data on the flash drive will be deleted. If you didn't manage to save something - save it, after formatting the flash drive - it will not be so easy to restore the data ...

That, in fact, is all, a flash drive recorded in this way should work 100% and be visible, in almost any modern BIOS version (UEFI) ...
2) Boot priority is not set in BIOS (UEFI)
So that you can boot from a flash drive and start installing Windows, you need to properly configure the BIOS / UEFI (and this is always difficult, especially for novice users).
First you need to log in bIOS settings .
To help!
BIOS has boot priority (sometimes referred to as a boot queue): for example, a floppy disk is first checked for boot records, if not, then the hard disk, then the CD drive, etc. As soon as they are found on some medium boot records - the computer will boot from it.
Our task is to change the boot priority so that first of all the computer checks the boot records on the USB stick, and then on the hard drive.
To do this, the BIOS has a BOOT section. For example, the screenshot below illustrates the following download priority:
- CD / DVD discs;
- HDD.
Naturally, with this setting - no matter how much you insert a USB flash drive into the USB port - the computer will not see it!

BIOS will not see the USB flash drive
By changing the download priority to your own - i.e., putting on the first uSB place, instead of a CD / DVD drive, you can boot from a USB stick (do not forget to save the settings - F10 key, or Exit: Save and Exit) .

Now the BIOS will see the USB flash drive

Boot Section - Boot Configuration (Example UEFI Settings)
What else I want to note: different BIOS versions may differ in menus, sections, and generally in appearance.
The screenshot below shows the settings " Award Software Advanced BIOS Features"- in it, in order to boot from a USB flash drive, you must opposite the item" First Boot Device" (note: first boot device) - expose USB-HDD (this is the flash drive). Next, save the settings (F10 key).

In the BIOS, laptops usually always have a section BOOT... Having entered it, you also need to put the device in the first place: USB Storage Device, USB-HDD, USB device, etc. (depending on your laptop model, BIOS version).

3) Not turned off Secure Boot in the BIOS (or the wrong flash drive)
Secure Boot - this is relative new function, which is designed to prevent unwanted software from running when the computer is turned on. All modern laptops and computers have this option (until about 2013 - it almost never met). Secure Boot support Windows 8, 8.1, 10.
There are two solutions:
- Create a uEFI flash drive, thus you do not have to disable Secure Boot in the BIOS. How to create such a bootable USB flash drive is described here:;
- Disable Secure Boot in Bios and install Windows ( by the way, for example Windows 7 does not support this function at all).
To disable Secure Boot - you need to enter the BIOS and open the section BOOT (in most cases this is the case, but sometimes this function is contained in the "Advanced" section).
As a rule, in BOOT, you need to change the following (for example, a Dell laptop):
- Boot List Option: change UEFI to Legacy;
- Fast Boot: Change Enabled to Disabled (ie disable "fast" boot);
- don't forget to change the boot priority (see example screenshot below).

Secure Boot enabled / disabled
4) USB 3.0 or USB 2.0
On new computers and laptops, some of the USB ports are made in the old "format" - USB 2.0, the other in the new - USB 3.0. When copying files to a USB flash drive - there is no big difference which USB to use (well, except for baud rate).
But when installing Windows - the choice of USB port plays a key role! The point is, Windows 7 does not support USB 3.0 installations! Those. inserting a bootable USB flash drive into such a port - you cannot install Windows 7!
How to distinguish a USB 3.0 port from uSB port 2.0
Everything is very simple - USB 3.0 are marked in blue (or blue): moreover, both plugs and ports are marked. Pay attention to the two photos below - everything is clear from them ...


Note: OS Windows 8, 10 - can be installed using uSB ports 3.0 (USB 3.1).
5) Is the USB port working ...
Without going far from the USB ports, I would also like to dwell on the following point: does the USB port work at all? If you have an "old" Windows OS installed, and it still "somehow" works (and in most cases it does) - try to boot your computer and check the port.
I recommend paying special attention to the USB ports on the front panel of the system unit, on keyboards, adapters, etc. Often, the reason lies precisely in this: for example, one friend of mine could not install Windows, because he connected a bootable USB flash drive to USB ports on the keyboard, and these ports began to work only after Windows was loaded.

USB ports on keyboard
Therefore, a simple advice: try connecting the flash drive to another USB port (preferably USB 2.0), on the back of the system unit.
6) "Brutal" collection with Windows
There is not much to comment on here - any assemblies can cause anything (I, of course, exaggerate somewhat, but still ...).
To help! How to download an ISO image from Windows 10 OS [officially and legally] -
7) "Old" PC, does not support booting from flash drives
If you have old computer - it is quite possible that yours may not support the option of booting from USB flash drives at all (however, in this case, you will not be able to configure the BIOS - it simply will not have an item for selecting USB-Flash Drive (i.e. it will be obvious)).
If you have an old PC and want to install from a USB stick, there are several ways:
- update the BIOS version to a newer one that supports booting from a USB flash drive (If, of course, there is such an update on the website of your equipment manufacturer. Important! Updating the BIOS may cause the PC to malfunction!);
- use a boot manager such as Plop Boot Manager. In this case, you will first boot into this manager (by the way, you can burn it to a CD as well), and then select boot from a USB device in it and continue with the installation.

Modern laptops are getting rid of CD / DVD drives one by one, becoming thinner and lighter. Along with this, users have a new need - the ability to install the OS from a flash drive. However, even with a bootable USB stick, not everything can go as smoothly as we would like. Microsoft specialists have always liked to throw interesting puzzles for their users. One of them - the BIOS may simply not see the carrier. The problem can be solved by several consistent actionwhich we will now describe.
In general, there is nothing better for installing the OS on your computer than a self-made bootable USB flash drive. You will be 100% sure of it. In some cases, it turns out that the media itself is made incorrectly. Therefore, we will look at several ways how to make it for the most popular versions of Windows.
In addition, you need to set correct parameters in the BIOS itself. Sometimes this may be the reason for the absence of a drive in the list of drives. Therefore, after we figure out how to create a USB flash drive, we will consider three more ways to configure the most common BIOS versions.
Method 1. Flash drive with Windows 7 installer
In this case, we'll use.

This method Suitable for Windows 7 and older. To record images of other systems, use our instructions for creating bootable USB drives.
AT following instructions You will be able to see ways to create the same drive, but not with Windows, but with other operating systems.
Method 2: Setting Award BIOS
To enter Award BIOS, press F8 during boot operating system... This is the most common option. There are also the following entry combinations:
- Ctrl + Alt + Esc;
- Ctrl + Alt + Del;
- Delete;
- Reset (for Dell computers);
- Ctrl + Alt + F11;
- Insert.
And now let's talk about how to properly configure the BIOS. In most cases, this is the problem. If you have an Award BIOS, do this:

For the computer to start not from the hard drive, but from a USB drive, it is necessary. This flash drive is used for system recovery, password reset and other "rescue" missions. But how to choose a carrier if it is not displayed in the BIOS settings? You can solve the problem yourself. Provided that the drive is in good working order and data is read from it.
How to fix the problem: BIOS does not "see" the USB stick?
Check if USB device support is enabled. How to do this depends on your motherboard model. After turning on the computer, the message “Press [key] to enter Setup” appears at the bottom of the screen. Click it to enter BIOS. And look for a menu that has "USB" in its name.
New versions of BIOS
You can work with the new versions of BIOS using the keyboard and mouse. Also "comes across" support for the Russian language. You will quickly figure out the parameters. But even if it is not there, you will be able to customize the boot order and run through a USB flash drive.

Award-BIOS
After starting BIOS, do you see two lists on a blue background? Then you have the Award version. You won't be able to navigate the menu by clicking the mouse. It can only be configured using the keyboard. At the bottom or on the side there will be instructions which buttons to press for this.


Now let's get down to load priority.

When you're done with the drive, return to the previous BIOS settings.
AMI-BIOS
There is a gray screen in the BIOS AMI, blue font and a row of bookmarks at the top. The information block is on the right. Mouse control is also not available.

Now you can change the bootloader parameters:

Phoenix-Award BIOS
The Phoenix-Award BIOS also has a gray screen. Information about which keys should be pressed is located below and highlighted in green. If the computer does not boot through the drive:

UEFI
You included uSB support, but for some reason there is no flash drive in the BIOS? The problem could appear due to UEFI - a mode that "protects" the bootloader from malware and extraneous code. This module will start the operating system even if you have configured the BIOS correctly. What to do? Disable UEFI.
The settings depend on the motherboard manufacturer. First way:

Second way:

After working with the media, re-enable Boot Protection.
Need a "correct" flash drive
Perhaps the point is in the flash drive itself. More precisely, in the way it is written. If you copy the information to it directly, nothing will work. But why is it necessary to create a "bootable" drive? To run it, you need a "program script". Without it, the system will not understand what, in general, to do with the carrier.
To create a bootable USB flash drive from the LiveUSB utility:
- Insert the drive into the slot.
- Run the installer.
- Select your Flash media from the list.
- Confirm the installation.
- Now through this drive you can "reanimate" the system.
To install a third-party OS, you need a ready-made ISO image and a burning program. For example, UltraISO or Rufus. Consider the second one:
- Insert the drive into a USB port.
- Run the program.
- Check the "Create bootable disk" checkbox.
- Click on the disk-shaped button.
- Specify the path to the image.
- Click on "Start".

A bootable USB stick can be created using Windows.

If the BIOS does not "see" the bootable USB flash drive, perhaps the problem is not with it, but with the settings. Don't throw it away ahead of time. Try changing the BIOS configuration first.
Each system Administrator should know how boot computer from USB stick... Most often this skill is required when installing an operating system. After all, the Windows distribution does not have to be located on a CD-ROM. And, for example, you won't even be able to install Windows on a netbook in a different way. it usually does not have a floppy drive.
Today I will tell you how to set boot from a USB flash drive to BIOS different manufacturers... Regardless of which version you have, the procedure will be as follows:
1. We insert our bootable USB flash drive into the computer's USB connector. It is advisable to insert it into a port located directly on motherboard, i.e. from the back of the system unit.
2. Turn on the computer and press the key Delete (or F2) to get into the BIOS. Depending on the manufacturer and BIOS version, other keys (Esc, F1, Tab) can also be used, so you need to carefully look at the prompts on the screen.
In BIOS, we can navigate through tabs and lines only using the keyboard.
Next, I will describe this process in detail using the example of different BIOS versions.
Setting up Award Bios to boot from a USB stick
Award Bios: First, let's check if the USB controller is enabled. Go to “Integrated Peripherals”. We go down with the arrow on the keyboard to the item “USB Controller”. Press the “Enter” key and select “Enable” in the window that appears (also using “Enter”). Opposite “USB Controller 2.0” should also be “Enable”.
  We leave this tab by pressing "Esc".
Then go to “Advanced BIOS Features” - “Hard Disk Boot Priority”. Now, in my example, the hard drive is in the first place, and the flash drive should be.  We stand on the line with the name of our flash drive (Patriot Memory) and raise it to the very top using the “+” key on the keyboard.
  We leave from here by pressing "Esc".
Now on the line “First Boot Device” press “Enter”. We selected “CD-ROM”, but it is necessary to set “USB-HDD” (if suddenly booting from a flash drive does not work, come back here and try to set “USB-FDD”). Let the second device be “Hard Disk”.  Exit this tab by pressing Esc.
Now we exit the BIOS, saving the changes. To do this, press “Save & Exit Setup” - press the “Y” key - “Enter”. 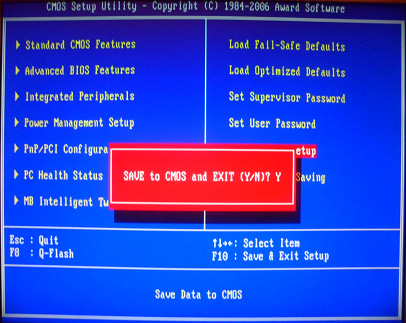
Configuring AMI Bios to boot from a USB flash drive
If, upon entering Bios, you see such a screen, then you have AMI Bios: First, let's check if the USB controller is enabled. Go to the “Advanced” - “USB Configuration” tab.
 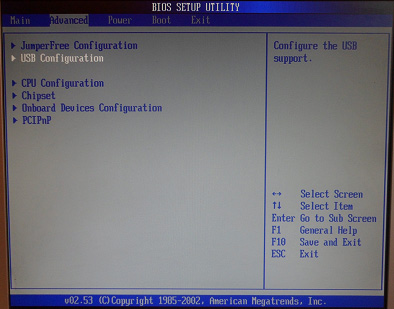 Opposite the items “USB Function” and “USB 2.0 Controller” should be “Enabled”.
  If this is not the case, we stand on this line and press the “Enter” key. From the list that appears, select “Enabled” (also using “Enter”).
Then we exit this tab by pressing “Esc”.
Go to the "Boot" - "Hard Disk Drives" tab.  Now my hard drive is in the first place, but I need to put a USB flash drive here. We stand on the first line, press “Enter” and in the window that appears, select our Patriot Memory flash drive.
  It should be like this:
  We leave from here through "Esc".
Choose “Boot Device Priority”. Here, the first boot device must be a USB flash drive.  Press Esc.
Then we exit BIOS, saving all the settings made. To do this, go to “Exit” - “Exit & Save Changes” - “OK”. 
Configuring Phoenix-Award Bios to Boot from a USB Flash Drive
If, upon entering Bios, you see such a screen, then you have Phoenix-Award BIOS: First, let's check if the USB controller is enabled. We go to the “Peripherals” tab - opposite the “USB Controller” and “USB 2.0 Controller” items there should be “Enabled”.
  Then go to the “Advanced” tab and set “USB-HDD” opposite the “First Boot Device”.
  After that, we exit Bios, saving the changes. To do this, go to "Exit" - "Save & Exit Setup" - press the "Y" key - "Enter"
 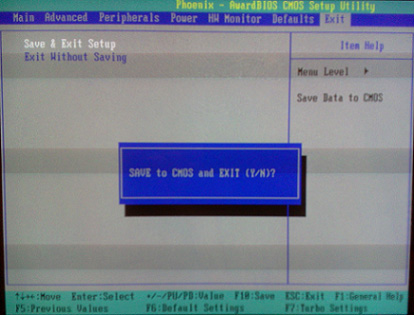 This is practically everything you need to know in order to boot from a USB flash drive. In my article, I described the process of configuring BIOS for the most popular versions: Award and AMI... The third example presents Phoenix-Award Bios, which is much less common.
AT different versions BIOS described procedure may differ slightly. But the main thing is that you understand the very principle of setting.
By the way, I would also like to add: in order to choose which device your computer will boot from, it is not necessary to change the settings in the BIOS. You can immediately after turning on the computer call a special menu for selecting boot devices (this can be done with the F8, F10, F11, F12 or Esc key). In order not to guess with the keys - we look closely at the monitor immediately after switching on. We need to have time to see an inscription like this: “Press Esc to selest boot device”. In my case it was necessary to press “Esc”.  If your computer BIOS UEFI, and you need to boot from a flash drive - you can familiarize yourself with.
If you need throw off forgotten password user using a bootable flash drive - how to do it.


