Base Code: What is a BIOS. Bios settings - Detailed instructions in pictures How to call BIOS on Windows 10
BIOS is a basic input and output system that is designed to control hardware composite PCs. This means that any device can be correctly connected to system unit or correctly configured in the laptop. Therefore, to correct many errors and malfunctions advanced users use the BIOS settings.
How to open BIOS in Windows 10 on a legacy computer?
There are several BIOS modes:
- Outdated classic BIOS;
- New BIOS-UEFI.
Each mode in Windows 10 has its own distinct interface and controls. The outdated BIOS has a white (gray)-blue interface and keyboard control. This means that in order to enable some function, all actions must be performed using the input method using the keyboard. The mouse does not work in this case.
The new BIOS mode - UEFI on each motherboard has its own bright design and any section can be opened using both the keyboard and the mouse.

To get in outdated version BIOS in Windows 10 can be done in several ways:
- Press and hold the "F2" key while turning on the laptop.

- The main BIOS menu in Windows 10 will open.

The second classic way to enter BIOS mode in Windows 10 is to configure the Control Panel sections. To do this, perform the following steps:
- Start, Control Panel. Select the "Power" section.

- Select "What the power buttons do" from the left menu.

- Uncheck "Turn on fast startup (recommended)".

- Now hold down the "Shift" button and select "Restart".
- A black screen will appear with information about the motherboard. Below are several download options. Select the one you need to enter the BIOS.

Thus, you can get into an outdated BIOS with Windows 10.
How to open BIOS-UEFI in Windows 10?
If a new BIOS-UEFI version is installed on your computer, you can start this mode as follows:
- Click "Start", "Settings", select the section "Update and Security".

- In the left menu, select "Recovery", click "Restart".

- will appear blue screen. To enter the BIOS, you need to select the "Diagnostics" mode. In the next window, click "Advanced Options".

- You need to select "UEFI Firmware Settings".

The system will enter BIOS. To exit the mode, you should press F10.
Also additional ways how to enter BIOS, you can see in the video:
The 10th version of Windows, along with numerous changes, brought difficulties with the transition to BIOS: during power-up, by default, the step with the login prompt is skipped. This was done to speed up the preparation of the computer for work. Let's see how to enter BIOS on Windows 10.
How to enter BIOS on Windows 10: boot setup
There is a regular mechanism that allows you to still go to the BIOS on initial stage startup, but by default it is not active. Instead, a quick-on mechanism is used, similar to hibernation: the OS goes into deep sleep, from which you can quickly return to work. However, you can configure the system so that this does not happen the next time you start it.
Via system settings
The first way to open BIOS is to configure the boot features directly from a running Windows 10. To do this, right-click the menu on the taskbar and select the lowest item.
An alternative way to enter the setting is available through notifications. You need to click on the notification icon on the taskbar and select the "All settings" button in the window that appears.

A window will appear where you can configure Windows 10. It needs a section called Update and Security.

And already in it the subsection "Recovery" is selected.

On the page that opens, in the subsection of the special download, click the "Restart now" button.

The device will then restart.
Via Start
Another option on how to enable BIOS is to go to Start and use the shutdown submenu located in it.


Through the login screen
There is another way to start the BIOS - directly from the start screen with a password. It will come in handy if you can’t log into Windows 10 for one reason or another.
At the bottom right, you need to click on the power icon, hold down Shift and click on reboot.

Further actions
After performing any of the above options, the PC will reboot and you will be prompted to select actions. You should go to the troubleshooting point.

A diagnostics section will be displayed, in which you will need to go to Advanced options.


Now you can click "Restart".

After that, the device will restart, while the mode quick start(similar to hibernation) will not be used. Therefore, you can press F2 or another appropriate key to enter the BIOS.
Please note: A different combination may be used on a laptop. Therefore, carefully follow the messages before turning on the OS, they indicate which button to press to work through the BIOS.

On modern computers UEFI is more commonly used - it is similar to BIOS, but it uses the capabilities of a PC more fully (for example, you can use a mouse in it, and the graphic design is richer). If Windows 10 is installed on a computer with UEFI, the corresponding item will be displayed.

It must be selected to switch to UEFI.
Disabling Fast Track
The next reboot change is suitable for a one-time use. But what if you need to do this several times on the computer - for example, to check the equipment or connect new devices? In this case, it is better to disable fast startup so that you are prompted to press F2 (or Del, or another key) without fail.
To do this, you first need to go to the control panel. You can do this through context menu, which is called by right clicking on Start.


A list of settings will appear. In it you need to find a section with power supply. Next, you need to open a sub-item to configure the power buttons.

Most likely, the checkbox will be unavailable. In this case, you need to click on the special link a little higher so that Windows 10 allows you to adjust the unavailable values.

Then you need to uncheck the box to put Windows 10 in normal start mode.

With acceleration disabled, after each turning off / on the device, you can use the keys to go to the BIOS.
Video tutorial: How to enter the BIOS on Windows 10
On any laptop, in addition to the graphical interface, which is designed for easy user control, there is also basic menu device management where deeper system configurations are available. In the BIOS menu, you can access all information about the device, from the model and type of drive to the temperature inside the processor in real time.
Important: Many settings in the BIOS menu significantly affect the operation of the computer, and rashly changing them can adversely affect the productivity and quality of the device. If you need expert advice or repairs, contact a trusted professional service center for Acer laptop repair.
Today we will look at entering the basic BIOS software menu using the example of an Acer laptop with Windows 10.
How to enter BIOS on an Acer laptop with Windows 10
Entering the BIOS on any laptop is very simple, and to do this, you do not need to have special training and additional knowledge.
Launching the BIOS menu on an Acer laptop using the function keys
- Before entering the menu, you must end all active and running processes on the computer and restart it.
- Further, while turning on the computer during the reboot process, before starting the operating system, you need to press the F2 or Del function key, depending on your model. After these steps are completed, you will enter the menu.
- After completing all the settings and configurations in the menu, you need to save all changes and exit the program. This can be done with function key F10.

After that, the computer will restart and start the Windows 10 operating system. All changes made will take effect.
If this method does not work, most likely you have the mode enabled. quick start.
Disable Windows 10 Fast Startup
- Go to the "Control Panel", then to the "Power Options" section, click on the "Actions of the power buttons" tab.

- After that, select "Change settings that are currently unavailable" and uncheck the "Turn on fast startup" function.

- After saving the settings and rebooting your system, you can enter the BIOS menu using the method described above, that is, by pressing the F2 or Del function key.
As you can see, working with the BIOS software environment is very simple and intuitive, and it also has help on all parameters for even greater ease of use. But, nevertheless, you still need to be very careful and responsible, since errors in system configurations can lead to serious consequences, up to the arrival of your laptop in a faulty state.
The BIOS is an essential part of a personal computer. This small piece of code, written to non-volatile flash memory, provides access to storage devices - floppy and hard drives, I / O ports, keyboard and mouse. In the beginning, the main task of the BIOS was to find the operating system on available drives and start it. Over time, the BIOS has acquired a settings menu, a graphical interface, and even the ability to surf the Internet without loading the main operating system. To date, motherboards are equipped with a BIOS of two different types A: Classic and UEFI. How to call, configure, update the BIOS is the topic of our article.
What is a BIOS and what is it for?
The Basic Input/Output System (BIOS) consists of two parts. The first part includes programs that simplify the interaction of the operating system with hardware: processor, RAM, hard drives, and I/O ports. This is a kind of underwater part of the iceberg, access to which is used or application programs or programmers when writing programs, and a simple user may not even know about it. The second part is an interactive system for setting up a computer, which you can run even without an operating system. Its capabilities are quite wide: you can change the system date and time, configure settings for working with hard drives, change the boot order from media, enable or disable peripherals and ports, as well as manage the speed of the computer by changing the frequency of the processor and random access memory.
The first personal computers equipped with a BIOS were the IBM PC/XT.More advanced BIOS versions equipped with a simple graphical interface with mouse support, there were built-in performance optimizers, an Internet browser, and even an antivirus that protected the boot partition of the hard drive from infection.
 The interactive BIOS menu allows you to view system information and carry out numerous computer settings
 What is the difference between UEFI and BIOS
Already at the beginning of the "zero" it became clear that the archaic text BIOS interface no longer meets the requirements of the time - the gap between the bright and lively Windows operating system and the dull two-color BIOS text mode looked too huge. In addition, the BIOS had restrictions on the maximum size of supported hard drives and addressable RAM, which did not allow equipping it with a high-quality graphical shell. Therefore, already in December 2000, INTEL Corporation released a specification for a new interface between hardware and the operating system, called EFI - Extensible Firmware Interface. Its commercial development was UEFI (Unified Extensible Firmware Interface) - a joint development of Intel, AMD and Microsoft, which motherboards have been equipped with since 2007.
 DeepDive - UEFI interface on motherboards Gigabyte boards
 In addition to a beautiful GUI with mouse support, network support, and a built-in Internet browser, UEFI demonstrates the following advantages over the classic BIOS:
- the ability to boot the operating system from large hard drives (BIOS cannot load the OS from drives larger than 2 TB);
- calling a UEFI shell directly from an operating system session Windows systems;
- safe launch secure boot, which will allow you to check the installed operating system for viruses and malware without the use of special bootable media;
- the ability to boot the operating system over the network - it is possible to create diskless workstations;
- installation of UEFI add-on applications that can be run before the operating system boots: browser, antivirus, client Email or internet messenger.
Since UEFI is a hardware-software solution, you cannot equip an old motherboard or laptop with it. As a result, on computers with UEFI, it is difficult or even impossible to start older operating systems, such as Windows XP or Windows 2000.
BIOS versions on computers
Depending on the manufacturer motherboard or a laptop, the BIOS version may be different, and, accordingly, the user interface in the control configurator may be different. The classic version of the BIOS provides approximately the same functionality for setting up the motherboard, depending on the developer, the BIOS only changes appearance interface and hot keys for calling BIOS settings at computer startup.
 The BIOS chip is installed in the socket: if the update was unsuccessful, it is possible to remove the chip and flash it with a programmer
 AWARD BIOS
One of the most common BIOS on mid-range and budget motherboards. The corporate interface is main screen with a list of sections, which can be navigated using the cursor keys - "arrows". You can use the Enter key to go to desired section where you can make the necessary settings.
 BIOS Main Menu
 To get into the AWARD BIOS settings, hold down the DEL key when turning on the computer. By holding down the F12 key while turning on the computer, you can call up the bootable media selection menu. This is useful if you are reinstalling the operating system and need to boot from a USB flash drive or optical disc.
 Home Screen BIOS boot Award
 BIOS of this type can be found both on the motherboards of stationary computers and on laptops, the interface control program represents Top Menu with sections and settings screens to navigate through. When you turn on the computer, press the DEL key to get to the main BIOS screen, which contains system information (processor type, amount of RAM, connected hard disks) and settings for the current time and date.
 AMI BIOS Boot Screen
 Exit the BIOS with saving the settings using the F10 key.
Phoenix Inc. for a long time designed BIOS for laptops, as well as motherboards for workstations and servers. After the takeover of AMI by the company, the BIOS functionality became unified, and the AMI BIOS and PHOENIX BIOS interfaces are absolutely the same.
 Phoenix BIOS main menu
 Notebook version of PHOENIX BIOS features a reduced number of settings - all features fine tuning RAM, CPU and chipset controls are locked to reduce the risk of damage to the laptop by an inexperienced user.
UEFI
Unlike the classic BIOS, where almost all motherboards were equipped with two varieties, the UEFI interface is different: ASUS, Gigabyte, Lenovo, MSI - everyone approached the development of the UEFI shell in their own way, equipping it with their proprietary "chips".
Asus offers EZ Booster, a performance tuning utility that automatically tunes your system for maximum performance by selecting the maximum high frequencies for RAM and CPU.
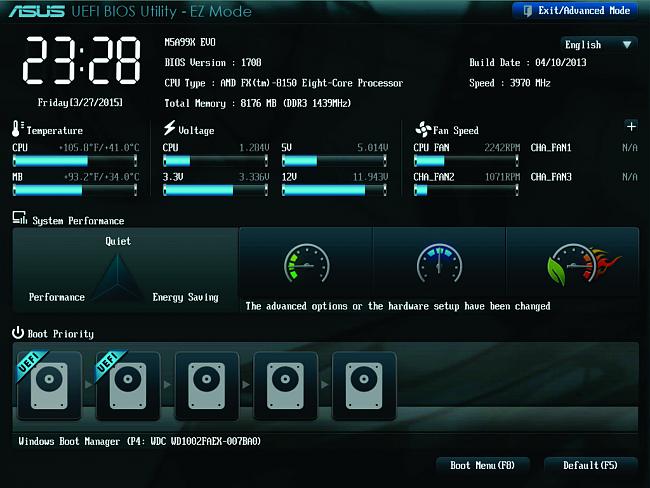 Motherboard UEFI interface ASUS boards
 Gigabyte has equipped its UEFI systems with a proprietary 3D BIOS shell that combines graphics and mouse control with a decade-old classic BIOS menu. This interface will appeal to conservative users.
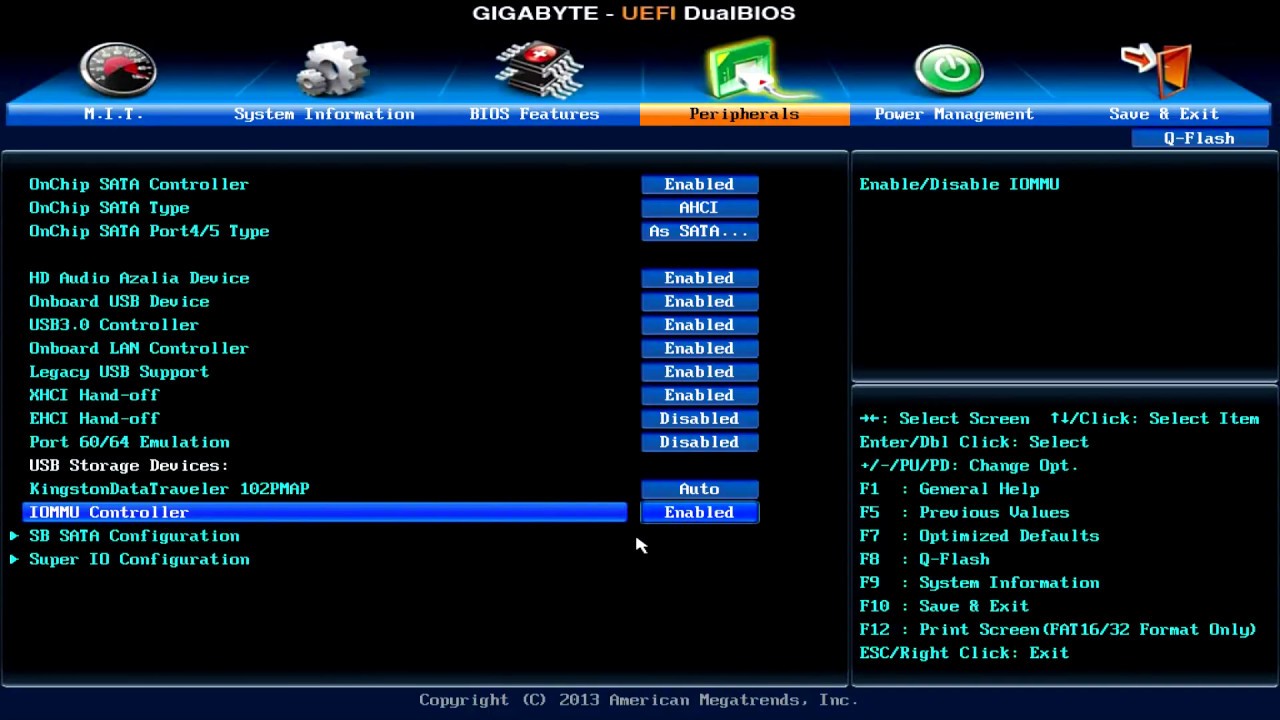 3D BIOS - a bridge between the classic BIOS interface and modern UEFI graphical shells
 All modern maternal MSI boards are equipped with the latest development of the company - Click BIOS 4. This is a graphic UEFI system, which provides the user with the most flexible level of settings for computer components, antivirus protection bootable media and a built-in UEFI Internet browser.
 Click BIOS 4 system - maximum settings in a colorful graphical interface
 As you can see, the shell is practically a mini-operating system with an intuitive graphical interface, so managing UEFI settings on different motherboards will not be difficult even for a beginner.
As a second-year student, I bought an IBM Thinkpad laptop from my hands, the BIOS of which turned out to be a “tough nut” for me - the laptop did not display any prompts when loading, and attempts to get into the BIOS settings using the DEL or F1 keys were unsuccessful. As it turned out later, to enter the BIOS settings, the manufacturer placed a special key on the keyboard - THINKVANTAGE, pressing which allows you to enter the BIOS settings both when loading the operating system and from WINDOWS environments. Now the Thinkpad line of laptops is manufactured by Lenovo, and the BIOS has changed to UEFI, but the blue THINKVANTAGE button is still present on the keyboard.
How to check the BIOS version in Windows 10
You can find out the BIOS version using the CPU-Z program, which is distributed completely free of charge. The program works in any current Windows versions- from XP to Windows 10, does not require registration and, in addition to information about the BIOS, allows you to learn a lot of interesting things about the components of your computer: motherboard, video card, processor, RAM modules.

How to enter BIOS on Windows 10
Depending on the version and manufacturer of the BIOS, the ways to enter the BIOS settings menu also differ. If most versions of the classic BIOS provide for entering the settings menu before loading the operating system, then with UEFI everything is exactly the opposite: the settings are entered using boot menu operating system.
Entering the BIOS when turning on the computer
When you turn on your computer, a boot screen image appears on the monitor, which displays the processor type, amount of RAM, and connected drives. At the same time, a hint appears on the bottom line of the screen, which key you need to press in order to get into the BIOS settings. Depending on the motherboard model, these may be the DEL, F1 or F2 keys.
 Boot screen workstation HP ProLiant
 BIOS hotkeys
When starting or restarting the computer, in addition to entering the BIOS settings menu, there are also hot keys for accessing some other functions that are available before the operating system boots. In most modern laptops, the function of restoring the operating system is available from hidden partition hard drive, which is also launched using the BIOS keyboard shortcut.
Table: keyboard shortcuts for calling various BIOS functions of desktop motherboards
| BIOS version | hot key | Function | |
| Acer | AMI | Del | Entering BIOS settings |
| F12 | Boot media selection | ||
| ASRock | AMI | F2 or DEL | Entering BIOS settings |
| F6 | |||
| F11 | Boot media selection | ||
| TAB | |||
| Asus | Phoenix Award | DEL | Entering BIOS settings |
| TAB | Display BIOS POST Message | ||
| F8 | Boot media selection | ||
| Alt+F2 | Program launch BIOS updates | ||
| F4 | Asus Core Unlocker | ||
| BioStar | Phoenix Award | F8 | Enable System Configuration |
| F9 | Boot media selection | ||
| DEL | Entering BIOS settings | ||
| Chaintech | Award | DEL | Entering BIOS settings |
| ALT+F2 | Running the BIOS updater | ||
| ECS (Elite Grour) | AMI | DEL | Entering BIOS settings |
| F11 | BBS POPUP | ||
| foxconn (WinFast) | AMI | TAB | Displaying the initial boot screen |
| DEL | Entering BIOS settings | ||
| ESC | Boot media selection | ||
| gigabyte | Award | ESC | Skip memory test |
| DEL | Entering BIOS settings | ||
| F9 | Call for disaster recovery | ||
| F12 | Boot media selection | ||
| Intel | AMI | F2 | Entering BIOS settings |
| MSI (MicroStar) | F2 | Entering BIOS settings |
Table: keyboard shortcuts for calling various laptop BIOS functions
| Notebook manufacturer | BIOS (Model) | hot key | Function |
| Acer | Phoenix | F2 | Entering BIOS settings |
| F12 | Boot media selection | ||
| Alt+F10 | |||
| Alt+F11 | Running the disk check system | ||
| Asus | AMI | F2 | Entering BIOS settings |
| ESC | popup menu | ||
| F4 | Easy Flash | ||
| Phoenix Award | DEL | Entering BIOS settings | |
| F8 | Boot media selection | ||
| F9 | Starting System Restore | ||
| Benq | Phoenix | F2 | Entering BIOS settings |
| Dell | Phoenix, Aptio | F2 | Entering BIOS settings |
| F12 | Boot media selection | ||
| Ctrl+F11 | Starting System Restore | ||
| eMachines (Acer) | Phoenix | F12 | Boot media selection |
| F2 | Entering BIOS settings | ||
| Fujitsu Siemens | AMI | F2 | Entering BIOS settings |
| F12 | Boot media selection | ||
| Alt+F10 | Starting System Restore | ||
| Gateway (Acer) | Phoenix | Click mouse or Enter | Menu |
| F2 | Entering BIOS settings | ||
| F10 | Boot media selection | ||
| F12 | PXE Boot | ||
| Alt+F10 | Starting System Restore | ||
| HP (Hewlett-Packard) / Compaq | Insyde | ESC | Boot media selection |
| F1 | System Information | ||
| F2 | System Diagnostics | ||
| F9 | Boot media selection | ||
| F10 | Entering BIOS settings | ||
| F11 | Starting System Restore | ||
| Enter | Continue Startup | ||
| F12 | Running disk check | ||
| Lenovo (IBM) | Phoenix SecureCore Tiano | F2 | Entering BIOS settings |
| F12 | Boot media selection | ||
| Alt+F10 | Starting System Restore | ||
| MSI (Microstar) | Phoenix | DEL | Entering BIOS settings |
| F11 | Boot media selection | ||
| TAB | Displaying the POST screen | ||
| F3 | Starting System Restore | ||
| Alt+F10 | Starting System Restore | ||
| Packard Bell (Acer) | Phoenix | F2 | Entering BIOS settings |
| F12 | Boot media selection | ||
| Samsung | Phoenix | ESC | Boot media selection |
| Toshiba | Phoenix | Esc, F1, F2 | Entering BIOS settings |
| Toshiba Satellite A300 | Phoenix | F12 | Entering BIOS settings |
Entering UEFI Settings from Windows 10
In the Windows 10 operating system, the UEFI settings are entered through the operating system boot menu. To get into it, do the following:

How to update BIOS on a Windows 10 computer
Modern Personal Computer is a modular device, and its motherboard is the longest-lived component. To support system components that were released later, such as new processors, hard drives, or memory modules, a BIOS firmware update procedure may be required. This can be done in several ways - using Windows applications, using the BIOS itself or by creating a special bootable media.
 To support new processors motherboard BIOS boards will need to be updated.
 Update by system utility in Windows environment
ASUS has released the WinFlash utility, which allows you to update the BIOS directly from the Windows operating system. Although the utility is designed to update the BIOS of ASUS laptops and computers only, enthusiasts posted on the Internet modified versions of the program that can now update the BIOS of any computer. To perform the update procedure, you will need to follow a few simple steps:
- Make sure your laptop battery is at least 75% charged if you have desktop computer- connect it to the mains via an uninterruptible power supply.
- Download from your motherboard or laptop manufacturer's website desired version BIOS and unpack the archive with the file.
 Download from site latest version BIOS
 - Download and install the WinFlash program on your computer, then run it.
 start screen WinFlash programs
 - Open the downloaded BIOS file with the program.
 On ASUS equipment the BIOS file can not only be opened from the disk, but also automatically obtained via the Internet
 - Before pressing the UPDATE button, make sure that the model is old and new version BIOS match. Completing the BIOS update process
- The computer will automatically restart and perform additional settings new BIOS version in automatic mode.
- The BIOS has been updated and the system is ready to go.
BIOS update
Most modern motherboards contain a built-in BIOS update utility, ASUS has EZ FLASH2, MSI has QFlash. The procedure for updating the BIOS using these utilities is no more complicated than updating from the Windows environment.
- Prepare a 1-2 GB flash drive and format it in file system FAT16 or FAT32, then write the new BIOS file to this disk.
 To update the BIOS, the media with the firmware file must be formatted in the FAT file system.
 - Restart your computer and run the update utility. To launch the QFlash utility, you must press and hold the END key while starting the computer.
 Confirm running QFlash in the main BIOS settings screen Select the drive containing the firmware file
 - The utility will first write to the drive backup old BIOS, and then starts the update procedure, which will take 2-3 minutes.
- After rebooting, the computer will be ready to work.
Some 4-5 year old motherboards could only read the BIOS update file from floppy disks. For such devices, you must enable the USB-FLOPPY emulation mode in the BIOS settings before the update procedure.
Video: updating the BIOS of the motherboard with the qFlash utility
Update in DOS environment (via bootable flash drive)
Award, AMI, and Phoenix have developed simple utility programs that run in DOS environment. Updating with the help of such utilities is the most versatile, although the longest way, because it works on absolutely any models of motherboards and laptops, even on very old ones. The upgrade process will consist of two steps: creating bootable media and running the upgrade program in a DOS environment. Consider the update procedure using an example Firm BIOS Awards:

Video: BIOS update in DOS environment
Computers and OS are becoming friendlier and simpler, even now for an inexperienced user, the operating system is the desktop and the icons on it. Most likely, over time, the architecture of computers will change so much that the BIOS will no longer be necessary, but now it is a powerful tuning tool that allows an advanced user to configure a PC to work with maximum efficiency. If you have to deal self assembly PC, installing operating systems, or just thinking about upgrading your pet - BIOS skills will help you to carry out the process without a hitch.
Some users are having problems entering the bios on this system, although in most cases uefi is already used instead of bios. You can distinguish them by the presence of the first graphical interface and the ability to use the mouse. At the same time, they perform the same functions and have similar interface tabs. Usually you can’t enter them because the top ten uses a quick start, which is very similar to hibernation. Therefore, if the user turned off the computer in normal mode, then he will not see suggestions for pressing certain keys to get into uefi.
Login to UEFI from operating system
To open this menu from the system itself, it must be launched in uefi mode, and the user must also have possibility of entry into the system, or at least to the boot screen.
If the user can freely work with the system, then he will have to go to the next item All settings - Update and security - Recovery.
In the window that opens, find the specified button and click " Reload Now". The device will restart itself and a special boot menu similar to the one shown below will be launched. 
Then you have to click on the menu again. First you need to click on the item Diagnostics, and then go to the section additional options. In this window, it remains to find the section that is responsible for the uefi firmware and click on it. 
After that device restart and the motherboard settings window will open. If the user cannot get into the system itself, but has access to the login window, then he can click on the shutdown icon, after which he will hold shift and click on the Restart line. Such manipulations will allow you to enter the same recovery menu.
Standard input when turning on the computer
The first option seems to many to be too long, while you have to perform much more manipulations and reboot the device several times. Previously, everything was simpler, when loading, you had to click f2 or del and everything was ready. However, the top ten loads really quickly and users now have little time to press the desired button. Sometimes the download is so fast that you may not have time to notice the window itself, which asks you to click the button.
To be able to log in in the usual way, you will need turn off mode quick launch. To do this, go to start and select there Control Panel. In the menu that opens, go to the Power Options section. Next, you need to click on the item power button actions.
In the window that opens, select the line " Changes to settings that are currently unavailable». 
So now you can go into bios or uefi, for this you will have to spend several large quantity manipulations or refuse to quickly start the device.
Related posts:
 Accounting and warehouse software Info-Enterprise ® Accounting software Info-Enterprise: Accounting ®
 Hot line telecard TV Satellite TV number telecard
 Autocode mos ru: a detailed guide to use - from checking documents to registering with the traffic police Autocode code violations and fines
 How to fix account sync issues
 All Sony Xperia Z1 Compact problems in one post Z1 compact firmware 6


