WindowsApps folder - access. WindowsApps folder - we get access What is the windowsapps folder in windows 10
If you download any program or file from a browser or other program, by default, if you have not changed the download folder, all items are downloaded to the Downloads program. Apps that you download through the Windows Store on Windows 10 or 8.1 are downloaded to a different folder.
In general, folders with application data are located in shared folder WindowsApps.
To find her we follow the path Local disk C: / ProgramFiles /.
Most likely you will not see this folder in the general list. it is hidden. To do this, at the top of the screen, click on the tab View, and set a checkmark opposite the item Hidden elements... After that, your folder should be displayed.

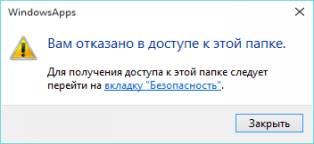
In addition, in most cases, you cannot immediately enter the folder due to the security settings. Therefore, you need to edit them a little.
To do this, when the window appears You do not have permission to access this folder click on the button Proceed, and when the window appears, you are denied access to this folder, click on the link the "Security" tab.

In the window that opens, select the tab Safety and click on the button Additionally.

Now in the opened window Additional security options for WindowsApps click on the button Proceed.


In the window that appears in the field Enter the names of the objects to select you need to enter a name accountto which you want to grant access, i.e. the one in which you are now, most often this is the name of the computer owner, "Administrators", "Admin", or the make and model of the computer and click on the Check names button. In this case, if the name is found, then it will be displayed in your underlined form and you will only have to click on the button OK... If the name was entered incorrectly, then you will get an error that the name was not found and the operation will not work.

If everything is in order, in the window also click OK, as well as OK click in the window Properties... After that, go back to the properties of this folder, in the tab Safety, press again Additionally... In chapter Permission elements we double-click on your account name.
Now, in the window that opens, set a checkmark opposite the item Full access and Apply these permissions to objects and containers only inside this container and press OK.

In the window Additional security options for WindowsAppsand then in the window WindowsApps Properties also press OK.
Now you can try to open this folder again. In some cases, the window may appear again You do not have permission to access this folder, then just click on the button Proceed, the second error should not appear this time.
Now you will see a list of folders in which the standard windows applications 10.
The WindowsApps folder stores the files of your installed apps from the store and was specially created by developers to perform their functions in operating system tenth version.
When you need to get to its contents to fix some problems with the installed from the store software, you will one hundred percent face with a restriction of access to it.
She, like many others that perform equally so important functions in the stable operation of the operating system, has a hidden location on system disk and is not visible to the user without some presetting display in Explorer. Even after you make the folder visible, you will surely face a denial of access to its contents.
Therefore, if you need to view or take any action with files in the WindowsApps directory, not just for the sake of interest, but in case of urgent need, then today you will get from me step by step instructions about getting full access to it. If you're ready to get started, read on. Don't forget to reserve your important files and data before interfering with the operating system!
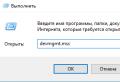
Follow the path:
C: \\ Program Files
enable the display of hidden items.

Find desired folder by name and open its properties using the context menu.

On the "Security" tab, click on the "Advanced" button. Opposite the "Owner" click on the "Change" link.

In the next window go to the "Advanced ..." button. On the right side, find and click on the "Search" button.

Select your name below and click on “OK”. Then again “OK”.

Check the box next to “Replace owner of subcontainers and objects” and apply the changes.

Wait for the end of the owner change process.

This should be enough to view the contents of the folder.

Be aware that file operations in this folder may disrupt installed applications from the store and make them unusable. Get more computer tips by following our link. If you are an advanced computer user or a “dummy”, we invite you to become a member of our Facebook group, which can be accessed via the corresponding link on the right side of the resource.
), in which the internal disk (a kind of memory card) has a size of only ~ 28 GB (formally 32 GB). The preinstalled Windows 10 Home 64-bit English takes up more than 10 GB, which leaves very little room for fantasies, so soon I was puzzled by cleaning the system from all sorts of pre-installed nonsense. Almost immediately, I discovered that this task cannot be solved by an unprepared user, even if he has considerable experience with Windows 7 and other systems from Microsoft. Therefore, I had to study the folk wisdom on this topic, found in these your Internet. I hasten to share the results ...
IObit Uninstaller
A hint about this magical application was found in the comments to the article on the topic How to Uninstall Windows 10’s Built-in Apps (and How to Reinstall Them) - they say, such a wonderful assistant, can remove standard Windows applications.
After some hesitation, I decided to test this functionality and installed IObit Uninstaller 5.4.0.119. The application is really convenient, it can show Windows Apps in a separate place and allows you to remove them, in addition, offering to clean the registry after that. Cool?
Unfortunately, as it turned out, this utility removes Windows Apps only for the current user (more precisely, for the user under which IObit Uninstaller is running, and it can only be launched with administrator rights). In fact, this way you can clean the start menu for super-users only. Apparently, the developers have not yet figured out what to do for other users.
Naturally, I deleted this hack, and soon quite accidentally discovered that this miracle left a tail in the form of the LiveUpdate service. A trifle, but unpleasant.
This tail should be mowed in this way (see How to remove LiveUpdate.exe from your computer - a three-year-old manual, but things are still there):
- services.msc: stop and disable Live Update (there may be several services with such a vague name in your system - be careful)
- Delete the service entry - on the command line (with administrator rights): sc delete LiveUpdateSvc
- We delete the directory with the service.
After that, you can forget about IObit Uninstaller.
PowerShell
Most of the tutorials on cleaning standard applications are based on using PowerShell (see habrahabr.ru, howtogeek.com, superuser.com, tenforums.com, winaero.com):
- remove apps for specific (current) user using Get-AppXPackage and Remove-AppXPackage
- remove the "source" applications so that they will not be installed for new user profiles using Get-AppXProvisionedPackage and Remove-AppXProvisionedPackage
Before exercising with command line, it is worth turning off automatic update (download?) custom applications: in the registry branch HKEY_LOCAL_MACHINE \\ SOFTWARE \\ Microsoft \\ Windows \\ CurrentVersion \\ WindowsStore \\ WindowsUpdate you need to set the value for the AutoDownload DWORD variable 2 (two).
Some standard applications (Cortana, Edge, etc.) cannot be removed using the methods below.
Cleaning for new profiles
Usually all applications are demolished except the Windows Store. In my opinion, this makes sense, since through the store, all applications can then be returned back.
For removing everything except Windows Store, in the PowerShell command line (with administrator rights):
Get-AppXProvisionedPackage –online | where-object ($ _. packagename –notlike “* store *”) | Remove-AppXProvisionedPackage -online
If you don't need the store either (i.e. you want to delete all standard applications), then the middle part of the "pipeline" can be removed, and the command will be shorter:
Get-AppXProvisionedPackage –online | Remove-AppXProvisionedPackage -online
If you want remove only some applications, then this can be done interactively (from here):
Get-AppXProvisionedPackage -Online | Out-GridView -PassThru | Remove-AppXProvisionedPackage -Online
Cleaning existing profiles
To my surprise, after the previous step, I did not feel the expected relief in the existing user profiles - the tiles of most of the standard applications were in place and still working.
The internet offers fast decision as a command for cleaning everything except Windows Store:
Get-AppXPackage -AllUsers | where-object ($ _. name -notlike “* store *”) | Remove-AppXPackage
Unfortunately, in my case it did not work - except for the current user, in fact, the command did not affect anyone. Perhaps due to the fact that for this user I previously ran IObit Uninstaller for the same purpose.
Using the –User username parameter instead of –AllUser didn't seem to help either. I have to admit that I got the impression that Remove-AppXPackage operates in the context of the current user, and all the “craftsmen” who offer this command to transfer other or even all users are doing copy-paste without real checking.
The matter ended with the fact that I logged in to the profile of each user and cleaned applications interactively:
Get-AppXPackage | Out-GridView -PassThru | Remove-AppXPackage
This way I saved the calculator :)
results
To quickly check the results of applying the above technique, just look at “C: \\ Program Files \\ WindowsApps”: if this directory contains more than 600 MB of Microsoft “good”, then you most likely forgot to extract applications from some user profile locally ...
In my case, the creation of a new profile and the subsequent login showed that most of the standard applications were in place (even the "tapeworm"), although only the "store" should have survived, which is honestly highlighted in the list when the Get-AppXProvisionedPackage -Online command was executed. True, some of these applications (in my opinion, only those that can be uninstalled in the usual way) have broken tiles - it is impossible to start, and the tile has an “indistinct name” (eg, "@ (Microsoft.BingNews_4.6.169.0_ ... ”). However, I admit that the set of tiles for new users is taken from standard file, and the system simply does not know how to handle situations when some standard applications are not available at the time of creating a new profile.
What to do? To answer this question, it should be understood that as long as a user has an application installed, it will not be removed from the "dump of good". Accordingly, we go to each person personally and in an interactive mode we are looking for a stuck application.
This is how the “dump” looks like after cleaning, when Windows Alarms, Calculator, Camera, Maps and Store are still in service:
As far as I understand, all these standard applications appeared in Windows 8, and it turns out that there is still no convenient toolkit to work with them the way users want. The above fiddling with the command line is more like the style of interacting with Linux-like systems.
- Destroy Windows Spying (if you want to get rid of not only standard applications)
- PackageManager Class (documentation for developers of a promising utility, from which it becomes clear that there were no convenient utilities, and there never will be)
), in which the internal disk (a kind of memory card) has a size of only ~ 28 GB (formally 32 GB). The preinstalled Windows 10 Home 64-bit English takes up more than 10 GB, which leaves very little room for fantasies, so soon I was puzzled by cleaning the system from all sorts of pre-installed nonsense. Almost immediately, I discovered that this task cannot be solved by an unprepared user, even if he has considerable experience with Windows 7 and other systems from Microsoft. Therefore, I had to study the folk wisdom on this topic, found in these your Internet. I hasten to share the results ...
IObit Uninstaller
A hint about this magical application was found in the comments to the article on the topic How to Uninstall Windows 10’s Built-in Apps (and How to Reinstall Them) - they say, such a wonderful assistant, can remove standard Windows applications.
After some hesitation, I decided to test this functionality and installed IObit Uninstaller 5.4.0.119. The application is really convenient, it can show Windows Apps in a separate place and allows you to remove them, in addition, offering to clean the registry after that. Cool?
Unfortunately, as it turned out, this utility removes Windows Apps only for the current user (more precisely, for the user under which IObit Uninstaller is running, and it can only be launched with administrator rights). In fact, this way you can clean the start menu for super-users only. Apparently, the developers have not yet figured out what to do for other users.
Naturally, I deleted this hack, and soon quite accidentally discovered that this miracle left a tail in the form of the LiveUpdate service. A trifle, but unpleasant.
This tail should be mowed in this way (see How to remove LiveUpdate.exe from your computer - a three-year-old manual, but things are still there):
- services.msc: stop and disable Live Update (there may be several services with such a vague name in your system - be careful)
- Delete the service entry - on the command line (with administrator rights): sc delete LiveUpdateSvc
- We delete the directory with the service.
After that, you can forget about IObit Uninstaller.
PowerShell
Most of the tutorials on cleaning standard applications are based on using PowerShell (see habrahabr.ru, howtogeek.com, superuser.com, tenforums.com, winaero.com):
- remove apps for specific (current) user using Get-AppXPackage and Remove-AppXPackage
- remove the "source" applications so that they will not be installed for new user profiles using Get-AppXProvisionedPackage and Remove-AppXProvisionedPackage
Before practicing with the command line, it is worth turning off automatic updating (downloading?) Of user applications: in the registry branch HKEY_LOCAL_MACHINE \\ SOFTWARE \\ Microsoft \\ Windows \\ CurrentVersion \\ WindowsStore \\ WindowsUpdate you need to set the value for the AutoDownload DWORD variable 2 (two).
Some standard applications (Cortana, Edge, etc.) cannot be removed using the methods below.
Cleaning for new profiles
Usually all applications are demolished except the Windows Store. In my opinion, this makes sense, since through the store, all applications can then be returned back.
For removing everything except Windows Store, in the PowerShell command line (with administrator rights):
Get-AppXProvisionedPackage –online | where-object ($ _. packagename –notlike “* store *”) | Remove-AppXProvisionedPackage -online
If you don't need the store either (i.e. you want to delete all standard applications), then the middle part of the "pipeline" can be removed, and the command will be shorter:
Get-AppXProvisionedPackage –online | Remove-AppXProvisionedPackage -online
If you want remove only some applications, then this can be done interactively (from here):
Get-AppXProvisionedPackage -Online | Out-GridView -PassThru | Remove-AppXProvisionedPackage -Online
Cleaning existing profiles
To my surprise, after the previous step, I did not feel the expected relief in the existing user profiles - the tiles of most of the standard applications were in place and still working.
The Internet offers a quick solution in the form of a command for cleaning everything except Windows Store:
Get-AppXPackage -AllUsers | where-object ($ _. name -notlike “* store *”) | Remove-AppXPackage
Unfortunately, in my case it did not work - except for the current user, in fact, the command did not affect anyone. Perhaps due to the fact that for this user I previously ran IObit Uninstaller for the same purpose.
Using the –User username parameter instead of –AllUser didn't seem to help either. I have to admit that I got the impression that Remove-AppXPackage operates in the context of the current user, and all the “craftsmen” who offer this command to transfer other or even all users are doing copy-paste without real checking.
The matter ended with the fact that I logged in to the profile of each user and cleaned applications interactively:
Get-AppXPackage | Out-GridView -PassThru | Remove-AppXPackage
This way I saved the calculator :)
results
To quickly check the results of applying the above technique, just look at “C: \\ Program Files \\ WindowsApps”: if this directory contains more than 600 MB of Microsoft “good”, then you most likely forgot to extract applications from some user profile locally ...
In my case, the creation of a new profile and the subsequent login showed that most of the standard applications were in place (even the "tapeworm"), although only the "store" should have survived, which is honestly highlighted in the list when the Get-AppXProvisionedPackage -Online command was executed. True, some of these applications (in my opinion, only those that can be uninstalled in the usual way) have broken tiles - it is impossible to start, and the tile has an “indistinct name” (eg, "@ (Microsoft.BingNews_4.6.169.0_ ... ”) However, I admit that the set of tiles for new users is taken from a standard file, and the system simply does not know how to handle situations when some standard applications are not available at the time of creating a new profile.
What to do? To answer this question, it should be understood that as long as a user has an application installed, it will not be removed from the "dump of good". Accordingly, we go to each person personally and in an interactive mode we are looking for a stuck application.
This is how the “dump” looks like after cleaning, when Windows Alarms, Calculator, Camera, Maps and Store are still in service:
As far as I understand, all these standard applications appeared in Windows 8, and it turns out that there is still no convenient toolkit to work with them the way users want. The above fiddling with the command line is more like the style of interacting with Linux-like systems.
- Destroy Windows Spying (if you want to get rid of not only standard applications)
- PackageManager Class (documentation for developers of a promising utility, from which it becomes clear that there were no convenient utilities, and there never will be)